更好的排版请访问:我的语雀工作空间、我的知乎专栏、我的稀土掘金
注意:实际项目使用时,务必添加内容安全检测,文字检测!!! 推荐使用:uni-sec-check
在uni-im中集成OpenAI
本文将介绍如何在uni-im中集成OpenAI API,以便为您的聊天应用程序提供更加智能和高效的聊天服务。通过集成OpenAI API,您可以利用各种自然语言处理和机器学习技术,如文本生成、语言翻译、图像分类等,来增强您的应用程序的功能和性能。
OK,Talk is cheap. Show me the code.
步骤一:注册OpenAI账号并获取API密钥
首先,您需要有OpenAI网站账号,并获取API密钥。网上有很多相关教程
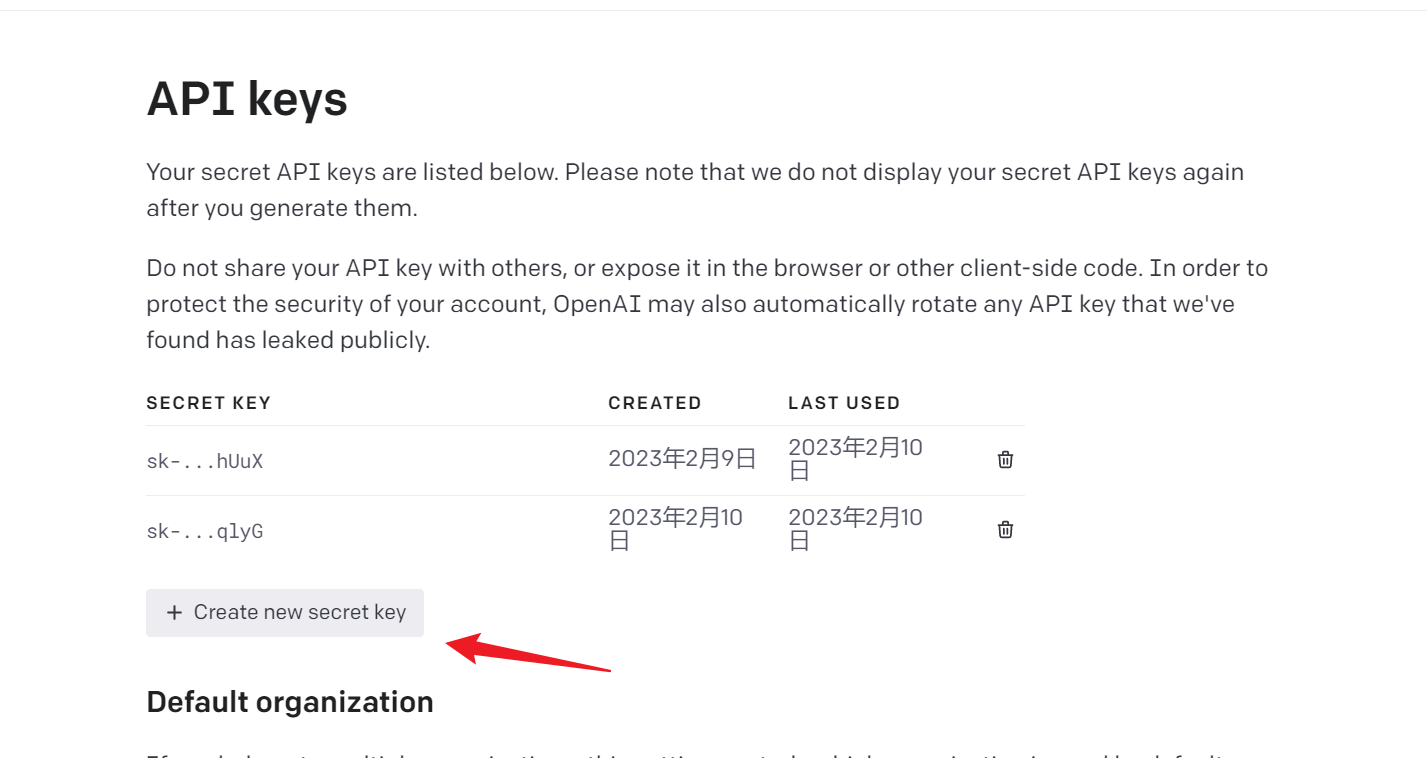
访问 Account API Keys - OpenAI API ,点击这里的 Create new secret key,创建一个新的 key,并保存备用。

步骤二:创建uni-im应用程序
接下来,我们在HBuilder X中创建一个uni-im项目,插件地址:https://ext.dcloud.net.cn/plugin?name=uni-im,并在开发者中心中启用UniPush2.0服务。
在此示例中我们直接使用uni-im的示例项目来进行。
1、在插件市场中点击【使用 HBuilderX 导入示例项目】
2、在HBuilder X中创建项目
3、绑定uniCloud服务空间
4、部署云端资源
5、开始部署
等待自动部署,如果是新服务空间一路同意。缺表就创建。如果是和其他项目共用一个服务空间。请谨慎操作
6、在开发者后台开启UniPush
7、跑起来
没有报错就成功了。
[GtPush] ["already connected"]
步骤三:在UniCloud中集成OpenAI API
1、新建云函数
2、修改云函数Nodejs版本
因为let's encrypt根证书过期,nodejs8版本请求使用了let's encrypt证书的网站时会出现
certificate has expired所以需要将云函数升级到nodejs12。相关文档: 云函数通过https访问其他服务器时出现“certificate has expired”
3、调用OpenAI API
OpenAI接口文档地址:https://platform.openai.com/docs/api-reference/completions
uniCloud访问其他HTTP服务文档:https://uniapp.dcloud.net.cn/uniCloud/cf-functions.html#httpclient
'use strict';
//OpenAI SDK、uniCloud.httpclient.request方式 二选一。
// const {
//  Configuration,
//  OpenAIApi
// } = require("openai");

exports.main = async (event, context) => {
    //event为客户端上传的参数
    console.log('event : ', event)
    // const configuration = new Configuration({
    //  apiKey: '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',
    // });
    // const openai = new OpenAIApi(configuration);
    // const {
    //  data: {
    //      choices
    //  },
    //  status,
    //  statusText
    // } = await openai.createCompletion({
    //  model: "text-davinci-003",
    //  prompt: `input:${event.body}?
    //   output:`,
    //  max_tokens: 300,
    //  temperature: 1,
    //  stop: ['output:']
    // });
    const {
        data: {
            choices
        },
        status,
        statusText
    } = await uniCloud.httpclient.request('https://api.openai.com/v1/completions', {
        method: 'POST',
        data: {
            // GPT-3 模型。详细介绍请参考:https://platform.openai.com/docs/models/overview
            model: "text-davinci-003",
            prompt: `input:${event.body}?
      output:`,
            max_tokens: 300,
            temperature: .6,
            stop: ['output:']
        },
        headers: {
            Authorization: `Bearer ${YOUR_API_KEY}`
        },
        timeout: 10000,
        contentType: 'json', // 指定以application/json发送data内的数据
        dataType: 'json' // 指定返回值为json格式,自动进行parse
    })
    //返回数据给客户端
    return {
        data: choices,
        errCode: status,
        errMsg: statusText
    }
};
4、测试一下
a、首先在云函数右击,配置运行测试参数
b、本地运行云函数
c、Bingo~
和OpenAI的对接就这么简单。接下来我们来改造一下Uni-im。
步骤四:在Uni-IM中集成Chat-GPT机器人。
1、创建Chat-GPT机器人账号
在
Chrome devtools-Applocation中找到“机器人”的uid。63eb5550819ce84ffc2df8c5
当然,更推荐你去uniCloud 控制台-云数据库 中查看uni-id-users表中的_id字段.
2、在公共模块中添加uid
3、调用ChatGPT接口回复用户信息
这一步我们将改造uni-im-co云对象,在用户发送消息的方法中请求OpenAI接口,并将接口返回的消息回复给用户。uni-im-co云对象的sendMsg是用户发送消息,并存储到数据库的方法。
我们在uni-im-co云对象中ctrl+G/control+G定位代码到435行
1、第一步
// 修改文件:uni-im-co/index.obj.js:435

// 请求公共模块中的ChatGPT _uid常量
const isChatGPT = uniImConfig.config('ChatGPT_uid')
if(isChatGPT === to_uid){
    try{
        // 请求chatGPT云函数
        const {result: { data: openAIResp }} = await uniCloud.callFunction({
            name:'ChatGPT',
            data:{
                body
            }
        })
        // 拼接消息
        const allChatData = openAIResp.reduce((prev, {text})=> prev + text, '')
        // 因为这一步要模拟ChatGPT给用户发消息,所以调换一下发送人和接受人的uid。
        const tempParams = { ...params,
        ...{
            from_uid: to_uid,
            to_uid: from_uid,
            body: allChatData,
            client_create_time: +new Date,
            original_from_uid: to_uid // 这个字段用来递归调用时区分当前发送者uid
        }};
        // 递归调用云对象中的sendMsg方法
        uniCloud.importObject('uni-im-co').sendMsg(tempParams, context);
    } catch (error){
        console.log('error boredape:>>>>>>>>>>>> ', error);
    }
}
1、兼容发送者uid
刚才我们在递归调用sendMsg方法时,传递了一个original_from_uid字段。这个字段是用来区分当前发送者uid的。我们在sendMsg方法参数中兼容处理一下它(我们在uni-im-co云对象中ctrl+G/control+G定位代码到248行找到sendMsg方法)
// 文件位置:uni-im-co/index.obj.js:248
const {
            to_uid,
            group_id,
            body,
            type,
            isRetries,
            appId,
            original_from_uid // 新增
        } = params
        //发送者身份id
        const from_uid = this.uid || original_from_uid; // 修改
4、大功告成!让我们来跟ChatGPT进行第一次正式约会。
1、创建一个自己的账号
2、手动跳转到chat页面
目前我们还不能直接和机器人对话。那就让我们主动一点在浏览器中输入房间号:(此处的user_id就是ChatGPT的uid)
http://localhost:8081/#/uni_modules/uni-im/pages/chat/chat?user_id=63eb5550819ce84ffc2df8c5
emmmmm~报错了。
看来是
uniPush不支持本地调试的问题,我们部署一下
如果有模块冲突请确认是否替换.
3、OK。我们部署完之后切换使用云端云函数
d、完成后重新运行一下项目。
EMMMMMMMMM~这又是什么错呢?
4、我们查一下云函数的运行日志
发现这个是因为
OpenAI超时导致的。云函数/云对象默认的超时时间时5S,这对于OpenAI来说很难在这么短时间内回复。
5、那我们修改一下ChatGPT、uni-im-co这两个云函数和云对象的超时时间
最大只支持10S哦
6、uni-im-co云对象在递归时会走云对象的拦截器_before进行鉴权。递归调用没有`this.clientInfo参数。所以鉴权失败,无法发送消息返回给用户。
我们来修改一下uni-im-co云对象的拦截器。判断当前云对象的调用环境。如果是云函数调用的则不进行鉴权。定位代码到uni-im-co/index.obj.js:35
        if (needLoginMethodName.includes(this.getMethodName())) {
            let res = await this.uniIdCommon.checkToken(this.clientInfo.uniIdToken)
            // console.log('checkToken', JSON.stringify(res));
                        // 判断当前调用的云对象方法是 ‘sendMsg’ 并且 是云函数调用的(递归)
            if(this.getMethodName() === 'sendMsg' && this.getClientInfo().source === 'function'){} // 新增
            else if (res.errCode ) {
                throw new Error(res.errCode)
            }
            this.uid = res.uid
        }
再来试一把
The END!
以上就是所有我们使用UniIM集成OpenAI的全部步骤。使用UniCloud快速对接OpenAI,封装属于自己的ChatGPT!
稍后我会上传Demo工程源码,不过强烈推荐您自己动手哦。能让您更加了解UniCloud和UniIM。真的是超棒的框架!
如果您觉得我的文章不错。请在左下方点赞,并关注我哦,如果有新文章会第一时间给您推送。您的支持是对我生发爆肝最大的动力。
如果您还想让我帮您体验使用Uni-app/UniCloud集成第三方好玩的SDK,请在下方评论区留言哦。


