


阿里云的全部ip名单,可用于需要固定ip的服务
阿里云的ip是不固定的,但是是有限的,下面我给大家总结了全部的ip,直接复制到需要固定ip的地方(比如公众号开发以及微信支付开发),就可以使用
"106.55.29.200",
"120.231.66.200",
"120.239.43.174",
"39.103.221.6",
"8.142.75.1",
"8.142.83.203",
"39.99.151.148",
"8.142.31.50",
"39.103.228.214",
"8.142.86.138",
"8.142.108.54",
"39.103.144.175",
"8.142.44.148",
"8.142.94.233",
"8.142.87.84",
"39.103.202.108",
"121.89.199.46",
"8.142.93.173",
"8.142.99.25",
"8.142.85.206",
"39.101.204.97",
"39.99.157.94",
"39.101.167.155",
"8.142.88.23",
"8.142.47.50",
"8.142.179.15",
"39.103.193.98",
"8.142.138.9",
"121.89.212.145",
"8.142.87.158",
"39.101.201.16",
"39.101.182.192",
"8.142.42.137",
"39.99.132.159",
"39.99.137.216",
"8.142.22.15",
"8.142.95.141",
"39.99.251.65",
"39.101.129.61",
"39.99.250.2",
"39.101.173.37",
"39.101.142.99",
"121.89.193.70",
"39.99.240.217",
"39.99.146.78",
"39.99.132.65",
"39.101.191.40",
"8.142.67.254",
"8.142.80.242",
"8.142.81.80",
"8.142.32.185",
"8.142.87.23",
"8.142.72.42",
"8.142.77.108",
"39.101.244.65",
"8.142.40.226",
"39.103.148.233",
"8.142.173.109",
"39.103.145.49",
"8.142.95.18",
"8.142.176.18",
"8.142.98.127",
"39.101.141.231",
"121.89.197.154",
"39.101.197.200",
"8.142.81.141",
"8.142.138.201",
"39.101.164.90",
"8.142.171.162",
"39.103.161.119",
"39.103.152.225",
"121.89.222.174",
"39.103.183.106",
"8.142.9.24",
"39.99.234.169",
"39.103.165.245",
"8.142.94.109",
"39.103.212.201",
"8.142.178.207",
"39.103.222.215",
"121.89.205.102",
"39.99.246.77",
"121.89.247.104",
"39.98.109.221",
"39.101.190.159",
"121.89.210.4",
"8.142.178.97",
"39.99.134.234",
"8.142.79.219",
"8.142.132.52",
"8.142.178.7",
"39.103.157.151",
"39.99.144.235",
"8.142.95.241",
"39.103.146.215",
"39.101.167.224",
"39.101.195.123",
"8.142.178.156",
"8.142.47.165",
"39.101.189.210",
"8.142.8.54",
"39.101.128.177",
"8.142.137.190",
"8.142.112.255",
"8.142.38.212",
"8.142.34.149",
"39.103.189.27",
"8.142.177.67",
"39.99.242.182",
"39.103.191.229",
"39.101.151.72",
"39.99.137.10",
"39.101.180.174",
"39.101.194.204",
"8.142.175.108",
"39.99.225.246",
"39.103.175.44",
"121.89.216.225",
"8.142.102.247",
"39.103.193.188",
"8.142.81.253",
"39.103.169.76",
"8.142.139.61",
"8.142.129.165",
"39.103.153.141",
"39.98.123.208",
"39.103.187.241",
"121.89.192.168",
"8.142.104.215",
"8.142.112.199",
"39.103.235.149",
"8.142.108.16",
"39.101.198.114",
"8.142.130.158",
"8.142.28.178",
"8.142.122.80",
"8.142.100.107",
"8.142.33.161",
"8.142.124.208",
"8.142.70.82",
"8.142.69.207",
"39.103.226.236",
"8.142.104.109",
"8.142.201.83",
"8.142.245.139",
"8.142.201.94",
"8.142.242.43",
"8.142.242.29",
"8.142.241.195",
"8.142.207.222",
"8.142.201.77",
"8.142.245.236",
"8.142.251.249",
"8.142.252.124",
"8.142.201.62",
"8.142.242.188",
"8.142.234.66",
"8.142.252.80"
关于数组去重和获取重复元素的数组
var arr=[1,2,3,4,3,5,4,6,7,2,1,4];
var newArr=[];
for (let i = 0; i < arr.length; i++) {
// let num=0;
for (let j = i+1; j < arr.length; j++) {
if(arr[i]==arr[j]){
// num++
arr.splice(j,1);//去重
}
}
if(num==1){//这里用num==1来做判断的好处,用倒数第二个元素作参考,打印出重复的元素。不会出现多次打印相同的重复元素,表现了打印出结果的唯一性。
                                    newArr.push(arr[i]);
                console.log("重复元素:"+arr[i])
            }
            num=0;
if(num>=1&&arr.indexOf(arr[i])==i){
console.log("重复元素:"+arr[i]+",重复次数:"+num)//打印出重复元素的次数
}
}
后台保活、不保证所有场景下有效(ios)
后台保活、不保证所有场景下有效(ios) :https://ext.dcloud.net.cn/plugin?id=9118
后台保活、不保证所有场景下有效(ios) :https://ext.dcloud.net.cn/plugin?id=9118
个推TechDay直播预告 | 8月24日晚19:30,实时数仓搭建保姆级教程开课
当下,企业的实时计算需求越来越高频,很多企业和组织选择建设实时数据仓库,以敏捷支撑实时报表分析、智能算法推荐、系统风险预警等多元业务场景需求。
相比离线数仓,实时数仓有哪些特性?如何进行实时数仓的技术选型?
个推TechDay“治数训练营”系列直播课第二期来了!
8月24日(下周三)晚上19:30-20:30,个推资深数据研发工程师为您解读实时数仓架构演进,分享实时数仓技术选型要点,并结合实战案例详细剖析实时数仓的搭建秘诀。
更有超多惊喜福利等你拿!

当下,企业的实时计算需求越来越高频,很多企业和组织选择建设实时数据仓库,以敏捷支撑实时报表分析、智能算法推荐、系统风险预警等多元业务场景需求。
相比离线数仓,实时数仓有哪些特性?如何进行实时数仓的技术选型?
个推TechDay“治数训练营”系列直播课第二期来了!
8月24日(下周三)晚上19:30-20:30,个推资深数据研发工程师为您解读实时数仓架构演进,分享实时数仓技术选型要点,并结合实战案例详细剖析实时数仓的搭建秘诀。
更有超多惊喜福利等你拿!
个推支持海外消息推送,助力APP扬帆出海
在全球化的浪潮之下,越来越多的国内开发者选择“乘风出海”。消息推送作为APP连接用户的有效途径,成为开发者进军海外市场的刚需。但由于海内外网络环境、应用生态等的差异,APP在海外推送的过程中,也面临着消息通道建设、海外用户精细运营、数据安全合规等方面的诸多挑战。
为此,个推推出海外消息推送解决方案,帮助APP高效整合海外消息通道,构建智能、精细、高效的用户触达体系,促进APP海外业务快速增长。

多链路触达体系,提升用户触达
用户触达通道,是APP与用户高效沟通的“桥梁”。但在APP构建海外消息通道的过程中,也存在着不少“隐痛”:一方面,自建通道或逐一对接各厂商海外通道,不仅费时费力且成本居高不下;另一方面,面对全球复杂的网络环境,若APP只采用FCM或APNs的系统通道,又会遇到消息送达率的瓶颈。
个推为APP构建了海外多链路触达体系,助其打破用户触达的壁垒。基于APP海外推送需求,个推不仅提供自有在线渠道,无缝对接FCM、APNs系统通道,还高效整合了小米、华为、荣耀、魅族、 OPPO等厂商推送能力。APP只需一次集成即可接入多厂商海外推送服务,实现在线、离线推送,保障消息稳定、高效送达。同时,个推还支持国际短信推送,帮助APP进一步拓宽海外用户触达渠道,全面提升消息到达率。

依托海外多链路触达体系, APP不仅可以自选消息下发通道触达海外用户,还能通过消息并发、分发、补发等方式,提高消息到达率。此外,个推还提供离线消息库、超长消息自动截短、厂商推送余量查询管理等能力,支持各阶段、各渠道推送数据后效分析,帮助APP科学管理渠道资源,以更低的成本实现用户触达效率的全面升级。
多样化推送策略,提升用户转化
消息点击率与运营转化效果密不可分。
基于海外推送场景,个推支持丰富的消息展示样式以及亮屏推送、A/B Test、消息分组、定时推送等消息运营工具,帮助APP精细化触达海外目标人群,提高消息点击转化率,提升用户活跃与留存。

保障数据合规,护航APP“扬帆出海
数据安全是全球关注的焦点,也是APP出海的“必修课”。
为全方位护航APP扬帆出海,个推构建了全球化的云服务集群,实现全球服务器多节点部署,保障海外推送的稳定性。此外,个推还提供分层权限管理、鉴权体系、日志监控、敏感内容审核过滤等多重保护机制,帮助APP降低运营风险,全方位保障数据安全、系统安全和内容安全。
深耕移动开发领域十余年,个推通过安全、稳定、可靠的产品及服务赢得了全球开发者的信赖。大航海时代,个推还将持续创新产品和技术服务,帮助更多开发者提升增长效率、开拓海外市场版图。
合作咨询
如果您对个推海外推送解决方案感兴趣,欢迎“码”上咨询,个推专属顾问,为您提供一对一服务!

在全球化的浪潮之下,越来越多的国内开发者选择“乘风出海”。消息推送作为APP连接用户的有效途径,成为开发者进军海外市场的刚需。但由于海内外网络环境、应用生态等的差异,APP在海外推送的过程中,也面临着消息通道建设、海外用户精细运营、数据安全合规等方面的诸多挑战。
为此,个推推出海外消息推送解决方案,帮助APP高效整合海外消息通道,构建智能、精细、高效的用户触达体系,促进APP海外业务快速增长。
多链路触达体系,提升用户触达
用户触达通道,是APP与用户高效沟通的“桥梁”。但在APP构建海外消息通道的过程中,也存在着不少“隐痛”:一方面,自建通道或逐一对接各厂商海外通道,不仅费时费力且成本居高不下;另一方面,面对全球复杂的网络环境,若APP只采用FCM或APNs的系统通道,又会遇到消息送达率的瓶颈。
个推为APP构建了海外多链路触达体系,助其打破用户触达的壁垒。基于APP海外推送需求,个推不仅提供自有在线渠道,无缝对接FCM、APNs系统通道,还高效整合了小米、华为、荣耀、魅族、 OPPO等厂商推送能力。APP只需一次集成即可接入多厂商海外推送服务,实现在线、离线推送,保障消息稳定、高效送达。同时,个推还支持国际短信推送,帮助APP进一步拓宽海外用户触达渠道,全面提升消息到达率。
依托海外多链路触达体系, APP不仅可以自选消息下发通道触达海外用户,还能通过消息并发、分发、补发等方式,提高消息到达率。此外,个推还提供离线消息库、超长消息自动截短、厂商推送余量查询管理等能力,支持各阶段、各渠道推送数据后效分析,帮助APP科学管理渠道资源,以更低的成本实现用户触达效率的全面升级。
多样化推送策略,提升用户转化
消息点击率与运营转化效果密不可分。
基于海外推送场景,个推支持丰富的消息展示样式以及亮屏推送、A/B Test、消息分组、定时推送等消息运营工具,帮助APP精细化触达海外目标人群,提高消息点击转化率,提升用户活跃与留存。
保障数据合规,护航APP“扬帆出海
数据安全是全球关注的焦点,也是APP出海的“必修课”。
为全方位护航APP扬帆出海,个推构建了全球化的云服务集群,实现全球服务器多节点部署,保障海外推送的稳定性。此外,个推还提供分层权限管理、鉴权体系、日志监控、敏感内容审核过滤等多重保护机制,帮助APP降低运营风险,全方位保障数据安全、系统安全和内容安全。
深耕移动开发领域十余年,个推通过安全、稳定、可靠的产品及服务赢得了全球开发者的信赖。大航海时代,个推还将持续创新产品和技术服务,帮助更多开发者提升增长效率、开拓海外市场版图。
合作咨询
如果您对个推海外推送解决方案感兴趣,欢迎“码”上咨询,个推专属顾问,为您提供一对一服务!

乐乐音乐H5网页版-支持krc歌词(动感歌词、翻译和音译歌词)
简介
乐乐音乐H5网页版主要是基于uni-app框架开发的音乐播放器,目前只支持krc歌词(支持歌词颜色、字体大小、歌词进度调整和翻译和音译歌词),不支持歌词快进功能。
环境配置
HBuilder 3.5.3.20220729
Vue 2.0
功能截图
网络

默认歌词

翻译歌词

音译歌词

设置

关于

反馈

性能
注:该版本主要是针对H5来开发,如果在手机上运行卡顿严重,建议下载Android版本;如果放到电脑网页上运行,性能较好。
参考
uni-app官网
uni Canvas
https://uniapp.dcloud.net.cn/api/canvas/CanvasContext.html
popmotion JS动画库
https://github.com/Popmotion/popmotion.git
乐乐音乐Android版本
https://github.com/zhangliangming/HappyPlayer5.git
项目地址
https://github.com/zhangliangming/HappyPlayer-Uni.git
其他
- 使用hb编译时,因为会存在跨域问题,建议使用内置浏览器运行。
- 由于uni是一种多平台的框架,有兴趣的可将代码编译到其他的平台和拓展其他格式的歌词。
- 目前是将Java代码语言翻译成对应的Js语言,在手机端上运行性能比较差,如果在PC上运行性能相对较好。
简介
乐乐音乐H5网页版主要是基于uni-app框架开发的音乐播放器,目前只支持krc歌词(支持歌词颜色、字体大小、歌词进度调整和翻译和音译歌词),不支持歌词快进功能。
环境配置
HBuilder 3.5.3.20220729
Vue 2.0
功能截图
网络
默认歌词
翻译歌词
音译歌词
设置
关于
反馈
性能
注:该版本主要是针对H5来开发,如果在手机上运行卡顿严重,建议下载Android版本;如果放到电脑网页上运行,性能较好。
参考
uni-app官网
uni Canvas
https://uniapp.dcloud.net.cn/api/canvas/CanvasContext.html
popmotion JS动画库
https://github.com/Popmotion/popmotion.git
乐乐音乐Android版本
https://github.com/zhangliangming/HappyPlayer5.git
项目地址
https://github.com/zhangliangming/HappyPlayer-Uni.git
其他
- 使用hb编译时,因为会存在跨域问题,建议使用内置浏览器运行。
- 由于uni是一种多平台的框架,有兴趣的可将代码编译到其他的平台和拓展其他格式的歌词。
- 目前是将Java代码语言翻译成对应的Js语言,在手机端上运行性能比较差,如果在PC上运行性能相对较好。

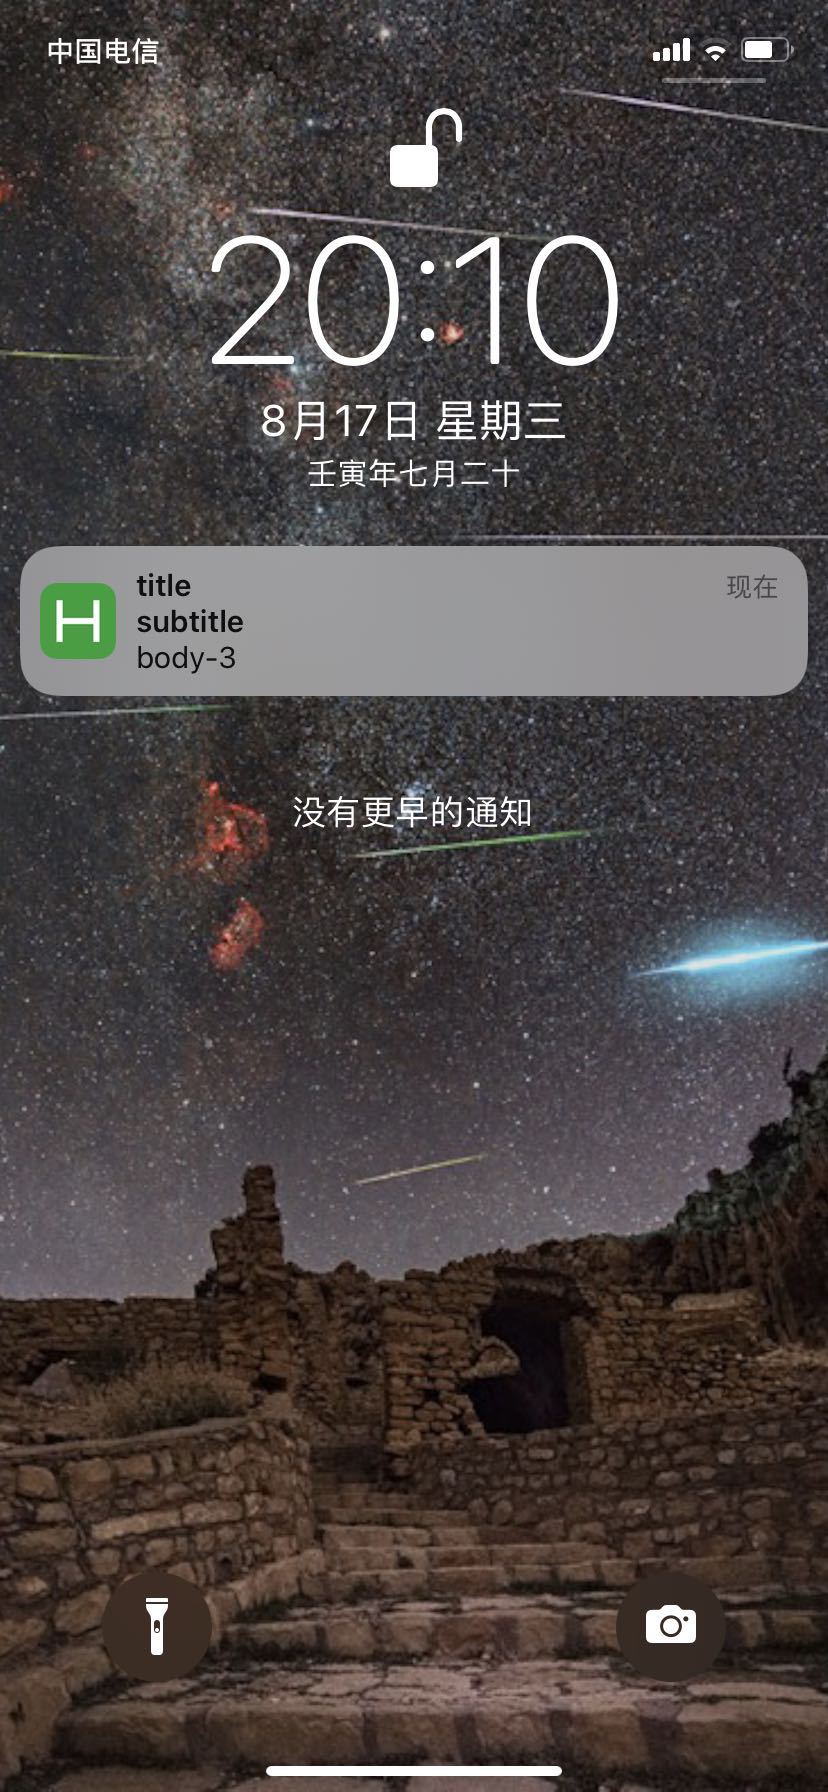
iOS 本地消息推送通知
效果如图
参考 iOS 最新的 UNNotificationRequest API
function notifyWithInterval(interval) {

    //content https://developer.apple.com/documentation/usernotifications/unmutablenotificationcontent?language=objc
    const content = plus.ios.newObject("UNMutableNotificationContent")
    const Sound = plus.ios.importClass('UNNotificationSound')
    content.plusSetAttribute("title", 'title');
    content.plusSetAttribute("subtitle", 'subtitle');
    content.plusSetAttribute("body", 'body_' + interval);
    content.plusSetAttribute('sound', Sound.defaultSound());

    //trigger https://developer.apple.com/documentation/usernotifications/unnotificationtrigger?language=objc
    const Trigger = plus.ios.importClass("UNTimeIntervalNotificationTrigger")
    const trigger = Trigger.triggerWithTimeIntervalrepeats(interval, false)

    const UUID = plus.ios.newObject('NSUUID')
    const uuid = UUID.plusGetAttribute('UUIDString')
    // const uuid = plus.tools.UUID('TIMER');

    //request
    const Req = plus.ios.importClass('UNNotificationRequest')
    const req = Req.requestWithIdentifiercontenttrigger(uuid, content, trigger)

    const NotiCenter = plus.ios.importClass("UNUserNotificationCenter")
    const userNotiCenter = NotiCenter.currentNotificationCenter()

    userNotiCenter.addNotificationRequest(req)
}
调用如下:
export default {
    ......
    onLaunch: function() {
        ......
        // 5 秒后推送本地提醒
        notifyWithInterval(5)
    }
    ......
}
其实不复杂,只是参考资料太少了,花两百买了一段代码,结果还是iOS废弃的api,自己看 iOS的文档重写了一个。
这里只写了一个 triggerWithTimeIntervalrepeats 的例子,其他的可参考 unnotificationtrigger
比较遗憾的是 delegate功能一直没调通,也就是自定义收到消息的后续操作,完全按 iOS 的文档实现 UNUserNotificationCenterDelegate
怎么都不行,有实现了的可以交流下,不打算弄原生插件,打算弃坑了……
相册获取所有照片图片和视频(ios)
相册获取所有照片图片和视频(ios) :https://ext.dcloud.net.cn/plugin?id=9060
相册获取所有照片图片和视频(ios) :https://ext.dcloud.net.cn/plugin?id=9060
通讯录选择联系人、可单选、多选、详情(ios)
通讯录选择联系人、可单选、多选、详情(ios):https://ext.dcloud.net.cn/plugin?id=9107
通讯录选择联系人、可单选、多选、详情(ios):https://ext.dcloud.net.cn/plugin?id=9107

App封装源码|分发平台搭建ios免签封装
快速发展的技术已推动企业在整个组织中使用各种应用程序。应用程序现在已成为提高生产力的组织不可或缺的一部分。App封装源码中全面的“应用程序管理”功能让您可以无缝地安装、控制和保护应用程序。
App封装源码及演示:s.appwin.top
什么是 App封装源码?
App封装源码最近在其应用库中添加了大量应用,以向其消费者提供改进的服务。每个 App封装源码工具都旨在帮助开发人员以更好的方式构建、发展和改进。
它可以帮助您测试跨平台,这意味着它可以让您上传两个 iOS 以构建一个 android APK 到同一个服务并将您的应用程序分发给适当的用户。
更令人惊奇的是,有多少用户可以测试应用程序是没有限制的。如果您已经在使用 App封装源码分析,则此服务很容易实施。更重要的是,它使比较和管理应用程序的多个 beta 版本变得简单。

App封装源码允许您通过无线方式将 iPhone、iPad 和 Android 应用程序分发给您的客户。
它由 2 个组件组成:
一个App封装源码管理界面,允许您上传应用程序并将其分配给用户。
一个移动优化的、受登录保护的下载区域,您的客户可以在其中下载与其登录凭据关联的应用程序。
支持 Python 2.7、3(在 3.4、3.5 上测试)和App封装源码= 1.7。
安装App封装源码= 1.7
pip install app-distribution
在项目的 settings.py 中添加app_distribution到您的列表中。INSTALLED_APPS
添加contrib.sites到INSTALLED_APPS项目的 settings.py 列表中。
启用消息框架
确保您已设置MEDIA_ROOT、MEDIA_URL、STATIC_URL和STATIC_ROOT。
添加BASE_PATH(或BASE_DIR)到您项目的 settings.py,例如import os.path BASE_PATH = os.path.dirname(file). 为了在与项目的 settings.py 相同的级别上创建 Android 上传文件夹,必须对其进行设置。
运行python manage.py migrate
运行python manage.py collectstatic
确保与android/android_apps项目的 settings.py 处于同一级别的文件夹可由您的网络服务器读写。
如果您的网络服务器无法为您创建它们,您必须手动创建它们。有关详细信息,请参阅下面的安全注意事项。
app_distribution.urls在您选择的挂载点包含到项目的 urls.py 文件中。这将是您的客户下载她的应用程序的地方。
包含app_distribution.auth_urls在您项目的 urls.py 中。
将LOGIN_REDIRECT_URL添加到项目的 settings.py 中。这是您在第 7 步中选择的 URL。如果您使用下面的示例,请将其设置为/distribute/.
将项目 settings.py 中的SITE_ID值添加到表示您的站点的 Site 对象的主键中。
登录到App封装源码Admin 并将服务器的 URL 添加到 Site 对象的域名(如果需要,创建一个)。在开发服务器上,这将是http://127.0.0.1:8000/


网址设置
在你的项目里面urls.py
from django.conf.urls import include, url
from django.contrib import admin
urlpatterns = [
url(r'^admin/', include(admin.site.urls)),
url(r'^distribute/', include('django_mobile_app_distribution.urls')),
url(r'^accounts/', include('django_mobile_app_distribution.auth_urls')),
]
在您的项目settings.py文件中
import os.path
BASE_PATH = os.path.dirname(file) # BASE_DIR is also available.
LOGIN_REDIRECT_URL = '/distribute/'
SITE_ID = 1
如果您在上传 Android APK 时收到权限被拒绝错误,请确保android/android_apps与您的项目的 settings.py 处于同一级别的文件夹可被您的网络服务器写入。
导出您的 iOS 应用程序以进行无线分发
在浏览器中登录App封装源码Admin 并导航到app_distribution IOS Apps
创建一个新的 iOS 应用程序。
选择用户或组
添加应用名称、捆绑版本、捆绑标识符和注释
打开 Xcode
在 Xcode 中将您的应用程序导出为存档:产品 存档
确保您已获得配置权并使用分发证书进行签名
转到管理器 档案
选择您的存档并点击导出
为企业或临时部署选择保存
选择您的协同设计身份
在 Xcode 中点击导出
选择要保存到的文件夹并记住它
在您的浏览器中将 IPA 文件上传到相应的字段中
在下载页面上,您应该能够使用正确配置的设备进行无线下载和安装
App封装源码优势
以下是 App封装源码App Distribution 的一些最显着的优势,您必须知道:
1. 有价值的发布前见解
应用分发可以为您提供一个仪表板,以查看有关您的预发布应用版本的见解。测试人员可以为您提供及时的反馈,而 Crashlytics 可以让您对用户的状态有可操作的见解。
2. 灵活快捷的服务
使用 App封装源码App Distribution,开始使用分发变得轻而易举。您无需安装 SDK、填写冗长的表格或执行任何其他操作即可开始使用它。这只是将您的应用程序载入 App封装源码并通过 CLI 或控制台发送您的应用程序构建。
3. 更易于测试人员使用
您可以使用简单的 UI 向应用测试人员发送电子邮件通知,以简化注册过程。此工具还使所有测试人员可以更轻松高效地通过应用管理器访问您的应用程序及其正在测试的版本。
App封装源码功能
让我们看看下面给出的 App封装源码App Distribution 的关键特性:
App封装源码App Distribution 可以让您管理您的 Android 和 iOS 测试,以便在发布之前分发您的应用程序。
快速将您的版本交到测试人员手中。它提供快速入门,无需安装 SDK。更重要的是,App封装源码App Distribution 还提供及时交付。
您可以通过不同的方式分发您的应用构建,包括 App封装源码CLI、控制台或 Gradle。您还可以使用它自动化您的应用程序分发。
它可以让你管理和组织你的测试团队成组。您可以通过入职流程通过简单的电子邮件邀请添加新测试人员。您甚至还可以跟踪每个测试人员的状态。
您可以将此工具与 Crashlytics 结合使用,以深入了解您的发行版的稳定性。
结论
App封装源码App Distribution 可以让您全面了解您的应用在 Android 和 iOS 上的 Beta 测试计划。
此外,它还可以在制作新版本之前为您提供有价值的反馈。它可以让您使用 CI 服务器和控制台发送应用程序的预版本。更令人惊讶的是,安装应用程序对测试人员来说也更加舒适。
快速发展的技术已推动企业在整个组织中使用各种应用程序。应用程序现在已成为提高生产力的组织不可或缺的一部分。App封装源码中全面的“应用程序管理”功能让您可以无缝地安装、控制和保护应用程序。
App封装源码及演示:s.appwin.top
什么是 App封装源码?
App封装源码最近在其应用库中添加了大量应用,以向其消费者提供改进的服务。每个 App封装源码工具都旨在帮助开发人员以更好的方式构建、发展和改进。
它可以帮助您测试跨平台,这意味着它可以让您上传两个 iOS 以构建一个 android APK 到同一个服务并将您的应用程序分发给适当的用户。
更令人惊奇的是,有多少用户可以测试应用程序是没有限制的。如果您已经在使用 App封装源码分析,则此服务很容易实施。更重要的是,它使比较和管理应用程序的多个 beta 版本变得简单。
App封装源码允许您通过无线方式将 iPhone、iPad 和 Android 应用程序分发给您的客户。
它由 2 个组件组成:
一个App封装源码管理界面,允许您上传应用程序并将其分配给用户。
一个移动优化的、受登录保护的下载区域,您的客户可以在其中下载与其登录凭据关联的应用程序。
支持 Python 2.7、3(在 3.4、3.5 上测试)和App封装源码= 1.7。
安装App封装源码= 1.7
pip install app-distribution
在项目的 settings.py 中添加app_distribution到您的列表中。INSTALLED_APPS
添加contrib.sites到INSTALLED_APPS项目的 settings.py 列表中。
启用消息框架
确保您已设置MEDIA_ROOT、MEDIA_URL、STATIC_URL和STATIC_ROOT。
添加BASE_PATH(或BASE_DIR)到您项目的 settings.py,例如import os.path BASE_PATH = os.path.dirname(file). 为了在与项目的 settings.py 相同的级别上创建 Android 上传文件夹,必须对其进行设置。
运行python manage.py migrate
运行python manage.py collectstatic
确保与android/android_apps项目的 settings.py 处于同一级别的文件夹可由您的网络服务器读写。
如果您的网络服务器无法为您创建它们,您必须手动创建它们。有关详细信息,请参阅下面的安全注意事项。
app_distribution.urls在您选择的挂载点包含到项目的 urls.py 文件中。这将是您的客户下载她的应用程序的地方。
包含app_distribution.auth_urls在您项目的 urls.py 中。
将LOGIN_REDIRECT_URL添加到项目的 settings.py 中。这是您在第 7 步中选择的 URL。如果您使用下面的示例,请将其设置为/distribute/.
将项目 settings.py 中的SITE_ID值添加到表示您的站点的 Site 对象的主键中。
登录到App封装源码Admin 并将服务器的 URL 添加到 Site 对象的域名(如果需要,创建一个)。在开发服务器上,这将是http://127.0.0.1:8000/
网址设置
在你的项目里面urls.py
from django.conf.urls import include, url
from django.contrib import admin
urlpatterns = [
url(r'^admin/', include(admin.site.urls)),
url(r'^distribute/', include('django_mobile_app_distribution.urls')),
url(r'^accounts/', include('django_mobile_app_distribution.auth_urls')),
]
在您的项目settings.py文件中
import os.path
BASE_PATH = os.path.dirname(file) # BASE_DIR is also available.
LOGIN_REDIRECT_URL = '/distribute/'
SITE_ID = 1
如果您在上传 Android APK 时收到权限被拒绝错误,请确保android/android_apps与您的项目的 settings.py 处于同一级别的文件夹可被您的网络服务器写入。
导出您的 iOS 应用程序以进行无线分发
在浏览器中登录App封装源码Admin 并导航到app_distribution IOS Apps
创建一个新的 iOS 应用程序。
选择用户或组
添加应用名称、捆绑版本、捆绑标识符和注释
打开 Xcode
在 Xcode 中将您的应用程序导出为存档:产品 存档
确保您已获得配置权并使用分发证书进行签名
转到管理器 档案
选择您的存档并点击导出
为企业或临时部署选择保存
选择您的协同设计身份
在 Xcode 中点击导出
选择要保存到的文件夹并记住它
在您的浏览器中将 IPA 文件上传到相应的字段中
在下载页面上,您应该能够使用正确配置的设备进行无线下载和安装
App封装源码优势
以下是 App封装源码App Distribution 的一些最显着的优势,您必须知道:
1. 有价值的发布前见解
应用分发可以为您提供一个仪表板,以查看有关您的预发布应用版本的见解。测试人员可以为您提供及时的反馈,而 Crashlytics 可以让您对用户的状态有可操作的见解。
2. 灵活快捷的服务
使用 App封装源码App Distribution,开始使用分发变得轻而易举。您无需安装 SDK、填写冗长的表格或执行任何其他操作即可开始使用它。这只是将您的应用程序载入 App封装源码并通过 CLI 或控制台发送您的应用程序构建。
3. 更易于测试人员使用
您可以使用简单的 UI 向应用测试人员发送电子邮件通知,以简化注册过程。此工具还使所有测试人员可以更轻松高效地通过应用管理器访问您的应用程序及其正在测试的版本。
App封装源码功能
让我们看看下面给出的 App封装源码App Distribution 的关键特性:
App封装源码App Distribution 可以让您管理您的 Android 和 iOS 测试,以便在发布之前分发您的应用程序。
快速将您的版本交到测试人员手中。它提供快速入门,无需安装 SDK。更重要的是,App封装源码App Distribution 还提供及时交付。
您可以通过不同的方式分发您的应用构建,包括 App封装源码CLI、控制台或 Gradle。您还可以使用它自动化您的应用程序分发。
它可以让你管理和组织你的测试团队成组。您可以通过入职流程通过简单的电子邮件邀请添加新测试人员。您甚至还可以跟踪每个测试人员的状态。
您可以将此工具与 Crashlytics 结合使用,以深入了解您的发行版的稳定性。
结论
App封装源码App Distribution 可以让您全面了解您的应用在 Android 和 iOS 上的 Beta 测试计划。
此外,它还可以在制作新版本之前为您提供有价值的反馈。它可以让您使用 CI 服务器和控制台发送应用程序的预版本。更令人惊讶的是,安装应用程序对测试人员来说也更加舒适。

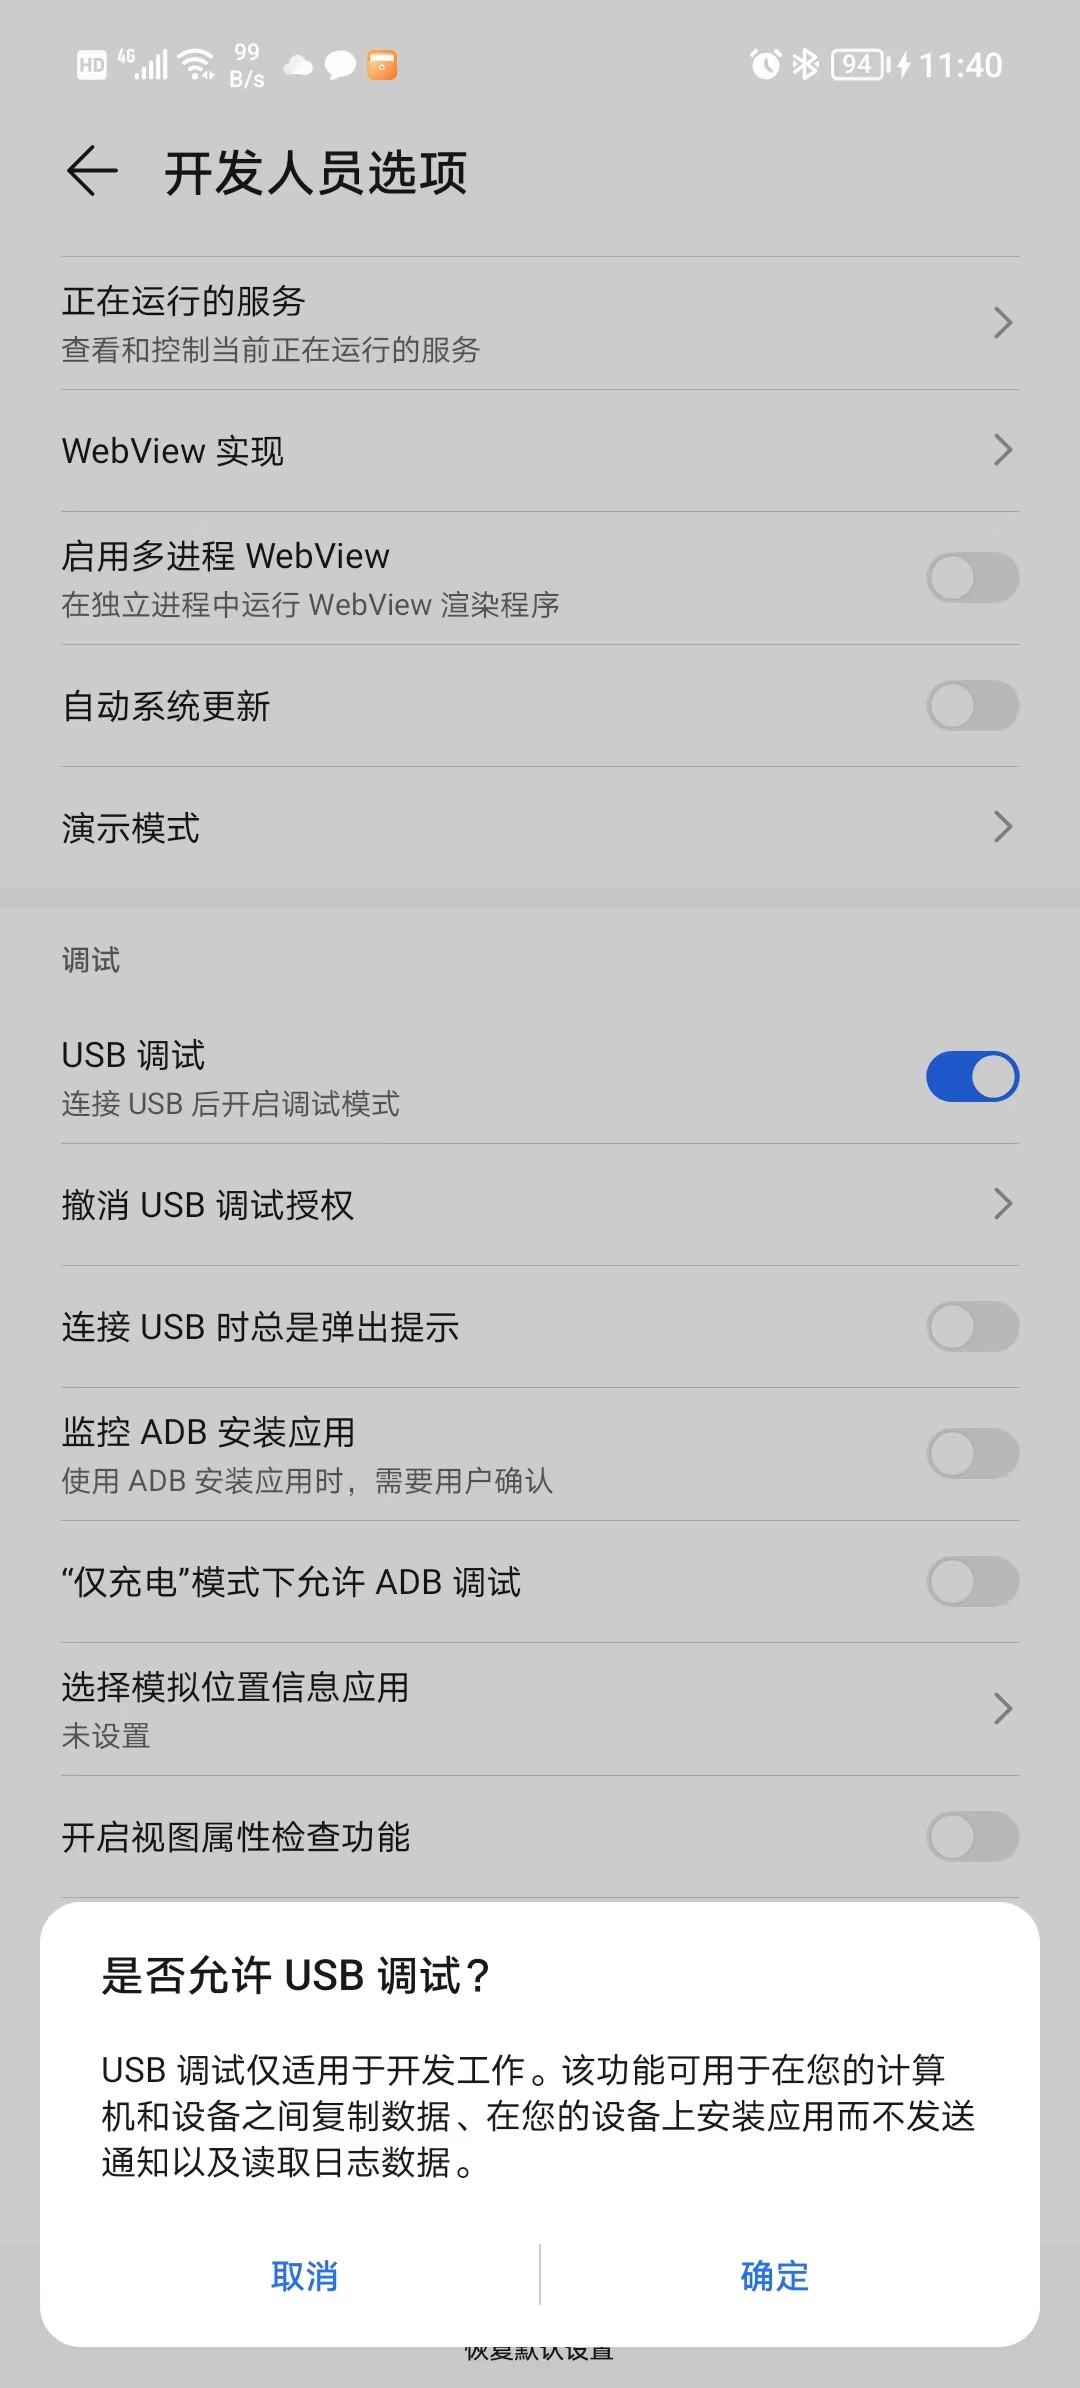
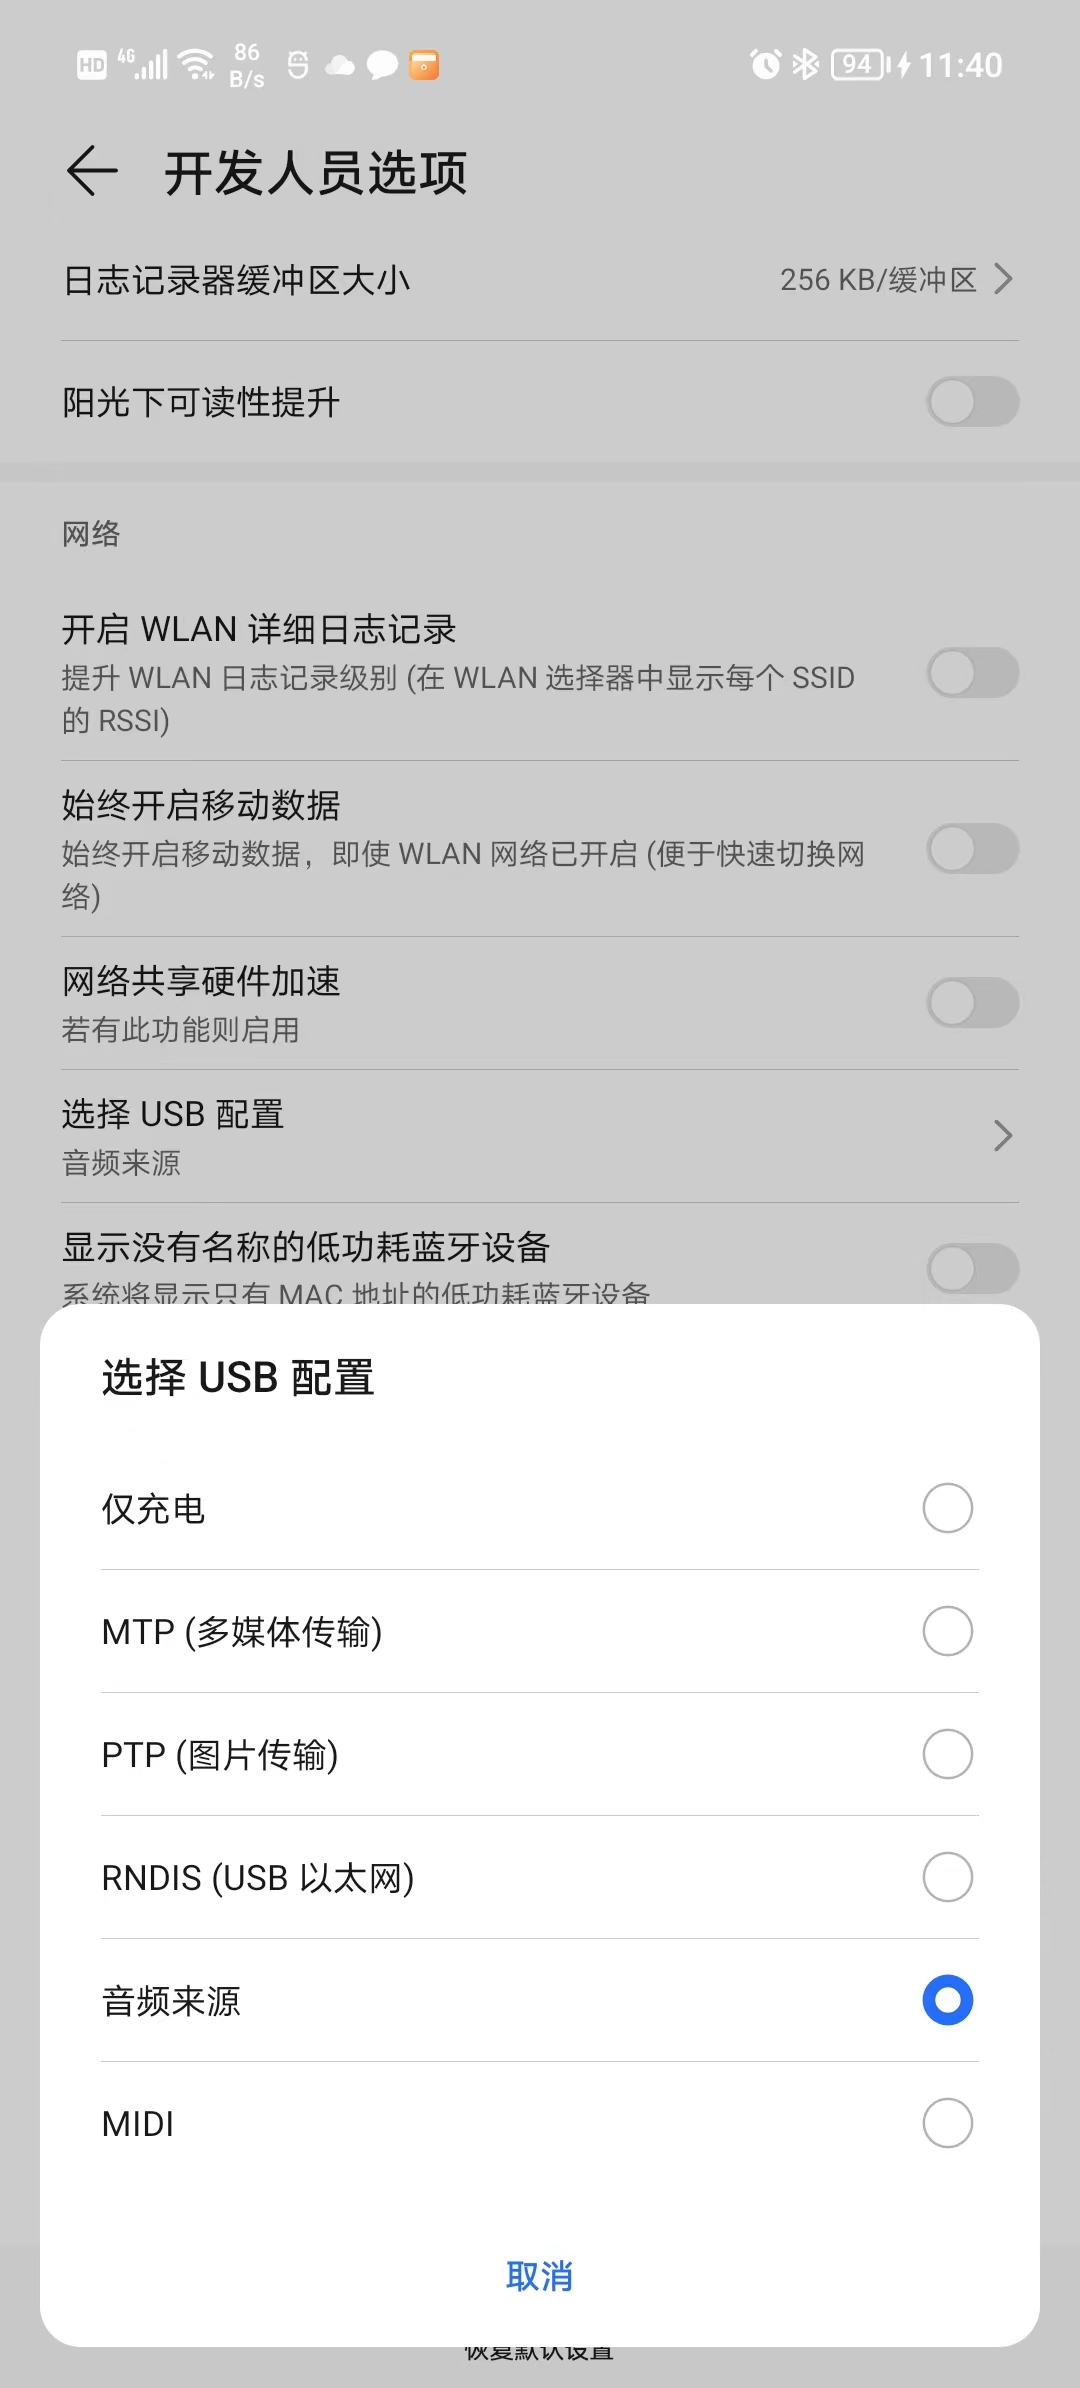
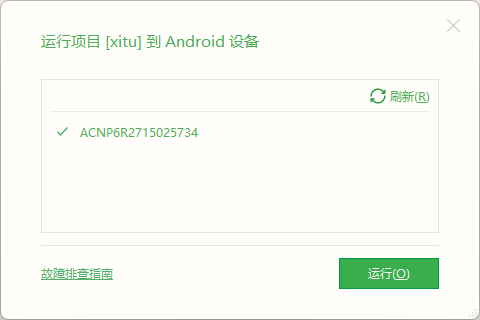
关于荣耀Magic UI系列HBuilder真机调试检测不到解决办法

最近用新买的荣耀手机调试app死活检测不到,去附件门店找技术人员,然后他们回复说他们也不知道原因,他们也没有办法,然后也测试了店里的其他的荣耀手机,结果都一样,华为的就正常,惊呆了,然后……………………………………
第二天,就各种整,然后……可以了,就是比较奇葩,直接上截图:
1、开启USB调试
2、选择USB配置,选择音频来源,奇葩吧
3、连接OK
最近用新买的荣耀手机调试app死活检测不到,去附件门店找技术人员,然后他们回复说他们也不知道原因,他们也没有办法,然后也测试了店里的其他的荣耀手机,结果都一样,华为的就正常,惊呆了,然后……………………………………
第二天,就各种整,然后……可以了,就是比较奇葩,直接上截图:
1、开启USB调试
2、选择USB配置,选择音频来源,奇葩吧
3、连接OK
