uni-app仿deepseek跨三端流式ai实例|uniapp聊天ai
经过一个多月迭代升级,2026最新款uniapp+vue3+deepseek搭建小程序.安卓.H5端流式打字ai对话模板。支持深度思考、复制代码、latex数学公式、链接、图片预览等功能。
三端效果如下:

运用技术:
- 编辑器:HbuilderX 4.87
- 技术框架:uni-app+vue3+pinia2+vite5
- 大模型框架:DeepSeek-V3.2
- 组件库:uni-ui+uv-ui
- 高亮插件:highlight.js
- markdown渲染:ua-markdown+mp-html
- 本地缓存:pinia-plugin-unistorage
项目结构目录
> #### uniapp-deepseek跨三端流式ai模板已经同步到我的原创作品集。
> 2026版uniapp+deepseek+vue3跨端AI流式输出对话模板
新增支持小程序端复制代码、latex数学公式、表格、链接复制、预览图片等功能。
h5端支持mermaid图表渲染,支持运行到pc端以750px宽度显示页面。
作者:xiaoyan2017
链接: https://www.cnblogs.com/xiaoyan2017/p/19599014
著作权归作者所有。商业转载请联系作者获得授权,非商业转载请注明出处。
经过一个多月迭代升级,2026最新款uniapp+vue3+deepseek搭建小程序.安卓.H5端流式打字ai对话模板。支持深度思考、复制代码、latex数学公式、链接、图片预览等功能。
三端效果如下:
运用技术:
- 编辑器:HbuilderX 4.87
- 技术框架:uni-app+vue3+pinia2+vite5
- 大模型框架:DeepSeek-V3.2
- 组件库:uni-ui+uv-ui
- 高亮插件:highlight.js
- markdown渲染:ua-markdown+mp-html
- 本地缓存:pinia-plugin-unistorage
项目结构目录
> #### uniapp-deepseek跨三端流式ai模板已经同步到我的原创作品集。
> 2026版uniapp+deepseek+vue3跨端AI流式输出对话模板
新增支持小程序端复制代码、latex数学公式、表格、链接复制、预览图片等功能。
h5端支持mermaid图表渲染,支持运行到pc端以750px宽度显示页面。
作者:xiaoyan2017
链接: https://www.cnblogs.com/xiaoyan2017/p/19599014
著作权归作者所有。商业转载请联系作者获得授权,非商业转载请注明出处。
安卓启动图变形问题解决方案,.9.png启动图生成
使用Android Studio工具去生成,效果嘎嘎好
有不会的联系我,或者发送邮件:it2003wei@163.com,请我喝杯奶茶帮你搞定嘻嘻
使用Android Studio工具去生成,效果嘎嘎好
有不会的联系我,或者发送邮件:it2003wei@163.com,请我喝杯奶茶帮你搞定嘻嘻
h5端尺寸转换逻辑
vue3 + vite
vue3 下 , h5使用rpx 时, 会 编译成 rem
注册 postcss 的 plugin
在/node_modules/@dcloudio/uni-h5-vite/dist/plugin/config.js,
代码是, 用的 是config 这个钩子
 css: {
    postcss: {
        plugins: (0, uni_cli_shared_1.initPostcssPlugin)({
            uniApp: (0, uni_cli_shared_1.parseRpx2UnitOnce)(inputDir, process.env.UNI_PLATFORM),
        }),
    },
},
parseRpx2UnitOnce , 选定使用的单位
exports.parseRpx2UnitOnce = (0, uni_shared_1.once)((inputDir, platform = 'h5') => {
    // 如果是  h5/app/鸿蒙 会使用 defaultRpx2Unit
    const rpx2unit = platform === 'h5' || platform === 'app' || platform === 'app-harmony'
        ? uni_shared_1.defaultRpx2Unit
        : uni_shared_1.defaultMiniProgramRpx2Unit;
    const manifestJson = (0, exports.parseManifestJsonOnce)(inputDir);
    let platformOptions = getPlatformManifestJson(manifestJson, platform);
    if (platformOptions && platformOptions.rpx) {
        return (0, shared_1.extend)({}, rpx2unit, platformOptions);
    }
    return (0, shared_1.extend)({}, rpx2unit);
});
都有啥呢 ?
const defaultRpx2Unit = {
    unit: 'rem',
    unitRatio: 10 / 320,
    unitPrecision: 5,
};
const defaultMiniProgramRpx2Unit = {
    unit: 'rpx',
    unitRatio: 1,
    unitPrecision: 1,
};
但是 注意这里 let platformOptions = getPlatformManifestJson(manifestJson, platform);
还是 会从 mainfest中 获取 配置的, 如果有 , 就用 mainfest 中的,
也就是 你可以 在 manifest.json的 h5节点下 , 覆盖 一些 配置 , 例如
    "h5": {
        "router": {
            "mode": "history"
        },
        "unit": "px",
        "unitRatio": 0.5,
        "unitPrecision": 2,
    }
但是 文档里 , 我没有 找到
哪里 修改的 rpx 2 rem 呢?
在这里 /node_modules/@dcloudio/uni-cli-shared/dist/postcss/plugins/uniapp.js
const uniapp = (opts) => {
    const platform = process.env.UNI_PLATFORM;
    const { unit, unitRatio, unitPrecision } = (0, shared_1.extend)({}, defaultUniAppCssProcessorOptions, opts);
    const rpx2unit = (0, uni_shared_1.createRpx2Unit)(unit, unitRatio, unitPrecision);
    return {
        postcssPlugin: 'uni-app',
        prepare() {
            return {
                OnceExit(root) {
                    root.walkDecls(walkDecls(rpx2unit));
                    const rewriteTag = transforms[platform];
                    filterPrefersColorScheme(root);
                    if (rewriteTag) {
                        root.walkRules(walkRules({
                            rewriteTag,
                        }));
                    }
                },
            };
        },
    };
};
就是 遍历 然后 替换
function walkDecls(rpx2unit) {
    return (decl) => {
        const { value } = decl;
        if (value.indexOf('rpx') === -1 && value.indexOf('upx') === -1) {
            return;
        }
        // 如果有 rpx 或者upx, 就调用rpx2unit
        decl.value = rpx2unit(decl.value);
    };
}
const unitRE = new RegExp(`"[^"]+"|'[^']+'|url\\([^)]+\\)|(\\d*\\.?\\d+)[r|u]px`, 'g');
// 这里的 参数 就是 defaultRpx2Unit的三个参数
function createRpx2Unit(unit, unitRatio, unitPrecision) {
// ignore: rpxCalcIncludeWidth
return (val) => val.replace(unitRE, (m, $1) => {
if (!$1) {
return m;
}
if (unitRatio === 1) {
return `${$1}${unit}`;
}
// 替换 为 rem
// 就是 * unitRatio, 然后 保留unitPrecision 位的小数
const value = toFixed(parseFloat($1) * unitRatio, unitPrecision);
return value === 0 ? '0' : `${value}${unit}`;
});
}我是 分割线----------------------------------------------------------------------------------------------------------------------------------------------------------------
vue2 + webpack
再 说一下 vue2的 处理, vue2 是 依托于 vue-cli-service
查看打包结果
写一个 最简单的 项目,
查看 打包后的 结果
 ___CSS_LOADER_EXPORT___.push([
            module.id,
            '@charset "UTF-8";\n/**\n  */.ggdxd[data-v-4551d3b2]{height:%?600?%;background-color:pink}',
            "",
        ]);
是 内联css ,
而 可以 修改么? 可以 在 vue.config.js中 设置css.extract么?
不可以
查看代码, uni 是 使用 自定义 的 vue-cli-service 插件,
/node_modules/@dcloudio/vue-cli-plugin-uni/index.js
h5 强制要 内联css...
if (process.env.UNI_PLATFORM === 'h5' || process.env.UNI_USING_V3) {
    options.css.extract = false
} else {
    options.css.extract = true
}
height:%?600?%
在 cli 项目中, 根目录下会有postcss.config.js
实际上 使用了 uni的 一个自定义 插件require('@dcloudio/vue-cli-plugin-uni/packages/postcss')
在 parseWord方法中
if (process.env.UNI_PLATFORM === 'h5') {
    if (u === 'upx' || u === 'rpx') {
          // 这里 变成了很奇怪的东西
      node.value = `%?${num}?%`
    }
}
也就是 在编译的产物中, rpx/upx 都转成了 %?${num}?%的 格式
啥时候 转成 px 哦?
是 运行时!
运行时的 转换代码 是哪里来的?
是 通过 webpack的 loader 处理的
我写了一个 webpack 插件, 获取了 resolve 之后的 样式使用的loader
[
  "/node_modules/@dcloudio/vue-cli-plugin-uni/packages/vue-loader/lib/loaders/pitcher.js",

  "/node_modules/@dcloudio/vue-cli-plugin-uni/packages/h5-vue-style-loader/index.js",

  "/node_modules/@vue/cli-service/node_modules/css-loader/dist/cjs.js",
  "/node_modules/@dcloudio/vue-cli-plugin-uni/packages/webpack-preprocess-loader/index.js",
  "/node_modules/postcss-loader/dist/cjs.js",
  "/node_modules/postcss-loader/dist/cjs.js",
  "/node_modules/@dcloudio/vue-cli-plugin-uni/packages/sass-loader/dist/cjs.js",
  "/node_modules/@dcloudio/vue-cli-plugin-uni/packages/webpack-preprocess-loader/index.js",
  "/node_modules/@dcloudio/vue-cli-plugin-uni/packages/vue-loader/lib/index.js",
  "/node_modules/@dcloudio/vue-cli-plugin-uni/packages/webpack-scoped-loader/index.js",
  "/node_modules/@dcloudio/vue-cli-plugin-uni/packages/wrap-loader/index.js",
]
为什么会使用这个 h5-vue-style-loader?
用了 alias
在 /node_modules/@dcloudio/vue-cli-plugin-uni/lib/h5/index.js文件中配置了webpack
resolveLoader: {
    alias: {
      'vue-style-loader': resolve('packages/h5-vue-style-loader')
    }
  }
在 h5-vue-style-loader中 处理 css模块时,
编译源码是
var code = [
  '// add the styles to the DOM',
  'var add = require(' + addStylesClientPath + ').default',
  'var update = add(' + id + ', content, ' + isProduction + ', ' + JSON.stringify(options) + ');'
]
动态 插入了 add/update 方法
执行后的返回示例:
// style-loader: Adds some css to the DOM by adding a <style> tag

// load the styles
var content = require("........!../node_modules/@dcloudio/vue-cli-plugin-uni/packages/wrap-loader/index.js??clonedRuleSet-45[0].rules[0].use!./App.vue?vue&type=style&index=0&lang=scss&");

if(content.__esModule) content = content.default;

if(typeof content === 'string') content = [[module.id, content, '']];
if(content.locals) module.exports = content.locals;

// add the styles to the DOM
var add = require("!../node_modules/@dcloudio/vue-cli-plugin-uni/packages/h5-vue-style-loader/lib/addStylesClient.js").default
var update = add("43b7a677", content, true, {"sourceMap":false,"shadowMode":false});
也就是 这个 css 模块 变成了 上面的样子
运行时呢?
css模块 代码 注入了
var add = require("!../node_modules/@dcloudio/vue-cli-plugin-uni/packages/h5-vue-style-loader/lib/addStylesClient.js").default
源码是:
var UPX_RE = /%\?([+-]?\d+(\.\d+)?)\?%/g;
function processCss(css) {
    var page = getPage();
    if (typeof uni !== "undefined" && !uni.canIUse("css.var")) {
        //不支持 css 变量
        var offset = getWindowOffset();
        css = css
            .replace(VAR_STATUS_BAR_HEIGHT, "0px")
            .replace(VAR_WINDOW_TOP, offset.top + "px")
            .replace(VAR_WINDOW_BOTTOM, offset.bottom + "px")
            .replace(VAR_WINDOW_LEFT, "0px")
            .replace(VAR_WINDOW_RIGHT, "0px");
    }
    return css
        .replace(BODY_SCOPED_RE, page)
        .replace(BODY_RE, "")
        .replace(PAGE_SCOPED_RE, "body." + page + " uni-page-body")
        .replace(/\{[\s\S]+?\}|@media.+?\{/g, function (css) {
            if (typeof uni === "undefined") {
                return css;
            }
            // 这里 把  %?数值?% 格式的  数字样式 使用 upx2px 计算成px
            return css.replace(UPX_RE, function (a, b) {
                return uni.upx2px(b) + "px";
            });
        });
}vue3 + vite
vue3 下 , h5使用rpx 时, 会 编译成 rem
注册 postcss 的 plugin
在/node_modules/@dcloudio/uni-h5-vite/dist/plugin/config.js,
代码是, 用的 是config 这个钩子
 css: {
    postcss: {
        plugins: (0, uni_cli_shared_1.initPostcssPlugin)({
            uniApp: (0, uni_cli_shared_1.parseRpx2UnitOnce)(inputDir, process.env.UNI_PLATFORM),
        }),
    },
},
parseRpx2UnitOnce , 选定使用的单位
exports.parseRpx2UnitOnce = (0, uni_shared_1.once)((inputDir, platform = 'h5') => {
    // 如果是  h5/app/鸿蒙 会使用 defaultRpx2Unit
    const rpx2unit = platform === 'h5' || platform === 'app' || platform === 'app-harmony'
        ? uni_shared_1.defaultRpx2Unit
        : uni_shared_1.defaultMiniProgramRpx2Unit;
    const manifestJson = (0, exports.parseManifestJsonOnce)(inputDir);
    let platformOptions = getPlatformManifestJson(manifestJson, platform);
    if (platformOptions && platformOptions.rpx) {
        return (0, shared_1.extend)({}, rpx2unit, platformOptions);
    }
    return (0, shared_1.extend)({}, rpx2unit);
});
都有啥呢 ?
const defaultRpx2Unit = {
    unit: 'rem',
    unitRatio: 10 / 320,
    unitPrecision: 5,
};
const defaultMiniProgramRpx2Unit = {
    unit: 'rpx',
    unitRatio: 1,
    unitPrecision: 1,
};
但是 注意这里 let platformOptions = getPlatformManifestJson(manifestJson, platform);
还是 会从 mainfest中 获取 配置的, 如果有 , 就用 mainfest 中的,
也就是 你可以 在 manifest.json的 h5节点下 , 覆盖 一些 配置 , 例如
    "h5": {
        "router": {
            "mode": "history"
        },
        "unit": "px",
        "unitRatio": 0.5,
        "unitPrecision": 2,
    }
但是 文档里 , 我没有 找到
哪里 修改的 rpx 2 rem 呢?
在这里 /node_modules/@dcloudio/uni-cli-shared/dist/postcss/plugins/uniapp.js
const uniapp = (opts) => {
    const platform = process.env.UNI_PLATFORM;
    const { unit, unitRatio, unitPrecision } = (0, shared_1.extend)({}, defaultUniAppCssProcessorOptions, opts);
    const rpx2unit = (0, uni_shared_1.createRpx2Unit)(unit, unitRatio, unitPrecision);
    return {
        postcssPlugin: 'uni-app',
        prepare() {
            return {
                OnceExit(root) {
                    root.walkDecls(walkDecls(rpx2unit));
                    const rewriteTag = transforms[platform];
                    filterPrefersColorScheme(root);
                    if (rewriteTag) {
                        root.walkRules(walkRules({
                            rewriteTag,
                        }));
                    }
                },
            };
        },
    };
};
就是 遍历 然后 替换
function walkDecls(rpx2unit) {
    return (decl) => {
        const { value } = decl;
        if (value.indexOf('rpx') === -1 && value.indexOf('upx') === -1) {
            return;
        }
        // 如果有 rpx 或者upx, 就调用rpx2unit
        decl.value = rpx2unit(decl.value);
    };
}
const unitRE = new RegExp(`"[^"]+"|'[^']+'|url\\([^)]+\\)|(\\d*\\.?\\d+)[r|u]px`, 'g');
// 这里的 参数 就是 defaultRpx2Unit的三个参数
function createRpx2Unit(unit, unitRatio, unitPrecision) {
// ignore: rpxCalcIncludeWidth
return (val) => val.replace(unitRE, (m, $1) => {
if (!$1) {
return m;
}
if (unitRatio === 1) {
return `${$1}${unit}`;
}
// 替换 为 rem
// 就是 * unitRatio, 然后 保留unitPrecision 位的小数
const value = toFixed(parseFloat($1) * unitRatio, unitPrecision);
return value === 0 ? '0' : `${value}${unit}`;
});
}我是 分割线----------------------------------------------------------------------------------------------------------------------------------------------------------------
vue2 + webpack
再 说一下 vue2的 处理, vue2 是 依托于 vue-cli-service
查看打包结果
写一个 最简单的 项目,
查看 打包后的 结果
 ___CSS_LOADER_EXPORT___.push([
            module.id,
            '@charset "UTF-8";\n/**\n  */.ggdxd[data-v-4551d3b2]{height:%?600?%;background-color:pink}',
            "",
        ]);
是 内联css ,
而 可以 修改么? 可以 在 vue.config.js中 设置css.extract么?
不可以
查看代码, uni 是 使用 自定义 的 vue-cli-service 插件,
/node_modules/@dcloudio/vue-cli-plugin-uni/index.js
h5 强制要 内联css...
if (process.env.UNI_PLATFORM === 'h5' || process.env.UNI_USING_V3) {
    options.css.extract = false
} else {
    options.css.extract = true
}
height:%?600?%
在 cli 项目中, 根目录下会有postcss.config.js
实际上 使用了 uni的 一个自定义 插件require('@dcloudio/vue-cli-plugin-uni/packages/postcss')
在 parseWord方法中
if (process.env.UNI_PLATFORM === 'h5') {
    if (u === 'upx' || u === 'rpx') {
          // 这里 变成了很奇怪的东西
      node.value = `%?${num}?%`
    }
}
也就是 在编译的产物中, rpx/upx 都转成了 %?${num}?%的 格式
啥时候 转成 px 哦?
是 运行时!
运行时的 转换代码 是哪里来的?
是 通过 webpack的 loader 处理的
我写了一个 webpack 插件, 获取了 resolve 之后的 样式使用的loader
[
  "/node_modules/@dcloudio/vue-cli-plugin-uni/packages/vue-loader/lib/loaders/pitcher.js",

  "/node_modules/@dcloudio/vue-cli-plugin-uni/packages/h5-vue-style-loader/index.js",

  "/node_modules/@vue/cli-service/node_modules/css-loader/dist/cjs.js",
  "/node_modules/@dcloudio/vue-cli-plugin-uni/packages/webpack-preprocess-loader/index.js",
  "/node_modules/postcss-loader/dist/cjs.js",
  "/node_modules/postcss-loader/dist/cjs.js",
  "/node_modules/@dcloudio/vue-cli-plugin-uni/packages/sass-loader/dist/cjs.js",
  "/node_modules/@dcloudio/vue-cli-plugin-uni/packages/webpack-preprocess-loader/index.js",
  "/node_modules/@dcloudio/vue-cli-plugin-uni/packages/vue-loader/lib/index.js",
  "/node_modules/@dcloudio/vue-cli-plugin-uni/packages/webpack-scoped-loader/index.js",
  "/node_modules/@dcloudio/vue-cli-plugin-uni/packages/wrap-loader/index.js",
]
为什么会使用这个 h5-vue-style-loader?
用了 alias
在 /node_modules/@dcloudio/vue-cli-plugin-uni/lib/h5/index.js文件中配置了webpack
resolveLoader: {
    alias: {
      'vue-style-loader': resolve('packages/h5-vue-style-loader')
    }
  }
在 h5-vue-style-loader中 处理 css模块时,
编译源码是
var code = [
  '// add the styles to the DOM',
  'var add = require(' + addStylesClientPath + ').default',
  'var update = add(' + id + ', content, ' + isProduction + ', ' + JSON.stringify(options) + ');'
]
动态 插入了 add/update 方法
执行后的返回示例:
// style-loader: Adds some css to the DOM by adding a <style> tag

// load the styles
var content = require("........!../node_modules/@dcloudio/vue-cli-plugin-uni/packages/wrap-loader/index.js??clonedRuleSet-45[0].rules[0].use!./App.vue?vue&type=style&index=0&lang=scss&");

if(content.__esModule) content = content.default;

if(typeof content === 'string') content = [[module.id, content, '']];
if(content.locals) module.exports = content.locals;

// add the styles to the DOM
var add = require("!../node_modules/@dcloudio/vue-cli-plugin-uni/packages/h5-vue-style-loader/lib/addStylesClient.js").default
var update = add("43b7a677", content, true, {"sourceMap":false,"shadowMode":false});
也就是 这个 css 模块 变成了 上面的样子
运行时呢?
css模块 代码 注入了
var add = require("!../node_modules/@dcloudio/vue-cli-plugin-uni/packages/h5-vue-style-loader/lib/addStylesClient.js").default
源码是:
var UPX_RE = /%\?([+-]?\d+(\.\d+)?)\?%/g;
function processCss(css) {
    var page = getPage();
    if (typeof uni !== "undefined" && !uni.canIUse("css.var")) {
        //不支持 css 变量
        var offset = getWindowOffset();
        css = css
            .replace(VAR_STATUS_BAR_HEIGHT, "0px")
            .replace(VAR_WINDOW_TOP, offset.top + "px")
            .replace(VAR_WINDOW_BOTTOM, offset.bottom + "px")
            .replace(VAR_WINDOW_LEFT, "0px")
            .replace(VAR_WINDOW_RIGHT, "0px");
    }
    return css
        .replace(BODY_SCOPED_RE, page)
        .replace(BODY_RE, "")
        .replace(PAGE_SCOPED_RE, "body." + page + " uni-page-body")
        .replace(/\{[\s\S]+?\}|@media.+?\{/g, function (css) {
            if (typeof uni === "undefined") {
                return css;
            }
            // 这里 把  %?数值?% 格式的  数字样式 使用 upx2px 计算成px
            return css.replace(UPX_RE, function (a, b) {
                return uni.upx2px(b) + "px";
            });
        });
}uni.setStorage/getStorage PC浏览器调试没问题 apk安装后加载不了
使用uni.setStorage/getStorage存读数据,PC调试的时候都没问题。封装apk,安装后,读不出来了。不管是同步还是异步。已经打算自己写xml了。不知有无大佬遇到类似问题。
使用uni.setStorage/getStorage存读数据,PC调试的时候都没问题。封装apk,安装后,读不出来了。不管是同步还是异步。已经打算自己写xml了。不知有无大佬遇到类似问题。
video组件报错,DOMException: The element has no supported sources.
在内置浏览器上会报错,运行在真机上就可以
在内置浏览器上会报错,运行在真机上就可以
鸿蒙如何在本地测试 wgt 更新
鸿蒙端使用升级中心,发布测试版本后,直接运行到手机上测试 wgt 升级时可能会发现升级不成功,应用重启后还是旧的内容;
这是因为运行到鸿蒙端调试时,升级中心释放 wgt 的逻辑被调试时的热更新覆盖掉了,但是可以使用以下方法测试 wgt 升级:
- 使用本地打包,生成安装包
- 将打包出来的内容(unpackage/dist/build/app-harmony)直接拖到 DevEco 中运行到升级测试
鸿蒙端使用升级中心,发布测试版本后,直接运行到手机上测试 wgt 升级时可能会发现升级不成功,应用重启后还是旧的内容;
这是因为运行到鸿蒙端调试时,升级中心释放 wgt 的逻辑被调试时的热更新覆盖掉了,但是可以使用以下方法测试 wgt 升级:
- 使用本地打包,生成安装包
- 将打包出来的内容(unpackage/dist/build/app-harmony)直接拖到 DevEco 中运行到升级测试
Uni app x 打包 apk 植物人也会
🟢🟢 点个关注不迷路🟢🟢 (≧◡≦) ♡
🥺拜托了欧尼酱,阿里嘎多 Thank you 高马斯密达💖
👇👇⬇️⬇️
| 哔哩哔哩|CSDN|Github|Gitcode|
| 传送门 | 传送门 | 传送门 | 传送门 |
> 一般CSDN会第一时间更新图文教程,后续会上传源码到Github和Gitcode上,最后再录视频教程发到哔哩哔哩,如果没时间的话可能不会录视频。
Uni App X 安卓本地离线打包
介绍:Uni App X 安卓本地离线打包喂饭教程
效果图片
🟢温馨提示:如果图片无法加载请前往国内Gitcode镜像仓库


代码地址
🟢温馨提示:如果图片无法加载请前往国内Gitcode镜像仓库
Github:https://github.com/BrokenDreamTech/UniAppxPack
Gitcode:https://gitcode.com/BrokenDreamTech/UniAppxPack
特性
Github Action一键打包,无需配置Android Studio配置
压缩混淆配置,打包"Hello" apk大小:7.7MB
HBuilder X 4.85
HBuilder X 4.87
环境
HBuilder X 4.87
Android Studio 2025.2.2
教程
视频教程
传送门:https://www.bilibili.com/video/BV1yW6oBeEqy
图文教程
- 使用HBuilder X打开你的uni-app x项目点击"工具栏"-"发行"-"App-Android/iOS-本地打包"-"生成本地App打包资源"
- 因为"此项目"已有一个示例uni-app x,所以先把示例项目资源删除(不要乱删文件):
- 删除"此项目"的"app/src/main/assets/apps"文件夹下的所有
- 删除"此项目"的"app/src/main/java"文件夹下的:"index.kt"文件和"pages"文件夹
- 将生成的" UNI XXXXXX"文件夹复制到"此项目"的"app/src/main/assets/apps"文件夹下
- 将生成的"uniappx/app-android/src"文件夹下的所有东西复制粘贴到"此项目"的"app/src/main/java"文件夹下
-
使用Android Studio打开"此项目",直接打包即可。
> 打包apk,在"此项目"的根目录打开命令行,执行:gradlew assembleRelease
一键打包 (不建议使用此方案,有构建时长限制,推荐自己按教程在本地打包)
- 下载或fork此项目,将仓库设置为私有(如果你不想公开你的项目),按照教程将uni-app x资源替换为自己的
- 将项目推送到Githab上,点击"Actions"-"Build Release",等待构建完成
- 构建完成后进入详情页,点击下载产物,下载后需解压
鸣谢
https://doc.dcloud.net.cn/uni-app-x/native/download/android.html
🟢🟢 点个关注不迷路🟢🟢 (≧◡≦) ♡
🥺拜托了欧尼酱,阿里嘎多 Thank you 高马斯密达💖
👇👇⬇️⬇️
| 哔哩哔哩|CSDN|Github|Gitcode|
| 传送门 | 传送门 | 传送门 | 传送门 |
> 一般CSDN会第一时间更新图文教程,后续会上传源码到Github和Gitcode上,最后再录视频教程发到哔哩哔哩,如果没时间的话可能不会录视频。
Uni App X 安卓本地离线打包
介绍:Uni App X 安卓本地离线打包喂饭教程
效果图片
🟢温馨提示:如果图片无法加载请前往国内Gitcode镜像仓库


代码地址
🟢温馨提示:如果图片无法加载请前往国内Gitcode镜像仓库
Github:https://github.com/BrokenDreamTech/UniAppxPack
Gitcode:https://gitcode.com/BrokenDreamTech/UniAppxPack
特性
Github Action一键打包,无需配置Android Studio配置
压缩混淆配置,打包"Hello" apk大小:7.7MB
HBuilder X 4.85
HBuilder X 4.87
环境
HBuilder X 4.87
Android Studio 2025.2.2
教程
视频教程
传送门:https://www.bilibili.com/video/BV1yW6oBeEqy
图文教程
- 使用HBuilder X打开你的uni-app x项目点击"工具栏"-"发行"-"App-Android/iOS-本地打包"-"生成本地App打包资源"
- 因为"此项目"已有一个示例uni-app x,所以先把示例项目资源删除(不要乱删文件):
- 删除"此项目"的"app/src/main/assets/apps"文件夹下的所有
- 删除"此项目"的"app/src/main/java"文件夹下的:"index.kt"文件和"pages"文件夹
- 将生成的" UNI XXXXXX"文件夹复制到"此项目"的"app/src/main/assets/apps"文件夹下
- 将生成的"uniappx/app-android/src"文件夹下的所有东西复制粘贴到"此项目"的"app/src/main/java"文件夹下
-
使用Android Studio打开"此项目",直接打包即可。
> 打包apk,在"此项目"的根目录打开命令行,执行:gradlew assembleRelease
一键打包 (不建议使用此方案,有构建时长限制,推荐自己按教程在本地打包)
- 下载或fork此项目,将仓库设置为私有(如果你不想公开你的项目),按照教程将uni-app x资源替换为自己的
- 将项目推送到Githab上,点击"Actions"-"Build Release",等待构建完成
- 构建完成后进入详情页,点击下载产物,下载后需解压
鸣谢
https://doc.dcloud.net.cn/uni-app-x/native/download/android.html
https://doc.dcloud.net.cn/uni-app-x/native/use/android.html
收起阅读 »sh: uni: command not found
uni-app 项目
遇到了 "sh: uni: command not found" 的错误。这通常与 uni-app 开发环境配置有关。
使用了 @dcloudio/uni-app 和相关依赖。uni 命令是 uni-app CLI 工具的一部分,但看起来没有正确安装或配置。
项目使用 pnpm 作为包管理器(有 pnpm-lock.yaml 文件),并且没有看到 node_modules 目录。这很可能是导致 uni 命令找不到的原因。
- 检查依赖是否已安装:
ls -la node_modules 2>/dev/null || echo "node_modules not found" - 全局安装 pnpm,然后安装项目依赖。
npm install -g pnpm - 因为在 uni-app 项目中,uni 命令通常是通过 npm scripts 运行的,而不是全局命令。让我检查 node_modules 中的 .bin 目录,并尝试通过 npx 或 pnpm 运行:
ls node_modules/.bin/ | grep uni - 检查 .bin 目录中的所有可执行文件:
ls node_modules/.bin/ - 看到 uni 命令确实存在于 node_modules/.bin/ 目录中。在 uni-app 项目中,正确的使用方式是通过 npm scripts 或者 npx/pnpm 来运行。让我测试一下:
pnpm run dev成功解决了 "sh: uni: command not found" 错误!问题的原因是项目依赖没有正确安装。
解决步骤:
安装了 pnpm 包管理器(全局安装)
使用 pnpm 安装了项目的所有依赖(共 1137 个包)
确认 uni-app CLI 工具已正确安装
当前状态:
✅ pnpm 10.27.0 已安装
✅ 项目依赖已全部安装完成
✅ uni-app 开发环境已配置完成
✅ 项目可以正常启动(pnpm run dev 成功运行)
使用说明:
在 uni-app 项目中,uni 命令不是全局命令,而是通过 npm scripts 调用的。你可以使用以下命令:
pnpm run dev - 启动开发模式(微信小程序)
pnpm run start - 同 dev 命令
pnpm run build - 构建生产版本
npx uni -p mp-weixin - 直接使用 uni 命令
项目现在正在运行中,编译已完成并进入监听模式。你可以打开微信开发者工具,导入 dist/dev/mp-weixin 目录来查看运行效果。
UniApp开发者的噩梦终结!4.3a被拒的5个致命错误与避坑指南
亲爱的UniApp开发者们! 你是否经历过这样的场景:深夜加班,代码写得飞起,满怀期待地将应用提交到App Store审核,结果第二天醒来,邮件里赫然写着“4.3被拒”?😭 那一刻,感觉整个世界都崩塌了,对吧?别担心,你并不孤单!今天,我将为你揭开4.3被拒的神秘面纱,并分享5个致命错误及避坑指南,让你从此告别审核噩梦,轻松过审!🎉
引言:UniApp的魅力与挑战
UniApp作为一个跨平台开发框架,凭借其“一次编写,多端运行”的承诺,吸引了无数开发者。它允许你用Vue.js语法开发应用,同时生成iOS、Android、小程序等多个平台的代码,大大提升了开发效率。🚀 然而,这种跨平台特性也带来了独特的挑战,尤其是在iOS审核方面。苹果的App Store审核团队对应用质量有着极高的要求,任何不符合指南的行为都可能触发4.3拒绝,即“重复或类似应用”的拒绝。🍏
4.3被拒的核心在于苹果认为你的应用与市场上已有应用过于相似,缺乏创新或独特性。这不仅影响应用的上线时间,还可能损害开发者声誉。但别慌,通过深入分析常见错误并采取预防措施,我们可以有效规避这些问题。💡
致命错误1:过度依赖云打包,忽视本地打包潜力
错误描述:云打包的便捷陷阱
许多UniApp开发者习惯使用云打包服务,因为它简单快捷,无需配置复杂的本地环境。云打包服务由UniApp官方提供,开发者只需上传代码,平台自动处理编译和打包,生成iOS和Android应用包。📦 这种模式非常适合快速迭代和测试,但正是这种“便捷性”埋下了4.3被拒的隐患。
云打包的局限性在于,它无法让开发者深入控制编译过程。例如,iOS应用在云打包时,某些代码或资源可能被编译到动态库中,而开发者无法直接干预这些细节。这可能导致应用在审核时,因代码结构或功能实现与市场上其他应用相似而被拒。🔍
案例分析:代码结构相似性引发的4.3
假设你开发了一个健康管理应用,使用云打包服务。由于云打包的通用性,你的应用可能与其他健康应用在代码结构上高度相似,例如都使用了相同的第三方库或相同的UI组件。苹果审核团队在对比市场应用时,可能认为你的应用缺乏原创性,从而触发4.3拒绝。🏥
避坑指南:转向本地打包,掌握控制权
要避免这一问题,你需要从云打包转向本地打包。本地打包允许你直接操作Xcode工程,深入控制编译过程。以下是具体步骤:
下载UniApp本地打包指南:访问UniApp官方文档,找到“开发环境 | uni小程序SDK”部分,获取详细的本地打包配置说明。📚
重新配置Xcode工程:在Xcode中打开UniApp提供的工程模板,按照指南配置项目设置,如签名证书、应用标识符等。🔧
理解编译产物:使用工具如otool和size分析可执行文件,了解哪些代码被编译到主程序,哪些被放到动态库。这帮助你识别潜在的相似性风险。📊
自定义编译选项:在Xcode中调整编译设置,如优化代码混淆、删除不必要的第三方库,减少与市场应用的代码重叠。⚙️
通过本地打包,你不仅能避免4.3拒绝,还能提升应用性能,因为你可以优化资源加载和代码执行效率。💪
实际操作:从云到本的迁移步骤
备份云打包代码:在迁移前,确保备份所有云打包相关的代码和资源,以防数据丢失。💾
安装Xcode和依赖工具:确保你的开发环境安装了最新版本的Xcode和必要的命令行工具,如xcode-select。🍎
导入UniApp工程:将UniApp的本地打包工程导入Xcode,检查并修复任何编译错误。📥
测试和验证:在iOS模拟器或设备上测试应用,确保所有功能正常运行,尤其是那些在云打包中可能被忽略的细节。📱
致命错误2:忽视平台差异,代码“一锅炖”
错误描述:跨平台开发的“通用”陷阱
UniApp的跨平台特性鼓励开发者编写通用代码,但这也可能导致应用在不同平台上表现不佳,尤其在iOS上。例如,开发者可能使用JavaScript的window对象或特定Web API,这些在iOS的WebView中可能无法正常工作,或在审核时暴露平台差异,引发4.3拒绝。🌐
案例分析:平台特定API的误用
考虑一个登录页面,开发者使用了window.location.href进行页面跳转。在iOS的WebView中,此行为可能与原生应用导航不兼容,导致用户体验断裂。苹果审核团队可能认为应用缺乏平台一致性,从而拒绝应用。🔗
避坑指南:利用条件编译,精准适配
UniApp提供了条件编译指令,允许你为不同平台编写特定代码。以下是具体方法:
使用条件编译指令:在代码中使用#ifdef、#ifndef等指令,根据平台(iOS、Android等)编写特定逻辑。例如:
javascript
Copy Code
// #ifdef APP-PLUS
// iOS特定的代码
// #endif
平台特定API替换:避免使用跨平台不兼容的API,如window对象。改用UniApp提供的跨平台API,如uni.navigateTo进行页面跳转。📲
测试多平台兼容性:在开发过程中,频繁在iOS和Android模拟器上测试应用,确保所有功能在不同平台表现一致。🔍
实际操作:条件编译示例
创建平台特定页面:在UniApp项目中,为iOS和Android创建不同版本的页面,使用条件编译指令控制加载。例如:
vue
Copy Code
<template>
<view>
<!-- #ifdef APP-PLUS -->
<iOS-specific-component />
<!-- #endif -->
<!-- #ifdef MP-ALIPAY -->
<Android-specific-component />
<!-- #endif -->
</view>
</template>
使用UniApp API:在JavaScript逻辑中,优先使用UniApp的跨平台API,如uni.request替代原生XMLHttpRequest,确保行为一致性。📡
致命错误3:误用第三方插件,引入代码冲突
错误描述:第三方插件的兼容性风险
UniApp生态中的第三方插件提供了丰富功能,但它们的兼容性和代码质量参差不齐。某些插件可能包含与iOS审核指南冲突的代码,如使用私有API或实现类似市场应用的功能,导致4.3拒绝。🔌
案例分析:插件引发的功能相似性
假设你集成了一个广告插件,该插件在iOS上使用了非公开的广告SDK,或广告展示方式与市场应用高度相似。苹果审核团队可能认为应用缺乏创新,从而拒绝应用。📺
避坑指南:插件审核与替代方案
插件审核:在集成前,使用工具如otool分析插件生成的代码,检查是否有私有API或敏感操作。📝
选择高质量插件:优先选择官方推荐或社区评价高的插件,避免使用来源不明的插件。🌟
自定义功能实现:对于关键功能,考虑自行实现而非依赖插件,减少代码相似性风险。💡
实际操作:插件集成步骤
插件市场调研:在UniApp插件市场浏览插件,阅读用户评价和更新日志,选择活跃维护的插件。🛒
代码分析:集成插件后,在Xcode中分析编译产物,使用nm命令检查符号表,确保无私有API引用。🔬
测试广告功能:在iOS设备上测试广告展示,确保广告策略(如位置、频率)符合苹果指南,避免与市场应用雷同。📊
致命错误4:忽视元数据优化,信息不准确
错误描述:元数据与应用的“身份”错位
应用元数据(如应用名称、描述、图标)是审核团队的第一印象。不准确或误导性的元数据可能触发4.3拒绝,因为苹果认为应用与描述不符,缺乏独特性。📝
案例分析:元数据不匹配引发的拒绝
假设你的应用名称是“健康助手”,但实际功能仅限于计步,而市场上有许多类似应用。苹果可能认为名称误导用户,或应用功能与市场应用重叠,从而拒绝应用。🏃
避坑指南:元数据优化策略
名称独特性:选择不常见的名称,避免使用通用词汇,如“工具”、“助手”。🎨
描述准确性:在应用描述中明确核心功能,避免夸大或模糊表述。📖
图标创新:设计独特图标,避免与市场应用雷同,使用工具如Canva创建原创设计。🖼️
实际操作:元数据优化步骤
市场调研:在App Store搜索关键词,分析竞品元数据,确保你的应用名称和描述独树一帜。🔍
描述撰写:编写清晰、简洁的应用描述,突出核心功能和用户价值,避免技术术语堆砌。✍️
图标设计:使用设计工具创建图标,确保颜色、形状和风格与竞品区分,提交前进行多设备预览。📱
致命错误5:代码混淆不足,暴露核心逻辑
错误描述:代码混淆的“透明”风险
代码混淆是保护应用核心逻辑不被逆向工程的关键。未混淆的代码可能在审核时被苹果团队分析,暴露与市场应用的相似性,触发4.3拒绝。🔐
案例分析:代码暴露引发的拒绝
假设你的应用使用了未混淆的JavaScript代码,包含通用算法或UI逻辑。苹果审核团队可能通过代码分析,认为应用功能与市场应用相似,从而拒绝应用。📜
避坑指南:代码混淆与加固
使用ProGuard(Android)和R8(iOS):在本地打包配置中启用代码混淆工具,删除无用代码、重命名类和变量。🛡️
自定义混淆规则:设置混淆规则,保护核心算法和业务逻辑,避免过度混淆导致应用崩溃。⚙️
测试混淆效果:在混淆后,在模拟器和设备上测试应用,确保功能正常运行,监控性能影响。📊
实际操作:代码混淆步骤
配置混淆工具:在UniApp的本地打包工程中,找到混淆配置选项,启用ProGuard或R8。🔧
设置规则文件:创建自定义混淆规则文件,指定需要保护的类和变量,避免过度混淆。📝
测试与验证:混淆后,执行全面测试,包括功能测试和性能测试,确保应用稳定。✅
总结与行动号召
亲爱的UniApp开发者,通过深入分析这5个致命错误,你现在掌握了避免4.3被拒的关键策略。从云打包转向本地打包,精准适配平台差异,谨慎选择第三方插件,优化元数据,以及强化代码混淆,这些步骤将显著提升你的应用过审概率。🚀
立即行动,告别审核噩梦! 如果你觉得这篇指南有价值,请转发给其他UniApp开发者,帮助他们避免同样的陷阱。💌 同时,欢迎在评论区分享你的审核故事或提问,让我们一起在UniApp开发的道路上越走越顺!🎉
收起阅读 »uniapp专用ipa上传工具苹果ios上架审核提包ipa防关联windows版
# iOSUploader
ipa ios review审核上架提包Transporter for window 防关联
1.最新下载地址
ipa Transporter for window - iOSUploader

2.首次打开软`件报错,需要安装微软官方.NET 8.0 Core下载地址:
https://builds.dotnet.microsoft.com/dotnet/WindowsDesktop/8.0.22/windowsdesktop-runtime-8.0.22-win-x64.exe
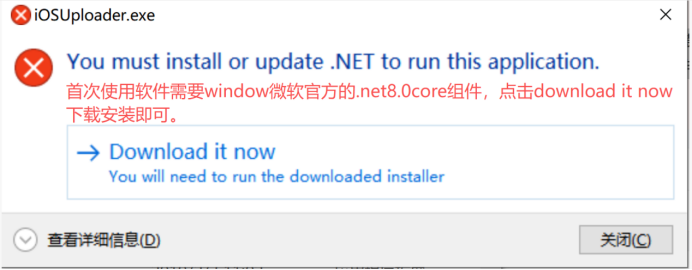
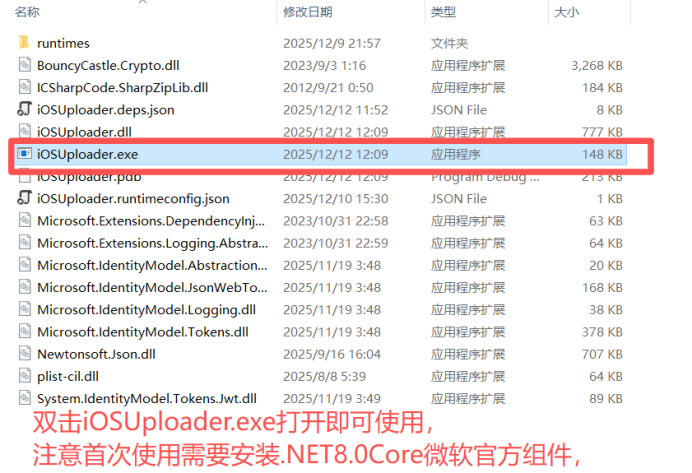
3.打开文件夹里iOSUploader.exe主程序就可以使用了
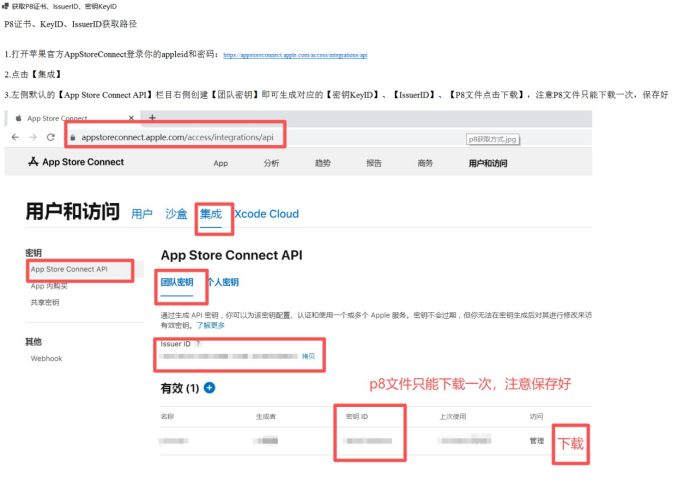
4.配置IssuerID、密钥KeyID、p8格式的证书路径
具体获取地址苹果官方入口,https://appstoreconnect.apple.com/access/integrations/api
登录你的苹果开发者id和密码,【顶部集成】->【左侧的App Store Connect API】->【右侧团队密钥加号】就有了,p8文件只能下载一次,注意保存好;
比市面上Appleid和密码登录方式更加安全,不泄露密码,也防止了一台电脑多个appleid账户登录的问题

5. ipa上传到AppStore Connect中心准备提交审核
第一步:点击选择ipa按钮,选择打包签名好的ipa文件,然后程序会自动解析出来AppStoreConnect管理里的App ID
第二步:点击上传IPA按钮,进度条走到头就上传成功了。

6. 证书管理
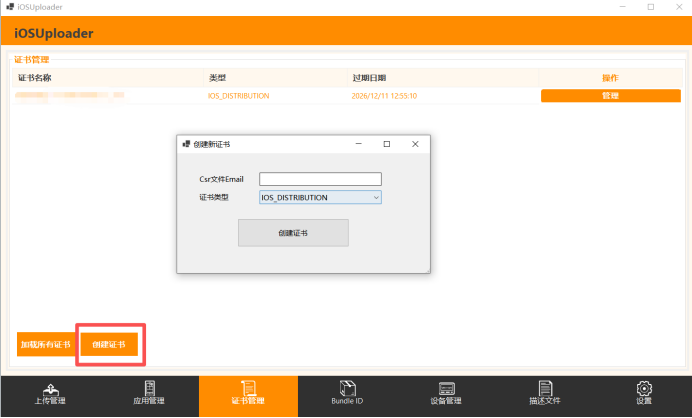
可以创建证书,包括开发develope、发布上架distribute证书,证书右侧点击管理栏目,可以下载或者撤销当前证书

输入Email创建证书
7. 包名BundleIdentifier管理

点击【左下角创建Bundle】、每行的【管理】按钮可以弹出来创建更新框
8. 设备DeviceID管理
快速录入需要调试开发的苹果设备deviceid

查看每个设备deviceid
9. 描述文件mobileprovision管理
轻松快速新建和下载打包需要的描述文件

快速创建描述文件,选择包名、证书、设备udid,
10. AppStoreConnect的App管理
在这里可以快速的查看当前苹果开发者账号下的所有app和详情信息,

快速批量上传app对应每种语言的多种尺寸预览图,快捷实用

快速查看、更新app的基本信息,包括版本号、版权信息、内容版权声明、主要语言等

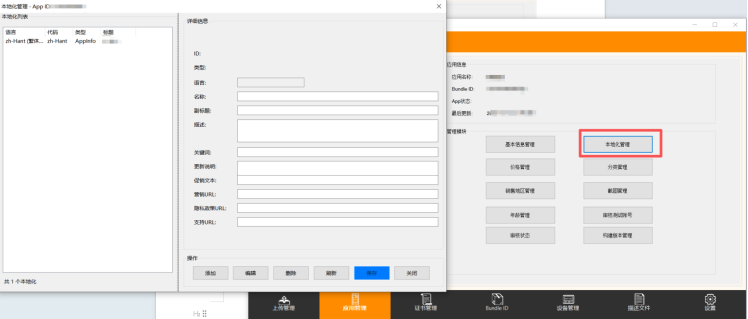
本地化管理,快速查看更新多语言下的app详细信息,
包括每种语言的,app名称、副标题
描述、关键词、更新内容、营销URL、隐私政策URL、技术支持URL等信息
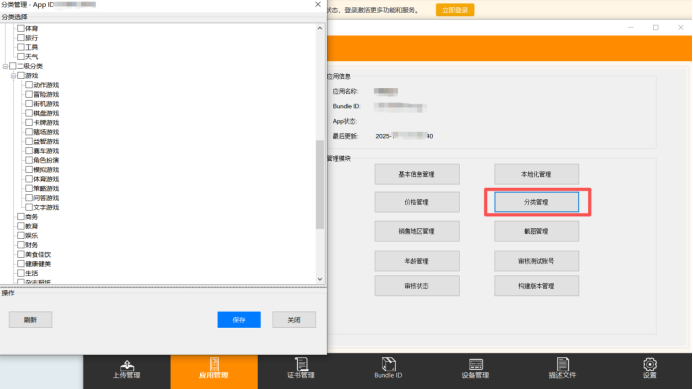
快速更新查看app的分类
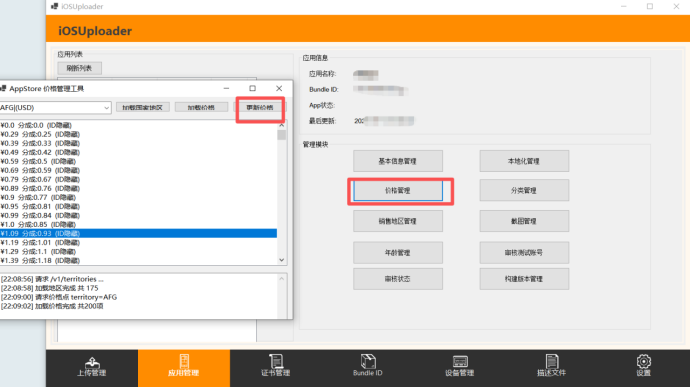
快速更新查看当前app的销售价格
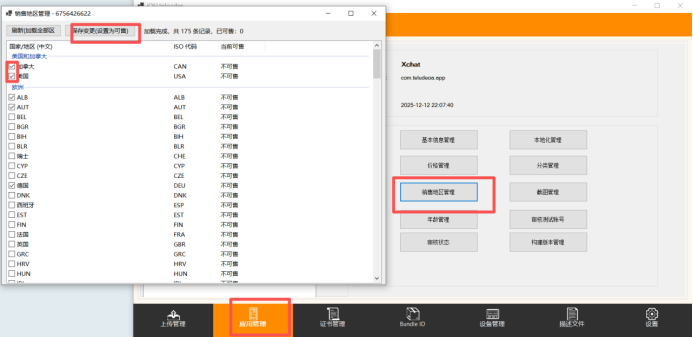
快速查看更新app的销售国家和地区
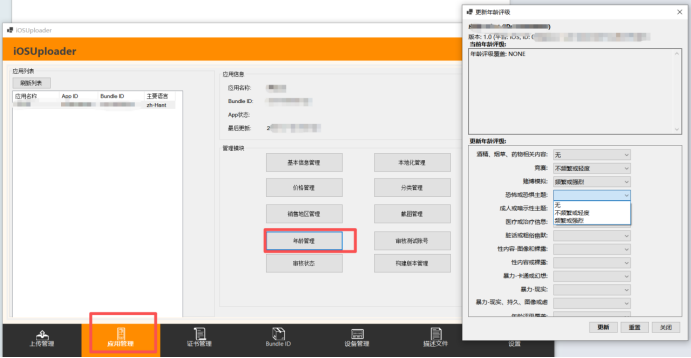
快速更新查看app的年龄管理
# iOSUploader
ipa ios review审核上架提包Transporter for window 防关联
1.最新下载地址
ipa Transporter for window - iOSUploader

2.首次打开软`件报错,需要安装微软官方.NET 8.0 Core下载地址:
https://builds.dotnet.microsoft.com/dotnet/WindowsDesktop/8.0.22/windowsdesktop-runtime-8.0.22-win-x64.exe

3.打开文件夹里iOSUploader.exe主程序就可以使用了

4.配置IssuerID、密钥KeyID、p8格式的证书路径
具体获取地址苹果官方入口,https://appstoreconnect.apple.com/access/integrations/api
登录你的苹果开发者id和密码,【顶部集成】->【左侧的App Store Connect API】->【右侧团队密钥加号】就有了,p8文件只能下载一次,注意保存好;
比市面上Appleid和密码登录方式更加安全,不泄露密码,也防止了一台电脑多个appleid账户登录的问题


5. ipa上传到AppStore Connect中心准备提交审核
第一步:点击选择ipa按钮,选择打包签名好的ipa文件,然后程序会自动解析出来AppStoreConnect管理里的App ID
第二步:点击上传IPA按钮,进度条走到头就上传成功了。

6. 证书管理
可以创建证书,包括开发develope、发布上架distribute证书,证书右侧点击管理栏目,可以下载或者撤销当前证书

输入Email创建证书

7. 包名BundleIdentifier管理

点击【左下角创建Bundle】、每行的【管理】按钮可以弹出来创建更新框
8. 设备DeviceID管理
快速录入需要调试开发的苹果设备deviceid

查看每个设备deviceid
9. 描述文件mobileprovision管理
轻松快速新建和下载打包需要的描述文件

快速创建描述文件,选择包名、证书、设备udid,
10. AppStoreConnect的App管理
在这里可以快速的查看当前苹果开发者账号下的所有app和详情信息,

快速批量上传app对应每种语言的多种尺寸预览图,快捷实用

快速查看、更新app的基本信息,包括版本号、版权信息、内容版权声明、主要语言等

本地化管理,快速查看更新多语言下的app详细信息,
包括每种语言的,app名称、副标题
描述、关键词、更新内容、营销URL、隐私政策URL、技术支持URL等信息

快速更新查看app的分类

快速更新查看当前app的销售价格

快速查看更新app的销售国家和地区

快速更新查看app的年龄管理


