


Uniappx 离线打包配置
Uniapp-x的离线打包
准备(我的配置)
-
HBuilder X (4.29版本及以上)
-
uniapp x SDK (4.29),是uniapp x的SDK,不要跟uniapp的搞混了,下载地址Uniapp x SDK
-
android studio (2023/2024都行)
其它:gradle版本为8.7。gradle插件版本为8.6.0。kotlin插件版本为1.9.0
1. 新建一个Android空项目
打开 android studio,点击顶部的 New Project –> Phone And Tablet –> No Activity,如下图:出现下面的界面

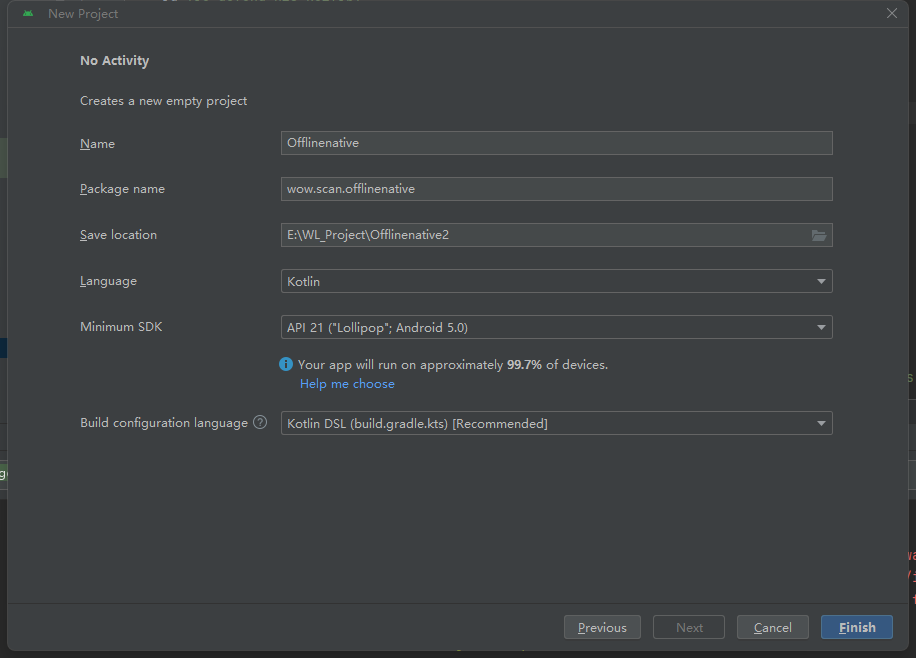
- Name 是你的项目名称
- Package name是你的包名
- Language 要选择 Kotlin
- Min Sdk 建议21
点击Finsh,这是空项目模板
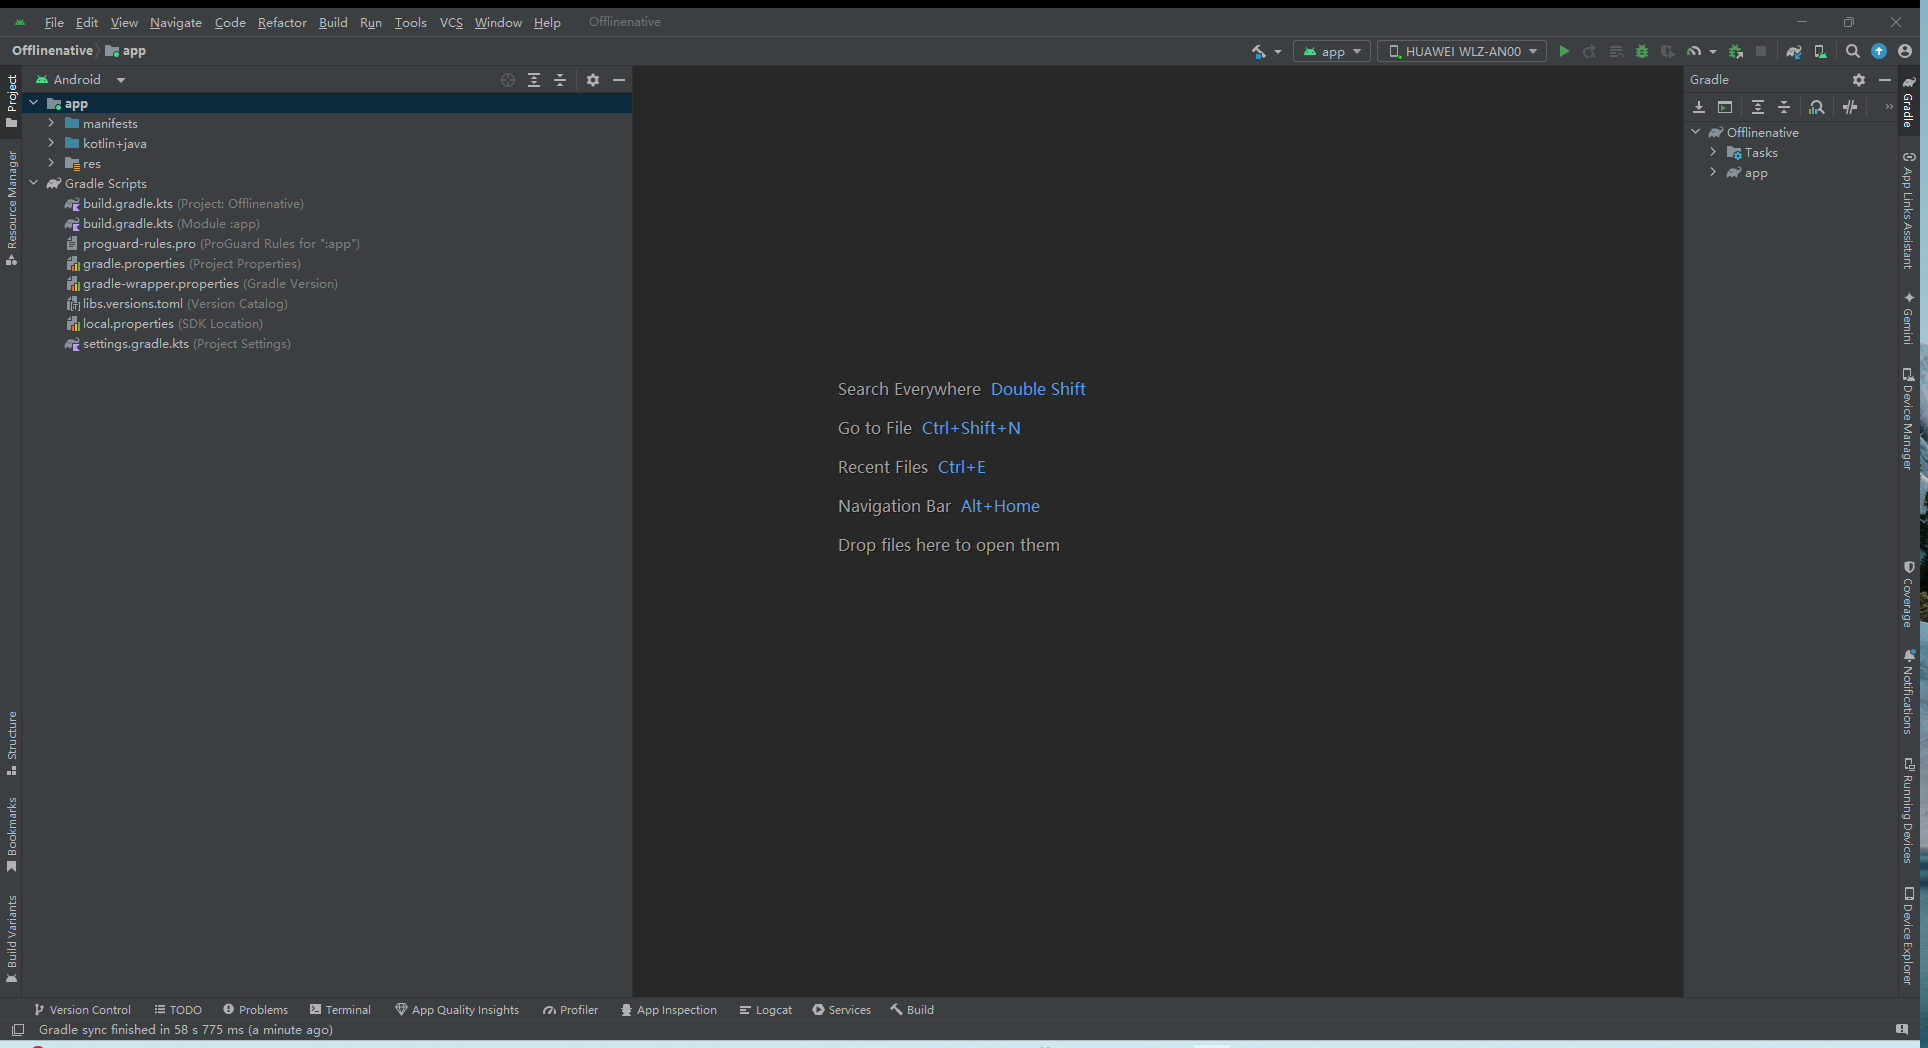
我这里是gradle构建之后的目录,后面的都是基于构建完成的
- 一般称app为主模块,它下面的 build.gradle.kts 是主模块的编译配置文件,也是项目级别的编译配置文件,一定要跟其它的区分开来
下面的步骤就是跟官网一致了!
2. 新建uni-app x模块
点击File->New->New Module...
点击左侧Templates的Android Library。
Language选择Kotlin。
Module name建议设置为uniappx。
点击Finish。
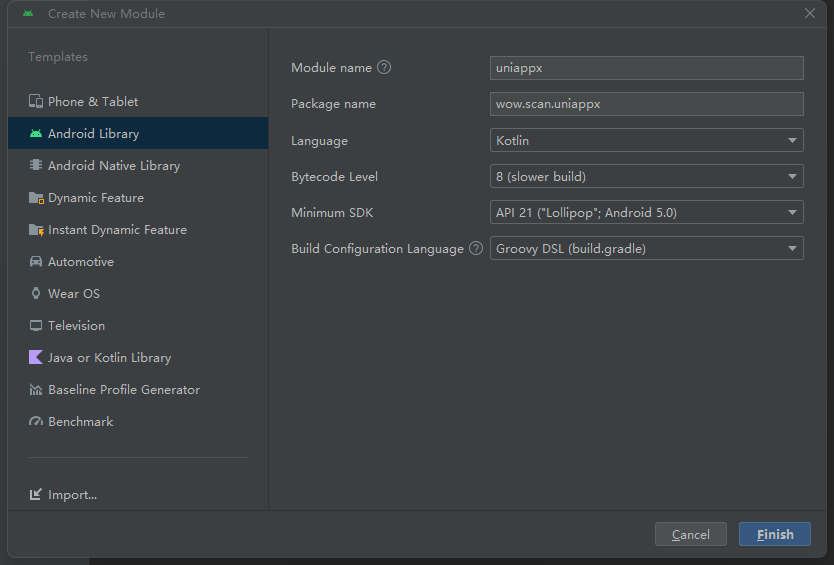
构建之后会多出一个uniappx目录
基础库配置
- 在uni-app x模块下新建目录
libs,跟src同级别 ,将uts-runtime-release.aar,android-gif-drawable-1.2.28.aar,app-common-release.aar,app-runtime-release.aar,breakpad-build-release.aar,dcloud-layout-release.aar, framework-release.aar,uni-exit-release.aar,uni-getAccessibilityInfo-release.aar,uni-getAppAuthorizeSetting-release.aar,uni-getAppBaseInfo-release.aar, uni-getSystemSetting-release.aar,uni-openAppAuthorizeSetting-release.aar,uni-prompt-release.aar,uni-storage-release.aar,uni-getDeviceInfo-release.aar, uni-getSystemInfo-release.aar,uni-rpx2px-release.aar,uni-theme-release.aar共19个aar拷贝到libs下,参考下图

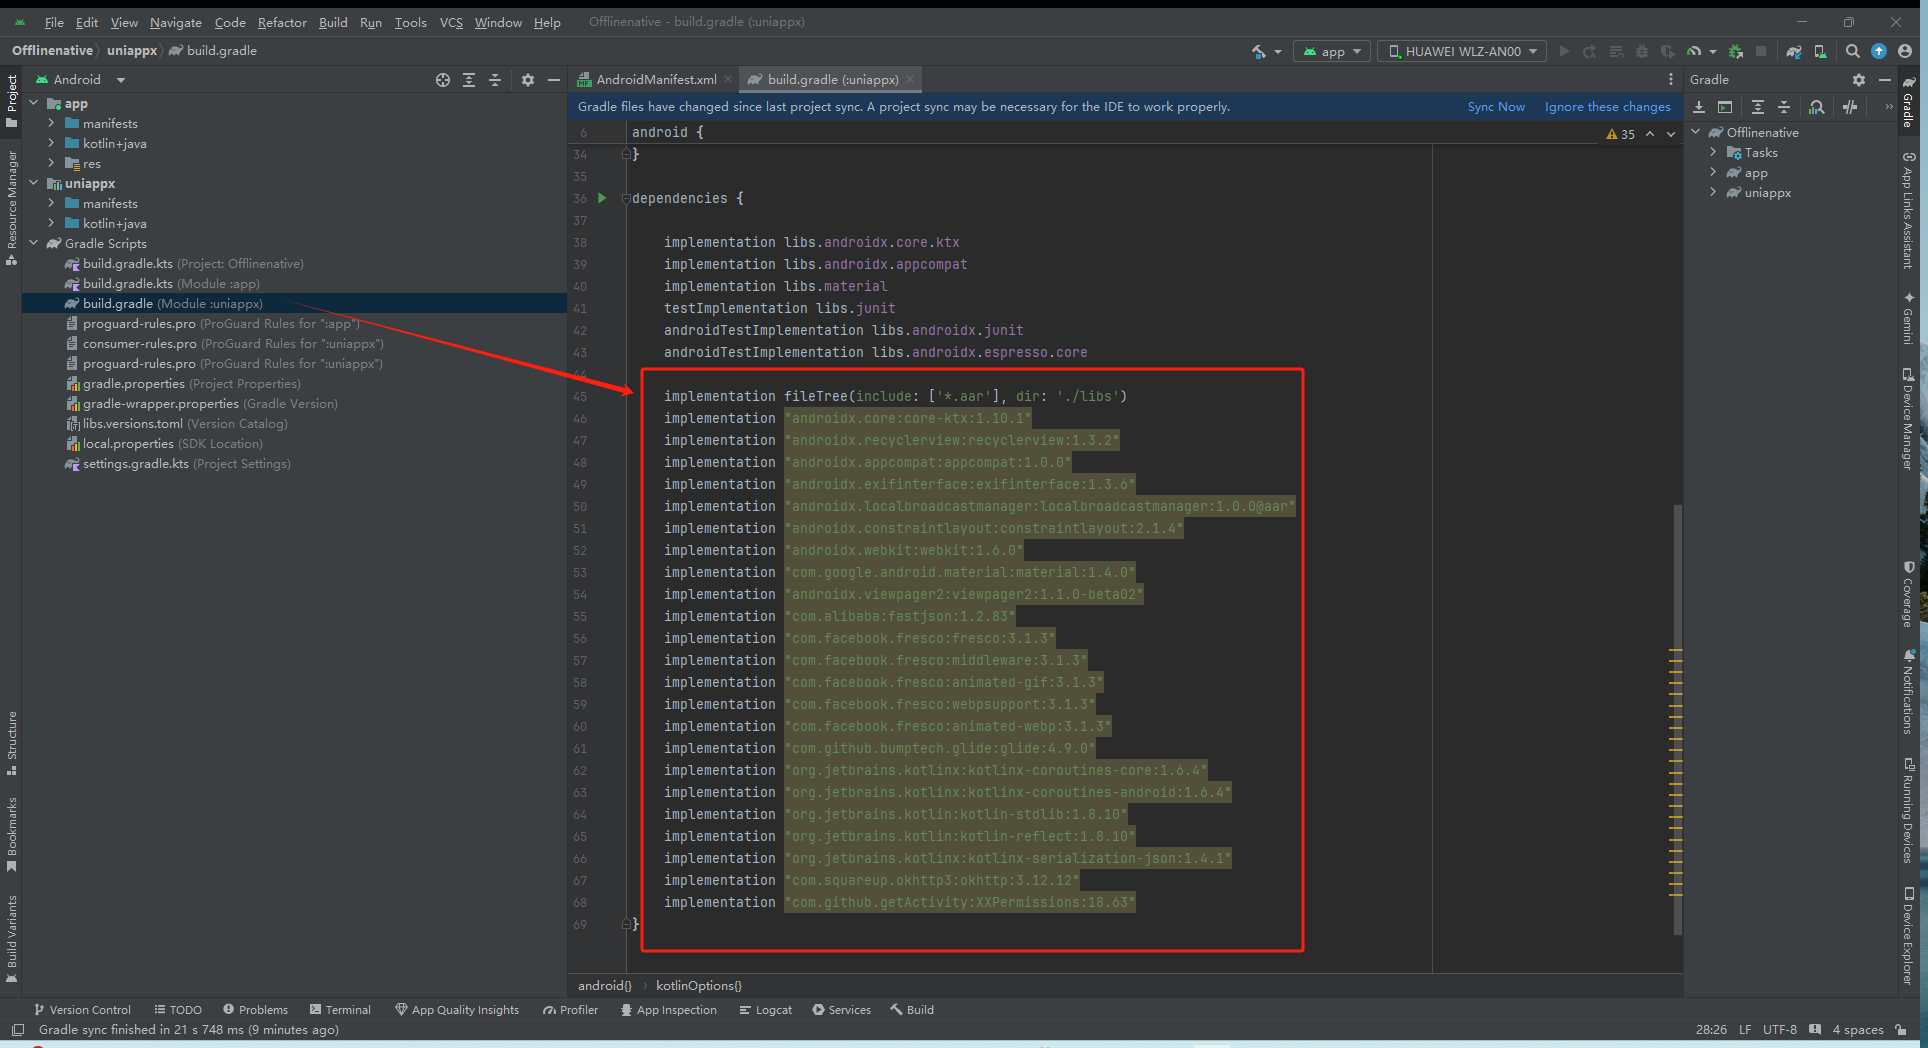
修改uniappx模块下的build.gradle
- 添加依赖
将下面的依赖信息添加到build.gradle中
dependencies {
    ···
    implementation fileTree(include: ['*.aar'], dir: './libs')
    implementation "androidx.core:core-ktx:1.10.1"
    implementation "androidx.recyclerview:recyclerview:1.3.2"
    implementation "androidx.appcompat:appcompat:1.0.0"
    implementation "androidx.exifinterface:exifinterface:1.3.6"
    implementation "androidx.localbroadcastmanager:localbroadcastmanager:1.0.0@aar"
    implementation "androidx.constraintlayout:constraintlayout:2.1.4"
    implementation "androidx.webkit:webkit:1.6.0"
    implementation "com.google.android.material:material:1.4.0"
    implementation "androidx.viewpager2:viewpager2:1.1.0-beta02"
    implementation "com.alibaba:fastjson:1.2.83"
    implementation "com.facebook.fresco:fresco:3.1.3"
    implementation "com.facebook.fresco:middleware:3.1.3"
    implementation "com.facebook.fresco:animated-gif:3.1.3"
    implementation "com.facebook.fresco:webpsupport:3.1.3"
    implementation "com.facebook.fresco:animated-webp:3.1.3"
    implementation "com.github.bumptech.glide:glide:4.9.0"
    implementation "org.jetbrains.kotlinx:kotlinx-coroutines-core:1.6.4"
    implementation "org.jetbrains.kotlinx:kotlinx-coroutines-android:1.6.4"
    implementation "org.jetbrains.kotlin:kotlin-stdlib:1.8.10"
    implementation "org.jetbrains.kotlin:kotlin-reflect:1.8.10"
    implementation "org.jetbrains.kotlinx:kotlinx-serialization-json:1.4.1"
    implementation "com.squareup.okhttp3:okhttp:3.12.12"
    implementation "com.github.getActivity:XXPermissions:18.63"
}
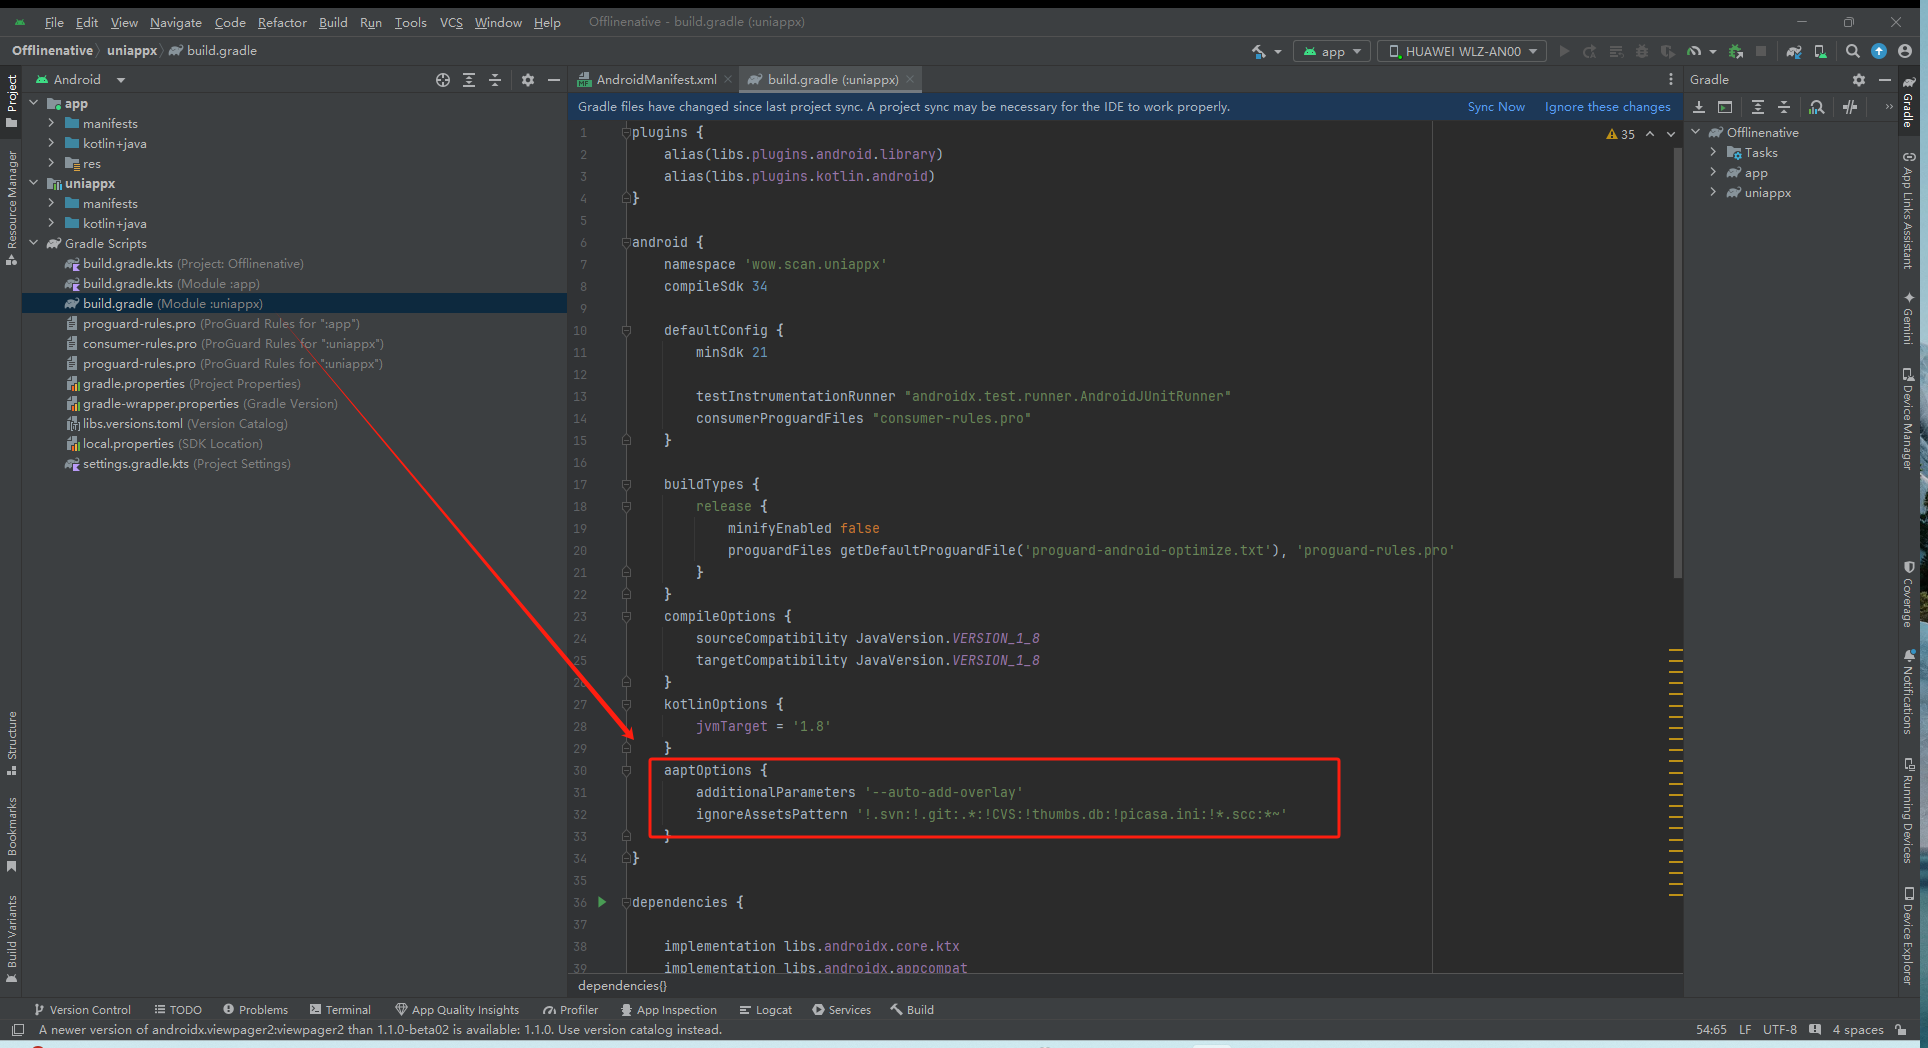
- 添加aaptOptions配置
将aaptOptions配置添加到android节点下
aaptOptions {
    additionalParameters '--auto-add-overlay'
    ignoreAssetsPattern '!.svn:!.git:.*:!CVS:!thumbs.db:!picasa.ini:!*.scc:*~'
}
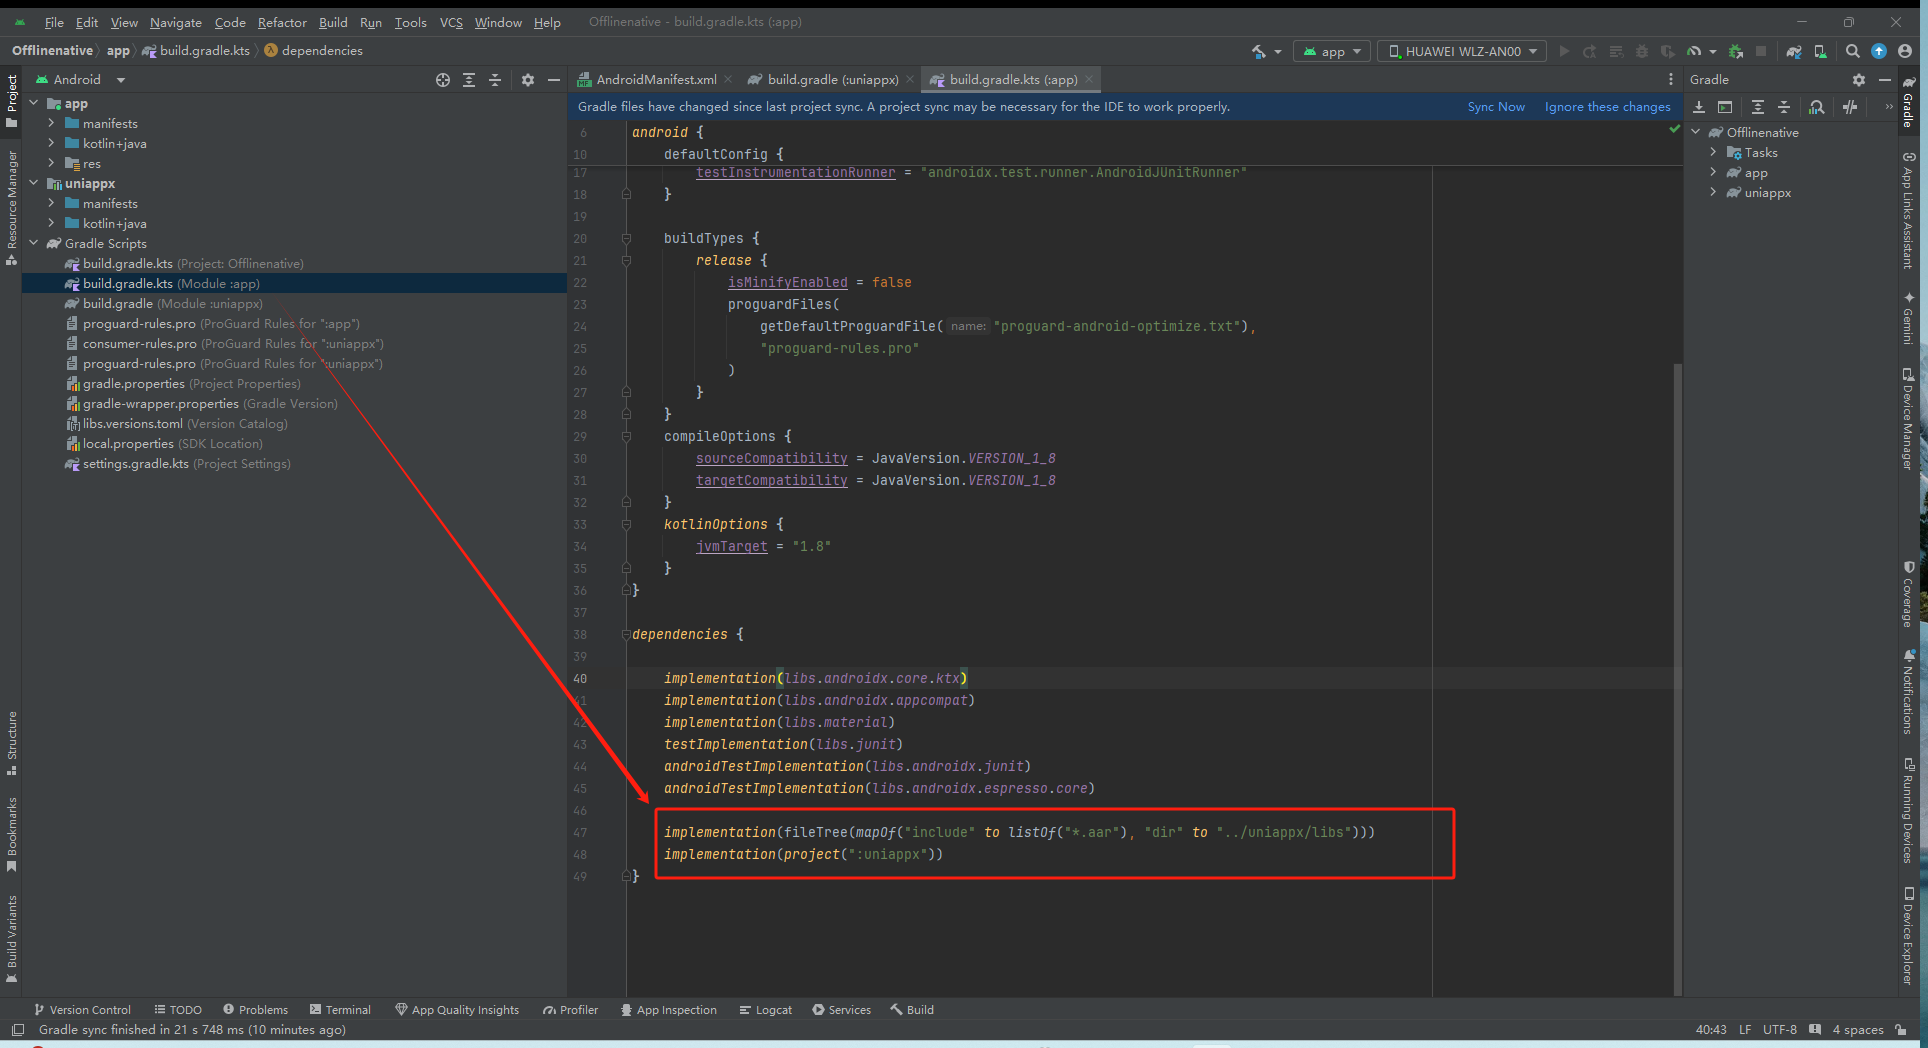
- 修改app主模块的配置(不要漏掉了)
在build.gradle的dependencies节点添加下面两行
implementation(fileTree(mapOf("include" to listOf("*.aar"), "dir" to "../uniappx/libs")))
implementation(project(":uniappx"))
配置gradle插件
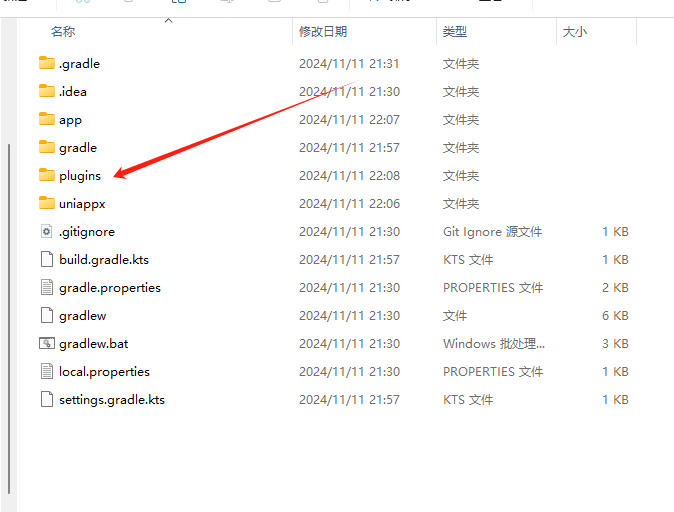
1.下载的SDK压缩包里面有一个plugins文件,将它复制到你的项目根目录
2.在项目根目录的build.gradle的顶部添加gradle插件的依赖
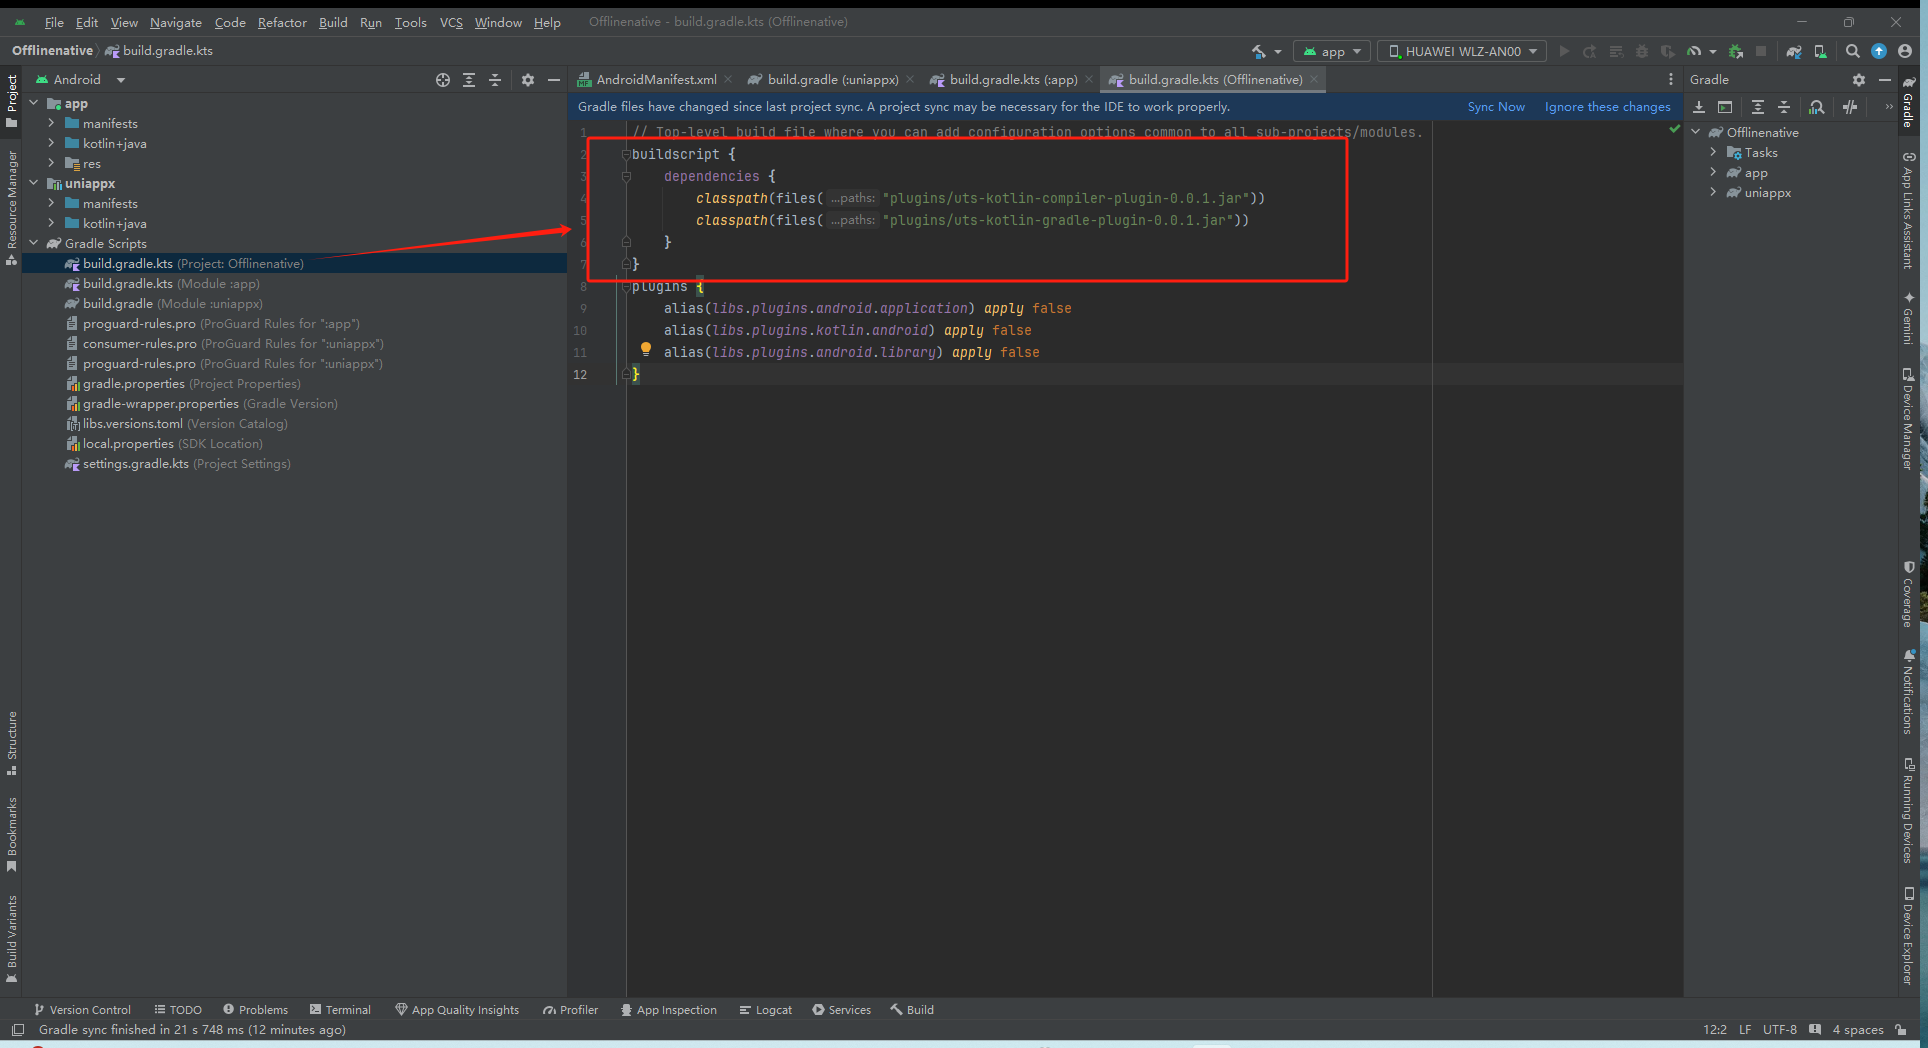
buildscript {
    dependencies {
        classpath(files("plugins/uts-kotlin-compiler-plugin-0.0.1.jar"))
        classpath(files("plugins/uts-kotlin-gradle-plugin-0.0.1.jar"))
    }
}- 然后在uniappx模块的build.gradle下添加插件io.dcloud.uts.kotlin的依赖
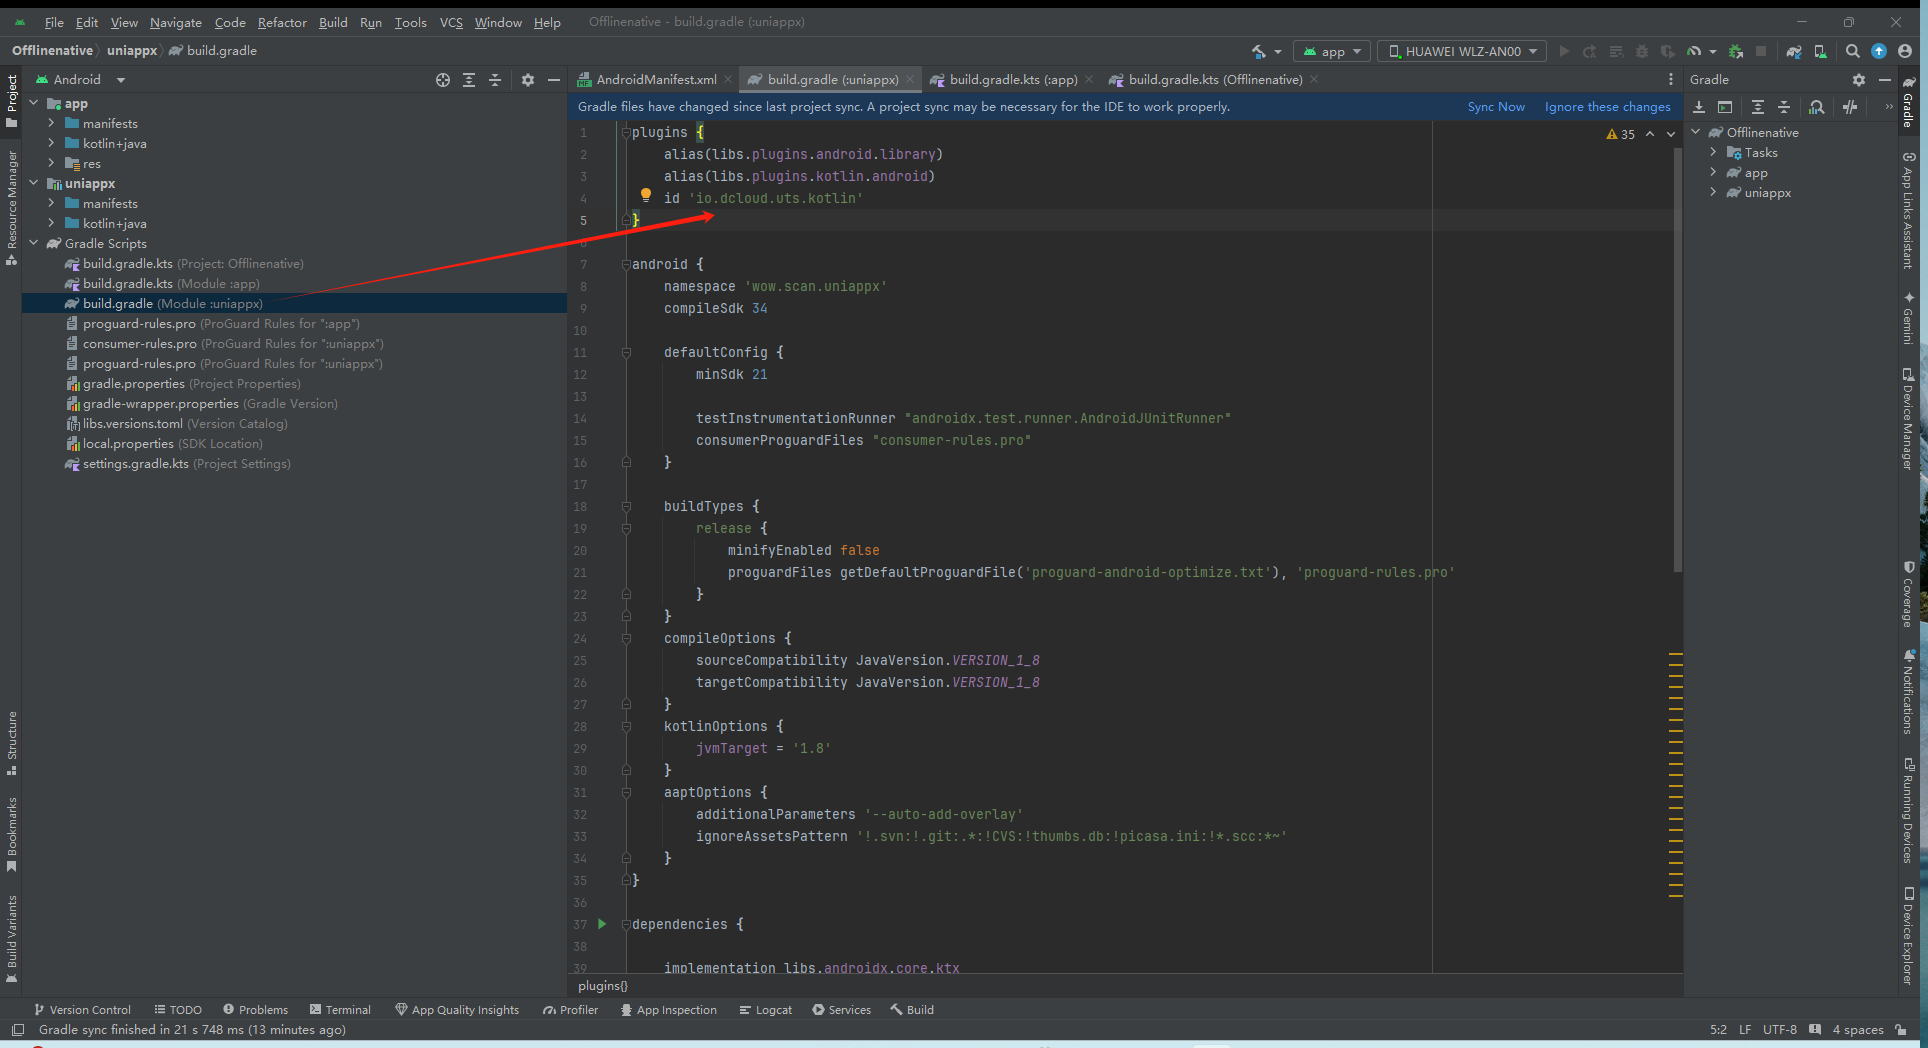
plugins {
    ...
    id 'io.dcloud.uts.kotlin'
}
修改项目的settings.gradle
- 在项目根路径下的settings.gradle中添加jitpack的maven的仓库地址和本地gradle插件的路径配置
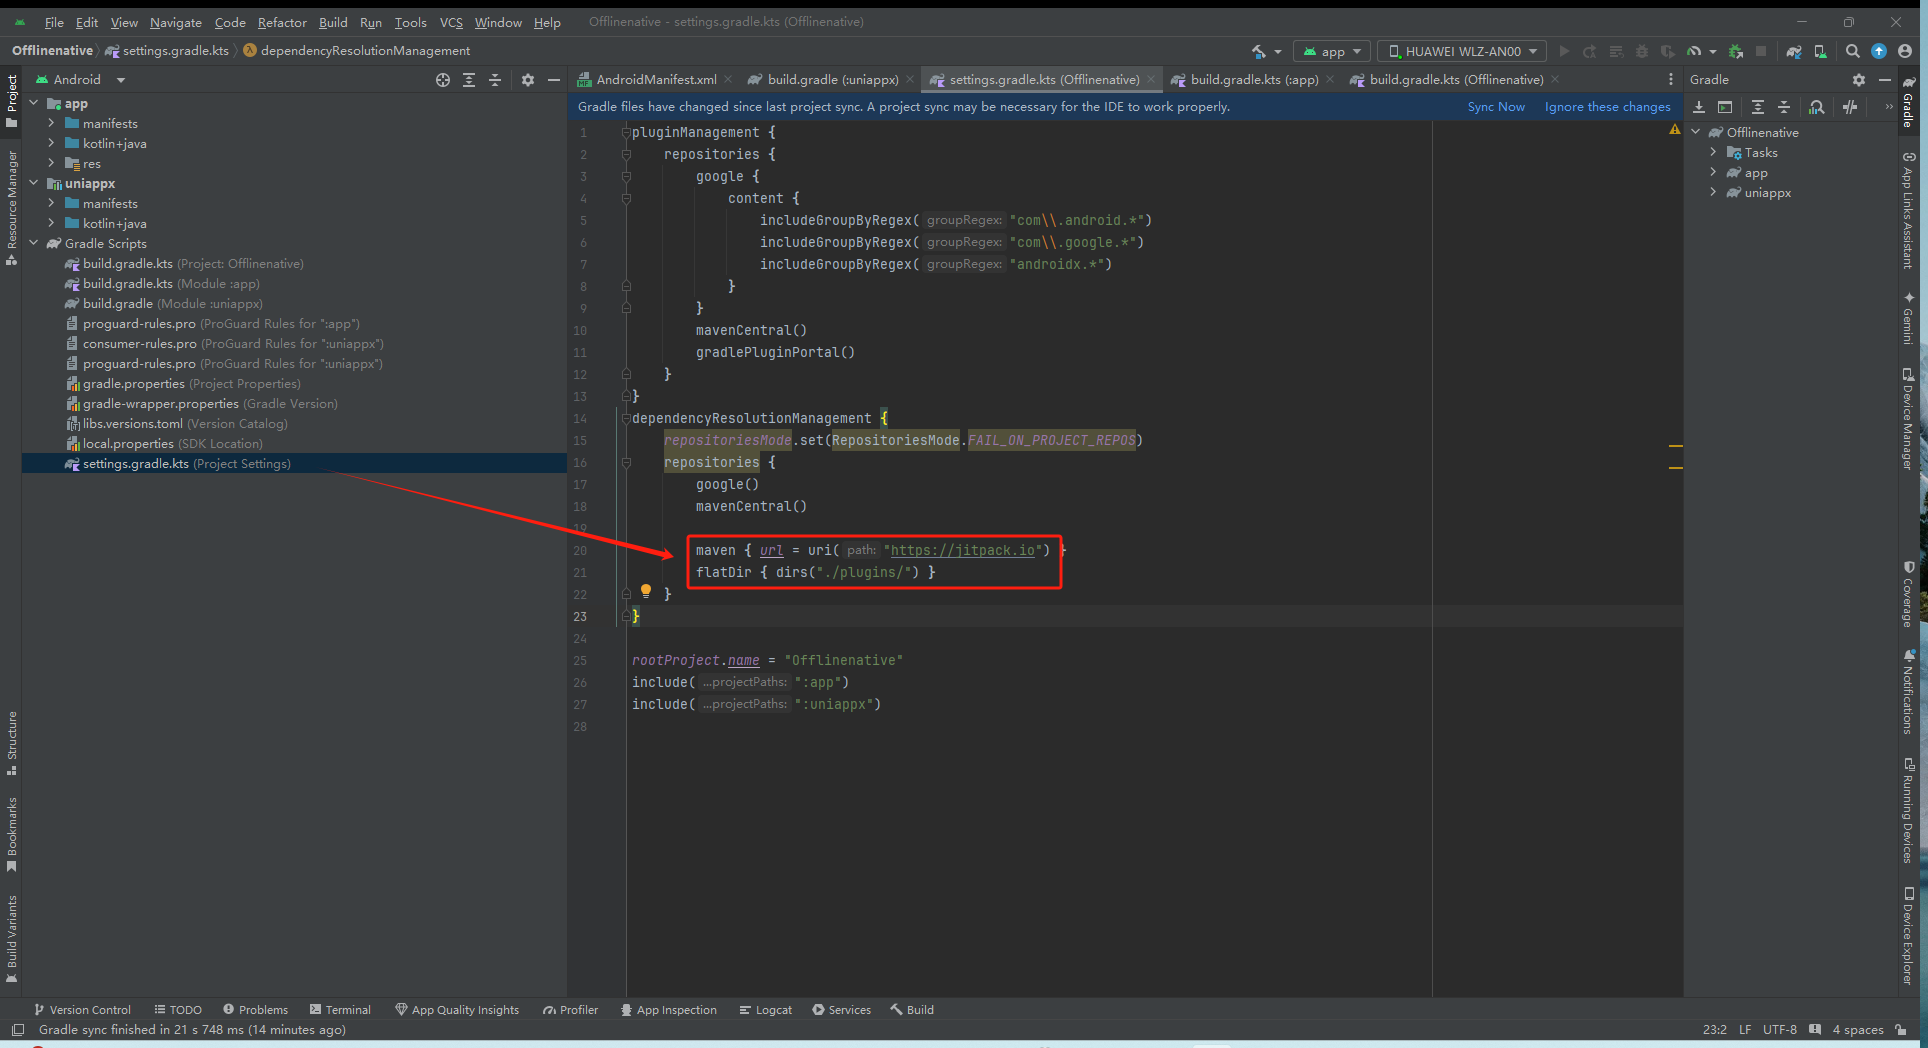
dependencyResolutionManagement {
    repositoriesMode.set(RepositoriesMode.FAIL_ON_PROJECT_REPOS)
    repositories {
        ...
        maven { url = uri("https://jitpack.io") }
        flatDir { dirs('./plugins/') }
    }
}
修改项目的gradle.properties
- 在项目根路径下的gradle.properties中追加如下内容
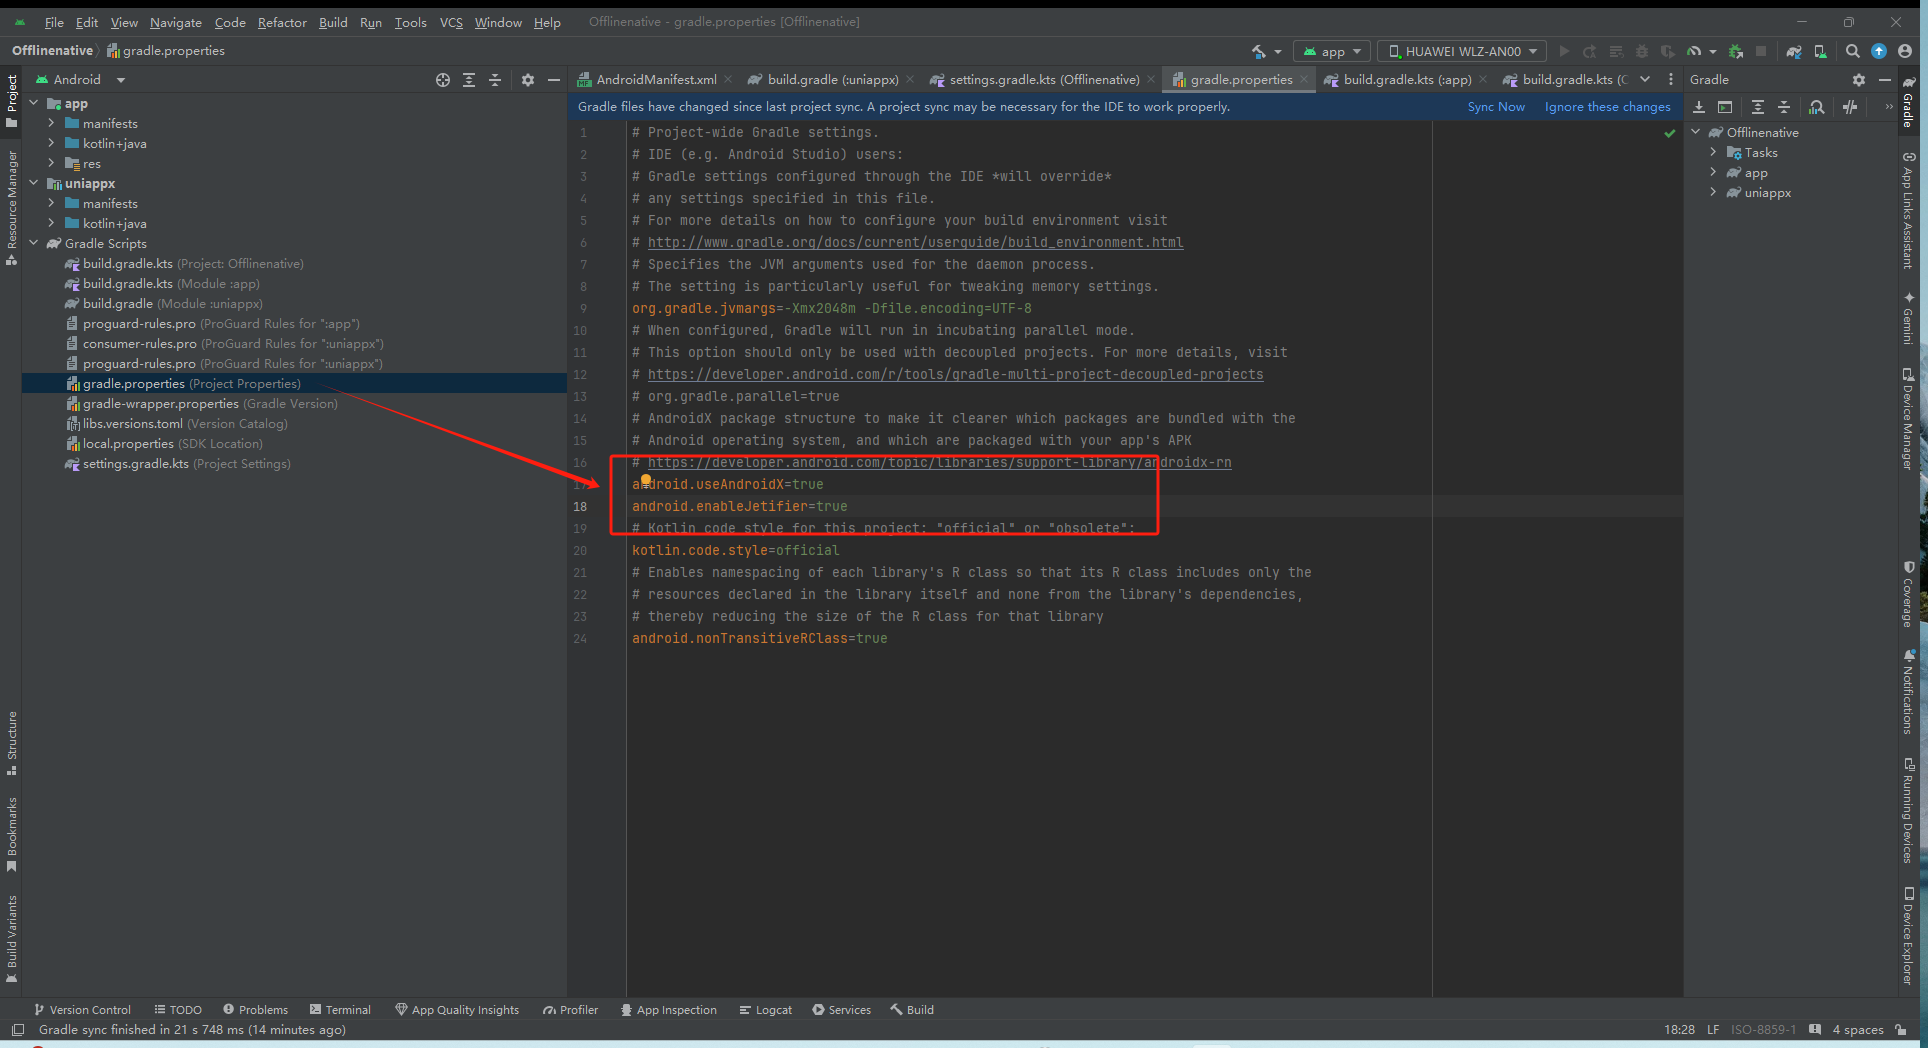
android.useAndroidX=true
android.enableJetifier=true
修改app主模块下的AndroidManifest.xml
- 添加activity,将下面内容拷贝到application节点下
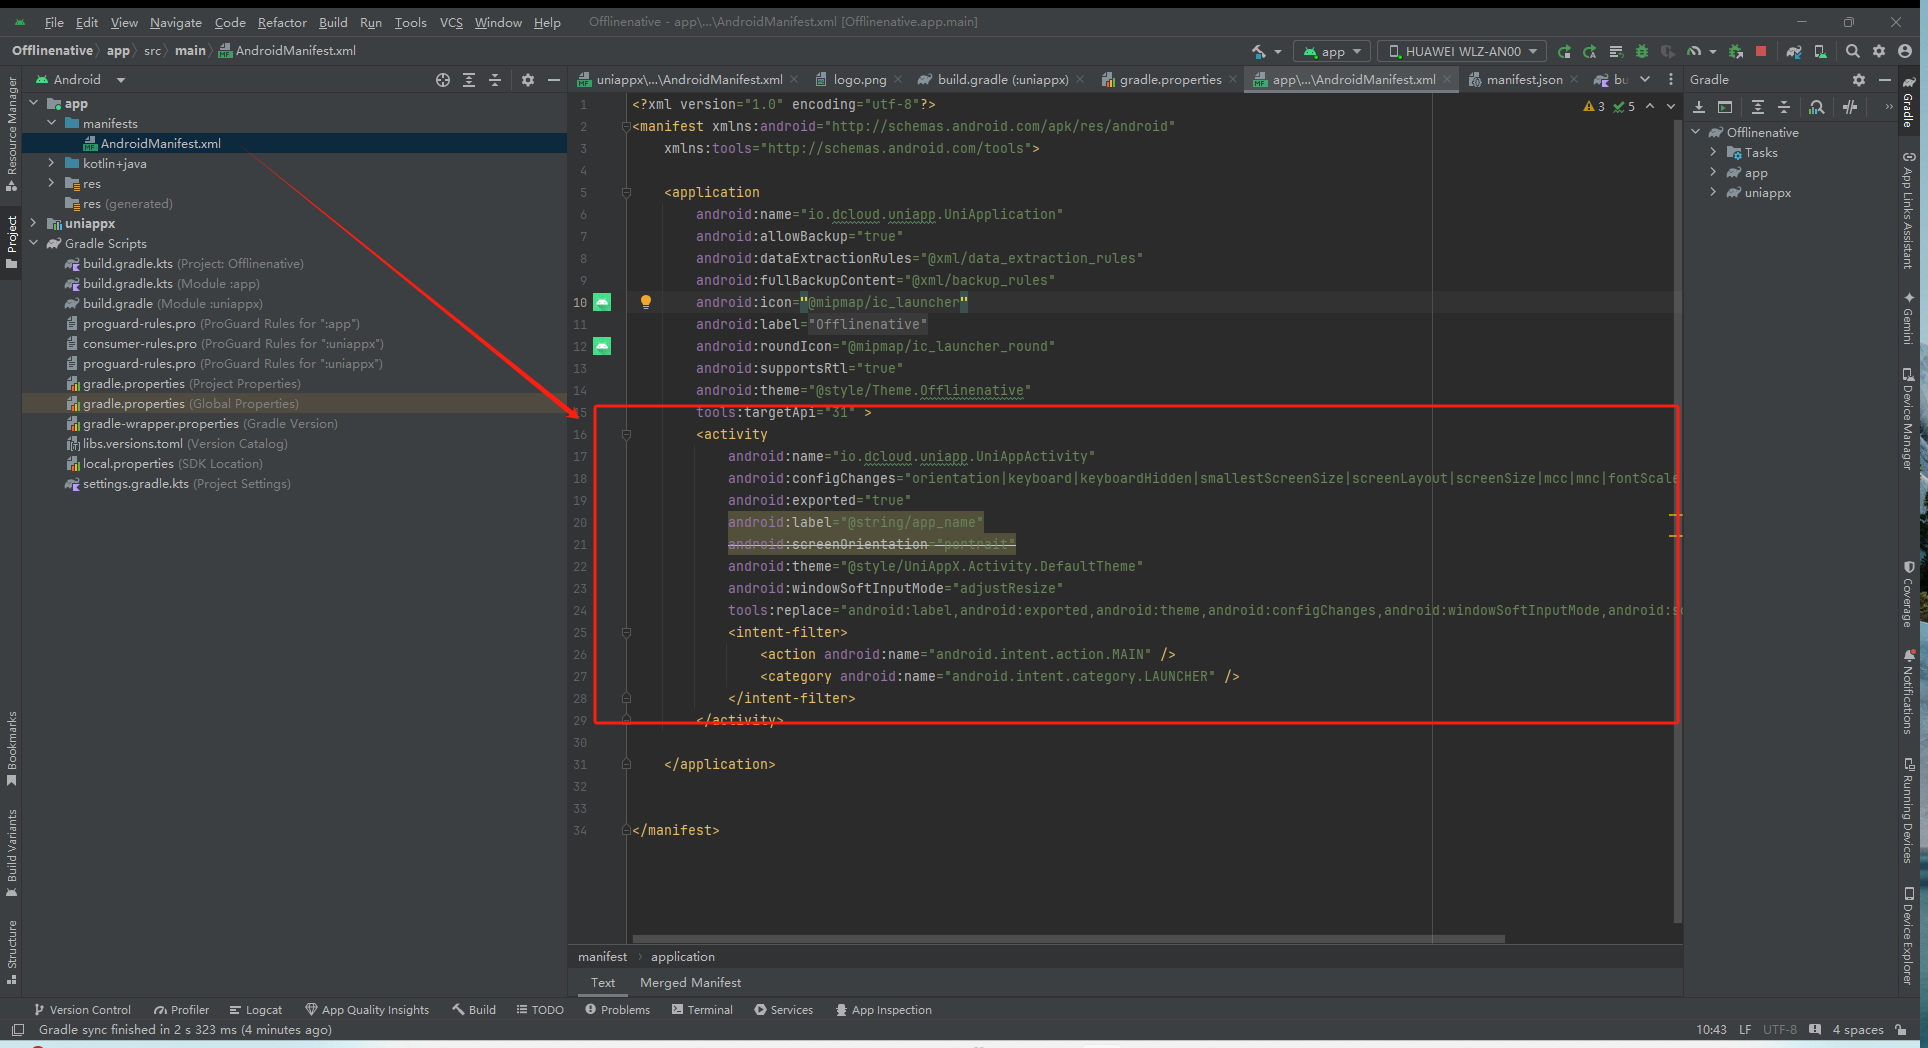
完成的AndroidManifest.xml如下
<?xml version="1.0" encoding="utf-8"?>
<manifest xmlns:android="http://schemas.android.com/apk/res/android"
    xmlns:tools="http://schemas.android.com/tools">

    <application
        android:name="io.dcloud.uniapp.UniApplication"
        android:allowBackup="true"
        android:dataExtractionRules="@xml/data_extraction_rules"
        android:fullBackupContent="@xml/backup_rules"
        android:icon="@mipmap/ic_launcher"
        android:label="@string/app_name"
        android:roundIcon="@mipmap/ic_launcher_round"
        android:supportsRtl="true"
        android:theme="@style/Theme.Offlinenative"
        tools:targetApi="31" >
        <activity
            android:name="io.dcloud.uniapp.UniAppActivity"
            android:configChanges="orientation|keyboard|keyboardHidden|smallestScreenSize|screenLayout|screenSize|mcc|mnc|fontScale|navigation|uiMode"
            android:exported="true"
            android:label="@string/app_name"
            android:screenOrientation="portrait"
            android:theme="@style/UniAppX.Activity.DefaultTheme"
            android:windowSoftInputMode="adjustResize"
            tools:replace="android:label,android:exported,android:theme,android:configChanges,android:windowSoftInputMode,android:screenOrientation">
            <intent-filter>
                <action android:name="android.intent.action.MAIN" />
                <category android:name="android.intent.category.LAUNCHER" />
            </intent-filter>
        </activity>

    </application>

</manifest>
修改uniappx模块下的AndroidManifest.xml
- 添加appid,在application节点下添加
DCLOUD_UNI_APPID节点
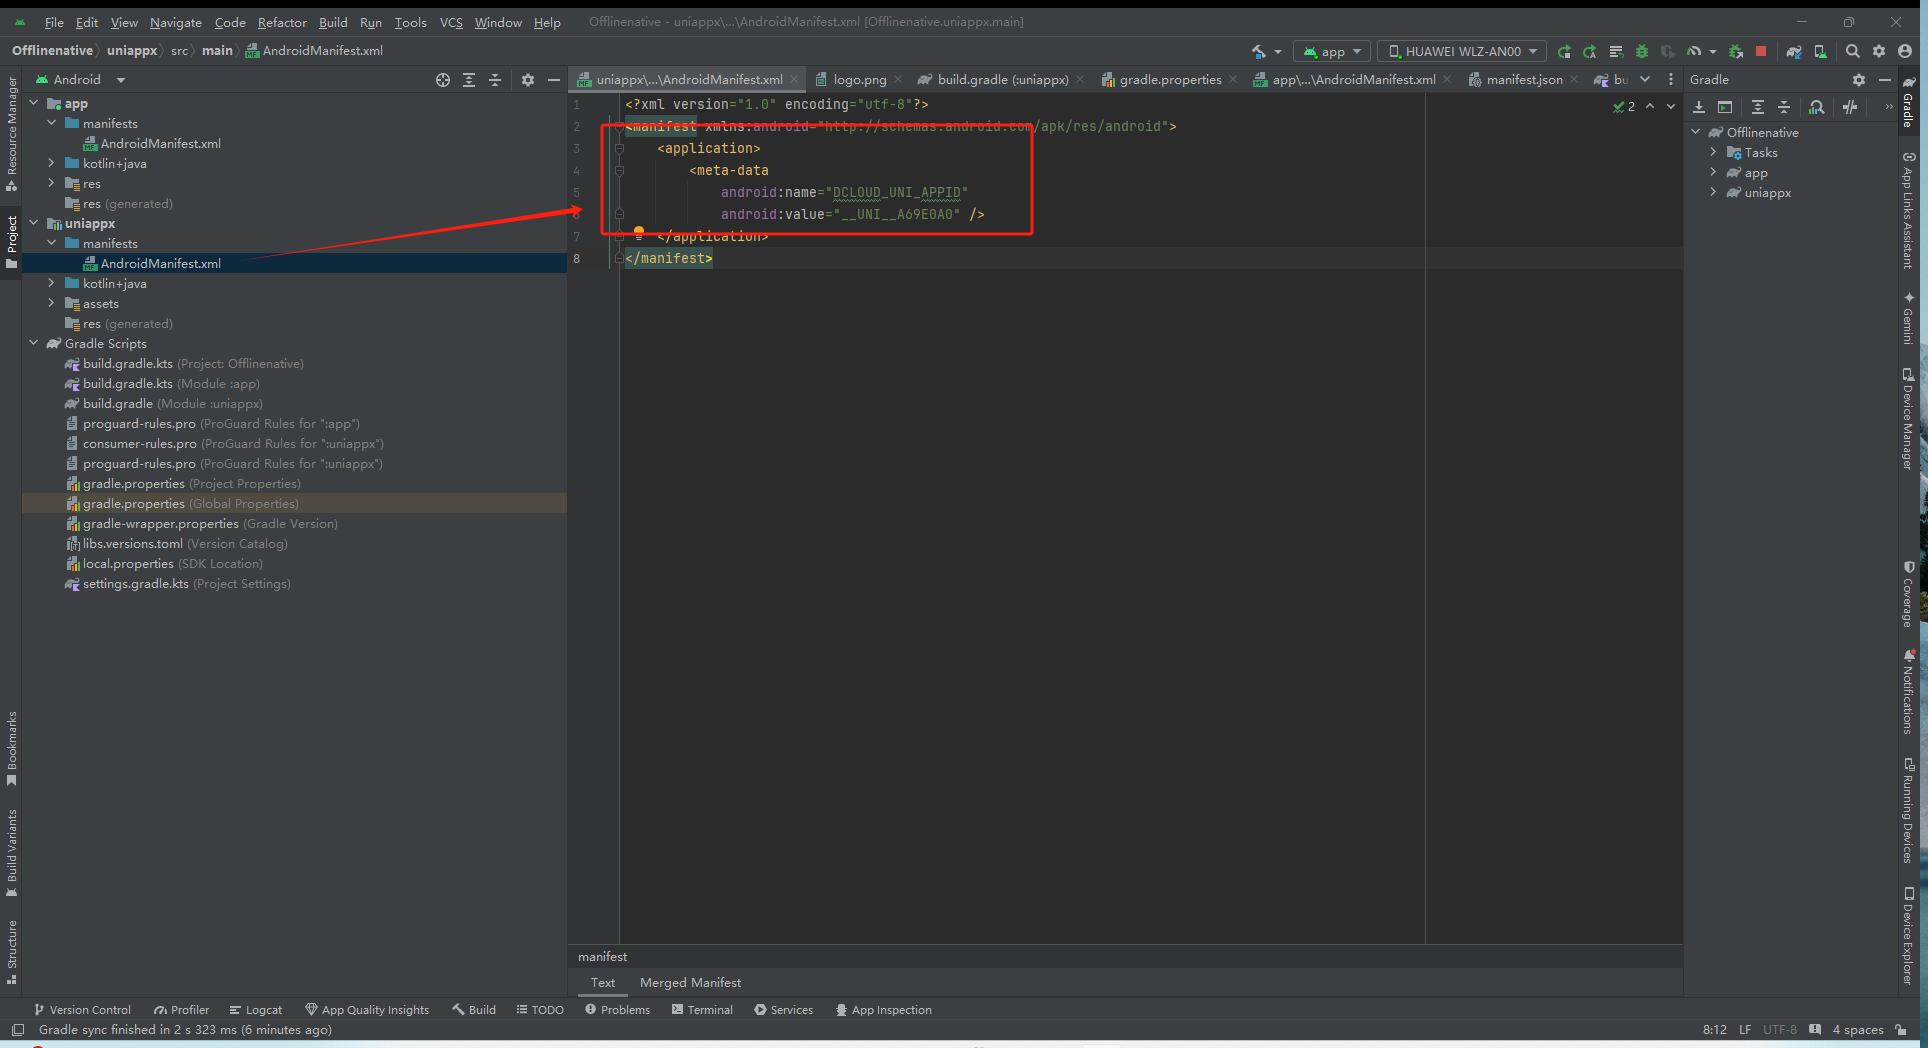
    <application>
        <meta-data
            android:name="DCLOUD_UNI_APPID"
            android:value="你的appid" />
    </application>
拷贝资源文件
-
导出uni-app x项目的资源文件:选择项目,然后点击:发行 -> 原生App-本地打包 -> 生成本地打包App资源,导出成功之后会在项目的unpackage/resources目录下生成资源文件
-
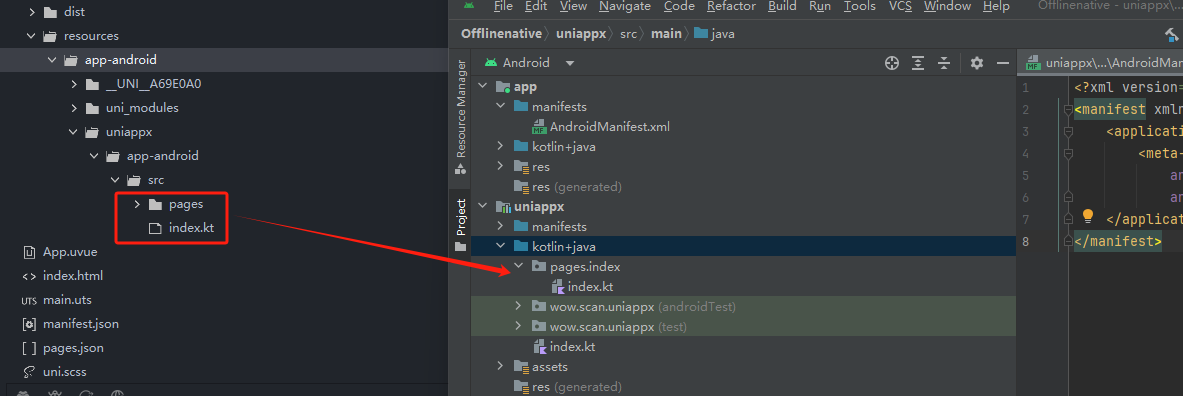
将app-android目录下与appid对应的目录拷贝到uniappx的
assets/apps目录下,需要自己先创建

- 拷贝kt文件:需要将
unkackage/resource/app-android/uniappx/app-android/src/目录下的所有文件拷贝到项目的uniappx模块下的src/main/java下,src/main/java下的包名文件夹可以删掉
如果你的项目没有uts插件,到这一步已经可以使用As运行啦
配置uts插件
资源导出成功之后,uts插件资源位于unpackage/resource/app-android/uni_modules下
为方便区分,uts插件指前端封装的uni_modules插件;android uts插件指根据编译后的uts插件生成的安卓原生模块
新建android uts插件模块,跟新建uniappx一样,下面以插件wow-scankit为例子,下面所有都是基于wow-scankit的配置示例
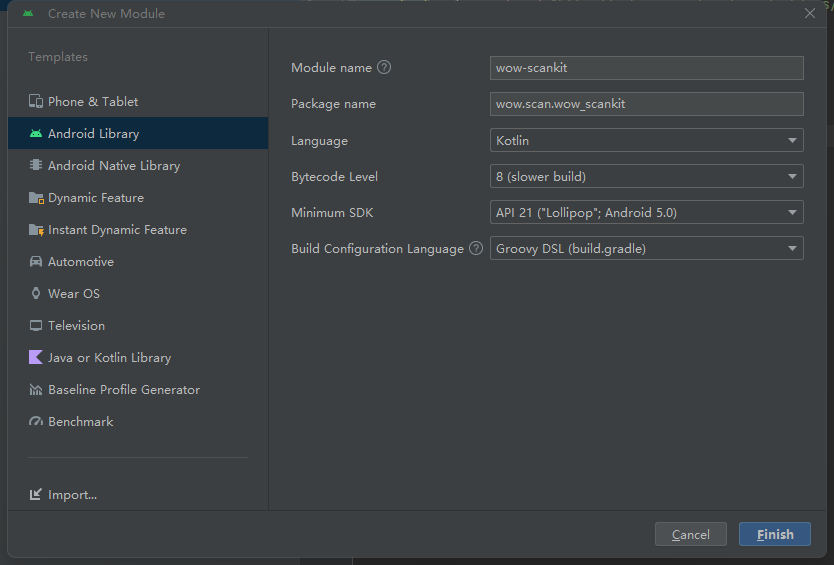
-
点击左侧Templates的Android Library。
-
Language选择Kotlin。
-
Module name建议与uts插件模块名称一致。
-
点击Finish。
注意:
- Templates一定要选择Android Library。
- Language一定要选择Kotlin。
- Build configuration language建议选择Groovy DSL(build.gradle)。以下教程均按照此模式进行
添加gradle插件
- 在
`wow-scankit插件模块的build.gradle的plugins节点下添加io.dcloud.uts.kotlin的依赖
plugins {
    ...
    id 'io.dcloud.uts.kotlin'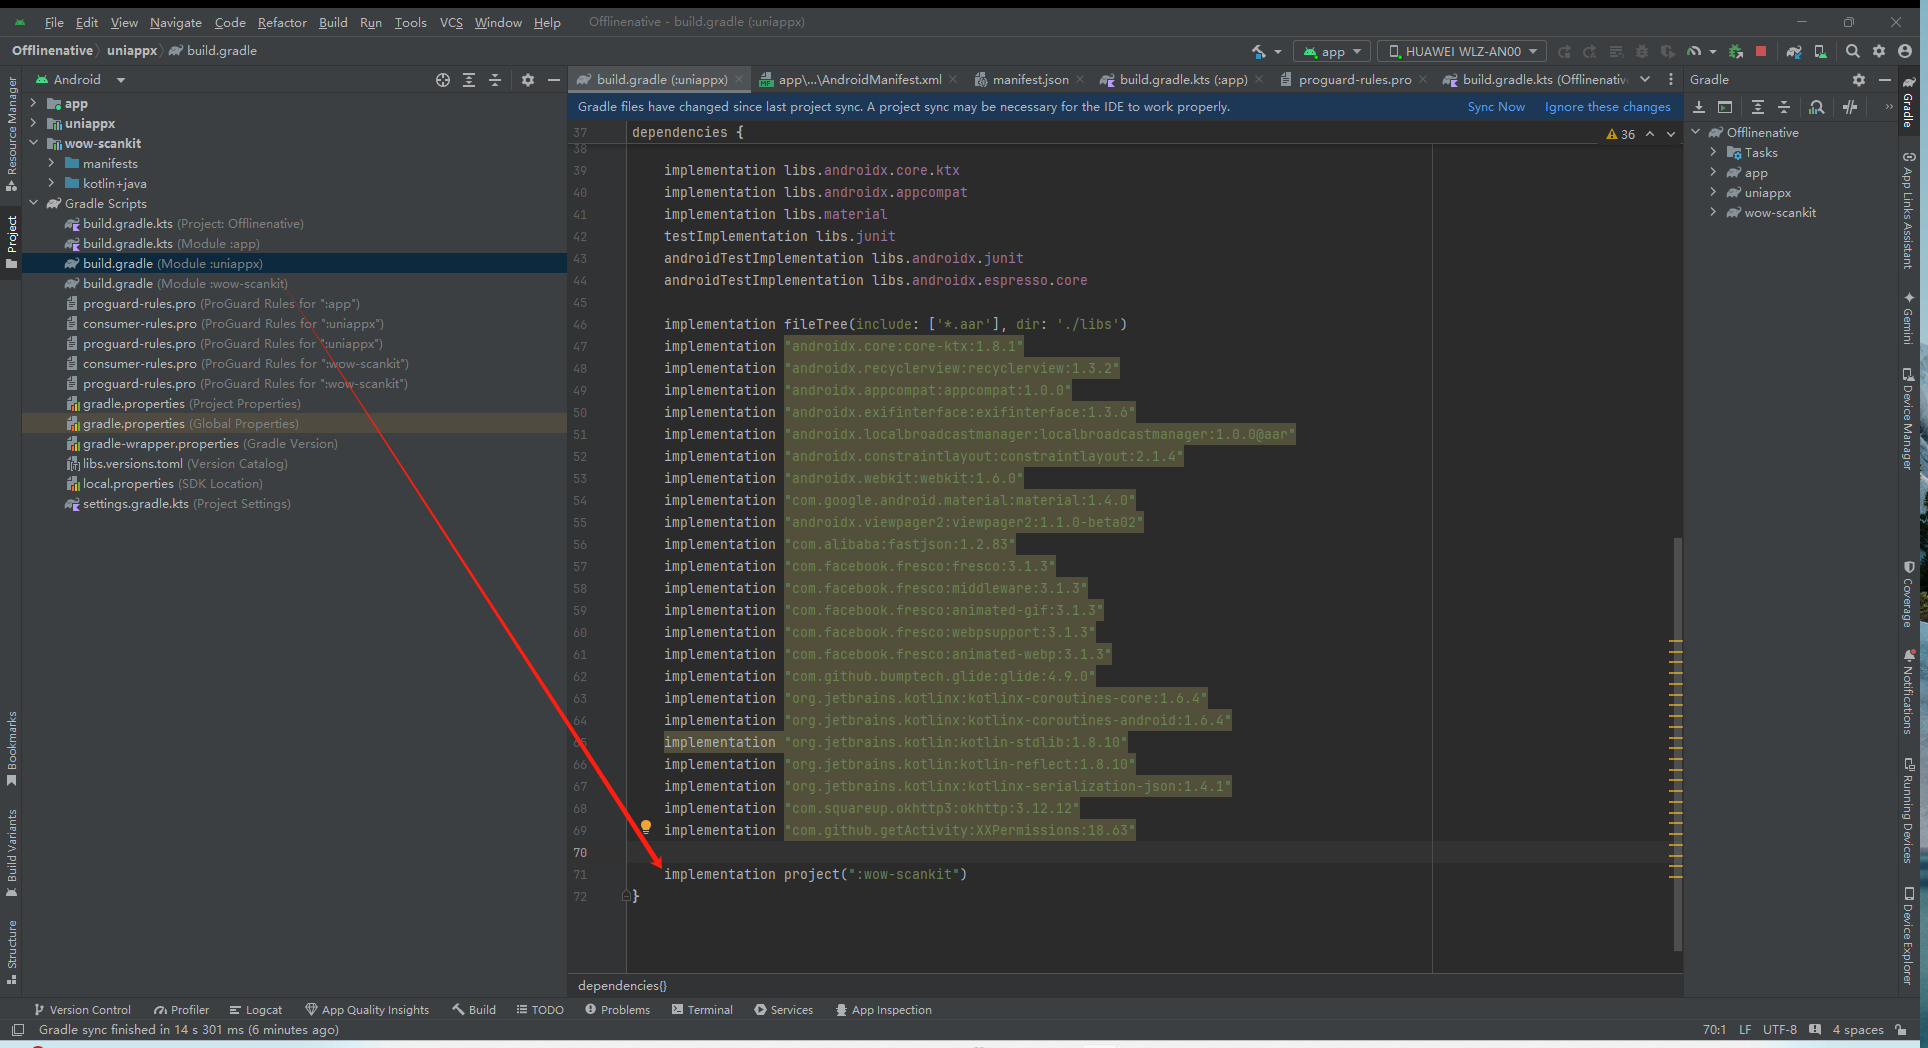
}- 添加依赖
将下面内容拷贝到build.gradle中,添加到原有的dependencies节点,不要删掉原有的
dependencies {
    compileOnly fileTree(include: ['*.aar'], dir: '../uniappx/libs')
    compileOnly fileTree(include: ['*.aar'], dir: './libs')
    compileOnly "com.alibaba:fastjson:1.2.83"
    compileOnly "androidx.core:core-ktx:1.10.1"
    compileOnly 'org.jetbrains.kotlinx:kotlinx-coroutines-core:1.3.8'
    compileOnly 'org.jetbrains.kotlinx:kotlinx-coroutines-android:1.3.8'
}
根据config.json配置应用
如果uts插件的config.json有内容
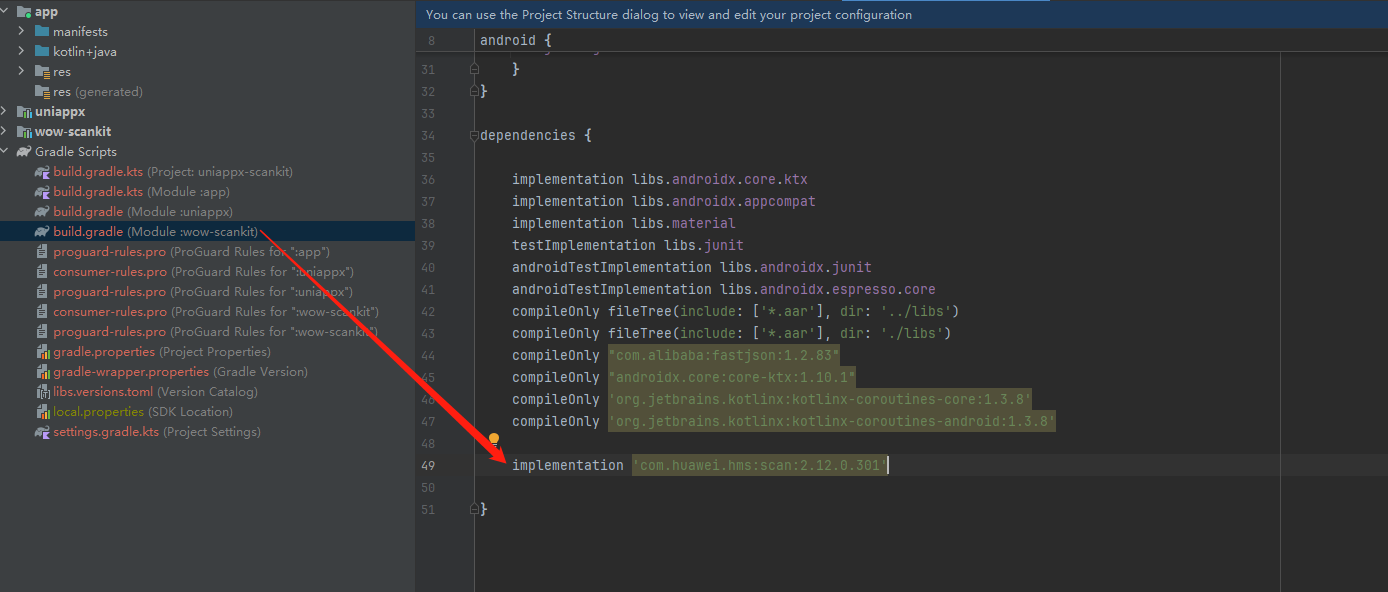
下面是插件wow-scankit的配置
minSdkVersion
在插件wow-scankit的android节点的defaultConfig的minSdk设置此字段
{
    "minSdkVersion": "21",
    "dependencies": ["com.huawei.hms:scan:2.12.0.301"]
}
dependencies
在插件wow-scankit的dependencies 添加 implementation 'com.huawei.hms:scan:2.12.0.301'
- 在项目的
settings.gradle.jks文件需要添加仓库地址
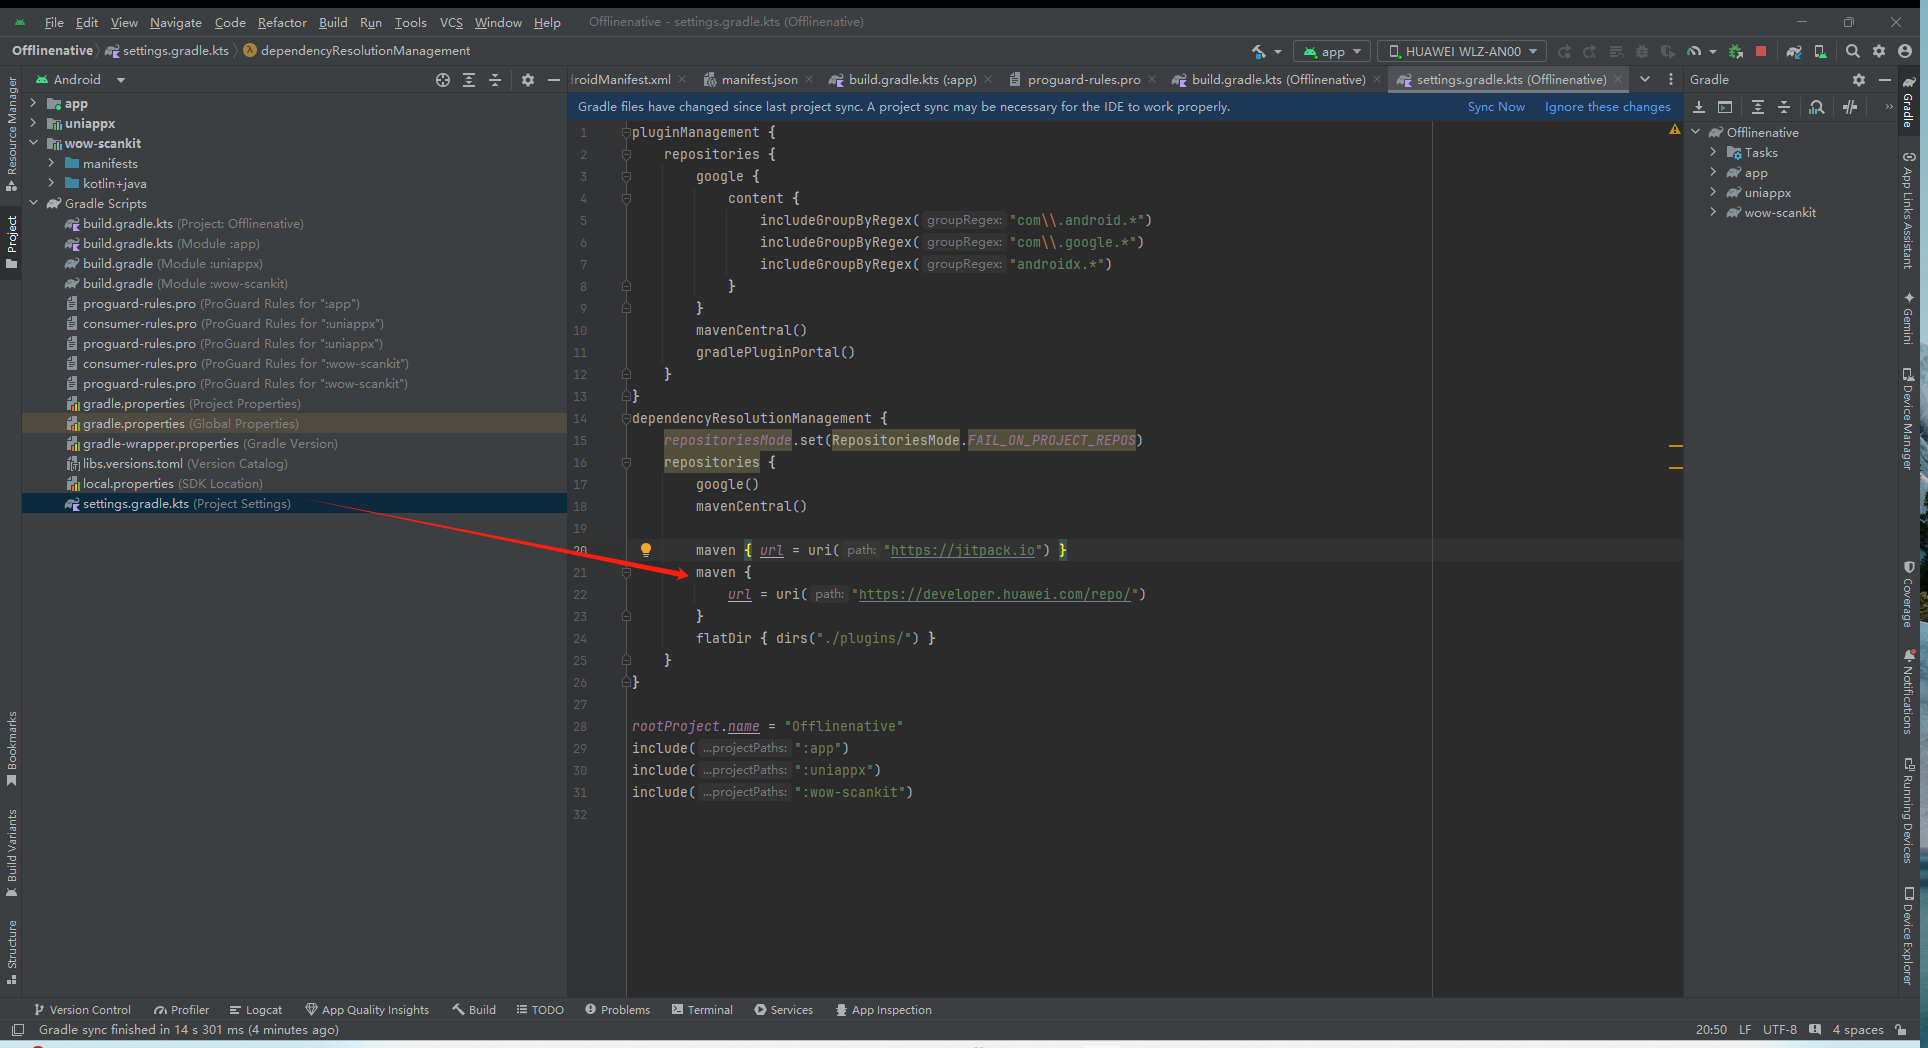
完整的dependencyResolutionManagement如下
dependencyResolutionManagement {
    repositoriesMode.set(RepositoriesMode.FAIL_ON_PROJECT_REPOS)
    repositories {
        google()
        mavenCentral()
        maven {
            url = uri("https://jitpack.io")
        }
        maven {
            url = uri("https://developer.huawei.com/repo/")
        }
        flatDir {
            dirs("./plugins/")
        }
    }
}- 将插件添加到
uniappx模块
implementation project(":wow-scankit")复制资源(如果有就复制)
libs
将src目录下的所有文件拷贝到android uts插件模块/src/main/java目录下(wow-scankit插件没有)
assets
将assets文件夹拷贝到wow-scankit插件模块/src/main/目录下
res
将res文件夹拷贝到wow-scankit插件模块/src/main/目录下。
AndroidManifest.xml
将AndroidManifest.xml拷贝到wow-scankit插件模块/src/main/目录下
添加到主项目
将wow-scankit插件模块的依赖添加到uniappx模块的build.gradle的依赖中
implementation project(':wow-scankit')配置完成后重新构建
如果前面步骤没有出错的话,到这里就已经完成了
Uniapp-x的离线打包
准备(我的配置)
-
HBuilder X (4.29版本及以上)
-
uniapp x SDK (4.29),是uniapp x的SDK,不要跟uniapp的搞混了,下载地址Uniapp x SDK
-
android studio (2023/2024都行)
其它:gradle版本为8.7。gradle插件版本为8.6.0。kotlin插件版本为1.9.0
1. 新建一个Android空项目
打开 android studio,点击顶部的 New Project –> Phone And Tablet –> No Activity,如下图:出现下面的界面
- Name 是你的项目名称
- Package name是你的包名
- Language 要选择 Kotlin
- Min Sdk 建议21
点击Finsh,这是空项目模板
我这里是gradle构建之后的目录,后面的都是基于构建完成的
- 一般称app为主模块,它下面的 build.gradle.kts 是主模块的编译配置文件,也是项目级别的编译配置文件,一定要跟其它的区分开来
下面的步骤就是跟官网一致了!
2. 新建uni-app x模块
点击File->New->New Module...
点击左侧Templates的Android Library。
Language选择Kotlin。
Module name建议设置为uniappx。
点击Finish。
构建之后会多出一个uniappx目录
基础库配置
- 在uni-app x模块下新建目录
libs,跟src同级别 ,将uts-runtime-release.aar,android-gif-drawable-1.2.28.aar,app-common-release.aar,app-runtime-release.aar,breakpad-build-release.aar,dcloud-layout-release.aar, framework-release.aar,uni-exit-release.aar,uni-getAccessibilityInfo-release.aar,uni-getAppAuthorizeSetting-release.aar,uni-getAppBaseInfo-release.aar, uni-getSystemSetting-release.aar,uni-openAppAuthorizeSetting-release.aar,uni-prompt-release.aar,uni-storage-release.aar,uni-getDeviceInfo-release.aar, uni-getSystemInfo-release.aar,uni-rpx2px-release.aar,uni-theme-release.aar共19个aar拷贝到libs下,参考下图
修改uniappx模块下的build.gradle
- 添加依赖
将下面的依赖信息添加到build.gradle中
dependencies {
    ···
    implementation fileTree(include: ['*.aar'], dir: './libs')
    implementation "androidx.core:core-ktx:1.10.1"
    implementation "androidx.recyclerview:recyclerview:1.3.2"
    implementation "androidx.appcompat:appcompat:1.0.0"
    implementation "androidx.exifinterface:exifinterface:1.3.6"
    implementation "androidx.localbroadcastmanager:localbroadcastmanager:1.0.0@aar"
    implementation "androidx.constraintlayout:constraintlayout:2.1.4"
    implementation "androidx.webkit:webkit:1.6.0"
    implementation "com.google.android.material:material:1.4.0"
    implementation "androidx.viewpager2:viewpager2:1.1.0-beta02"
    implementation "com.alibaba:fastjson:1.2.83"
    implementation "com.facebook.fresco:fresco:3.1.3"
    implementation "com.facebook.fresco:middleware:3.1.3"
    implementation "com.facebook.fresco:animated-gif:3.1.3"
    implementation "com.facebook.fresco:webpsupport:3.1.3"
    implementation "com.facebook.fresco:animated-webp:3.1.3"
    implementation "com.github.bumptech.glide:glide:4.9.0"
    implementation "org.jetbrains.kotlinx:kotlinx-coroutines-core:1.6.4"
    implementation "org.jetbrains.kotlinx:kotlinx-coroutines-android:1.6.4"
    implementation "org.jetbrains.kotlin:kotlin-stdlib:1.8.10"
    implementation "org.jetbrains.kotlin:kotlin-reflect:1.8.10"
    implementation "org.jetbrains.kotlinx:kotlinx-serialization-json:1.4.1"
    implementation "com.squareup.okhttp3:okhttp:3.12.12"
    implementation "com.github.getActivity:XXPermissions:18.63"
}
- 添加aaptOptions配置
将aaptOptions配置添加到android节点下
aaptOptions {
    additionalParameters '--auto-add-overlay'
    ignoreAssetsPattern '!.svn:!.git:.*:!CVS:!thumbs.db:!picasa.ini:!*.scc:*~'
}
- 修改app主模块的配置(不要漏掉了)
在build.gradle的dependencies节点添加下面两行
implementation(fileTree(mapOf("include" to listOf("*.aar"), "dir" to "../uniappx/libs")))
implementation(project(":uniappx"))
配置gradle插件
1.下载的SDK压缩包里面有一个plugins文件,将它复制到你的项目根目录
2.在项目根目录的build.gradle的顶部添加gradle插件的依赖
buildscript {
    dependencies {
        classpath(files("plugins/uts-kotlin-compiler-plugin-0.0.1.jar"))
        classpath(files("plugins/uts-kotlin-gradle-plugin-0.0.1.jar"))
    }
}- 然后在uniappx模块的build.gradle下添加插件io.dcloud.uts.kotlin的依赖
plugins {
    ...
    id 'io.dcloud.uts.kotlin'
}
修改项目的settings.gradle
- 在项目根路径下的settings.gradle中添加jitpack的maven的仓库地址和本地gradle插件的路径配置
dependencyResolutionManagement {
    repositoriesMode.set(RepositoriesMode.FAIL_ON_PROJECT_REPOS)
    repositories {
        ...
        maven { url = uri("https://jitpack.io") }
        flatDir { dirs('./plugins/') }
    }
}
修改项目的gradle.properties
- 在项目根路径下的gradle.properties中追加如下内容
android.useAndroidX=true
android.enableJetifier=true
修改app主模块下的AndroidManifest.xml
- 添加activity,将下面内容拷贝到application节点下
完成的AndroidManifest.xml如下
<?xml version="1.0" encoding="utf-8"?>
<manifest xmlns:android="http://schemas.android.com/apk/res/android"
    xmlns:tools="http://schemas.android.com/tools">

    <application
        android:name="io.dcloud.uniapp.UniApplication"
        android:allowBackup="true"
        android:dataExtractionRules="@xml/data_extraction_rules"
        android:fullBackupContent="@xml/backup_rules"
        android:icon="@mipmap/ic_launcher"
        android:label="@string/app_name"
        android:roundIcon="@mipmap/ic_launcher_round"
        android:supportsRtl="true"
        android:theme="@style/Theme.Offlinenative"
        tools:targetApi="31" >
        <activity
            android:name="io.dcloud.uniapp.UniAppActivity"
            android:configChanges="orientation|keyboard|keyboardHidden|smallestScreenSize|screenLayout|screenSize|mcc|mnc|fontScale|navigation|uiMode"
            android:exported="true"
            android:label="@string/app_name"
            android:screenOrientation="portrait"
            android:theme="@style/UniAppX.Activity.DefaultTheme"
            android:windowSoftInputMode="adjustResize"
            tools:replace="android:label,android:exported,android:theme,android:configChanges,android:windowSoftInputMode,android:screenOrientation">
            <intent-filter>
                <action android:name="android.intent.action.MAIN" />
                <category android:name="android.intent.category.LAUNCHER" />
            </intent-filter>
        </activity>

    </application>

</manifest>
修改uniappx模块下的AndroidManifest.xml
- 添加appid,在application节点下添加
DCLOUD_UNI_APPID节点
    <application>
        <meta-data
            android:name="DCLOUD_UNI_APPID"
            android:value="你的appid" />
    </application>
拷贝资源文件
-
导出uni-app x项目的资源文件:选择项目,然后点击:发行 -> 原生App-本地打包 -> 生成本地打包App资源,导出成功之后会在项目的unpackage/resources目录下生成资源文件
-
将app-android目录下与appid对应的目录拷贝到uniappx的
assets/apps目录下,需要自己先创建
- 拷贝kt文件:需要将
unkackage/resource/app-android/uniappx/app-android/src/目录下的所有文件拷贝到项目的uniappx模块下的src/main/java下,src/main/java下的包名文件夹可以删掉
如果你的项目没有uts插件,到这一步已经可以使用As运行啦
配置uts插件
资源导出成功之后,uts插件资源位于unpackage/resource/app-android/uni_modules下
为方便区分,uts插件指前端封装的uni_modules插件;android uts插件指根据编译后的uts插件生成的安卓原生模块
新建android uts插件模块,跟新建uniappx一样,下面以插件wow-scankit为例子,下面所有都是基于wow-scankit的配置示例
-
点击左侧Templates的Android Library。
-
Language选择Kotlin。
-
Module name建议与uts插件模块名称一致。
-
点击Finish。
注意:
- Templates一定要选择Android Library。
- Language一定要选择Kotlin。
- Build configuration language建议选择Groovy DSL(build.gradle)。以下教程均按照此模式进行
添加gradle插件
- 在
`wow-scankit插件模块的build.gradle的plugins节点下添加io.dcloud.uts.kotlin的依赖
plugins {
    ...
    id 'io.dcloud.uts.kotlin'
}- 添加依赖
将下面内容拷贝到build.gradle中,添加到原有的dependencies节点,不要删掉原有的
dependencies {
    compileOnly fileTree(include: ['*.aar'], dir: '../uniappx/libs')
    compileOnly fileTree(include: ['*.aar'], dir: './libs')
    compileOnly "com.alibaba:fastjson:1.2.83"
    compileOnly "androidx.core:core-ktx:1.10.1"
    compileOnly 'org.jetbrains.kotlinx:kotlinx-coroutines-core:1.3.8'
    compileOnly 'org.jetbrains.kotlinx:kotlinx-coroutines-android:1.3.8'
}
根据config.json配置应用
如果uts插件的config.json有内容
下面是插件wow-scankit的配置
minSdkVersion
在插件wow-scankit的android节点的defaultConfig的minSdk设置此字段
{
    "minSdkVersion": "21",
    "dependencies": ["com.huawei.hms:scan:2.12.0.301"]
}
dependencies
在插件wow-scankit的dependencies 添加 implementation 'com.huawei.hms:scan:2.12.0.301'
- 在项目的
settings.gradle.jks文件需要添加仓库地址
完整的dependencyResolutionManagement如下
dependencyResolutionManagement {
    repositoriesMode.set(RepositoriesMode.FAIL_ON_PROJECT_REPOS)
    repositories {
        google()
        mavenCentral()
        maven {
            url = uri("https://jitpack.io")
        }
        maven {
            url = uri("https://developer.huawei.com/repo/")
        }
        flatDir {
            dirs("./plugins/")
        }
    }
}- 将插件添加到
uniappx模块
implementation project(":wow-scankit")复制资源(如果有就复制)
libs
将src目录下的所有文件拷贝到android uts插件模块/src/main/java目录下(wow-scankit插件没有)
assets
将assets文件夹拷贝到wow-scankit插件模块/src/main/目录下
res
将res文件夹拷贝到wow-scankit插件模块/src/main/目录下。
AndroidManifest.xml
将AndroidManifest.xml拷贝到wow-scankit插件模块/src/main/目录下
添加到主项目
将wow-scankit插件模块的依赖添加到uniappx模块的build.gradle的依赖中
implementation project(':wow-scankit')配置完成后重新构建
如果前面步骤没有出错的话,到这里就已经完成了
收起阅读 »用户体验极不好,项目无法工程化
都2024年了,HbuilderX IDE 登录还需要手动输入帐号密码,不能做一下浏览器登录跳转吗?另外不能支持一下系统级别的其它的密码自动完成吗?自定义发行不支持cli,导致项目无法工程化,每次都需要手动使用IDE执行,极其恶心
都2024年了,HbuilderX IDE 登录还需要手动输入帐号密码,不能做一下浏览器登录跳转吗?另外不能支持一下系统级别的其它的密码自动完成吗?自定义发行不支持cli,导致项目无法工程化,每次都需要手动使用IDE执行,极其恶心

uni-list 中的的loadmore事件不执行
nvue 中 uni-list 的loadmore不执行。
研究了 一天,发现龟儿 ,
1、
uni-list 的组件中,有写事件代码,但是没有绑定到 list组件中
loadMore(e) {
this.$emit('scrolltolower');
},
既然这样,我就给他帮上。我就复制了 loadMore 粘贴到 组件上,于是
<list :bounce="false" :scrollable="true" show-scrollbar :render-reverse="renderReverse" @scroll="scroll" class="uni-list" :class="{ 'uni-list--border': border }" :enableBackToTop="enableBackToTop"
loadmoreoffset="15" @loadMore="loadMore" >
坑来了,这样加上还是没有。
2、一遍一遍又看 了文档,开始觉得这球玩意是不是真的不支持。也许是因为这样,所以才没有添加的,但是list得文档说是支持的。
于是,一个字一个字看文档。最后发现 loadmore的这个m是小写的,于是就成功过了。真tm坑了我一天时间。
【公告】uni-app启动鸿蒙元服务立项
【IOS相册权限】Native.js IOS相册权限获取 弹窗请求授权
优化官方推荐的uni.authorize文档中permission.js中的相册授权方法,判断是否有授权没有则弹窗请求授权。
发现很多小伙伴有这个需求,自己也在网上搜索了一番无果。
在此分享出来,方便大家开发。
// 判断相册权限是否开启 resolve()返回值可以根据需求更具体一点,在业务中拿到状态码后弹窗提示用户是否要去设置页修改权限
function judgeIosPermissionPhotoLibrary() {
    return new Promise((resolve, reject) => {
        var PHAuthorizationStatus = {
            NotDetermined: 0, // 未申请过权限
            Restricted: 1, // 拒绝
            Denied: 2,  // 拒绝
            Authorized: 3, // 拥有
            Limited: 4 // iOS 14 新增
        };
        if (!PHPhotoLibrary) {
            var PHPhotoLibrary = plus.ios.import("PHPhotoLibrary");
        }
        var status  = PHPhotoLibrary.authorizationStatus();
        if (status === PHAuthorizationStatus.NotDetermined) {
            PHPhotoLibrary.requestAuthorization(() => {
                const status = PHPhotoLibrary.authorizationStatus(); {
                    if (status === PHAuthorizationStatus.Authorized) {
                        plus.ios.deleteObject(PHPhotoLibrary);
                        resolve(true)
                    } else {
                        plus.ios.deleteObject(PHPhotoLibrary);
                        resolve(false)
                    }
                }
            })
        } else if (status === PHAuthorizationStatus.Authorized) {
            plus.ios.deleteObject(PHPhotoLibrary);
            resolve(true)
        } else {
            if (status === PHAuthorizationStatus.Denied || status === PHAuthorizationStatus.Restricted) {
                console.log("您已拒绝访问相册权限,请在设置中手动开启。");
            } else if (status === PHAuthorizationStatus.Limited) {
                console.log("相册权限为有限访问。");
            }
            plus.ios.deleteObject(PHPhotoLibrary);
            resolve(false)
        }
    })

}优化官方推荐的uni.authorize文档中permission.js中的相册授权方法,判断是否有授权没有则弹窗请求授权。
发现很多小伙伴有这个需求,自己也在网上搜索了一番无果。
在此分享出来,方便大家开发。
// 判断相册权限是否开启 resolve()返回值可以根据需求更具体一点,在业务中拿到状态码后弹窗提示用户是否要去设置页修改权限
function judgeIosPermissionPhotoLibrary() {
    return new Promise((resolve, reject) => {
        var PHAuthorizationStatus = {
            NotDetermined: 0, // 未申请过权限
            Restricted: 1, // 拒绝
            Denied: 2,  // 拒绝
            Authorized: 3, // 拥有
            Limited: 4 // iOS 14 新增
        };
        if (!PHPhotoLibrary) {
            var PHPhotoLibrary = plus.ios.import("PHPhotoLibrary");
        }
        var status  = PHPhotoLibrary.authorizationStatus();
        if (status === PHAuthorizationStatus.NotDetermined) {
            PHPhotoLibrary.requestAuthorization(() => {
                const status = PHPhotoLibrary.authorizationStatus(); {
                    if (status === PHAuthorizationStatus.Authorized) {
                        plus.ios.deleteObject(PHPhotoLibrary);
                        resolve(true)
                    } else {
                        plus.ios.deleteObject(PHPhotoLibrary);
                        resolve(false)
                    }
                }
            })
        } else if (status === PHAuthorizationStatus.Authorized) {
            plus.ios.deleteObject(PHPhotoLibrary);
            resolve(true)
        } else {
            if (status === PHAuthorizationStatus.Denied || status === PHAuthorizationStatus.Restricted) {
                console.log("您已拒绝访问相册权限,请在设置中手动开启。");
            } else if (status === PHAuthorizationStatus.Limited) {
                console.log("相册权限为有限访问。");
            }
            plus.ios.deleteObject(PHPhotoLibrary);
            resolve(false)
        }
    })

}uni-app打包H5自动请求shadow-grey.png的问题
反应H5加载很慢,排查有个图片耗时较多,“https://cdn.dcloud.net.cn/img/shadow-grey.png”
这个图片是导航栏底边阴影效果预加载加速显示用的,如果不需要参考下面的配置。
app.vue 文件添加如下css,经测已正常。
<style>
    body::after {
        content: none !important;
    }
</style>反应H5加载很慢,排查有个图片耗时较多,“https://cdn.dcloud.net.cn/img/shadow-grey.png”
这个图片是导航栏底边阴影效果预加载加速显示用的,如果不需要参考下面的配置。
app.vue 文件添加如下css,经测已正常。
<style>
    body::after {
        content: none !important;
    }
</style>
分享一个第三方unicloud省市区数据库,顺便反馈一个bug
github地址 https://github.com/6613974/unicloud-china-city
==============================================
bug反馈, 客户端云数据库查询不支持地理查询(所有操作)均为==右侧值错误
示例代码需要在云函数内执行查询。
地图收费贵,uni自带的数据库个人不适应,重新整理了这个数据。 不需要基于经纬度的地理查询可以删除字段极大减小数据空间占用。
姑且算是满足了县级的地理逆解析,用小程序的可以用免费的经纬度接口配合查询。
==============================================
unicloud-china-city-geo
适用于unicloud于mongodb的大陆地区省市区及轮廓数据(gcj02)
数据来源
高德地图抓取
创建表
使用hubildX在database目录下用city-china.schema.json创建表,用city-china.json创建索引,或直接在unicloud控制台手动创建并添加索引,mongodb下自行修改导入文件格式
字段说明
code 唯一ID,省为两位,市四位,县六位 如北京为11 北京市1101 北京市西城区 110102
parent_code 上级ID 省级为null
name 地区简称 如北京
fullname 地区全称 如北京市
path 地区完整路径,如 北京市 北京市 西城区
pinyin 地区名称拼音 如 beijing
type 地区类型 0 省 1市 2县
first_letter 地区拼音首字母大写 如B
geometry 轮廓数据
基于经纬度的省市区查询
// 请在云函数中执行查询,uni-app本地无法执行地理查询
// lat 经度值 浮点数类型
// lng 纬度值 浮点数类型
const {errCode, data} = await db.collection('city')
.where({
geometry: db.command.geoIntersects({
geometry: db.Geo.Point(lat, lng)
})
})
.field({
code:true,
parent_code:true,
name:true,
fullname:true,
type:true,
first_letter:true,
pinyin:true,
})
.get()
省市区查询
省市区保存时只需保存最后一及的数值,以北京市西城区为例,110102, 可在path字段获取完整的省市区名称,无需二次查询
有时需要通过code反查上级code, 如北京可提取前两位获取11,北京市提取前4位即1101,无需反复查询数据库。
要查所有的省可以通过parent_code为null进行查询
要查北京下所有的市可模糊查询code为11开头且type为1
要查北京市下所有的区可模糊查询code为1101开头且type为2
可通过拼音或首字母进行搜索
不需要地理位置时可删除geometry字段可极大建设数据库空间占用
备注
数据来自高德,仅包括中国大陆地区,港、澳、台缺少轮廓数据的值为null
【解决】uni.createRequestPermissionListener()安卓离线打包问题
注意:如果hbuildx版本更新,离线打包的相关sdk都需要更新,避免出问题
一、首先需要Hbuilderx版本需大于等于4.21,离线sdk下载相对应版本
具体看官方回复:https://ask.dcloud.net.cn/question/193097,截图如下:

二、复制以下sdk:utsplugin-release.aar、uni-createRequestPermissionListener-release.aar

三、粘贴sdk到安卓的以下目录:

四、在项目的build.gradle添加以下代码,可以直接看官方文档:https://nativesupport.dcloud.net.cn/AppDocs/usemodule/androidModuleConfig/uts.html
1、在app级的build.gradle配置
implementation "com.squareup.okhttp3:okhttp:3.12.12"
implementation "androidx.core:core-ktx:1.6.0"
implementation "org.jetbrains.kotlin:kotlin-stdlib:1.8.10"
implementation "org.jetbrains.kotlin:kotlin-reflect:1.6.0"
implementation "org.jetbrains.kotlinx:kotlinx-coroutines-core:1.3.8"
implementation "org.jetbrains.kotlinx:kotlinx-coroutines-android:1.3.8"
implementation "com.github.getActivity:XXPermissions:18.0"
2、在项目根目录的build.gradle下添加jitpack依赖
maven {url 'https://jitpack.io'}
五、初次编译或者每次有改动都点击一下“Sync Project with Gradle Files”按钮

六、看是要运行还是要打包
↓↓↓ 各位大佬点点赞
注意:如果hbuildx版本更新,离线打包的相关sdk都需要更新,避免出问题
一、首先需要Hbuilderx版本需大于等于4.21,离线sdk下载相对应版本
具体看官方回复:https://ask.dcloud.net.cn/question/193097,截图如下:
二、复制以下sdk:utsplugin-release.aar、uni-createRequestPermissionListener-release.aar
三、粘贴sdk到安卓的以下目录:
四、在项目的build.gradle添加以下代码,可以直接看官方文档:https://nativesupport.dcloud.net.cn/AppDocs/usemodule/androidModuleConfig/uts.html
1、在app级的build.gradle配置
implementation "com.squareup.okhttp3:okhttp:3.12.12"
implementation "androidx.core:core-ktx:1.6.0"
implementation "org.jetbrains.kotlin:kotlin-stdlib:1.8.10"
implementation "org.jetbrains.kotlin:kotlin-reflect:1.6.0"
implementation "org.jetbrains.kotlinx:kotlinx-coroutines-core:1.3.8"
implementation "org.jetbrains.kotlinx:kotlinx-coroutines-android:1.3.8"
implementation "com.github.getActivity:XXPermissions:18.0"
2、在项目根目录的build.gradle下添加jitpack依赖
maven {url 'https://jitpack.io'}五、初次编译或者每次有改动都点击一下“Sync Project with Gradle Files”按钮
六、看是要运行还是要打包
↓↓↓ 各位大佬点点赞
收起阅读 »小程序预览时,显示空白页,首页没有显示
我的小程序有基本的功能,我想看看在手机上实际的效果,结果扫描小程序预览二维码后,总是显示一个空白页。一开始我以为是网速慢什么原因,尝试分包下载,结果还是一样。后来我就用微信小程序开发工具生成一个最简单的hello小程序,再预览,效果还是一样。后来我选择一个单页面模板,再试,结果显示”页面没找到'。我想就一个页面怎么会没找到呢?细看扫描页面,发现有个页面设置,我以前设置了一个预览页面,现在改了代码,那个页面不存在了。
总结以下:小程序预览时,预设的路径如果不是首页,可能会显示空白页,甚至不报错。
我的小程序有基本的功能,我想看看在手机上实际的效果,结果扫描小程序预览二维码后,总是显示一个空白页。一开始我以为是网速慢什么原因,尝试分包下载,结果还是一样。后来我就用微信小程序开发工具生成一个最简单的hello小程序,再预览,效果还是一样。后来我选择一个单页面模板,再试,结果显示”页面没找到'。我想就一个页面怎么会没找到呢?细看扫描页面,发现有个页面设置,我以前设置了一个预览页面,现在改了代码,那个页面不存在了。
总结以下:小程序预览时,预设的路径如果不是首页,可能会显示空白页,甚至不报错。
收起阅读 »全职外包接单,个人开发者承接app、小程序、网页外包
全职在家承接外包,多年外包经验,个人开发者,绝对实惠靠谱,有很多款线上应用(度是自己开发的,自己独立完成,可查)
可做商城类,社交类,工具类,任务平台类,mes 类等,除了游戏和带颜色的,其他度可以开发
可承接安卓/IOS、各个端的小程序、H5网页、PC网页开发,从前端到后端,我全度会,一条龙服务
有需要开发的并能看得上我的请联系我哈
vx:wu1020yt
各位同行就别在下面打广告了谢谢,很不礼貌的
全职在家承接外包,多年外包经验,个人开发者,绝对实惠靠谱,有很多款线上应用(度是自己开发的,自己独立完成,可查)
可做商城类,社交类,工具类,任务平台类,mes 类等,除了游戏和带颜色的,其他度可以开发
可承接安卓/IOS、各个端的小程序、H5网页、PC网页开发,从前端到后端,我全度会,一条龙服务
有需要开发的并能看得上我的请联系我哈
vx:wu1020yt
各位同行就别在下面打广告了谢谢,很不礼貌的
收起阅读 »uniCloud 三个云厂商的功能差异汇总,持续更新中
前言
官方已抹平了三个云厂商的绝大部分差异,但是还有部分功能表现不一致,或语法不统一等。
此表格汇总目前已知差异,旨在为开发者提供参考,无论是在首次选择云厂商,还是后期切换厂商,都能做到心中有数。
群策群力
一个人的精力有限,欢迎每一位开发者在留言中补充更多差异项。
套餐区别及云资源限制差异
官方已整理汇总,点击查看官方文档
云函数/云对象差异
| 功能项 | 腾讯云 | 阿里云 | 支付宝云 | 详情 | 备注 |
|---|---|---|---|---|---|
| 云函数数量限制 | 149 | 99 | 499 | - | - |
| 最大超时时间 | 30秒 | 120秒 | 180秒 | - | 如果超时时间不够用,可递归调用云函数 |
| 定时任务单次最大运行时间 | 15分钟 | 2小时 | 3小时 | - | - |
| QPS | 500-1w | 1k | 2k | - | - |
| 云端安装node_modules | ✅ | ❌ | ✅ | - | npm包不占用云函数体积 |
| 读取文件路径 | 相对路径、绝对路径 | 相对路径 | 相对路径 | - | - |
| 云函数内访问其他服务空间 | ✅ | ❌ | ✅ | 查看 | - |
| 实例回收时间 | 30分钟 | 15分钟 | 60秒 | - | 实例回收后,下次访问会触发冷启动 |
| 单实例多并发 | ❌ | ✅ | ✅ | 查看 | - |
| node版本 | node8.9.4(可改node12) | node16(可改node12) | node18(可改node16) | 查看 | 腾讯云使用node12时,可配置return后是否继续执行 |
| 时区 | UTC+0 | UTC+0 | UTC+8 | - | 本地运行时是电脑的时区 |
| WebSocket | ❌ | ❌ | ✅ | - | 客户端需使用uni-app x |
| 固定出口IP | - | - | - | 查看 | - |
| IP防刷 | 基于Redis | 基于Redis | 网关层面 | - | - |
| - | - | - | - | - | - |
云数据库差异
| 功能项 | 腾讯云 | 阿里云 | 支付宝云 | 详情 | 备注 |
|---|---|---|---|---|---|
| 集合数量限制 | 300 | 100 | 400 | - | - |
| _id区别 | 32位的字符串类型 | 24位的ObjectId类型 | 24位的字符串类型 | 查看 | - |
| 数据库回档 | - | - | ❓ | 查看 | - |
| JQL运算 | - | - | ❓ | 查看 | - |
前端网页托管差异
| 功能项 | 腾讯云 | 阿里云 | 支付宝云 | 详情 | 备注 |
|---|---|---|---|---|---|
| history模式 | ✅ | ✅ | ❌ | 查看 | - |
| gzip压缩 | ❓ | ✅ | ❌ | 查看 | - |
| 防盗链 | ✅ | ❌ | ✅ | 查看 | - |
| 删除非空文件夹 | ✅ | ✅ | ❌ | 查看 | - |
