现在插件市场和广告联盟面向个人开发者提供新的提现选项了——云账户(天津)。
云账户介绍
云账户综合服务平台为全国共享经济平台企业和个体经营者提供共享经济综合服务。
1、通过云账户收款完全合法,是按经营所得缴个税后的合法收入,有完税证明,这部分收入是经营所得,无需和工资薪金所得等综合所得进行汇算清缴,个人税赋降低。法律依据:小规模纳税人税收优惠政策。
2、通过云账户收款DCloud将不再代扣代缴劳务个人所得税,而是由云账户代缴1%的税费、并由云账户收取6.1%的服务费(服务费由云账户收取,DCloud 不收取任何费用)后的金额是开发者的实际收入。
如何通过云账户收款
DCloud 已开通线上启用云账户的功能,通过下面页面补充财务信息后会自动启用云账户,选择以下任意一种方式即可
智能节税方案
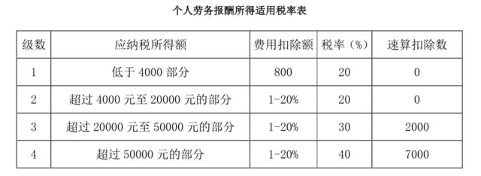
DCloud在处理个人开发者提现申请时,会根据账单金额自动选择税费最优的打款方式。根据目前的个人劳务所得税计算方法,当月收入低于1200元时,使用银行打款税费最低,超过1200元时使用云账户收款税费更低。
如何开通云账户
当开发者的提现申请满足云账户打款条件时,DCloud会向云账户发起付款申请,如果开发者尚未开通云账户,此时会收到云账户的服务开通短信,开发者按照短信提示开通相关服务即可。使用云账户收款时,开发者需要在云账户 APP 进行线上签约、注册。开发者可以在“应用宝”中搜索“云账户”进行下载安装,或者当使用云账户收款时,云账户会通过短信方式,将下载链接发送到开发者手机号。
使用方法:下载云账户APP,选择线上签约--线上注册--获得收入。如有相关问题,可发送邮件到market@dcloud.io进行咨询。
注意:请务必保证在开发者中心绑定的手机号是有效的手机号,并请留意该手机的短信。以免遗漏短信影响您的收款。
其他问题
Q: 云账户是什么公司的?可靠吗?
A: 云账户是天津的公司,网址:https://www.yunzhanghu.com/,是业内普通使用的兼职服务平台,比如很多直播App的主播打赏,都是通过云账户支付。
Q: 云账户开通个体工商户,影响上班的薪资个税吗?
A: 个体工商户申报的是生产经营所得,和个税没关系