


做聊天页面scroll,页面无法滑动有关之坑,经验之谈分享一下
聊天功能相关实现了,但是页面一进去就无法滑动,发送一条消息才会好,滚动也卡顿。需求是进入聊天动态加载记录应该定位到底部。
一、聊天内容块外面套上框架的滚动div
<div class="mui-scroll-wrapper"style="padding:50px 0">
<div class="mui-scroll">
<div id='你的内容'> </div>
</div>
</div>
二、js中初始化scroll控件。
mui('.mui-scroll-wrapper').scroll({deceleration: 0.0005 });
三、加载好数据后,后面调用这两个方法,一定要调用reLayout,害人不浅!
mui('.mui-scroll-wrapper').scroll().reLayout();
mui('.mui-scroll-wrapper').scroll().scrollToBottom(1000);//毫秒,滚动到底部需要的时间,可自定义。
搞定,滑动和页面初始定位都好用了
之前报错:Ignored attempt to cancel a touchmove event with cancelable=false, for example because scrolling is in progress and cannot be interrupted.这个具体原因算不算控件bug不知道,遇见了也不要方,该包的包起来就行了。
(os:之前的坑还有很多,但是没有记录过,以后再遇见奇葩and一搜索不知所云的问题还会来分享的~)
模板样式 - NVeiw模板 - wap2app教程
NView模板中,控件样式需通过控件标签的style属性定义,类似HTML的内联样式,语法如下:
<element style="property1:value1;property2:value2;">NView模板的样式属性是CSS的子集,本文主要介绍NView模板支持的样式定义。
Tips:所有样式定义均需通过标签的style属性设置,目前不支持link外部css文件,也不支持style标签(<style></style>)定义内部样式;
align(对齐)
定义NView控件元素在水平、垂直方向的对齐方式,目前支持的属性包括:
- align
- vertical-align
align
控件元素在父容器中的水平对齐方式,可取值:
- left - 水平居左对齐;
- center - 水平居中对齐;
- right - 水平居右对齐
默认值为center。
vertical-align
控件元素在父容器中的垂直对齐方式,可取值:
- top - 垂直居顶对齐;
- middle - 垂直居中对齐;
- bottom - 垂直居底对齐
默认值为middle
background(背景)
定义NView控件元素的背景颜色,目前仅支持background-color一个属性,示例:
<nview id="nview1" style="background-color: #56C1FF;"></nview>颜色值有两种方式:
- 十六进制,如:"#ff0000";
- RGBA方式,如:"rgba(255,0,0,0.8)"
border(边框)
定义NView控件元素边框的样式和颜色,目前支持的属性包括:
- border-color
- border-radius
- border-width
border-color
控件边框的颜色,可取值:
- 十六进制,如:"#ff0000";
- RGBA方式,如:"rgba(255,0,0,0.8)"
默认值为控件的背景颜色值。
border-radius
控件圆角半径像素值,数字加"px"格式字符串,如"5px"。
border-width
控件边框宽度像素值,数字加"px"格式字符串,如"1px"。
font(字体)
定义NView控件元素的文字颜色、带下、加粗等样式,目前支持的属性包括:
- color
- font-size
- font-weight
- font-style
- text-overflow
- white-space
color
文本字体颜色,可取值:
- 十六进制,如:"#ff0000";
- RGBA方式,如:"rgba(255,0,0,0.8)"
默认值为"#000000"(黑色)
font-size
文本字体大小,可取值:字体高度像素值,数字加"px"格式字符串,如"12px"。 默认值为"16px"。
font-style
文本字体样式,可取值:
- normal - 正常字体样式;
- italic - 斜体样式。
默认值为normal。
font-weight
文本字体粗细,可取值:
- normal - 普通字体;
- bold - 粗字体
默认值为normal。
text-overflow
文本内容超出显示区域时处理方式,可取值:
- clip - 超出显示区域时内容裁剪;
- ellipsis - 超出显示区域时尾部显示省略标记(...)
默认值为clip。
Tips:text-overflow属性在richtext容器下无效。
white-space
文本换行模式,可取值:
- nowrap - 不换行,将所有文本在一行中绘制,忽略换行符("\n");
- normal - 自动换行,当指定的宽度无法绘制所有文本时自动换行绘制,碰到'\n'字符时强制换行。
默认值为nowrap。
position(定位)
定义NView控件元素的位置信息,目前支持的属性包括:
- top
- height
- bottom
- left
- width
- right
- position
Tips:richtext标签下的元素为流式布局,不支持通过如上属性设置位置信息;
top
NView模板控件元素相对于父容器的向下的偏移量,可取值:
- 像素值,如"100px";
- 百分比,如"10%",相对于父容器的高度自动计算;
height
NView模板控件元素的高度,可取值:
- 像素值,如"100px";
- 百分比,如"10%",相对于父容器的高度进行计算
bottom
NView模板控件元素相对于父容器向上的偏移量,可取值:
像素值,如"100px";
百分比,如"10%",相对于父容器的高度计算。
控件元素的垂直位置,可以通过top/height/bottom三个属性共同确定,其中:
- 当设置了top和height值时,忽略bottom属性值;
- 当未设置top值时,可通过bottom和height属性值来确定垂直位置;
- 当未设置height值时,可通过top和bottom属性值来确定元素的高度
left
NView模板控件元素相对于父容器的向右的偏移量,可取值:
- 像素值,如"100px";
- 百分比,如"10%",相对于父容器的宽度自动计算;
width
NView模板控件元素的宽度,可取值:
- 像素值,如"100px";
- 百分比,如"10%",相对于父容器的宽度进行计算
right
NView模板控件元素相对于父容器向左的偏移量,可取值:
- 像素值,如"100px";
- 百分比,如"10%",相对于父容器的宽度
控件元素的水平位置,可以通过left/width/right三个属性共同确定,其中:
- 当设置了left和width值时,忽略right属性值;
- 当未设置left值时,可通过right和width属性值来确定水平位置;
- 当未设置width值时,可通过left和right属性值来确定元素的宽度
position
nview控件在webview中的排版方式,可取值:
- static - View控件在页面中正常定位,如果页面存在滚动条,则View控件跟随窗口内容一起滚动;
- absolute - Veiw控件在页面中绝对定位,如果页面存在滚动条,View控件显示在屏幕固定位置,不随窗口内容滚动,常用于底部选项卡、购物车等固定显示在特定位置的场景;
注意:position属性仅对<nview>标签元素有用,区别于css中的position属性,NView模板中的position仅表示NView控件是否随着webview页面内容一起滚动,默认为static(随着webview一起滚动);在static排版方式下,依然可以通过坐标位置确定NView控件的位置信息。
收起阅读 »
HBuilder 图片压缩,截取
贡献一下代码
<!DOCTYPE html>
<html>

    <head>
        <meta charset="utf-8">
        <meta name="viewport" content="width=device-width,initial-scale=1,minimum-scale=1,maximum-scale=1,user-scalable=no" />
        <title></title>

        <script type="text/javascript" src="js/jquery-1.11.2.min.js" ></script>

        <script src="js/mui.min.js"></script>
        <link href="css/mui.min.css" rel="stylesheet" />
        <script type="text/javascript" charset="utf-8">
            mui.init();
        </script>
    </head>

    <body>
        <header class="mui-bar mui-bar-nav">
            <a class="mui-action-back mui-icon mui-icon-left-nav mui-pull-left"></a>
            <h1 class="mui-title">起始页</h1>
        </header>
        <div class="mui-content">
            <button id="primary" class="mui-btn-primary mui-btn-block" style="margin-top: 20px;">拍照</button>
            <button id="success" class="mui-btn-success mui-btn-block" style="margin-top: 20px;">打开相册</button>
        </div>

        <div id='dkj-result'>

        </div>

        <script>
            if (window.plus) {
                plusReady();
            } else {
                document.addEventListener('plusready', plusReady, false);
            }

            function plusReady() {
                mui(".mui-content").on("tap", "#primary", function() {
                    var cmr = plus.camera.getCamera();
                    cmr.captureImage(function(p) {
                        plus.io.resolveLocalFileSystemURL(p, function(entry) {
                            mui.openWindow({
                                url: 'cropper.html',
                                id: 'cropper.html',
                                extras: {
                                    path: "file:///" + entry.fullPath,
                                    change: "cem"
                                }
                            });
                        }, function(e) {
                            mui.toast(e.message);
                        });
                    }, function(e) {}, {
                        filename: "_doc/camera/"
                    });
                })
                mui(".mui-content").on("tap", "#success", function() {
                    plus.gallery.pick(function(url) {
                        mui.openWindow({
                            url: 'cropper.html',
                            id: 'cropper.html',
                            extras: {
                                path: url,
                                change: "open"
                            }
                        });
                    }, function(error) {
                        mui.toast("打开相册失败");
                    });
                }, false);
            };
            window.addEventListener('newsId',function(event){

                var urlPath = event.detail.urlPath;

                var sHtml = '<img style="margin: 10px 10px 10px 10px; width: 100px; height: 100px;" src="'+ urlPath +'" />';
                console.log('返回的参数:' + sHtml);
                $("#dkj-result").append( sHtml );
            });
        </script>
    </body>

</html>
第二个文件:
<!DOCTYPE html>
<html>

    <head>
        <meta charset="utf-8">
        <meta name="viewport" content="width=device-width,initial-scale=1,minimum-scale=1,maximum-scale=1,user-scalable=no" />
        <script src="js/mui.js"></script>
        <link href="css/mui.min.css" rel="stylesheet" />
        <link href="css/iconfont.css" rel="stylesheet" />
        <link rel="stylesheet" href="css/cropper.css" />

        <script src="js/custom/common.js"></script>
        <script type="text/javascript" src="js/fastclick.js"></script>
        <script type="text/javascript" src="js/exif.js"></script>
        <link href="css/user-information.css" rel="stylesheet" />
        <script>
            window.addEventListener('load', function() {
                FastClick.attach(document.body);
            }, false);
        </script>
    </head>

    <body>
        <div id="cropper-example-1">
            <img id="im" alt="Picture" style="height:100%;width:100%;">
        </div>

        <div class="divbut">
            <div>
                <p id="quxiao" class="iconfont icon-quxiao"></p>
            </div>
            <div>
                <p id="xuanqu" class="iconfont icon-queding"></p>
            </div>
        </div>
        <div id="test" style="position: absolute;"></div>
    </body>
    <script type="text/javascript" src="js/jquery-1.11.2.min.js"></script>
    <script src="js/cropper.min.js"></script>
    <!--script src="js/cropper-img.js"></script -->
    <script type="text/javascript">

        /*$(function() {
            ! function() {
                var i = {
                    aspectRatio: 1 / 1
                };
            }()
        });*/
        (function(c) {

            var Cro = function() {}
            c.extend(Cro.prototype, {
                orientation: null,
                simg: null,
                simg2: null,
                urldata: null,
                view: null,
                num: 0,
                sbx: null,
                sby: null,
                n: 0,
                imgurl: null,
                weizhi: null,
                imageData: null,
                onReady: function() {
                    var that = this;
                    mui.init();
                    that.bindEvent();
                    that.view = plus.webview.currentWebview();

                    that.simg = document.createElement("img");
                    that.simg.setAttribute("id", "simg");
                    document.body.appendChild(that.simg);

                    var url = that.view.path;
                    var img = document.createElement("img");
                    img.setAttribute("src", url);

                    console.log('原始截取图片路径: ' + url);

                    //判断图片是否已经加载完,如果已经加载完,则执行下面的函数。
                    img.addEventListener("load", function() {

                        EXIF.getData(img, function() {  //调用EXIF解决,图片旋转90的问题

                            var orientation = EXIF.getAllTags(this).Orientation;

                            //本地压缩图片。
                            that.loadcopyImg( img, orientation, url );

                        });
                    })
                },
                cropperImg: function() {    //加载图片截取框
                    var that = this;

                    $('#cropper-example-1 > img').cropper({
                        aspectRatio: 1 / 1,     //长宽的比例
                        autoCropArea: 0.5,      //拆减图片框框的大小
                        strict: true,           //默认值true。 在strict模式中,canvas不能小于容器,剪裁容器不能再canvas之外。
                        background: false,      //是否在容器上显示网格背景。
                        guides: true,           //是否在剪裁框上显示虚线
                        highlight: false,       //是否在剪裁框上显示白色的模态窗口。
                        dragCrop: false,        //是否允许移除当前的剪裁框,并通过拖动来新建一个剪裁框区域。
                        movable: false,         //是否允许移动剪裁框。
                        resizable: false,       //是否允许改变剪裁框的大小。
                        crop: function(data) {

                            that.weizhi = data; //将当前截取区域的位置 和 大小放入全局变量中

                            that.imageData = $('#cropper-example-1 > img').cropper('getImageData'); //将当前图片的信息放入全局参数中去

                            console.log('getImageData: ' + JSON.stringify( that.imageData ) );
                            console.log('weizhi: ' + JSON.stringify( that.weizhi ));
                        }
                    });
                },
                loadcopyImg: function(img, opt,url) {   //本地处理图片。将图片进行压缩
                    var that = this;

                    var name="_doc/upload/F_ZDDZZ_"+ ( new Date() ).valueOf() +".jpg"; //拼装唯一图片值
                    plus.zip.compressImage({
                            src:url,        //src: (String 类型 )压缩转换原始图片的路径
                            dst:name,       //压缩转换目标图片的路径
                            quality:20,     //quality: (Number 类型 )压缩图片的质量.取值范围为1-100
                            overwrite:true  //overwrite: (Boolean 类型 )覆盖生成新文件
                        },
                        function(event) {
                            var path = name;            //压缩转换目标图片的路径
                            console.log( '本地压缩图片成功:' + event.target);

                            that.imgurl = event.target; //将压缩后的图片放入全局变量中

                            $("#im").attr("src", event.target );    //显示压缩后的图片
                            //$("#im").attr("src", 'file:///var/mobile/Containers/Data/Application/67789E0B-1848-4491-A225-E25B1C645A26/Documents/Pandora/apps/HBuilder/doc/upload/F_cutOut_1504768316962.jpg');
                            that.cropperImg();  //调用截取框

                        },function(error) {
                            plus.nativeUI.toast("压缩图片失败,请稍候再试");
                    });

                },
                bindEvent: function() {                 //绑定事件
                    document.getElementById("quxiao").addEventListener("click", function() {
                        window.cro.view.close();
                    });
                    document.getElementById("xuanqu").addEventListener("click", function() {
                        //window.cro.showFace(window.cro.urldata);
                        window.cro.jieQu();
                    });
                },
                jieQu: function(){
                    console.log('截取开始');
                    var date = (new Date()).valueOf();  //时间戳,避免截图后的文件名相同
                    var that = this;

                    //计算各个数值的百分比
                    var top_Precentage = ( that.weizhi.y / that.imageData.naturalHeight ).toFixed(2) * 100 + '%';
                    var left_Precentage = ( that.weizhi.x / that.imageData.naturalWidth ).toFixed(2) * 100 + '%';
                    var width_Precentage = ( that.weizhi.width / that.imageData.naturalWidth ).toFixed(2) * 100 + '%';
                    var height_Precentage = ( that.weizhi.height / that.imageData.naturalHeight ).toFixed(2) * 100 + '%';

                    console.log( top_Precentage + " | " + left_Precentage + " | " + width_Precentage + " | " + height_Precentage );
                    //通过压缩按比例截取图片
                    plus.zip.compressImage({
                        src: that.imgurl,   //src在这里是第一步Url里的src。也就是本地路径
                        dst: '_doc/upload/F_cutOut_'+ date +'.jpg',
                        overwrite: true,
                        clip: {
                          top: top_Precentage,
                          left: left_Precentage,
                          width: width_Precentage,
                          height: height_Precentage
                        }
                      },
                      function( event ) {
                        console.log('截取后的图片路径:' + event.target);

                        var vNextPage = plus.webview.getWebviewById( 'home.html' );
                        if( vNextPage != null ){

                            mui.fire( vNextPage, 'newsId',{
                                urlPath : event.target
                            });
                        }else{
                            console.log( '跳转失败 ');
                        }

                        window.cro.view.close();/**/
                        $("#im").attr("src", event.target ); //压缩图片
                      }
                    );
                }

            });
            window.cro = new Cro();
            c.plusReady(function() {
                window.cro.onReady();
            })
        })(mui)
    </script>

</html>
贡献一下代码
<!DOCTYPE html>
<html>

    <head>
        <meta charset="utf-8">
        <meta name="viewport" content="width=device-width,initial-scale=1,minimum-scale=1,maximum-scale=1,user-scalable=no" />
        <title></title>

        <script type="text/javascript" src="js/jquery-1.11.2.min.js" ></script>

        <script src="js/mui.min.js"></script>
        <link href="css/mui.min.css" rel="stylesheet" />
        <script type="text/javascript" charset="utf-8">
            mui.init();
        </script>
    </head>

    <body>
        <header class="mui-bar mui-bar-nav">
            <a class="mui-action-back mui-icon mui-icon-left-nav mui-pull-left"></a>
            <h1 class="mui-title">起始页</h1>
        </header>
        <div class="mui-content">
            <button id="primary" class="mui-btn-primary mui-btn-block" style="margin-top: 20px;">拍照</button>
            <button id="success" class="mui-btn-success mui-btn-block" style="margin-top: 20px;">打开相册</button>
        </div>

        <div id='dkj-result'>

        </div>

        <script>
            if (window.plus) {
                plusReady();
            } else {
                document.addEventListener('plusready', plusReady, false);
            }

            function plusReady() {
                mui(".mui-content").on("tap", "#primary", function() {
                    var cmr = plus.camera.getCamera();
                    cmr.captureImage(function(p) {
                        plus.io.resolveLocalFileSystemURL(p, function(entry) {
                            mui.openWindow({
                                url: 'cropper.html',
                                id: 'cropper.html',
                                extras: {
                                    path: "file:///" + entry.fullPath,
                                    change: "cem"
                                }
                            });
                        }, function(e) {
                            mui.toast(e.message);
                        });
                    }, function(e) {}, {
                        filename: "_doc/camera/"
                    });
                })
                mui(".mui-content").on("tap", "#success", function() {
                    plus.gallery.pick(function(url) {
                        mui.openWindow({
                            url: 'cropper.html',
                            id: 'cropper.html',
                            extras: {
                                path: url,
                                change: "open"
                            }
                        });
                    }, function(error) {
                        mui.toast("打开相册失败");
                    });
                }, false);
            };
            window.addEventListener('newsId',function(event){

                var urlPath = event.detail.urlPath;

                var sHtml = '<img style="margin: 10px 10px 10px 10px; width: 100px; height: 100px;" src="'+ urlPath +'" />';
                console.log('返回的参数:' + sHtml);
                $("#dkj-result").append( sHtml );
            });
        </script>
    </body>

</html>
第二个文件:
<!DOCTYPE html>
<html>

    <head>
        <meta charset="utf-8">
        <meta name="viewport" content="width=device-width,initial-scale=1,minimum-scale=1,maximum-scale=1,user-scalable=no" />
        <script src="js/mui.js"></script>
        <link href="css/mui.min.css" rel="stylesheet" />
        <link href="css/iconfont.css" rel="stylesheet" />
        <link rel="stylesheet" href="css/cropper.css" />

        <script src="js/custom/common.js"></script>
        <script type="text/javascript" src="js/fastclick.js"></script>
        <script type="text/javascript" src="js/exif.js"></script>
        <link href="css/user-information.css" rel="stylesheet" />
        <script>
            window.addEventListener('load', function() {
                FastClick.attach(document.body);
            }, false);
        </script>
    </head>

    <body>
        <div id="cropper-example-1">
            <img id="im" alt="Picture" style="height:100%;width:100%;">
        </div>

        <div class="divbut">
            <div>
                <p id="quxiao" class="iconfont icon-quxiao"></p>
            </div>
            <div>
                <p id="xuanqu" class="iconfont icon-queding"></p>
            </div>
        </div>
        <div id="test" style="position: absolute;"></div>
    </body>
    <script type="text/javascript" src="js/jquery-1.11.2.min.js"></script>
    <script src="js/cropper.min.js"></script>
    <!--script src="js/cropper-img.js"></script -->
    <script type="text/javascript">

        /*$(function() {
            ! function() {
                var i = {
                    aspectRatio: 1 / 1
                };
            }()
        });*/
        (function(c) {

            var Cro = function() {}
            c.extend(Cro.prototype, {
                orientation: null,
                simg: null,
                simg2: null,
                urldata: null,
                view: null,
                num: 0,
                sbx: null,
                sby: null,
                n: 0,
                imgurl: null,
                weizhi: null,
                imageData: null,
                onReady: function() {
                    var that = this;
                    mui.init();
                    that.bindEvent();
                    that.view = plus.webview.currentWebview();

                    that.simg = document.createElement("img");
                    that.simg.setAttribute("id", "simg");
                    document.body.appendChild(that.simg);

                    var url = that.view.path;
                    var img = document.createElement("img");
                    img.setAttribute("src", url);

                    console.log('原始截取图片路径: ' + url);

                    //判断图片是否已经加载完,如果已经加载完,则执行下面的函数。
                    img.addEventListener("load", function() {

                        EXIF.getData(img, function() {  //调用EXIF解决,图片旋转90的问题

                            var orientation = EXIF.getAllTags(this).Orientation;

                            //本地压缩图片。
                            that.loadcopyImg( img, orientation, url );

                        });
                    })
                },
                cropperImg: function() {    //加载图片截取框
                    var that = this;

                    $('#cropper-example-1 > img').cropper({
                        aspectRatio: 1 / 1,     //长宽的比例
                        autoCropArea: 0.5,      //拆减图片框框的大小
                        strict: true,           //默认值true。 在strict模式中,canvas不能小于容器,剪裁容器不能再canvas之外。
                        background: false,      //是否在容器上显示网格背景。
                        guides: true,           //是否在剪裁框上显示虚线
                        highlight: false,       //是否在剪裁框上显示白色的模态窗口。
                        dragCrop: false,        //是否允许移除当前的剪裁框,并通过拖动来新建一个剪裁框区域。
                        movable: false,         //是否允许移动剪裁框。
                        resizable: false,       //是否允许改变剪裁框的大小。
                        crop: function(data) {

                            that.weizhi = data; //将当前截取区域的位置 和 大小放入全局变量中

                            that.imageData = $('#cropper-example-1 > img').cropper('getImageData'); //将当前图片的信息放入全局参数中去

                            console.log('getImageData: ' + JSON.stringify( that.imageData ) );
                            console.log('weizhi: ' + JSON.stringify( that.weizhi ));
                        }
                    });
                },
                loadcopyImg: function(img, opt,url) {   //本地处理图片。将图片进行压缩
                    var that = this;

                    var name="_doc/upload/F_ZDDZZ_"+ ( new Date() ).valueOf() +".jpg"; //拼装唯一图片值
                    plus.zip.compressImage({
                            src:url,        //src: (String 类型 )压缩转换原始图片的路径
                            dst:name,       //压缩转换目标图片的路径
                            quality:20,     //quality: (Number 类型 )压缩图片的质量.取值范围为1-100
                            overwrite:true  //overwrite: (Boolean 类型 )覆盖生成新文件
                        },
                        function(event) {
                            var path = name;            //压缩转换目标图片的路径
                            console.log( '本地压缩图片成功:' + event.target);

                            that.imgurl = event.target; //将压缩后的图片放入全局变量中

                            $("#im").attr("src", event.target );    //显示压缩后的图片
                            //$("#im").attr("src", 'file:///var/mobile/Containers/Data/Application/67789E0B-1848-4491-A225-E25B1C645A26/Documents/Pandora/apps/HBuilder/doc/upload/F_cutOut_1504768316962.jpg');
                            that.cropperImg();  //调用截取框

                        },function(error) {
                            plus.nativeUI.toast("压缩图片失败,请稍候再试");
                    });

                },
                bindEvent: function() {                 //绑定事件
                    document.getElementById("quxiao").addEventListener("click", function() {
                        window.cro.view.close();
                    });
                    document.getElementById("xuanqu").addEventListener("click", function() {
                        //window.cro.showFace(window.cro.urldata);
                        window.cro.jieQu();
                    });
                },
                jieQu: function(){
                    console.log('截取开始');
                    var date = (new Date()).valueOf();  //时间戳,避免截图后的文件名相同
                    var that = this;

                    //计算各个数值的百分比
                    var top_Precentage = ( that.weizhi.y / that.imageData.naturalHeight ).toFixed(2) * 100 + '%';
                    var left_Precentage = ( that.weizhi.x / that.imageData.naturalWidth ).toFixed(2) * 100 + '%';
                    var width_Precentage = ( that.weizhi.width / that.imageData.naturalWidth ).toFixed(2) * 100 + '%';
                    var height_Precentage = ( that.weizhi.height / that.imageData.naturalHeight ).toFixed(2) * 100 + '%';

                    console.log( top_Precentage + " | " + left_Precentage + " | " + width_Precentage + " | " + height_Precentage );
                    //通过压缩按比例截取图片
                    plus.zip.compressImage({
                        src: that.imgurl,   //src在这里是第一步Url里的src。也就是本地路径
                        dst: '_doc/upload/F_cutOut_'+ date +'.jpg',
                        overwrite: true,
                        clip: {
                          top: top_Precentage,
                          left: left_Precentage,
                          width: width_Precentage,
                          height: height_Precentage
                        }
                      },
                      function( event ) {
                        console.log('截取后的图片路径:' + event.target);

                        var vNextPage = plus.webview.getWebviewById( 'home.html' );
                        if( vNextPage != null ){

                            mui.fire( vNextPage, 'newsId',{
                                urlPath : event.target
                            });
                        }else{
                            console.log( '跳转失败 ');
                        }

                        window.cro.view.close();/**/
                        $("#im").attr("src", event.target ); //压缩图片
                      }
                    );
                }

            });
            window.cro = new Cro();
            c.plusReady(function() {
                window.cro.onReady();
            })
        })(mui)
    </script>

</html>弹出 mui-modal 标题出现显示不正常的问题
<div id="transferModal" class="mui-modal">
<header class="mui-bar mui-bar-nav" style="background-color: #FFFFFF;border-bottom: 1px #F4F4F4 solid;">
<a class="mui-icon mui-pull-left" href="#transferModal">
<img src="../public/img/backArrow_gray19x19@3x.png" width="15" style="margin-left:3px;margin-top:4px;" />
</a>
<h1 class="mui-title">标题</h1>
</header>
<div class="mui-content" style="height: 100%;">
</div>
</div>
比如这个modal 弹出后,发现标题 header 直接没了。各种原因找了,发现加上样式:
.mui-modal header{overflow: hidden;}就可以解决了。
收起阅读 »用vue和mui整合开发的一个图片压缩服务示例
前言
这只是个人的经验总结和分享,并不是,也没时间做一个完整的教程。
分享的是我在实际项目开发中碰到的杂七杂八的问题,仅供参考。
一个简单的图片压缩工具
在线地址: 图片压缩工具-友间共享
在工作过程中,难免会碰到需要为同一个图片生成多种分辨率的情形,比如打包app之前需要准备好的各类图标,虽然简单,但是费点时间在所难免,就自己做了一个小工具,主要功能如下:
- 可以自定义处理后的图片的分辨率和压缩方式等,自定义的样式自动保存,下次可以重复使用。
- 一键上传图片,根据预设的样式批量生成处理结果,根据需要再自行下载


开发环境
- vue+mui+webpack+npm+macos
- 后台服务: 七牛云存储
运行环境
在线服务,可在支持h5的浏览器上运行,电脑,手机平板理论上都可以
在线地址: 图片压缩工具-友间共享
实现原理
其实很简单,就是先上传图片到七牛云服务
然后在页面上提供配置页面,保存用户配置的格式,然后把每个格式都转化成七牛的图片转化服务的格式化字符串,最后把这个字符串和图片的原地址合并成图片下载链接,就可以在点击链接时调用七牛的图片处理服务,按照我们设定的格式下载转化后的图片。
项目目录结构

** 详细目录结构介绍和开发环境部署参考 怎么搭建vue和Mui的多页面开发环境
主要代码
引入vue,mui等库
import LContext from 'lui/context.js'
import Vue from 'vue'
import 'babel-polyfill'
import Vuex from 'vuex'
import $ from './mui/mui.min'

require('../css/mui.min.css')
require('../css/icons-extra.css')
//require('../css/iconfont.css')
//require('../css/app.css')
require('../css/app.less')
window.Vue = Vue
window.Vuex = Vuex
window.$ = $
window.mui = $

require('./mui/mui.pullToRefresh')
require('./mui/mui.pullToRefresh.material')

//加载BASE64
require('exports-loader!./util/base64.js')
Vue.use(Vuex)

//import LoginDialog from 'app/Login'

if(process.env.NODE_ENV === 'production') {
    Vue.config.productionTip = false
}
有点偷懒,部分变量其实是可以在环境配置时引入的,这里就先忽略了,反正效果也一样
其中的库可根据需要引入,因为是从我自己的架构上COPY下来的,有些文件和库在这个项目中是可以不用引入的。引用的路径和webpack环境配置有关,以下是我的配置
    resolve: {
        extensions: ['.js', '.vue', '.json'],
        alias: { //定义别名,简易方式,可以在require调用时缩短路径
            'vue$': 'vue/dist/vue.esm.js',
            '@': resolve('src'),
            "page$": resolve('src/js/page.js'),
            'app': resolve('src/components/'),
            'lui': resolve('src/js/lui/'),
            'mui': resolve('src/js/mui/'),
            'util': resolve('src/js/util/')
        }
    },
output.js代码
import Page from 'page'

import Uploader from 'lui/upload.js'

var formVue = new Vue({
    el: '.mui-content',
    data: {
        src: '',
        formats: [],
        formatBuff: {
            facs: 9,
            scaleType: '按指定宽高值强行缩略,可能导致目标图片变形,width和height取值范围1-9999'
        }, //当前正在编辑的图片类型
        collapsePanels: {
            scale: false
        },
        logined: false
    },
    computed: {
        showScale: function() {
            switch(this.formatBuff.facs) {
                case 1:
                    return true;
                case 2:
                    return true;
                case 3:
                    return true;
                default:
                    break;
            }
            return false;
        },
        showHeight: function() {
            switch(this.formatBuff.facs) {
                case 5:
                    return true;

                case 7:
                    return true;
                case 8:
                    return true;

                case 9:
                    return true;

                case 10:
                    return true;

                case 11:
                    return true;
                default:
                    break;
            }
            return false;
        },
        showWidth: function() {
            switch(this.formatBuff.facs) {
                case 4:
                    return true;
                case 7:
                    return true;
                case 8:
                    return true;

                case 9:
                    return true;
                case 10:
                    return true;

                case 11:
                    return true;
                default:
                    break;
            }
            return false
        },
        showArea: function() {
            switch(this.formatBuff.facs) {
                case 12:
                    return true;
                default:
                    break;
            }
            return false;
        },
        showInput: function() {
            if(this.formatBuff.facs > 0) {
                return true
            }
            return false
        },
        srcUri: function() {
            if(this.src) {
                return LContext.fileServer + this.src + LContext.image.Thumbnail
            }
            return ''
        },
        srcThumbnail: function() {
            if(this.src) {
                return LContext.fileServer + this.src +
                    LContext.image.Thumbnail
            }
            return ''
        },
        isEdit: function() {
            if(this.formatBuff.uid) {
                return true
            }
            return false
        },
        saveBtnText: function() {
            console.log(this.isEdit + '  edit')
            if(this.isEdit) {
                return '保存修改'
            } else {
                return '保存新建样式'
            }
        }
    },
    methods: {
        downLoad: function(format) {
            var _format = this.decodeFormat(format)
            if(_format.length > 2) {
                lpage.open(LContext.fileServer + this.src + '?imageMogr2' + _format, undefined, 'new')
            } else {
                lpage.alert('下载格式无效!')
            }
        },
        downUrl: function(format) {
            var _format = this.decodeFormat(format)
            if(_format.length > 2) {
                return LContext.fileServer + this.src + '?imageMogr2' + _format
            } else {
                return false
            }
        },
        deleteFormat: function(format) {
            for(var i = 0; i < this.formats.length; i++) {
                if(this.formats[i].uid === format.uid) {
                    this.formats.splice(i, 1)
                    lpage.saveFormats()
                }
            }
        },
        setFacs: function(facs, event) {
            //          this.formatBuff.facs = parseInt(facs, 10)
            Vue.set(this.formatBuff, 'facs', parseInt(facs, 10))
            Vue.set(this.formatBuff, 'scaleType', event.currentTarget.innerText)

            Vue.nextTick(function() {
                this.closePanel('scale')
            }.bind(this))
            //          console.log(JSON.stringify(this.formatBuff))
        },
        decodeFormat: function(format) {
            //缩放
            var formatStr = '/thumbnail/'
            switch(format.facs) {
                case 1:
                    formatStr += '!' + format.scale + 'p'
                    break;
                case 2:
                    formatStr += '!' + format.scale + 'px'
                    break;
                case 3:
                    formatStr += '!x' + format.scale + 'p'
                    break;
                case 4:
                    formatStr += format.width + 'x'
                    break;
                case 5:
                    formatStr += 'x' + format.height
                    break;

                case 7:
                    formatStr += format.width + 'x' + format.height
                    break;

                case 8:
                    formatStr += '!' + format.width + 'x' + format.height
                    break;

                case 9:
                    formatStr += format.width + 'x' + format.height + '!'
                    break;

                case 10:
                    formatStr += format.width + 'x' + format.height + '>'
                    break;

                case 11:
                    formatStr += format.width + 'x' + format.height + '<'
                    break;
                case 12:
                    formatStr += format.area + '@'
                    break;
                default:
                    formatStr = ''
                    break;
            }
            //格式转换
            if(format.suffix !== 'auto') {
                formatStr += '/format/' + format.suffix
            }
            return formatStr
        },
        isActiveFacs: function(facs) {
            if(this.formatBuff.facs === facs) {
                return true
            }
            return false
        },
        panelActive: function(collapseList) {
            return this.collapsePanels[collapseList]
        },
        togglePanel: function(collapseList) {
            Vue.set(this.collapsePanels, collapseList, !this.collapsePanels[collapseList])
        },
        closePanel: function(collapseList) {
            Vue.set(this.collapsePanels, collapseList, false)
        },
        submitNewFormat: function() {
            var newFormat = {
                uid: 'format_' + new Date().getTime(),
                height: this.formatBuff.height,
                width: this.formatBuff.width,
                scale: this.formatBuff.scale,
                area: this.formatBuff.area,
                facs: this.formatBuff.facs,
                desc: this.formatBuff.desc,
                scaleType: this.formatBuff.scaleType,
                suffix: this.formatBuff.suffix ? this.formatBuff.suffix : 'auto', //图片类型
                quality: this.formatBuff.quality ? this.formatBuff.quality : 75 //图片质量
            }
            var change = false
            if(this.formatBuff.uid) {
                for(var i = 0; i < this.formats.length; i++) {
                    if(this.formats[i].uid === this.formatBuff.uid) {
                        newFormat.uid = this.formatBuff.uid
                        this.formatBuff.uid = undefined
                        Vue.set(this.formats, i, newFormat)
                        change = true
                    }
                }
            }!change && this.formats.push(newFormat)
            lpage.saveFormats()
        },
        editFormat: function(format) {
            Vue.set(this.formatBuff, 'uid', format.uid)
            Vue.set(this.formatBuff, 'height', format.height)
            Vue.set(this.formatBuff, 'width', format.width)
            Vue.set(this.formatBuff, 'scale', format.scale)
            Vue.set(this.formatBuff, 'area', format.area)
            Vue.set(this.formatBuff, 'facs', format.facs)
            Vue.set(this.formatBuff, 'desc', format.desc)
            Vue.set(this.formatBuff, 'scaleType', format.scaleType)
            Vue.set(this.formatBuff, 'suffix', format.suffix === 'auto' ? undefined : format.suffix)
            Vue.set(this.formatBuff, 'quality', format.quality ? format.quality : 75)
        }
    }
})

var pcPage = {
    initUI: function() {
        this.initUploader()
    },
    initData: function() {
        //      this.user.isLogin(function(logined) {
        //          if(logined) {
        //              formVue.logined = true
        lpage.getFormats()
        //          } else {
        //              formVue.logined = false
        //              lpage.user.login()
        //          }
        //      })
    },
    initUploader: function() {
        new Uploader({
            selector: 'image_uploader',
            token: {
                mode: 'imagescale',
                image: { //图片
                    prefix: '/utils/imagescale/'
                }
            },
            success: function(data) {
                formVue.src = data.key
                lpage.saveFormats()
            }
        }).init()
    },
    saveFormats: function() {
        lpage.setItem('_myFormats', JSON.stringify(formVue.formats))
        lpage.setItem('_lastSrc', formVue.src)
    },
    getFormats: function() {
        var _fmt = lpage.getItem('_myFormats')
        if(!_fmt) {
            _fmt = [{
                'uid': 'format_1504082048978',
                'height': '2208',
                'width': '1242',
                'scale': '50',
                'facs': 9,
                'desc': '苹果IphoneApp审核用的截屏图片1242*2208',
                'scaleType': '按指定宽高值强行缩略,可能导致目标图片变形,width和height取值范围1-9999\n',
                'suffix': 'auto',
                'quality': '100'
            }, {
                'uid': 'format_1504144877541',
                'height': '2732',
                'width': '2048',
                'scale': '50',
                'facs': 9,
                'desc': '苹果IpadApp审核用的截屏图片2048*2732',
                'scaleType': '按指定宽高值强行缩略,可能导致目标图片变形,width和height取值范围1-9999\n',
                'suffix': 'auto',
                'quality': '100'
            }]
            Vue.set(formVue, 'formats', _fmt)
        } else

        if(_fmt) {
            try {
                _fmt = JSON.parse(_fmt)
                Vue.set(formVue, 'formats', _fmt)
            } catch(e) {
                //TODO handle the exception
                console.log('err')
            }
        }

        _fmt = lpage.getItem('_lastSrc')
        if(_fmt) {
            formVue.src = _fmt
        }
    }
}

Page.init({
    pc: pcPage
})
output.html源码
<!DOCTYPE html>
<html class="feedback">

    <head>
        <meta charset="utf-8">
        <meta name="viewport" content="width=device-width, initial-scale=1,maximum-scale=1,user-scalable=no">
        <meta name="apple-mobile-web-app-capable" content="yes">
        <meta name="apple-mobile-web-app-status-bar-style" content="black">
        <title>友间共享-图片处理</title>
        <style>
            .mui-content .mui-table-view-radio .mui-table-view-cell>a:not(.mui-btn) {
                text-align: left;
                white-space: normal;
            }
        </style>
    </head>

    <body>
        <header class="mui-bar mui-bar-nav">
            <a class="mui-action-back mui-btn  mui-btn-link mui-btn-nav mui-pull-left"><span class=" mui-icon mui-icon-left-nav "></span> </a>
            <h1 class="mui-title">友间共享-图片处理</h1>
        </header>

        <div class="mui-content">

            <p class="mui-content-padded">可将上传的图片一次性转化输出成多个指定高度/宽度的图片,每次上传文件会扣除一定数额的积分,积分可通过多种方式获取
                <a l-href="https://www.betweenfriends.cn/view/mine/bonusrule.html">积分获取/使用规则</a>
            </p>
            <div class="mui-content-padded ">
                <img :src="srcUri" style="max-width: 250px;" />
                <div class="image-list">
                    <div class="image-item space">
                        <button type="button" class="mui-btn mui-btn-blue">点击上传</button>
                        <div class="file">
                            <form id="image_uploader"></form>
                        </div>
                    </div>
                </div>
            </div>

            <p class="mui-content-padded">转换后的图片下载</p>
            <ul class="mui-table-view">
                <li v-for="format in formats" class="mui-table-view-cell mui-media">
                    <img class="mui-media-object mui-pull-left" :src="srcThumbnail">
                    <div class="mui-media-body">
                        <p>{{format.desc}}</p>
                        <button type="button" class="mui-btn mui-btn-link" @tap="deleteFormat(format)">删除样式</button>
                        <button type="button" class="mui-btn mui-btn-link" @tap="editFormat(format)">编辑样式</button>
                        <a class="mui-btn mui-btn-blue" :href="downUrl(format)" download="格式化图片">下载图片</a>
                    </div>
                </li>
            </ul>

            <hr />
            <p class="mui-content-padded" style="margin-top: 20px;">图片处理参数配置,可在此处新增图片样式</p>
            <ul class="mui-table-view">

                <li class="mui-table-view-cell mui-collapse" :class="{'mui-active':panelActive('scale')}" @tap="togglePanel('scale')">
                    <a class="mui-navigate-right">
                        缩放模式</a>
                    <ul class="mui-table-view mui-table-view-radio">

                        <li class="mui-table-view-cell" :class="{'mui-selected':isActiveFacs(9)}" @tap="setFacs(9,$event)">
                            <a class="mui-navigate-right">
                                按指定宽高值强行缩略,可能导致目标图片变形,width和height取值范围1-9999
                            </a>
                        </li>

                        <li class="mui-table-view-cell" :class="{'mui-selected':isActiveFacs(1)}" @tap="setFacs(1,$event)">
                            <a class="mui-navigate-right">
                                基于原图大小,按指定百分比缩放。Scale取值范围1-999
                            </a>
                        </li>
                        <li class="mui-table-view-cell" :class="{'mui-selected':isActiveFacs(2)}" @tap="setFacs(2,$event)">
                            <a class="mui-navigate-right">
                                以百分比形式指定目标图片宽度,高度不变。Scale取值范围1-999
                            </a>
                        </li>
                        <li class="mui-table-view-cell" :class="{'mui-selected':isActiveFacs(3)}" @tap="setFacs(3,$event)">
                            <a class="mui-navigate-right">
                                以百分比形式指定目标图片高度,宽度不变。Scale取值范围1-999
                            </a>
                        </li>
                        <li class="mui-table-view-cell" :class="{'mui-selected':isActiveFacs(4)}" @tap="setFacs(4,$event)">
                            <a class="mui-navigate-right">
                                指定目标图片宽度,高度等比缩放,Width取值范围1-9999
                            </a>
                        </li>
                        <li class="mui-table-view-cell" :class="{'mui-selected':isActiveFacs(5)}" @tap="setFacs(5,$event)">
                            <a class="mui-navigate-right">
                                指定目标图片高度,宽度等比缩放,Height取值范围1-9999
                            </a>
                        </li>

                        <li class="mui-table-view-cell" :class="{'mui-selected':isActiveFacs(7)}" @tap="setFacs(7,$event)">
                            <a class="mui-navigate-right">
                                等比缩放,比例值为宽缩放比和高缩放比的较小值,Width 和 Height 取值范围1-9999。 注意:宽缩放比:目标宽/原图宽   高缩放比:目标高/原图高
                            </a>
                        </li>
                        <li class="mui-table-view-cell" :class="{'mui-selected':isActiveFacs(8)}" @tap="setFacs(8,$event)">
                            <a class="mui-navigate-right">
                                等比缩放,比例值为宽缩放比和高缩放比的较大值,Width 和 Height 取值范围1-9999。 注意:宽缩放比:目标宽/原图宽   高缩放比:目标高/原图高
                            </a>
                        </li>

                        <li class="mui-table-view-cell" :class="{'mui-selected':isActiveFacs(10)}" @tap="setFacs(10,$event)">
                            <a class="mui-navigate-right">
                                等比缩小,比例值为宽缩放比和高缩放比的较小值。如果目标宽和高都大于原图宽和高,则不变,Width 和 Height 取值范围1-9999。 注意:宽缩放比:目标宽/原图宽   高缩放比:目标高/原图高;
                            </a>
                        </li>

                        <li class="mui-table-view-cell" :class="{'mui-selected':isActiveFacs(11)}" @tap="setFacs(11,$event)">
                            <a class="mui-navigate-right">
                                等比放大,比例值为宽缩放比和高缩放比的较小值。如果目标宽(高)小于原图宽(高),则不变,Width 和 Height 取值范围1-9999。 注意: 宽缩放比:目标宽/原图宽   高缩放比:目标高/原图高
                            </a>
                        </li>

                        <li class="mui-table-view-cell" :class="{'mui-selected':isActiveFacs(12)}" @tap="setFacs(12,$event)">
                            <a class="mui-navigate-right">
                                按原图高宽比例等比缩放,缩放后的像素数量不超过指定值,Area取值范围1-24999999
                            </a>
                        </li>
                    </ul>
                </li>
            </ul>
            <p class="mui-content-padded" v-show="showInput">{{formatBuff.scaleType}}</p>
            <form class="mui-input-group">
                <div class="mui-input-row" v-show="showScale">
                    <label>缩放百分比</label>
                    <input type="number" v-model="formatBuff.scale" class="mui-input-clear" min="1" max="999" step="1" placeholder="取值1到999">
                </div>
                <div class="mui-input-row" v-show="showHeight">
                    <label>高度</label>
                    <input type="number" v-model="formatBuff.height" class="mui-input-clear" placeholder="高度,0表示根据宽度等比例缩放">
                </div>
                <div class="mui-input-row" v-show="showWidth">
                    <label>宽度</label>
                    <input type="number" v-model="formatBuff.width" class="mui-input-clear" placeholder="宽度,0表示根据高度等比例缩放">
                </div>
                <div class="mui-input-row" v-show="showArea">
                    <label>像素限制</label>
                    <input type="number" v-model="formatBuff.area" class="mui-input-clear" placeholder="只对jpg有效">
                </div>

                <div class="mui-input-row" v-show="showInput">
                    <label>图片质量</label>
                    <input type="number" v-model="formatBuff.quality" class="mui-input-clear" min="1" max="100" placeholder="从1到100,默认75">
                </div>

                <div class="mui-input-row" v-show="showInput">
                    <label>输出文件格式</label>
                    <input type="text" class="mui-input-clear" v-model="formatBuff.suffix" placeholder="默认为原图格式,如jpg,非法格式可能导致出错">
                </div>
                <div class="mui-input-row" v-show="showInput">
                    <label>格式说明</label>
                    <input type="text" class="mui-input-clear" v-model="formatBuff.desc" placeholder="格式说明,用途说明等,将作为该格式的备注显示">
                </div>
                <div class="mui-button-row">
                    <button type="button" class="mui-btn mui-btn-link " v-show="showInput&&isEdit" @tap="submitNewFormat">放弃修改</button>
                    <button type="button" class="mui-btn mui-btn-blue " v-show="showInput" @tap="submitNewFormat">{{saveBtnText}}</button>

                </div>
            </form>

        </div>

        <div class="mui-text-center" style="margin-top: 30px; bottom: 0px;width: 100%;">
            © 2017 -
            <a l-href="https://www.betweenfriends.cn"> 友间共享 </a>
            <a l-href="https://blog.betweenfriends.cn/about"> 关于我们 </a> - 闽ICP备17012098号-1
        </div>
    </body>

</html>
代码解读
- 利用mui控制UI的布局和渲染展示
- vue负责绑定ui和后台数据,并跟踪数据变化
- Page是我自己定义的框架,源码就不方便分享了,简单的实现参考怎么实现一站式跨平台开发
原文地址:https://blog.betweenfriends.cn/post/crossdomaindev.html
前言
这只是个人的经验总结和分享,并不是,也没时间做一个完整的教程。
分享的是我在实际项目开发中碰到的杂七杂八的问题,仅供参考。
一个简单的图片压缩工具
在线地址: 图片压缩工具-友间共享
在工作过程中,难免会碰到需要为同一个图片生成多种分辨率的情形,比如打包app之前需要准备好的各类图标,虽然简单,但是费点时间在所难免,就自己做了一个小工具,主要功能如下:
- 可以自定义处理后的图片的分辨率和压缩方式等,自定义的样式自动保存,下次可以重复使用。
- 一键上传图片,根据预设的样式批量生成处理结果,根据需要再自行下载
开发环境
- vue+mui+webpack+npm+macos
- 后台服务: 七牛云存储
运行环境
在线服务,可在支持h5的浏览器上运行,电脑,手机平板理论上都可以
在线地址: 图片压缩工具-友间共享
实现原理
其实很简单,就是先上传图片到七牛云服务
然后在页面上提供配置页面,保存用户配置的格式,然后把每个格式都转化成七牛的图片转化服务的格式化字符串,最后把这个字符串和图片的原地址合并成图片下载链接,就可以在点击链接时调用七牛的图片处理服务,按照我们设定的格式下载转化后的图片。
项目目录结构
** 详细目录结构介绍和开发环境部署参考 怎么搭建vue和Mui的多页面开发环境
主要代码
引入vue,mui等库
import LContext from 'lui/context.js'
import Vue from 'vue'
import 'babel-polyfill'
import Vuex from 'vuex'
import $ from './mui/mui.min'

require('../css/mui.min.css')
require('../css/icons-extra.css')
//require('../css/iconfont.css')
//require('../css/app.css')
require('../css/app.less')
window.Vue = Vue
window.Vuex = Vuex
window.$ = $
window.mui = $

require('./mui/mui.pullToRefresh')
require('./mui/mui.pullToRefresh.material')

//加载BASE64
require('exports-loader!./util/base64.js')
Vue.use(Vuex)

//import LoginDialog from 'app/Login'

if(process.env.NODE_ENV === 'production') {
    Vue.config.productionTip = false
}
有点偷懒,部分变量其实是可以在环境配置时引入的,这里就先忽略了,反正效果也一样
其中的库可根据需要引入,因为是从我自己的架构上COPY下来的,有些文件和库在这个项目中是可以不用引入的。引用的路径和webpack环境配置有关,以下是我的配置
    resolve: {
        extensions: ['.js', '.vue', '.json'],
        alias: { //定义别名,简易方式,可以在require调用时缩短路径
            'vue$': 'vue/dist/vue.esm.js',
            '@': resolve('src'),
            "page$": resolve('src/js/page.js'),
            'app': resolve('src/components/'),
            'lui': resolve('src/js/lui/'),
            'mui': resolve('src/js/mui/'),
            'util': resolve('src/js/util/')
        }
    },
output.js代码
import Page from 'page'

import Uploader from 'lui/upload.js'

var formVue = new Vue({
    el: '.mui-content',
    data: {
        src: '',
        formats: [],
        formatBuff: {
            facs: 9,
            scaleType: '按指定宽高值强行缩略,可能导致目标图片变形,width和height取值范围1-9999'
        }, //当前正在编辑的图片类型
        collapsePanels: {
            scale: false
        },
        logined: false
    },
    computed: {
        showScale: function() {
            switch(this.formatBuff.facs) {
                case 1:
                    return true;
                case 2:
                    return true;
                case 3:
                    return true;
                default:
                    break;
            }
            return false;
        },
        showHeight: function() {
            switch(this.formatBuff.facs) {
                case 5:
                    return true;

                case 7:
                    return true;
                case 8:
                    return true;

                case 9:
                    return true;

                case 10:
                    return true;

                case 11:
                    return true;
                default:
                    break;
            }
            return false;
        },
        showWidth: function() {
            switch(this.formatBuff.facs) {
                case 4:
                    return true;
                case 7:
                    return true;
                case 8:
                    return true;

                case 9:
                    return true;
                case 10:
                    return true;

                case 11:
                    return true;
                default:
                    break;
            }
            return false
        },
        showArea: function() {
            switch(this.formatBuff.facs) {
                case 12:
                    return true;
                default:
                    break;
            }
            return false;
        },
        showInput: function() {
            if(this.formatBuff.facs > 0) {
                return true
            }
            return false
        },
        srcUri: function() {
            if(this.src) {
                return LContext.fileServer + this.src + LContext.image.Thumbnail
            }
            return ''
        },
        srcThumbnail: function() {
            if(this.src) {
                return LContext.fileServer + this.src +
                    LContext.image.Thumbnail
            }
            return ''
        },
        isEdit: function() {
            if(this.formatBuff.uid) {
                return true
            }
            return false
        },
        saveBtnText: function() {
            console.log(this.isEdit + '  edit')
            if(this.isEdit) {
                return '保存修改'
            } else {
                return '保存新建样式'
            }
        }
    },
    methods: {
        downLoad: function(format) {
            var _format = this.decodeFormat(format)
            if(_format.length > 2) {
                lpage.open(LContext.fileServer + this.src + '?imageMogr2' + _format, undefined, 'new')
            } else {
                lpage.alert('下载格式无效!')
            }
        },
        downUrl: function(format) {
            var _format = this.decodeFormat(format)
            if(_format.length > 2) {
                return LContext.fileServer + this.src + '?imageMogr2' + _format
            } else {
                return false
            }
        },
        deleteFormat: function(format) {
            for(var i = 0; i < this.formats.length; i++) {
                if(this.formats[i].uid === format.uid) {
                    this.formats.splice(i, 1)
                    lpage.saveFormats()
                }
            }
        },
        setFacs: function(facs, event) {
            //          this.formatBuff.facs = parseInt(facs, 10)
            Vue.set(this.formatBuff, 'facs', parseInt(facs, 10))
            Vue.set(this.formatBuff, 'scaleType', event.currentTarget.innerText)

            Vue.nextTick(function() {
                this.closePanel('scale')
            }.bind(this))
            //          console.log(JSON.stringify(this.formatBuff))
        },
        decodeFormat: function(format) {
            //缩放
            var formatStr = '/thumbnail/'
            switch(format.facs) {
                case 1:
                    formatStr += '!' + format.scale + 'p'
                    break;
                case 2:
                    formatStr += '!' + format.scale + 'px'
                    break;
                case 3:
                    formatStr += '!x' + format.scale + 'p'
                    break;
                case 4:
                    formatStr += format.width + 'x'
                    break;
                case 5:
                    formatStr += 'x' + format.height
                    break;

                case 7:
                    formatStr += format.width + 'x' + format.height
                    break;

                case 8:
                    formatStr += '!' + format.width + 'x' + format.height
                    break;

                case 9:
                    formatStr += format.width + 'x' + format.height + '!'
                    break;

                case 10:
                    formatStr += format.width + 'x' + format.height + '>'
                    break;

                case 11:
                    formatStr += format.width + 'x' + format.height + '<'
                    break;
                case 12:
                    formatStr += format.area + '@'
                    break;
                default:
                    formatStr = ''
                    break;
            }
            //格式转换
            if(format.suffix !== 'auto') {
                formatStr += '/format/' + format.suffix
            }
            return formatStr
        },
        isActiveFacs: function(facs) {
            if(this.formatBuff.facs === facs) {
                return true
            }
            return false
        },
        panelActive: function(collapseList) {
            return this.collapsePanels[collapseList]
        },
        togglePanel: function(collapseList) {
            Vue.set(this.collapsePanels, collapseList, !this.collapsePanels[collapseList])
        },
        closePanel: function(collapseList) {
            Vue.set(this.collapsePanels, collapseList, false)
        },
        submitNewFormat: function() {
            var newFormat = {
                uid: 'format_' + new Date().getTime(),
                height: this.formatBuff.height,
                width: this.formatBuff.width,
                scale: this.formatBuff.scale,
                area: this.formatBuff.area,
                facs: this.formatBuff.facs,
                desc: this.formatBuff.desc,
                scaleType: this.formatBuff.scaleType,
                suffix: this.formatBuff.suffix ? this.formatBuff.suffix : 'auto', //图片类型
                quality: this.formatBuff.quality ? this.formatBuff.quality : 75 //图片质量
            }
            var change = false
            if(this.formatBuff.uid) {
                for(var i = 0; i < this.formats.length; i++) {
                    if(this.formats[i].uid === this.formatBuff.uid) {
                        newFormat.uid = this.formatBuff.uid
                        this.formatBuff.uid = undefined
                        Vue.set(this.formats, i, newFormat)
                        change = true
                    }
                }
            }!change && this.formats.push(newFormat)
            lpage.saveFormats()
        },
        editFormat: function(format) {
            Vue.set(this.formatBuff, 'uid', format.uid)
            Vue.set(this.formatBuff, 'height', format.height)
            Vue.set(this.formatBuff, 'width', format.width)
            Vue.set(this.formatBuff, 'scale', format.scale)
            Vue.set(this.formatBuff, 'area', format.area)
            Vue.set(this.formatBuff, 'facs', format.facs)
            Vue.set(this.formatBuff, 'desc', format.desc)
            Vue.set(this.formatBuff, 'scaleType', format.scaleType)
            Vue.set(this.formatBuff, 'suffix', format.suffix === 'auto' ? undefined : format.suffix)
            Vue.set(this.formatBuff, 'quality', format.quality ? format.quality : 75)
        }
    }
})

var pcPage = {
    initUI: function() {
        this.initUploader()
    },
    initData: function() {
        //      this.user.isLogin(function(logined) {
        //          if(logined) {
        //              formVue.logined = true
        lpage.getFormats()
        //          } else {
        //              formVue.logined = false
        //              lpage.user.login()
        //          }
        //      })
    },
    initUploader: function() {
        new Uploader({
            selector: 'image_uploader',
            token: {
                mode: 'imagescale',
                image: { //图片
                    prefix: '/utils/imagescale/'
                }
            },
            success: function(data) {
                formVue.src = data.key
                lpage.saveFormats()
            }
        }).init()
    },
    saveFormats: function() {
        lpage.setItem('_myFormats', JSON.stringify(formVue.formats))
        lpage.setItem('_lastSrc', formVue.src)
    },
    getFormats: function() {
        var _fmt = lpage.getItem('_myFormats')
        if(!_fmt) {
            _fmt = [{
                'uid': 'format_1504082048978',
                'height': '2208',
                'width': '1242',
                'scale': '50',
                'facs': 9,
                'desc': '苹果IphoneApp审核用的截屏图片1242*2208',
                'scaleType': '按指定宽高值强行缩略,可能导致目标图片变形,width和height取值范围1-9999\n',
                'suffix': 'auto',
                'quality': '100'
            }, {
                'uid': 'format_1504144877541',
                'height': '2732',
                'width': '2048',
                'scale': '50',
                'facs': 9,
                'desc': '苹果IpadApp审核用的截屏图片2048*2732',
                'scaleType': '按指定宽高值强行缩略,可能导致目标图片变形,width和height取值范围1-9999\n',
                'suffix': 'auto',
                'quality': '100'
            }]
            Vue.set(formVue, 'formats', _fmt)
        } else

        if(_fmt) {
            try {
                _fmt = JSON.parse(_fmt)
                Vue.set(formVue, 'formats', _fmt)
            } catch(e) {
                //TODO handle the exception
                console.log('err')
            }
        }

        _fmt = lpage.getItem('_lastSrc')
        if(_fmt) {
            formVue.src = _fmt
        }
    }
}

Page.init({
    pc: pcPage
})
output.html源码
<!DOCTYPE html>
<html class="feedback">

    <head>
        <meta charset="utf-8">
        <meta name="viewport" content="width=device-width, initial-scale=1,maximum-scale=1,user-scalable=no">
        <meta name="apple-mobile-web-app-capable" content="yes">
        <meta name="apple-mobile-web-app-status-bar-style" content="black">
        <title>友间共享-图片处理</title>
        <style>
            .mui-content .mui-table-view-radio .mui-table-view-cell>a:not(.mui-btn) {
                text-align: left;
                white-space: normal;
            }
        </style>
    </head>

    <body>
        <header class="mui-bar mui-bar-nav">
            <a class="mui-action-back mui-btn  mui-btn-link mui-btn-nav mui-pull-left"><span class=" mui-icon mui-icon-left-nav "></span> </a>
            <h1 class="mui-title">友间共享-图片处理</h1>
        </header>

        <div class="mui-content">

            <p class="mui-content-padded">可将上传的图片一次性转化输出成多个指定高度/宽度的图片,每次上传文件会扣除一定数额的积分,积分可通过多种方式获取
                <a l-href="https://www.betweenfriends.cn/view/mine/bonusrule.html">积分获取/使用规则</a>
            </p>
            <div class="mui-content-padded ">
                <img :src="srcUri" style="max-width: 250px;" />
                <div class="image-list">
                    <div class="image-item space">
                        <button type="button" class="mui-btn mui-btn-blue">点击上传</button>
                        <div class="file">
                            <form id="image_uploader"></form>
                        </div>
                    </div>
                </div>
            </div>

            <p class="mui-content-padded">转换后的图片下载</p>
            <ul class="mui-table-view">
                <li v-for="format in formats" class="mui-table-view-cell mui-media">
                    <img class="mui-media-object mui-pull-left" :src="srcThumbnail">
                    <div class="mui-media-body">
                        <p>{{format.desc}}</p>
                        <button type="button" class="mui-btn mui-btn-link" @tap="deleteFormat(format)">删除样式</button>
                        <button type="button" class="mui-btn mui-btn-link" @tap="editFormat(format)">编辑样式</button>
                        <a class="mui-btn mui-btn-blue" :href="downUrl(format)" download="格式化图片">下载图片</a>
                    </div>
                </li>
            </ul>

            <hr />
            <p class="mui-content-padded" style="margin-top: 20px;">图片处理参数配置,可在此处新增图片样式</p>
            <ul class="mui-table-view">

                <li class="mui-table-view-cell mui-collapse" :class="{'mui-active':panelActive('scale')}" @tap="togglePanel('scale')">
                    <a class="mui-navigate-right">
                        缩放模式</a>
                    <ul class="mui-table-view mui-table-view-radio">

                        <li class="mui-table-view-cell" :class="{'mui-selected':isActiveFacs(9)}" @tap="setFacs(9,$event)">
                            <a class="mui-navigate-right">
                                按指定宽高值强行缩略,可能导致目标图片变形,width和height取值范围1-9999
                            </a>
                        </li>

                        <li class="mui-table-view-cell" :class="{'mui-selected':isActiveFacs(1)}" @tap="setFacs(1,$event)">
                            <a class="mui-navigate-right">
                                基于原图大小,按指定百分比缩放。Scale取值范围1-999
                            </a>
                        </li>
                        <li class="mui-table-view-cell" :class="{'mui-selected':isActiveFacs(2)}" @tap="setFacs(2,$event)">
                            <a class="mui-navigate-right">
                                以百分比形式指定目标图片宽度,高度不变。Scale取值范围1-999
                            </a>
                        </li>
                        <li class="mui-table-view-cell" :class="{'mui-selected':isActiveFacs(3)}" @tap="setFacs(3,$event)">
                            <a class="mui-navigate-right">
                                以百分比形式指定目标图片高度,宽度不变。Scale取值范围1-999
                            </a>
                        </li>
                        <li class="mui-table-view-cell" :class="{'mui-selected':isActiveFacs(4)}" @tap="setFacs(4,$event)">
                            <a class="mui-navigate-right">
                                指定目标图片宽度,高度等比缩放,Width取值范围1-9999
                            </a>
                        </li>
                        <li class="mui-table-view-cell" :class="{'mui-selected':isActiveFacs(5)}" @tap="setFacs(5,$event)">
                            <a class="mui-navigate-right">
                                指定目标图片高度,宽度等比缩放,Height取值范围1-9999
                            </a>
                        </li>

                        <li class="mui-table-view-cell" :class="{'mui-selected':isActiveFacs(7)}" @tap="setFacs(7,$event)">
                            <a class="mui-navigate-right">
                                等比缩放,比例值为宽缩放比和高缩放比的较小值,Width 和 Height 取值范围1-9999。 注意:宽缩放比:目标宽/原图宽   高缩放比:目标高/原图高
                            </a>
                        </li>
                        <li class="mui-table-view-cell" :class="{'mui-selected':isActiveFacs(8)}" @tap="setFacs(8,$event)">
                            <a class="mui-navigate-right">
                                等比缩放,比例值为宽缩放比和高缩放比的较大值,Width 和 Height 取值范围1-9999。 注意:宽缩放比:目标宽/原图宽   高缩放比:目标高/原图高
                            </a>
                        </li>

                        <li class="mui-table-view-cell" :class="{'mui-selected':isActiveFacs(10)}" @tap="setFacs(10,$event)">
                            <a class="mui-navigate-right">
                                等比缩小,比例值为宽缩放比和高缩放比的较小值。如果目标宽和高都大于原图宽和高,则不变,Width 和 Height 取值范围1-9999。 注意:宽缩放比:目标宽/原图宽   高缩放比:目标高/原图高;
                            </a>
                        </li>

                        <li class="mui-table-view-cell" :class="{'mui-selected':isActiveFacs(11)}" @tap="setFacs(11,$event)">
                            <a class="mui-navigate-right">
                                等比放大,比例值为宽缩放比和高缩放比的较小值。如果目标宽(高)小于原图宽(高),则不变,Width 和 Height 取值范围1-9999。 注意: 宽缩放比:目标宽/原图宽   高缩放比:目标高/原图高
                            </a>
                        </li>

                        <li class="mui-table-view-cell" :class="{'mui-selected':isActiveFacs(12)}" @tap="setFacs(12,$event)">
                            <a class="mui-navigate-right">
                                按原图高宽比例等比缩放,缩放后的像素数量不超过指定值,Area取值范围1-24999999
                            </a>
                        </li>
                    </ul>
                </li>
            </ul>
            <p class="mui-content-padded" v-show="showInput">{{formatBuff.scaleType}}</p>
            <form class="mui-input-group">
                <div class="mui-input-row" v-show="showScale">
                    <label>缩放百分比</label>
                    <input type="number" v-model="formatBuff.scale" class="mui-input-clear" min="1" max="999" step="1" placeholder="取值1到999">
                </div>
                <div class="mui-input-row" v-show="showHeight">
                    <label>高度</label>
                    <input type="number" v-model="formatBuff.height" class="mui-input-clear" placeholder="高度,0表示根据宽度等比例缩放">
                </div>
                <div class="mui-input-row" v-show="showWidth">
                    <label>宽度</label>
                    <input type="number" v-model="formatBuff.width" class="mui-input-clear" placeholder="宽度,0表示根据高度等比例缩放">
                </div>
                <div class="mui-input-row" v-show="showArea">
                    <label>像素限制</label>
                    <input type="number" v-model="formatBuff.area" class="mui-input-clear" placeholder="只对jpg有效">
                </div>

                <div class="mui-input-row" v-show="showInput">
                    <label>图片质量</label>
                    <input type="number" v-model="formatBuff.quality" class="mui-input-clear" min="1" max="100" placeholder="从1到100,默认75">
                </div>

                <div class="mui-input-row" v-show="showInput">
                    <label>输出文件格式</label>
                    <input type="text" class="mui-input-clear" v-model="formatBuff.suffix" placeholder="默认为原图格式,如jpg,非法格式可能导致出错">
                </div>
                <div class="mui-input-row" v-show="showInput">
                    <label>格式说明</label>
                    <input type="text" class="mui-input-clear" v-model="formatBuff.desc" placeholder="格式说明,用途说明等,将作为该格式的备注显示">
                </div>
                <div class="mui-button-row">
                    <button type="button" class="mui-btn mui-btn-link " v-show="showInput&&isEdit" @tap="submitNewFormat">放弃修改</button>
                    <button type="button" class="mui-btn mui-btn-blue " v-show="showInput" @tap="submitNewFormat">{{saveBtnText}}</button>

                </div>
            </form>

        </div>

        <div class="mui-text-center" style="margin-top: 30px; bottom: 0px;width: 100%;">
            © 2017 -
            <a l-href="https://www.betweenfriends.cn"> 友间共享 </a>
            <a l-href="https://blog.betweenfriends.cn/about"> 关于我们 </a> - 闽ICP备17012098号-1
        </div>
    </body>

</html>
代码解读
- 利用mui控制UI的布局和渲染展示
- vue负责绑定ui和后台数据,并跟踪数据变化
- Page是我自己定义的框架,源码就不方便分享了,简单的实现参考怎么实现一站式跨平台开发
原文地址:https://blog.betweenfriends.cn/post/crossdomaindev.html
收起阅读 »
分享自动生成ios离线打包所需各种大小icon的gulp代码
离线打包时需要各种大小分辨率不同的启动图标,手动一个个制作太麻烦了。
经过我半天的研究,终于写出了可以自动生成各种所需启动图标的gulp代码,如下:
var gulp = require('gulp')
var imageResize = require('gulp-image-resize')
var rename = require('gulp-rename')

gulp.task('icon-ios', () => {
    var sizes = [29, 40, 50, 57, 58, 72, 76, 80, 87, 100, 114, 120, 144, 152, 180]
    sizes.forEach((size, index) => {
        gulp.src('icon.png')
            .pipe(imageResize({
                width: size,
                height: size,
                corp: true
            }))
            .pipe(rename('icon'+size+'.png'))
            .pipe(gulp.dest('dist'))
    })
})
需要注意的是gulp-image-resize是需要额外安装两个依赖的,可以去官网查看:
gulp-image-resize
希望官方能把这段经验加到离线打包的文档里,防止后人走弯路
收起阅读 »怎么搭建vue和Mui的多页面开发环境
现在有很多的打包工具可以选择,grunt,gulp,webpack等等。vue官方建议是使用webpack,而且webpack相对其他打包工具的好处是代码动态编译,可以根据需要提取出公共部分的代码。因此我们也选择webpack作为打包工具。
目录结构

开发目录 src
- assets 静态资源,如图片等的保存
- css 样式文件,css,less等
- fonts 字体文件,根据需要添加自定义字体
- js js框架,公共部分代码,自定义组件等
5.view html页面文件,页面入口js文件
build 打包参数配置
主要用于对打包过程的控制
- webpack.base.conf.js 基础配置参数,开发和生成代码打包共用
- webpack.dev.conf.js 开发环境下的打包参数配置
- webpack.prod.conf.js 生产环境的打包参数配置
config 打包模式配置
主要是打包相关的基础参数配置,如文件存放目录,打包后的访问根目录,是否压缩等
assets 生产环境下的js/css/图片等文件保存路径
可在config中指定
view 生产环境下的页面文件Html保存路径
和src/view下的html文件一一对应
package.json 打包的环境依赖配置
使用方式
-
开发 npm run dev 开启本地web服务,方便调试页面和代码
-
生产环境打包 npm run build 将src下的代码打包到根目录下的 assets和view目录下
功能
-
支持vue开发的调试,支持webpack打包的调试和自动更新,不需要手动刷新代码
-
支持代码和语法检查,可在根目录的.eslintrc下配置检查规则
3.支持webpack的多页面(多入口)开发,相比单入口模式,逻辑更清楚
使用说明
1.view下的页面必须放在view的下级目录,比如view/index/index.html,同时每个页面文件必须搭配一个同名的js文件作为页面入口,比如view/index/index.js
2.可根据需要配置本地调试服务器的端口,默认8000,
在config/index下配置
3.可配置打包路径等,同样在config/index下配置
初始化说明
-
在根目录下执行 npm install (如果不是root用户的话,sudo npm install)
-
打包或者调试时,如果npm 命令提示错误,一般是某个模块未安装,可执行 npm install ***(模块名称) 安装相关模块
-
npm run dev (调试)
-
npm run build (正式打包)
下载完整目录
原文链接:https://blog.betweenfriends.cn/post/howtodevwithvueandmui.html
现在有很多的打包工具可以选择,grunt,gulp,webpack等等。vue官方建议是使用webpack,而且webpack相对其他打包工具的好处是代码动态编译,可以根据需要提取出公共部分的代码。因此我们也选择webpack作为打包工具。
目录结构
开发目录 src
- assets 静态资源,如图片等的保存
- css 样式文件,css,less等
- fonts 字体文件,根据需要添加自定义字体
- js js框架,公共部分代码,自定义组件等
5.view html页面文件,页面入口js文件
build 打包参数配置
主要用于对打包过程的控制
- webpack.base.conf.js 基础配置参数,开发和生成代码打包共用
- webpack.dev.conf.js 开发环境下的打包参数配置
- webpack.prod.conf.js 生产环境的打包参数配置
config 打包模式配置
主要是打包相关的基础参数配置,如文件存放目录,打包后的访问根目录,是否压缩等
assets 生产环境下的js/css/图片等文件保存路径
可在config中指定
view 生产环境下的页面文件Html保存路径
和src/view下的html文件一一对应
package.json 打包的环境依赖配置
使用方式
-
开发 npm run dev 开启本地web服务,方便调试页面和代码
-
生产环境打包 npm run build 将src下的代码打包到根目录下的 assets和view目录下
功能
-
支持vue开发的调试,支持webpack打包的调试和自动更新,不需要手动刷新代码
-
支持代码和语法检查,可在根目录的.eslintrc下配置检查规则
3.支持webpack的多页面(多入口)开发,相比单入口模式,逻辑更清楚
使用说明
1.view下的页面必须放在view的下级目录,比如view/index/index.html,同时每个页面文件必须搭配一个同名的js文件作为页面入口,比如view/index/index.js
2.可根据需要配置本地调试服务器的端口,默认8000,
在config/index下配置
3.可配置打包路径等,同样在config/index下配置
初始化说明
-
在根目录下执行 npm install (如果不是root用户的话,sudo npm install)
-
打包或者调试时,如果npm 命令提示错误,一般是某个模块未安装,可执行 npm install ***(模块名称) 安装相关模块
-
npm run dev (调试)
-
npm run build (正式打包)
下载完整目录
原文链接:https://blog.betweenfriends.cn/post/howtodevwithvueandmui.html
收起阅读 »布局理念 - NView模板 - wap2app教程
布局容器
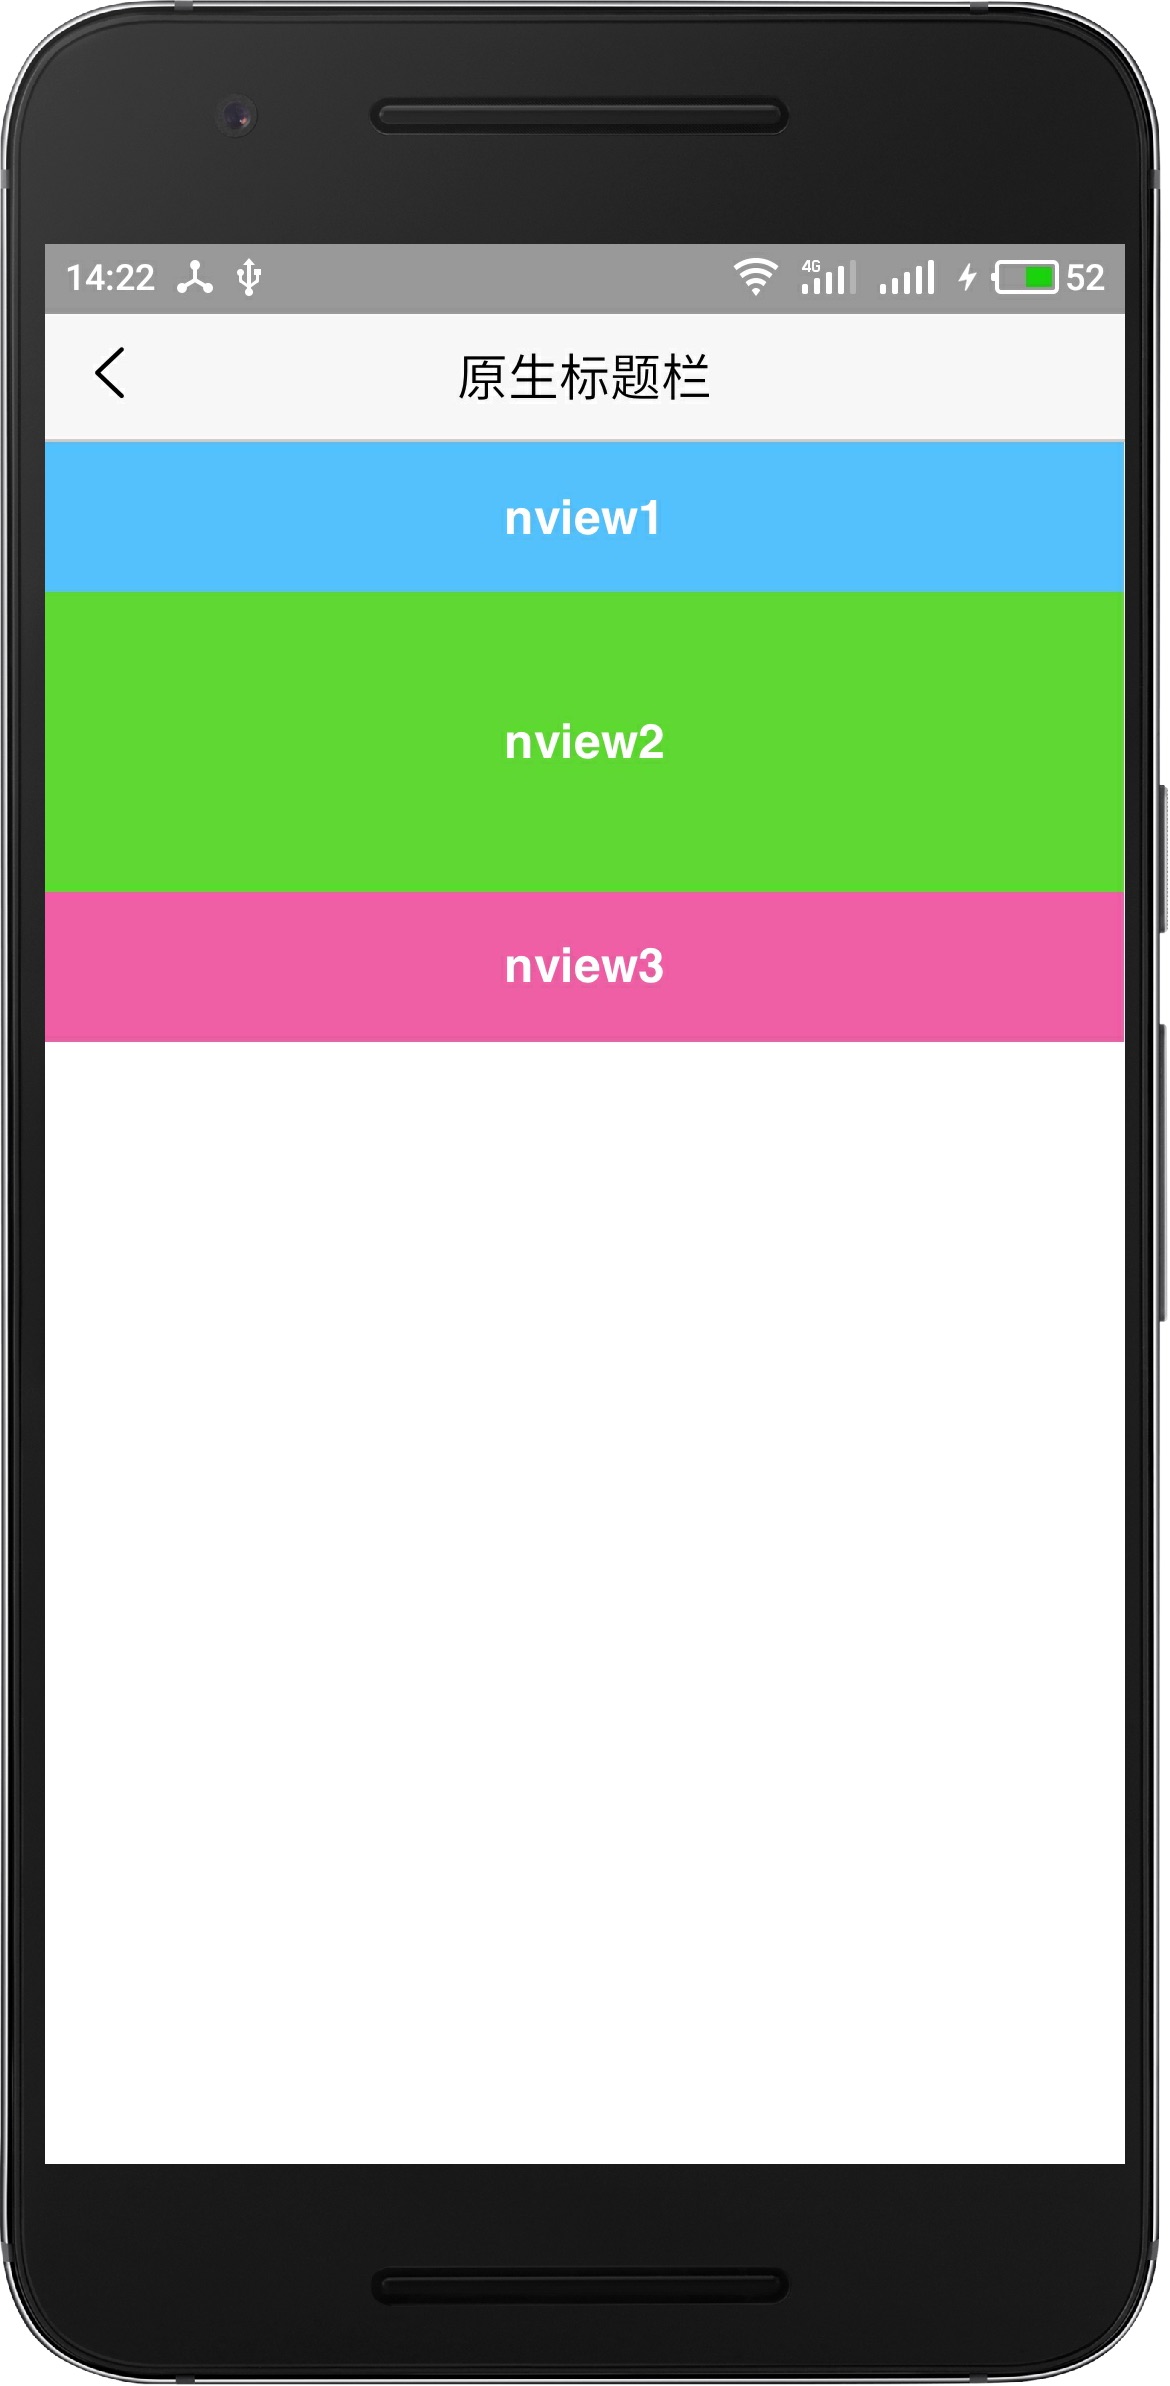
在NView模板中,<nview>标签是布局容器,其它控件都必须包裹在<nview>容器中;<nview>默认为块级元素(宽度为100%屏幕宽度),自上而下排列布局,现阶段必须声明nview的高度,不支持高度自适应。如下是一个示例
    <nviews cachemaxage="86400">
        <nview id="nview1" style="height:50px;backgroundColor:#56C1FF"></nview>
        <nview id="nview2" style="height:100px;backgroundColor:#61D836"></nview>
        <nview id="nview3" style="height:50px;backgroundColor:#EF5FA7"></nview>
    </nviews>
如上代码布局效果如下(顶部自带原生标题栏):
除了默认的自上而下顺序布局,nview也支持绝对定位布局,如下示例中,将nview1设置为绝对定位,在窗口底部显示;
    <nviews cachemaxage ="86400">
        <nview id="nview1" style="position:absolute;bottom:0;height:50px;backgroundColor:#56C1FF"></nview>
        <nview id="nview2" style="height:100px;backgroundColor:#61D836"></nview>
        <nview id="nview3" style="height:50px;backgroundColor:#EF5FA7"></nview>
    </nviews>
设置nview1为绝对定位后,运行示意图如下:
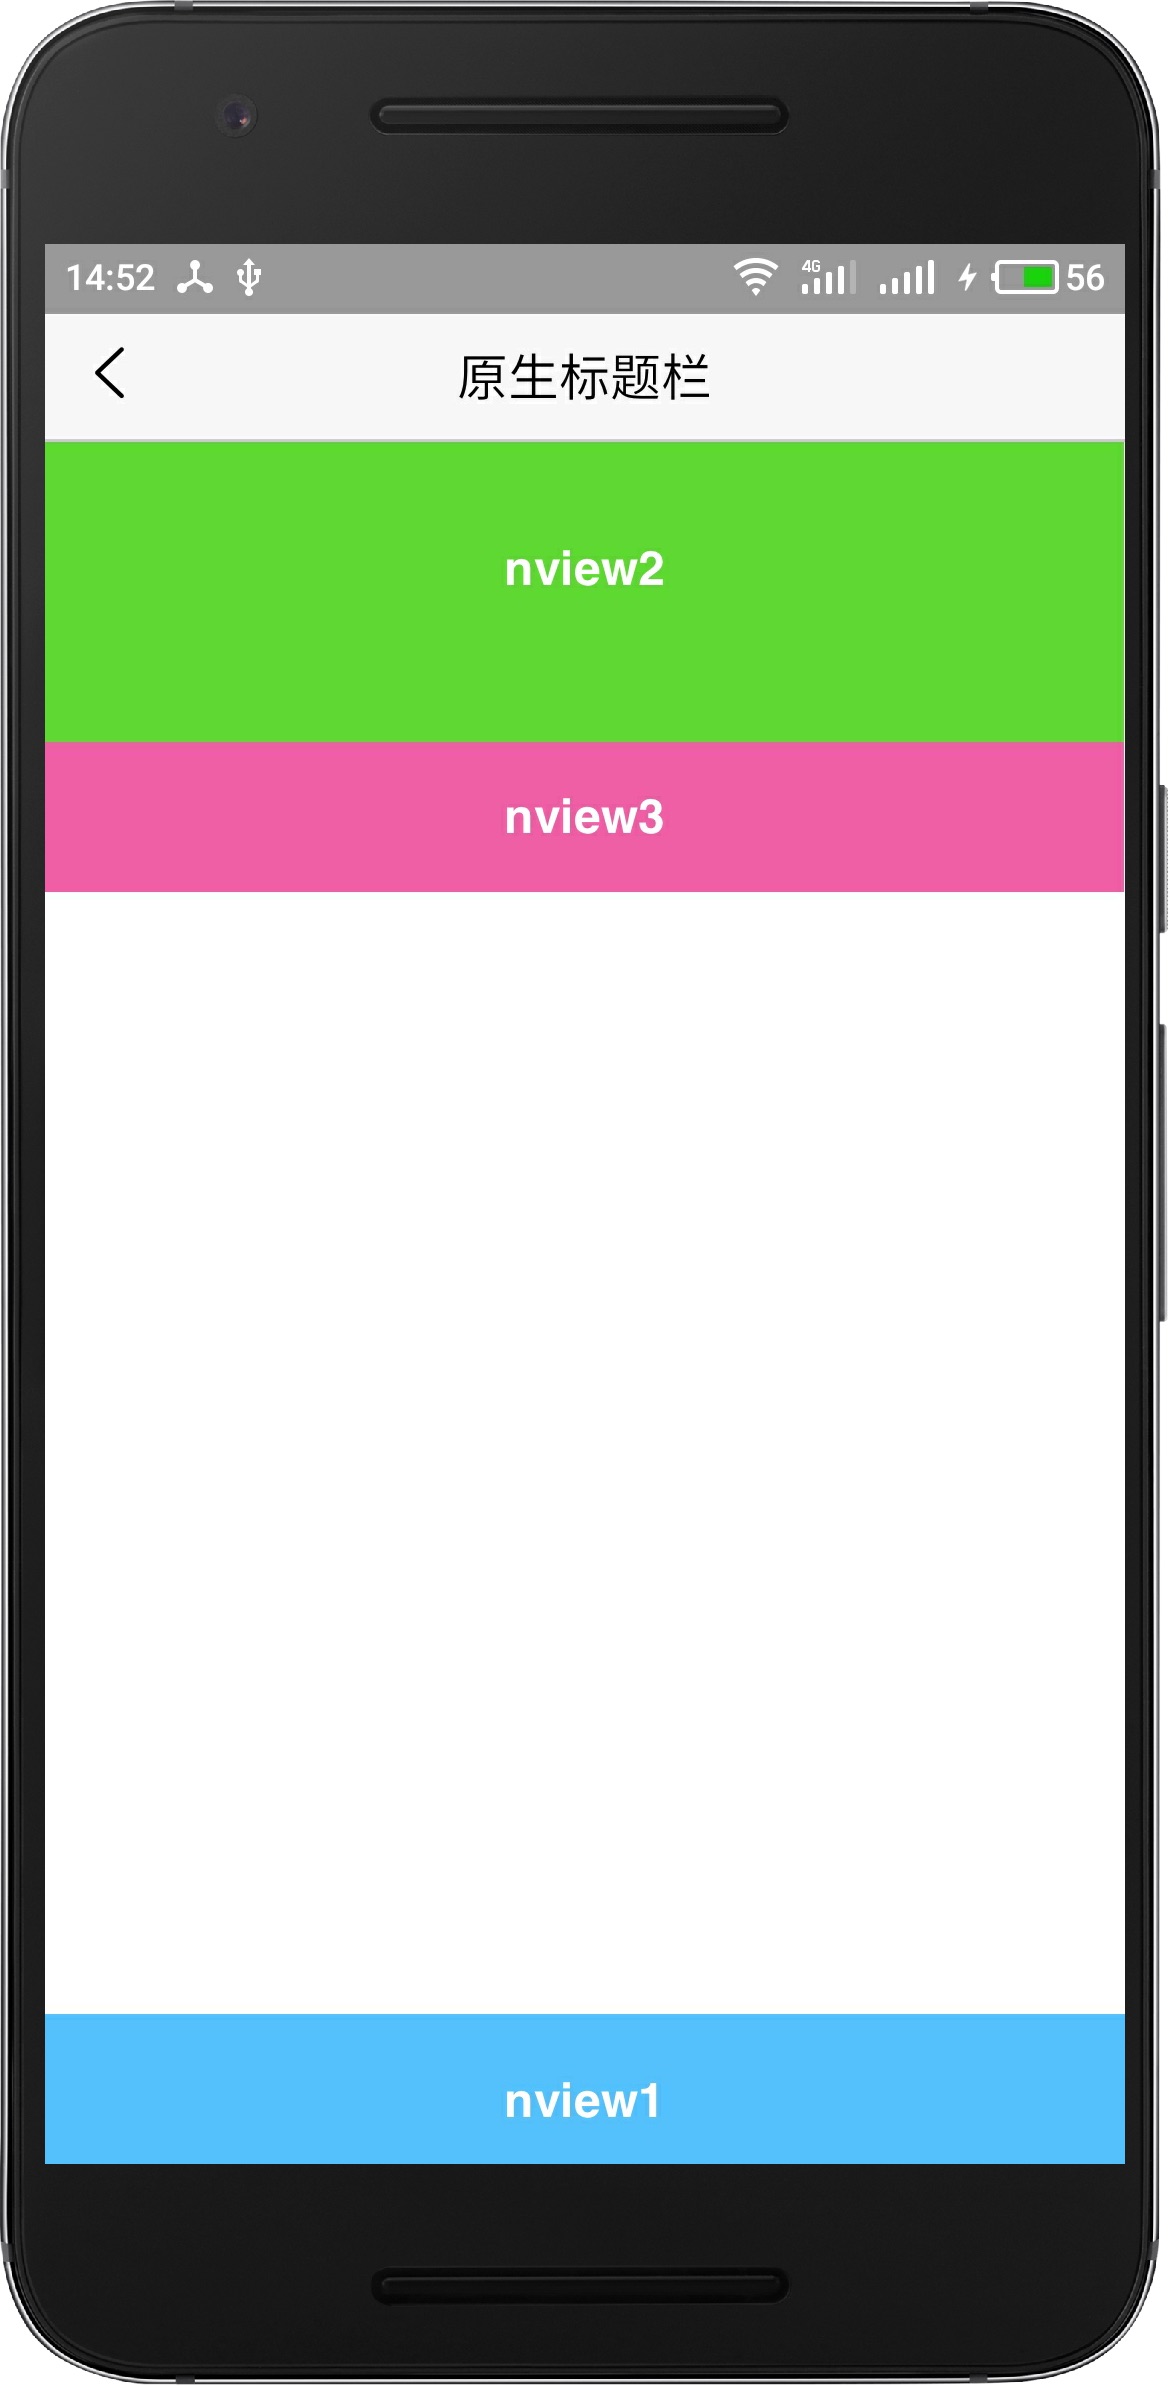
从运行结果可以看出,nview1设置为绝对定位后,脱离文档流自行定位;但nview2、nview3继续使用默认的自上而下的布局方式。
在nview布局容器下,可以嵌套imageslider、list、canvas、richtext四个子标签,子标签默认和nview容器具备相同的宽高;其中:
- imageslider/list是封装好的组件,标签及布局方式固定;
- canvas/richtext是布局控件,分别表示绝对布局/流式布局
接下来重点介绍 richtext/canvas两种布局控件
布局控件
先看如下代码,有两个nview,分别嵌套流式布局的richtext和绝对布局的canvas:
    <nviews cachemaxage ="86400">
        <nview id="nview_richtext" style="height:100px;backgroundColor:#56C1FF">
            <richtext>
                <font>Hello</font>
                <font>World</font>
            </richtext>
        </nview>
        <nview id="nview_canvas" style="height:100px;backgroundColor:#EF5FA7">
            <canvas>
                <font>Hello</font>
                <font>World</font>
            </canvas>
        </nview>
    </nviews>
运行结果如下:
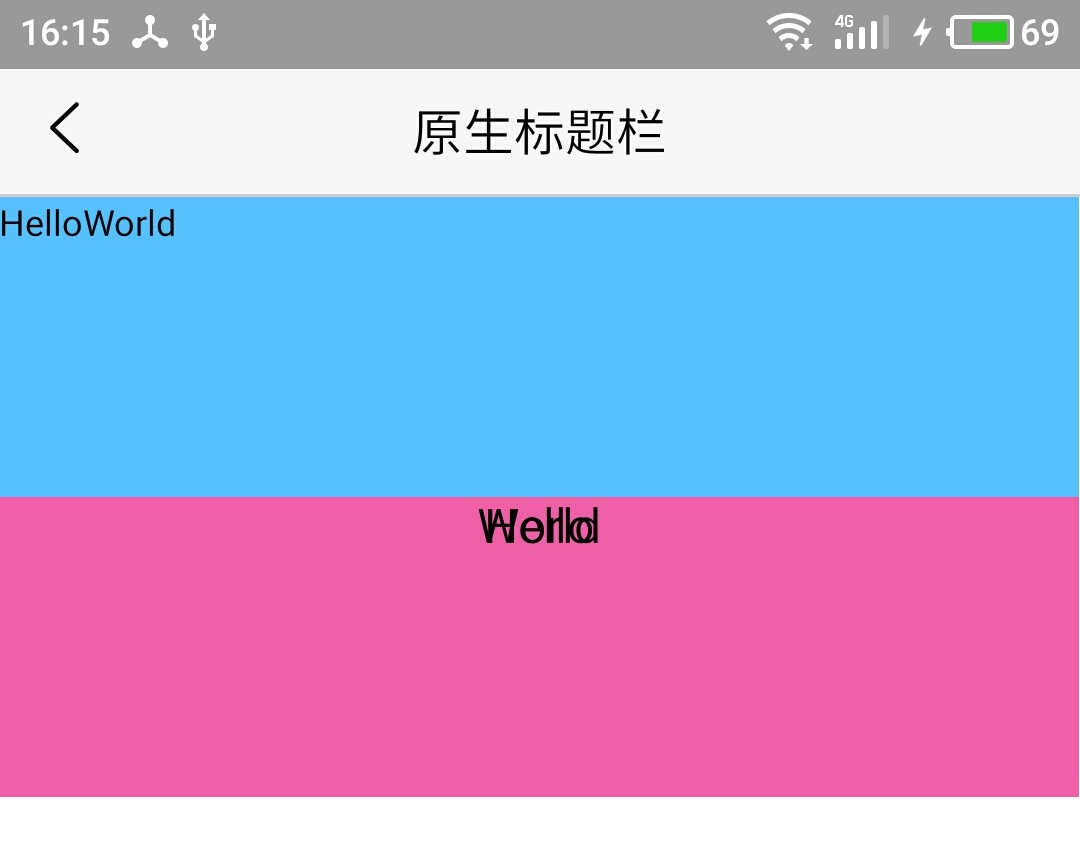
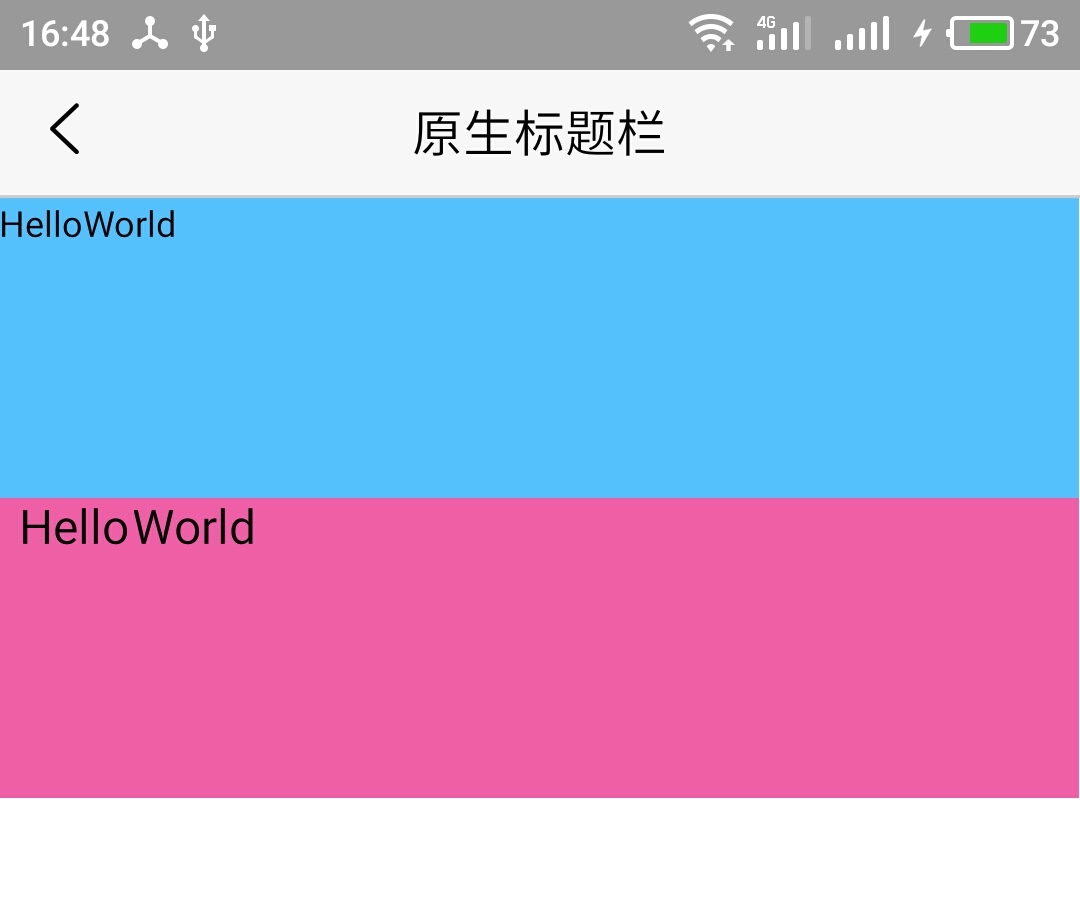
从图中可以,richtext下的两个font流式排版,显示正常;但canvas下的两个font重叠在一起,这是因为canvas下的子标签默认为绝对定位,不进入文档流,多个子标签则会以多层的方式重叠排版;给canvas下子标签设置位置坐标即可正常布局,代码如下:
<nviews cachemaxage ="86400">
    <nview id="nview_richtext" style="height:100px;backgroundColor:#56C1FF">
        <richtext>
            <font>Hello</font>
            <font>World</font>
        </richtext>
    </nview>
    <nview id="nview_canvas" style="height:100px;backgroundColor:#EF5FA7">
        <canvas>
            <!--设置坐标位置-->
            <font style="left:5px;width:40px;">Hello</font>
            <font style="left:45px;width:40px;">World</font>
        </canvas>
    </nview>
</nviews>
对应运行结果如下:
canvas绝对布局
canvas是绝对布局的容器标签,具有以下特点:
- 支持a、font、img、button、input、hr子标签
- 子标签全部绝对定位,需要声明标签相对父元素的相对坐标值
- 子标签大小由坐标固定,不会随着内容自动变化,若内容过长则自动裁剪(超出部分不可见)
如若nview标签下仅有一个canvas子标签,则canvas和nview默认具有相同的的大小/宽高信息。 如下是一个代码示例,演示canvas子标签如何定位:
    <nviews cachemaxage ="86400">
        <nview id="nview1" style="height:150px;background-color: #56C1FF;">
            <canvas>
                <font style="left:35px;top:35px;height:22px;align:left;font-size:17px;color:#ffffff">
                    这里是文字
                </font>
                <img src="_www/logo.png" style="top:60px;right:60px;width:60px;height:60px"/>
            </canvas>
        </nview>
        <nview id="nview2" style="height:150px;background-color: #EF5FA7;">
            <canvas>
                <button style="left:50px;right:50px;top:70px;height:30px;background-color:rgba(0,0,0,0);border-color:#ffffff;color:#ffffff;">按钮</button>
            </canvas>
        </nview>
    </nviews>
运行结果如下(为方便理解,标注了每个元素的坐标值,坐标值对应上面代码中的left/right/top等定义):
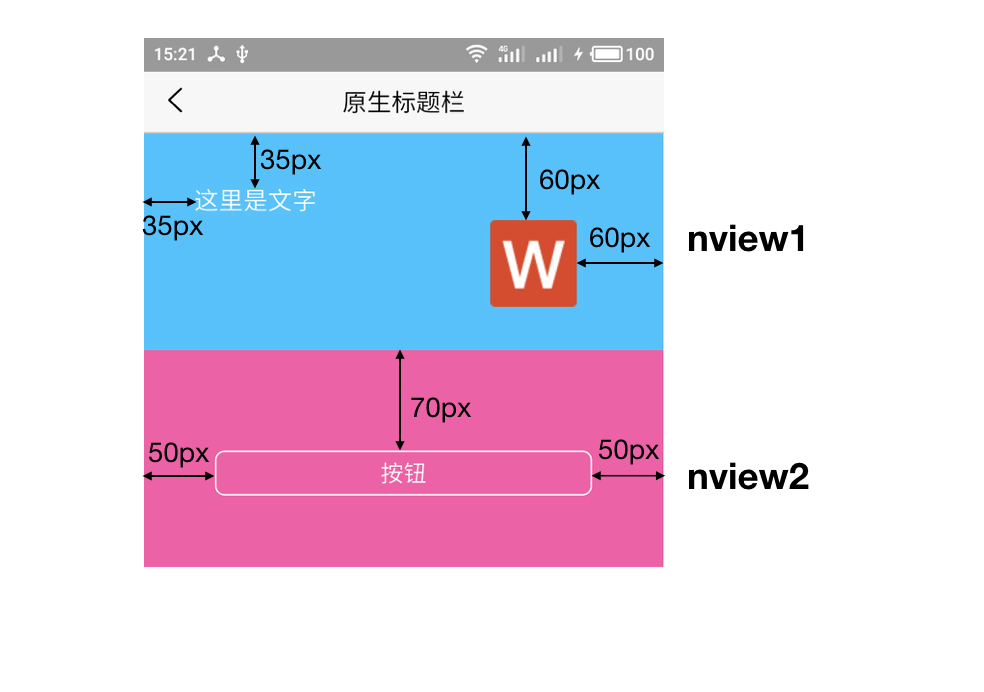
从上图可以看出:canvas布局控件下的元素,全部为精确定位,坐标值是相对于父容器的坐标(不是屏幕坐标)。
每个元素均需声明位置坐标
canvas布局控件下的每个子标签均需要声明坐标位置,否则每个标签将作为单独一层重叠绘制,如下是一个示例,创建两个nview,显示相同的元素,第一个不设置坐标位置,第二个设置坐标位置,示例代码如下:
    <nviews cachemaxage ="86400">
        <nview id="nview1" style="height:100px;background-color: #56C1FF;">
            <canvas>
                <!--未设置坐标位置-->
                <font style="height:20px;align:left;color:#ffffff;font-size:17px;">作者:CHB</font>
                <button style="width:50px;height:25px;background-color:#007aff;color:#ffffff;border-color:#007aff;">关注</button>
            </canvas>
        </nview>
        <nview id="nview2" style="height:100px;background-color: #EF5FA7;">
            <canvas>
                <!--设置坐标位置-->
                <font style="left:10px;top:10px;height:20px;align:left;color:#ffffff;font-size:17px;">作者:CHB</font>
                <button style="left:100px;top:10px;width:50px;height:25px;background-color:#007aff;color:#ffffff;border-color:#007aff;">关注</button>
            </canvas>
        </nview>
    </nviews>
运行结果如下:
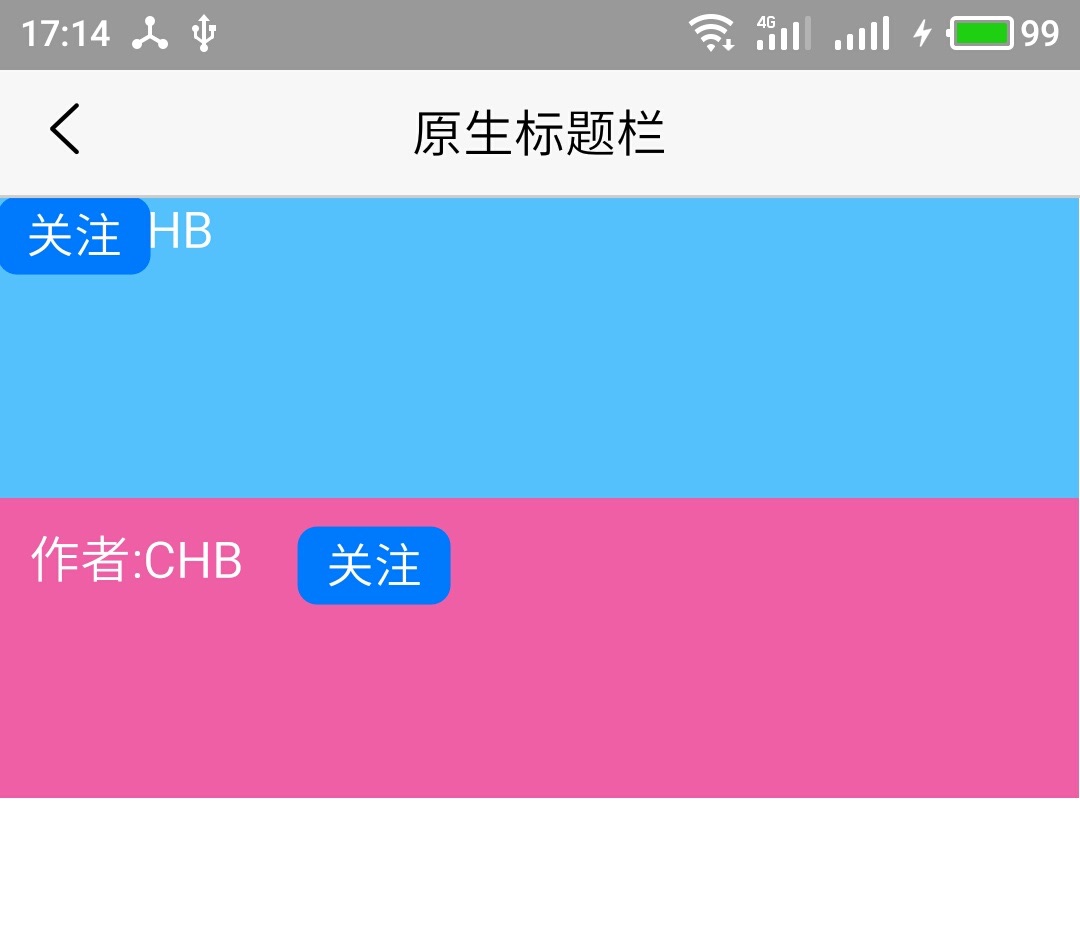
因为每个元素均需要声明位置信息,因此canvas布局适合精确定位的场景,比如:居右显示;
逐层渲染,非流式
另一方面,canvas布局不适合可变长度的场景,如上示例中,若将"作者:CHB"替换为“作者:George R.R. Martin”,默认就会和右侧关注按钮重叠,代码如下:
    <nviews cachemaxage ="86400">
        <nview id="nview1" style="height:100px;background-color: #56C1FF;">
            <canvas>
                <font style="left:10px;top:10px;height:20px;align:left;color:#ffffff;font-size:17px;">作者:CHB</font>
                <button style="left:100px;top:10px;width:50px;height:25px;background-color:#007aff;color:#ffffff;border-color:#007aff;">关注</button>
            </canvas>
        </nview>
        <nview id="nview2" style="height:100px;background-color: #EF5FA7;">
            <canvas>
                <!--名字较长时,会重叠绘制-->
                <font style="left:10px;top:10px;height:20px;align:left;color:#ffffff;font-size:17px;">作者:George R.R. Martin</font>
                <button style="left:100px;top:10px;width:50px;height:25px;background-color:#007aff;color:#ffffff;border-color:#007aff;">关注</button>
            </canvas>
        </nview>
    </nviews>
运行结果如下:
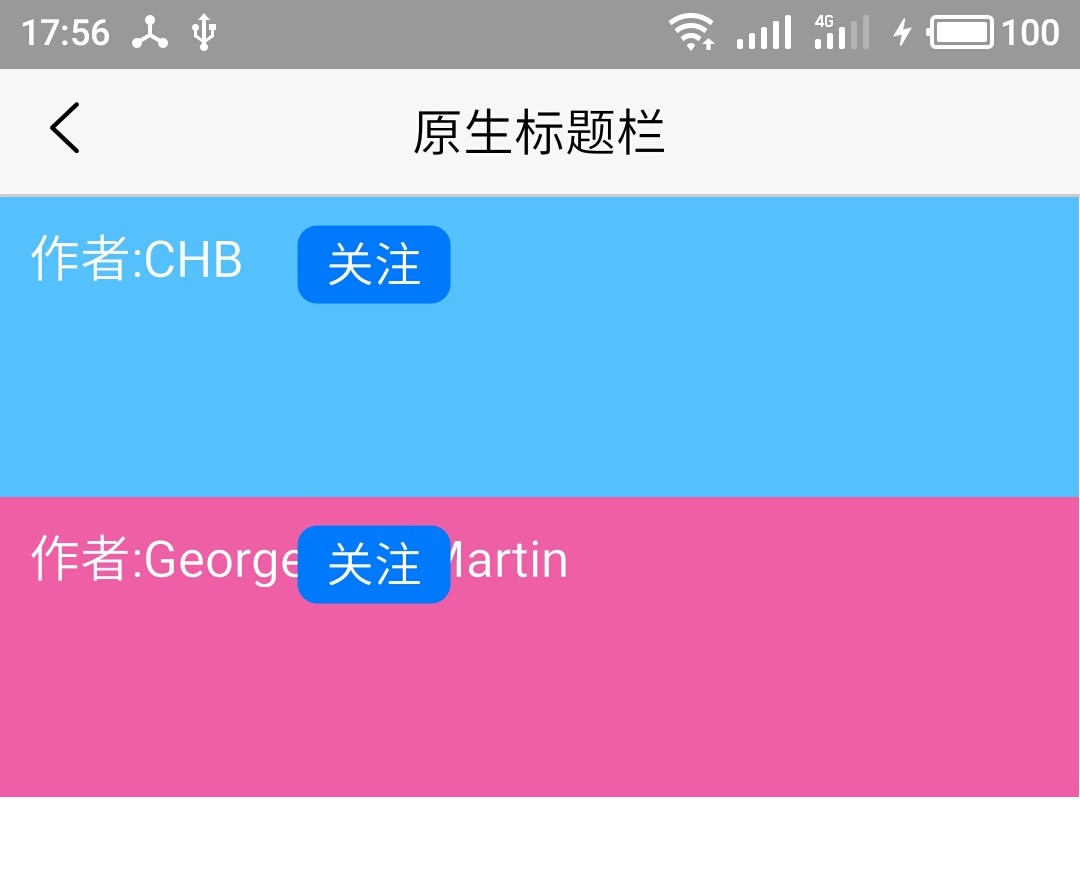
从上图可看出,关注按钮重叠在"George R.R. Martin”名字上方,这有如下两个原因:
- canvas下元素定位,类似于HTML5中的absolute定位,每个元素是按照坐标位置逐层绘制的,故关注按钮会和作者名字重叠,而不会像流式布局那样自动向右侧迁移;
- canvas下font标签默认宽度为100%,故可以将"George R.R. Martin”完整显示出来,而没有出现裁剪隐藏的情况;
richtext流式布局
richtext是流式布局的容器标签,有以下特点:
- 支持font、img、a、hr、br子标签;
- 各个子标签自左向右、自上向下流式排版;
- 子标签宽度和高度随内容自动变化,设置width/height属性无效(img标签例外),碰到较长文本时会自动换行;
- 支持通过空格( )来设置元素前后间距
- 设置位置坐标(left/top等)无效
如下是一个richtext示例:
<nviews cacheMaxAge="86400">
<nview id="nview_richtext" style="height:250px;background-color: #56C1FF;">
<richtext style="left:10px;right:10px;width:340px;top:10px">
<font style="font-size:23px;color:#ffffff;font-weight: bold;">这是一级标题,内容较长时会自动换行</font>
<br/><br/>
<img src="_www/logo.png" width="20px" height="20px"></img>
<font style="font-size: 17px;color:#ffffff"> 作者:CHB </font>
<font style="font-size: 15px;color:#ffffff">2017-09-04</font>
<br/>
<hr style="border-color:#EF5FA7"/>
<br/>
<font style="font-size:14px;color:#ffffff">原文链接:</font><a style="font-size:14px;color:#ffffff">http://www.example.com</a>
<br/><br/>
<font style="font-size:14px;color:#ffffff">下面是详细内容,文字较长时会自动进行换行,可变长度的文字推荐使用richtext布局控件...</font>
</richtext>
</nview>
</nviews>如上代码中,头像信息、作者信息、发布时间是顺序编写的,最终自动从左到右绘制在一行,运行结果如下:

因为设置位置坐标无效,故无法实现精确定位,比如要求发布时间居右显示,则在richtext中无法实现;
两种布局适用场景
通过如上分析,可以理解两种布局适用的场景不同:
- 需要多个元素自左向右显示,元素长度不固定,则使用richtext
- 文本长度不确定,需要自动换行,则使用richtext
- 图文混排,则使用richtext
- 需要精确定位(如右侧对齐),则使用canvas
布局容器
在NView模板中,<nview>标签是布局容器,其它控件都必须包裹在<nview>容器中;<nview>默认为块级元素(宽度为100%屏幕宽度),自上而下排列布局,现阶段必须声明nview的高度,不支持高度自适应。如下是一个示例
    <nviews cachemaxage="86400">
        <nview id="nview1" style="height:50px;backgroundColor:#56C1FF"></nview>
        <nview id="nview2" style="height:100px;backgroundColor:#61D836"></nview>
        <nview id="nview3" style="height:50px;backgroundColor:#EF5FA7"></nview>
    </nviews>
如上代码布局效果如下(顶部自带原生标题栏):
除了默认的自上而下顺序布局,nview也支持绝对定位布局,如下示例中,将nview1设置为绝对定位,在窗口底部显示;
    <nviews cachemaxage ="86400">
        <nview id="nview1" style="position:absolute;bottom:0;height:50px;backgroundColor:#56C1FF"></nview>
        <nview id="nview2" style="height:100px;backgroundColor:#61D836"></nview>
        <nview id="nview3" style="height:50px;backgroundColor:#EF5FA7"></nview>
    </nviews>
设置nview1为绝对定位后,运行示意图如下:
从运行结果可以看出,nview1设置为绝对定位后,脱离文档流自行定位;但nview2、nview3继续使用默认的自上而下的布局方式。
在nview布局容器下,可以嵌套imageslider、list、canvas、richtext四个子标签,子标签默认和nview容器具备相同的宽高;其中:
- imageslider/list是封装好的组件,标签及布局方式固定;
- canvas/richtext是布局控件,分别表示绝对布局/流式布局
接下来重点介绍 richtext/canvas两种布局控件
布局控件
先看如下代码,有两个nview,分别嵌套流式布局的richtext和绝对布局的canvas:
    <nviews cachemaxage ="86400">
        <nview id="nview_richtext" style="height:100px;backgroundColor:#56C1FF">
            <richtext>
                <font>Hello</font>
                <font>World</font>
            </richtext>
        </nview>
        <nview id="nview_canvas" style="height:100px;backgroundColor:#EF5FA7">
            <canvas>
                <font>Hello</font>
                <font>World</font>
            </canvas>
        </nview>
    </nviews>
运行结果如下:
从图中可以,richtext下的两个font流式排版,显示正常;但canvas下的两个font重叠在一起,这是因为canvas下的子标签默认为绝对定位,不进入文档流,多个子标签则会以多层的方式重叠排版;给canvas下子标签设置位置坐标即可正常布局,代码如下:
<nviews cachemaxage ="86400">
    <nview id="nview_richtext" style="height:100px;backgroundColor:#56C1FF">
        <richtext>
            <font>Hello</font>
            <font>World</font>
        </richtext>
    </nview>
    <nview id="nview_canvas" style="height:100px;backgroundColor:#EF5FA7">
        <canvas>
            <!--设置坐标位置-->
            <font style="left:5px;width:40px;">Hello</font>
            <font style="left:45px;width:40px;">World</font>
        </canvas>
    </nview>
</nviews>
对应运行结果如下:
canvas绝对布局
canvas是绝对布局的容器标签,具有以下特点:
- 支持a、font、img、button、input、hr子标签
- 子标签全部绝对定位,需要声明标签相对父元素的相对坐标值
- 子标签大小由坐标固定,不会随着内容自动变化,若内容过长则自动裁剪(超出部分不可见)
如若nview标签下仅有一个canvas子标签,则canvas和nview默认具有相同的的大小/宽高信息。 如下是一个代码示例,演示canvas子标签如何定位:
    <nviews cachemaxage ="86400">
        <nview id="nview1" style="height:150px;background-color: #56C1FF;">
            <canvas>
                <font style="left:35px;top:35px;height:22px;align:left;font-size:17px;color:#ffffff">
                    这里是文字
                </font>
                <img src="_www/logo.png" style="top:60px;right:60px;width:60px;height:60px"/>
            </canvas>
        </nview>
        <nview id="nview2" style="height:150px;background-color: #EF5FA7;">
            <canvas>
                <button style="left:50px;right:50px;top:70px;height:30px;background-color:rgba(0,0,0,0);border-color:#ffffff;color:#ffffff;">按钮</button>
            </canvas>
        </nview>
    </nviews>
运行结果如下(为方便理解,标注了每个元素的坐标值,坐标值对应上面代码中的left/right/top等定义):
从上图可以看出:canvas布局控件下的元素,全部为精确定位,坐标值是相对于父容器的坐标(不是屏幕坐标)。
每个元素均需声明位置坐标
canvas布局控件下的每个子标签均需要声明坐标位置,否则每个标签将作为单独一层重叠绘制,如下是一个示例,创建两个nview,显示相同的元素,第一个不设置坐标位置,第二个设置坐标位置,示例代码如下:
    <nviews cachemaxage ="86400">
        <nview id="nview1" style="height:100px;background-color: #56C1FF;">
            <canvas>
                <!--未设置坐标位置-->
                <font style="height:20px;align:left;color:#ffffff;font-size:17px;">作者:CHB</font>
                <button style="width:50px;height:25px;background-color:#007aff;color:#ffffff;border-color:#007aff;">关注</button>
            </canvas>
        </nview>
        <nview id="nview2" style="height:100px;background-color: #EF5FA7;">
            <canvas>
                <!--设置坐标位置-->
                <font style="left:10px;top:10px;height:20px;align:left;color:#ffffff;font-size:17px;">作者:CHB</font>
                <button style="left:100px;top:10px;width:50px;height:25px;background-color:#007aff;color:#ffffff;border-color:#007aff;">关注</button>
            </canvas>
        </nview>
    </nviews>
运行结果如下:
因为每个元素均需要声明位置信息,因此canvas布局适合精确定位的场景,比如:居右显示;
逐层渲染,非流式
另一方面,canvas布局不适合可变长度的场景,如上示例中,若将"作者:CHB"替换为“作者:George R.R. Martin”,默认就会和右侧关注按钮重叠,代码如下:
    <nviews cachemaxage ="86400">
        <nview id="nview1" style="height:100px;background-color: #56C1FF;">
            <canvas>
                <font style="left:10px;top:10px;height:20px;align:left;color:#ffffff;font-size:17px;">作者:CHB</font>
                <button style="left:100px;top:10px;width:50px;height:25px;background-color:#007aff;color:#ffffff;border-color:#007aff;">关注</button>
            </canvas>
        </nview>
        <nview id="nview2" style="height:100px;background-color: #EF5FA7;">
            <canvas>
                <!--名字较长时,会重叠绘制-->
                <font style="left:10px;top:10px;height:20px;align:left;color:#ffffff;font-size:17px;">作者:George R.R. Martin</font>
                <button style="left:100px;top:10px;width:50px;height:25px;background-color:#007aff;color:#ffffff;border-color:#007aff;">关注</button>
            </canvas>
        </nview>
    </nviews>
运行结果如下:
从上图可看出,关注按钮重叠在"George R.R. Martin”名字上方,这有如下两个原因:
- canvas下元素定位,类似于HTML5中的absolute定位,每个元素是按照坐标位置逐层绘制的,故关注按钮会和作者名字重叠,而不会像流式布局那样自动向右侧迁移;
- canvas下font标签默认宽度为100%,故可以将"George R.R. Martin”完整显示出来,而没有出现裁剪隐藏的情况;
richtext流式布局
richtext是流式布局的容器标签,有以下特点:
- 支持font、img、a、hr、br子标签;
- 各个子标签自左向右、自上向下流式排版;
- 子标签宽度和高度随内容自动变化,设置width/height属性无效(img标签例外),碰到较长文本时会自动换行;
- 支持通过空格( )来设置元素前后间距
- 设置位置坐标(left/top等)无效
如下是一个richtext示例:
<nviews cacheMaxAge="86400">
<nview id="nview_richtext" style="height:250px;background-color: #56C1FF;">
<richtext style="left:10px;right:10px;width:340px;top:10px">
<font style="font-size:23px;color:#ffffff;font-weight: bold;">这是一级标题,内容较长时会自动换行</font>
<br/><br/>
<img src="_www/logo.png" width="20px" height="20px"></img>
<font style="font-size: 17px;color:#ffffff"> 作者:CHB </font>
<font style="font-size: 15px;color:#ffffff">2017-09-04</font>
<br/>
<hr style="border-color:#EF5FA7"/>
<br/>
<font style="font-size:14px;color:#ffffff">原文链接:</font><a style="font-size:14px;color:#ffffff">http://www.example.com</a>
<br/><br/>
<font style="font-size:14px;color:#ffffff">下面是详细内容,文字较长时会自动进行换行,可变长度的文字推荐使用richtext布局控件...</font>
</richtext>
</nview>
</nviews>如上代码中,头像信息、作者信息、发布时间是顺序编写的,最终自动从左到右绘制在一行,运行结果如下:
因为设置位置坐标无效,故无法实现精确定位,比如要求发布时间居右显示,则在richtext中无法实现;
两种布局适用场景
通过如上分析,可以理解两种布局适用的场景不同:
- 需要多个元素自左向右显示,元素长度不固定,则使用richtext
- 文本长度不确定,需要自动换行,则使用richtext
- 图文混排,则使用richtext
- 需要精确定位(如右侧对齐),则使用canvas
mui两种预加载详解和爬坑
官方文档上的解释如下:
方式一:通过mui.init方法中的preloadPages参数进行配置.
mui.init({
preloadPages:[
{
url:prelaod-page-url,
id:preload-page-id,
styles:{},//窗口参数
extras:{},//自定义扩展参数
subpages:[{},{}]//预加载页面的子页面
}
],
preloadLimit:5//预加载窗口数量限制(一旦超出,先进先出)默认不限制
});
方式二:通过mui.preload方法预加载.
var page = mui.preload({
url:new-page-url,
id:new-page-id,//默认使用当前页面的url作为id
styles:{},//窗口参数
extras:{}//自定义扩展参数
});
方式一多页面加载问题如下
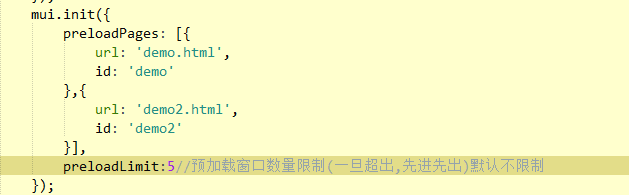
方式二preload需要放在plusready里面,解决如下

官方文档上的解释如下:
方式一:通过mui.init方法中的preloadPages参数进行配置.
mui.init({
preloadPages:[
{
url:prelaod-page-url,
id:preload-page-id,
styles:{},//窗口参数
extras:{},//自定义扩展参数
subpages:[{},{}]//预加载页面的子页面
}
],
preloadLimit:5//预加载窗口数量限制(一旦超出,先进先出)默认不限制
});
方式二:通过mui.preload方法预加载.
var page = mui.preload({
url:new-page-url,
id:new-page-id,//默认使用当前页面的url作为id
styles:{},//窗口参数
extras:{}//自定义扩展参数
});
方式一多页面加载问题如下
方式二preload需要放在plusready里面,解决如下


刚看到的一篇关于手机设置禁止横屏的解决方案,值得收藏!!!
解决横屏问题:
(转载)
真机运行时,manifest并不会实时生效,要打包才生效。
横屏有3个层级:
- 手机禁止横屏
- 手机允许横屏,但manifest禁止横屏
- 手机允许横屏、manifest允许横屏,但页面代码禁止横屏。
js里控制:
//仅支持横屏显示
plus.screen.lockOrientation("landscape-primary");
//仅支持横屏反方向显示
plus.screen.lockOrientation('landscape-secondary');
//仅支持竖屏显示
plus.screen.lockOrientation("portrait-primary");
//仅支持竖屏反方向显示
plus.screen.lockOrientation("portrait-secondary");
或(该方式未经测试)
// 锁定屏幕为竖屏模式,不能设备如何旋转,屏幕都不会切换到横屏模式。
window.screen.lockOrientation([“portrait-primary”,“portrait-secondary”]);
// 锁定屏幕为横屏模式,无能设备如何旋转,屏幕都不会切换到竖屏模式。
window.screen.lockOrientation([“landscape-primary”,“landscape-secondary”]);
// 取消屏幕的锁屏,屏幕回到原始状态,
window.screen.unlockOrientation();
manifest.json里控制:
"orientation": [
"portrait-primary",
"portrait-secondary"
]
该文转载地址:http://ask.dcloud.net.cn/article/522
承接MUI App,软件开发,微信开发
腾印网络致力于中小企业电商服务,软件开发,系统开发,提供一站式整体解决方案。
服务范围包括:网站建设,APP开发,微信开发,软件定制,系统定制 等
服务产品
PC端:网站建设,行业网站,电商平台
移动端:手机网站,手机APP
微信开发:微官网,微商城,公众号,小程序
系统开发:直播系统,点播系统,进销存系统 等
成功案例:电商类、视频类、在线教育类、生活服务类、游戏下载类等APP
QQ:1776609688
腾印网络致力于中小企业电商服务,软件开发,系统开发,提供一站式整体解决方案。
服务范围包括:网站建设,APP开发,微信开发,软件定制,系统定制 等
服务产品
PC端:网站建设,行业网站,电商平台
移动端:手机网站,手机APP
微信开发:微官网,微商城,公众号,小程序
系统开发:直播系统,点播系统,进销存系统 等
成功案例:电商类、视频类、在线教育类、生活服务类、游戏下载类等APP
QQ:1776609688
收起阅读 »