


蓝蘑云直播实时音视频集成指南
准备:
DEMO运行示例
- 下载DEMO源码从插件市场下载,解压打开;
- 打开HBuild工具导入demo工程,从自己账号获取DCloud AppID;

- 获取蓝蘑云APPID,填入代码中 export const appId = ""

- 配置App原生插件;

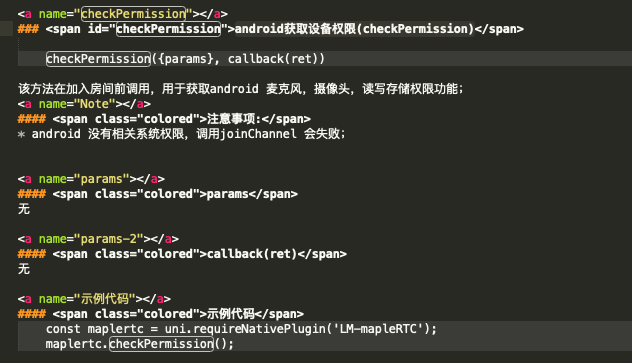
- 配置HBuild android权限


android 6.0以上需要手动添加权限,我们sdk 提供接口获取权限接口
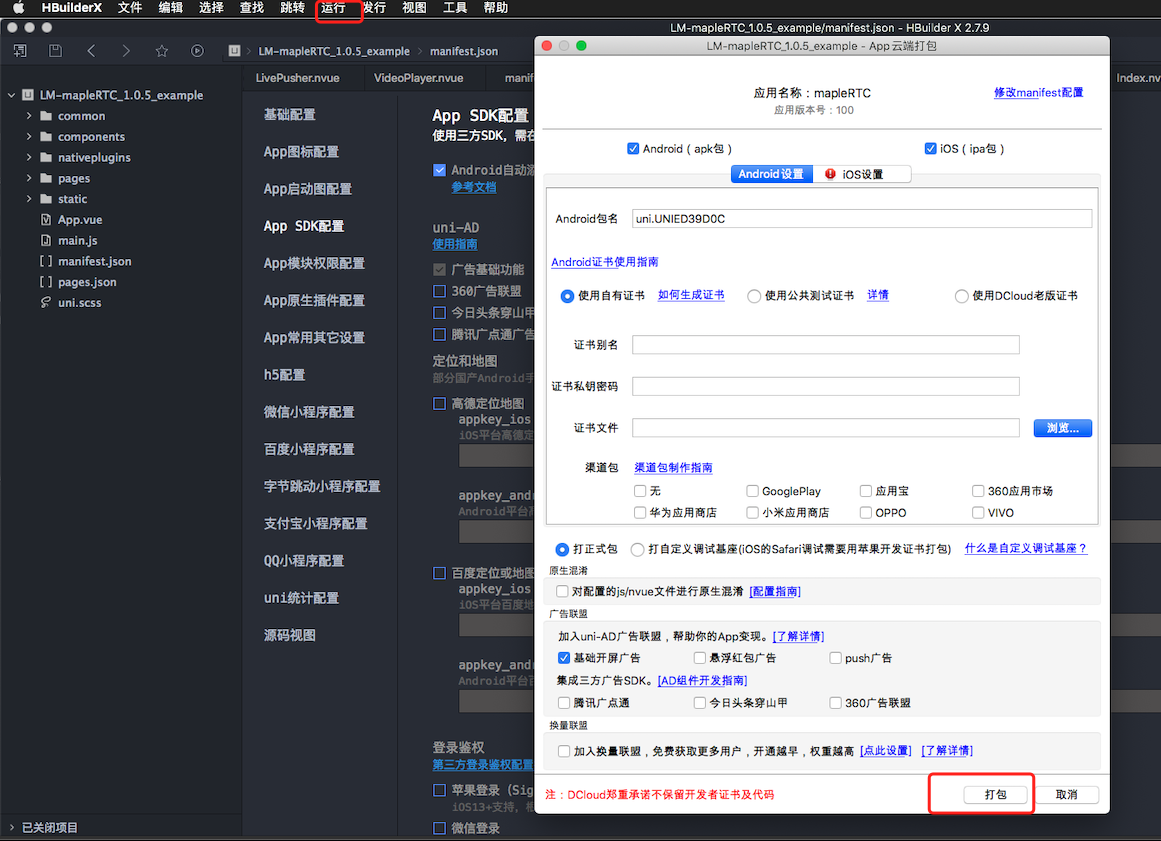
5.云打包
6.android demo 体验下载地址
注意事项
- 当前调试运行环境只支持真机调试运行,不能支持模拟器环境运行;
- 运行时确保app的摄像头和麦克风权限打开;如果加入房间失败,监听错误码为4007,代表无权限,需要在app权限设置里打开;
准备:
DEMO运行示例
- 下载DEMO源码从插件市场下载,解压打开;
- 打开HBuild工具导入demo工程,从自己账号获取DCloud AppID;
- 获取蓝蘑云APPID,填入代码中 export const appId = ""
- 配置App原生插件;
- 配置HBuild android权限
android 6.0以上需要手动添加权限,我们sdk 提供接口获取权限接口
5.云打包
6.android demo 体验下载地址
注意事项
- 当前调试运行环境只支持真机调试运行,不能支持模拟器环境运行;
- 运行时确保app的摄像头和麦克风权限打开;如果加入房间失败,监听错误码为4007,代表无权限,需要在app权限设置里打开;
蓝蘑云使用指南
概述:
maple-rtc 为蓝蘑云推出的直播&实时音视频系统,包括了直播,实时音频,视频,变声,美颜等功能,适用于娱乐,游戏,教育等实时场景中;Maple-RTC支持快速私有化部署,一键部署上线。
第一步:开通蓝蘑云服务
- 打开蓝蘑云用户管理后台,点击注册新用户
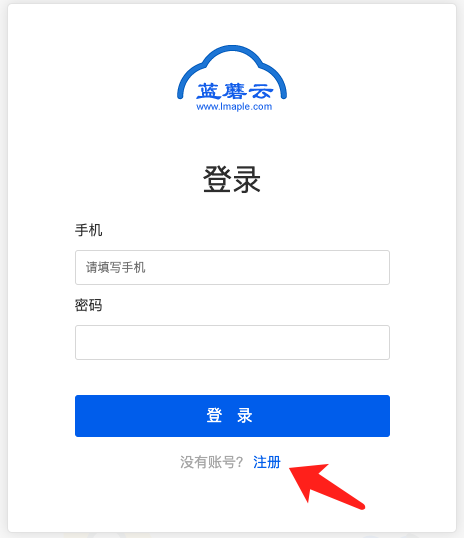
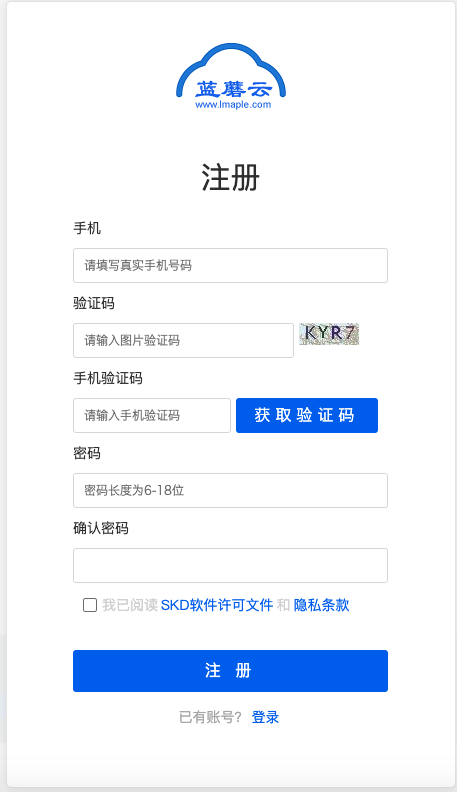
- 登录蓝蘑云用户管理后台,用刚注册的手机号码和密码登录管理后台

第二步:服务端创建应用AppID
- 点击创建新项目按钮,在弹出的对话框输入项目名称,点击立即创建;
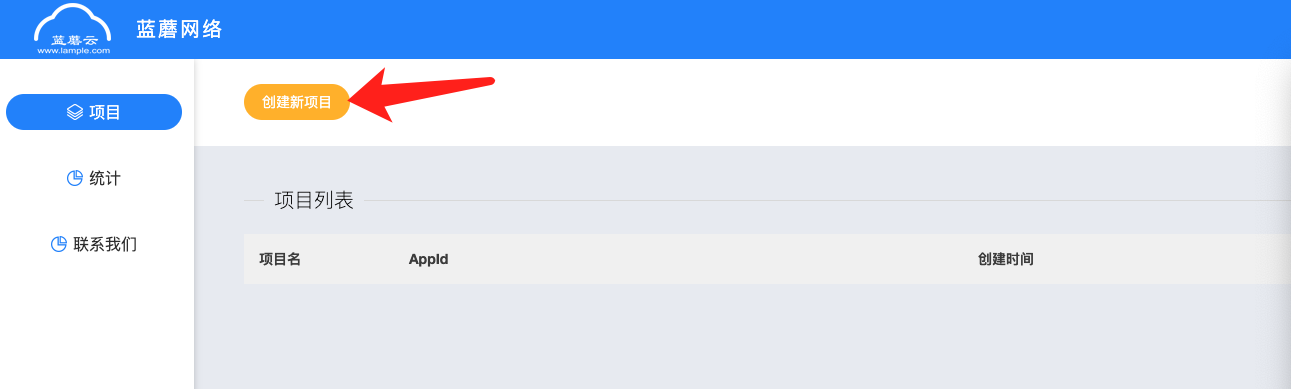
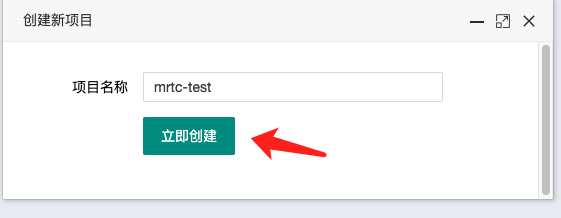
- 获取APPID替换到项目中;
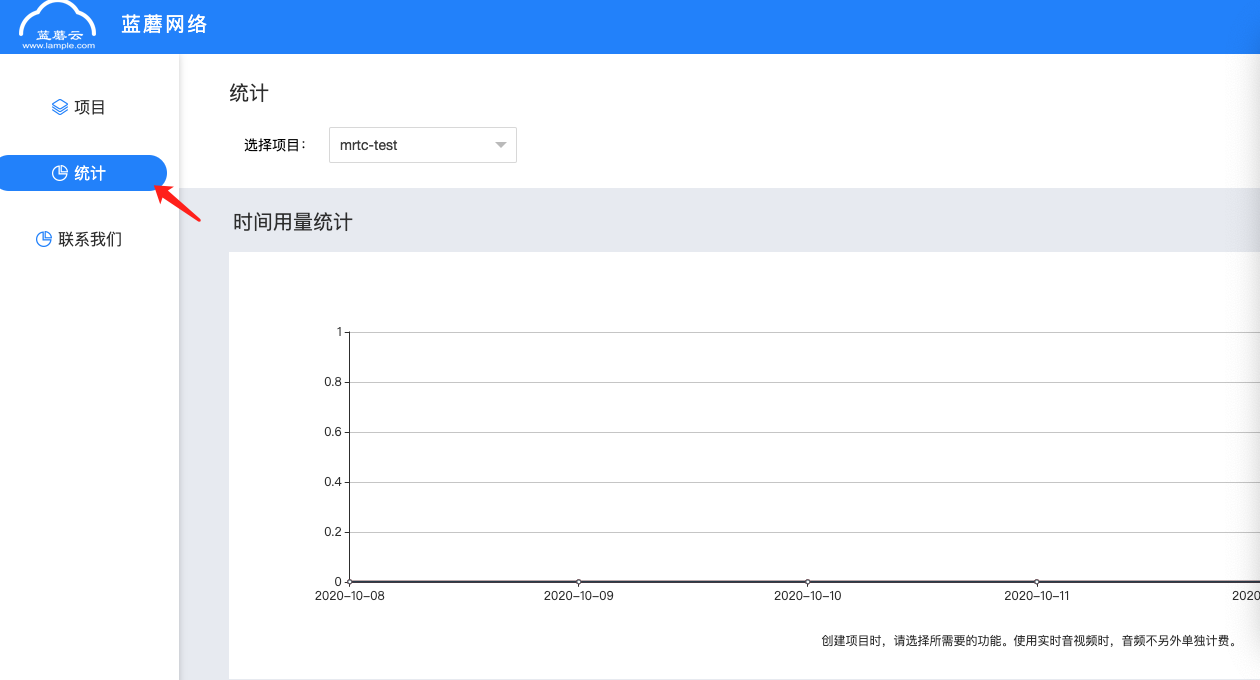
- 点击统计页面查看服务使用量;
收费标准
当前蓝蘑云提供1个月免费测试对接时间,让客户有充足时间对接测试,如果测试对接满意,需要联系商务开通正式服务商用,点击管理后台联系我们,可以联系到技术和商务;具体收费标准请查看官方标准,大客户都有优惠;
如您在对接中有任何其他问题需要技术咨询,可以加入我们的技术交流QQ群:701150764,或者直接联系我们商务,提供1对1技术支持;
概述:
maple-rtc 为蓝蘑云推出的直播&实时音视频系统,包括了直播,实时音频,视频,变声,美颜等功能,适用于娱乐,游戏,教育等实时场景中;Maple-RTC支持快速私有化部署,一键部署上线。
第一步:开通蓝蘑云服务
- 打开蓝蘑云用户管理后台,点击注册新用户
- 登录蓝蘑云用户管理后台,用刚注册的手机号码和密码登录管理后台
第二步:服务端创建应用AppID
- 点击创建新项目按钮,在弹出的对话框输入项目名称,点击立即创建;
- 获取APPID替换到项目中;
- 点击统计页面查看服务使用量;
收费标准
当前蓝蘑云提供1个月免费测试对接时间,让客户有充足时间对接测试,如果测试对接满意,需要联系商务开通正式服务商用,点击管理后台联系我们,可以联系到技术和商务;具体收费标准请查看官方标准,大客户都有优惠;
如您在对接中有任何其他问题需要技术咨询,可以加入我们的技术交流QQ群:701150764,或者直接联系我们商务,提供1对1技术支持;


【屏幕适配问题】强烈反对uni-app的“屏幕适配” 实现方案
目前的 “屏幕适配” 实现方案非常糟糕 (https://uniapp.dcloud.net.cn/adapt),从我这边看,有种产品经理脑子被驴踢了的感觉。
这个功能连官方自己的案例显示都不正常,请看下图(或自己访问:https://static-7d133019-9a7e-474a-b7c2-c01751f00ca5.bspapp.com/#/ )

既然我 app 是为移动端设计的,那么每个页面也肯定是为移动端设计的,在移动端能正常显示,就是最核心目标!
而目前搞 right window 这一套非常奇怪,只是首页能正常显示了,详细页无法正常显示。
而且,
不是所有app都是资讯类型!并不是所有app都是资讯类型!并不是所有app都是资讯类型!
如果是其它类型,大概率会造成交互上的混乱
其实大家的需求很简单,就是网页版直接默认一个宽度,居中, 就ok了。请不要搞些累赘的right window折腾开发者了
另外:用 iframe 是不ok的,因为我需要pc端可以单独访问某个页面
希望这个功能可以悬崖勒马,不要自己YY一套莫名其妙的方案,尽快改回正常的模式
目前的 “屏幕适配” 实现方案非常糟糕 (https://uniapp.dcloud.net.cn/adapt),从我这边看,有种产品经理脑子被驴踢了的感觉。
这个功能连官方自己的案例显示都不正常,请看下图(或自己访问:https://static-7d133019-9a7e-474a-b7c2-c01751f00ca5.bspapp.com/#/ )
既然我 app 是为移动端设计的,那么每个页面也肯定是为移动端设计的,在移动端能正常显示,就是最核心目标!
而目前搞 right window 这一套非常奇怪,只是首页能正常显示了,详细页无法正常显示。
而且,
不是所有app都是资讯类型!并不是所有app都是资讯类型!并不是所有app都是资讯类型!
如果是其它类型,大概率会造成交互上的混乱
其实大家的需求很简单,就是网页版直接默认一个宽度,居中, 就ok了。请不要搞些累赘的right window折腾开发者了
另外:用 iframe 是不ok的,因为我需要pc端可以单独访问某个页面
希望这个功能可以悬崖勒马,不要自己YY一套莫名其妙的方案,尽快改回正常的模式
收起阅读 »nvue map 组件 polyline 更换箭头图标格式说明
nvue 页面 map 组件是基于高德地图实现的,如果您想自定义 polyline 的 箭头图标(对应 arrowIconPath )请参考附件中提供的示例图片设计,该图片为高德官方示例图片,请按照此图片的尺寸切图。
注意事项:
- 在image两边增加部分透明像素,可减轻绘制产生的锯齿;
- 图片中的箭头方向向上;
效果图:
<img src="https://img.cdn.aliyun.dcloud.net.cn/nativedocs/nativeplugin/Iosimgs/IMG_7C59BC6C6C7F-1.jpeg" width="50%"/>
附件:
nvue 页面 map 组件是基于高德地图实现的,如果您想自定义 polyline 的 箭头图标(对应 arrowIconPath )请参考附件中提供的示例图片设计,该图片为高德官方示例图片,请按照此图片的尺寸切图。
注意事项:
- 在image两边增加部分透明像素,可减轻绘制产生的锯齿;
- 图片中的箭头方向向上;
效果图:
<img src="https://img.cdn.aliyun.dcloud.net.cn/nativedocs/nativeplugin/Iosimgs/IMG_7C59BC6C6C7F-1.jpeg" width="50%"/>
附件:
收起阅读 »推送PLUS重磅发布,全方位提升推送消息转化率
推送PLUS1.0主要从内容智选、数据归因、广告补发三大维度发力,以【分组对比】、【后效分析】、【广告补发】等功能模块为抓手,全方位助力运营提升推送消息转化率。
【分组对比】通过对各测试组的到达-展示-点击数据的监测分析,筛选出最优文案/人群,并支持实时及定时地按最优测试组补发剩余用户,提高通知消息点击率,助力运营提效。
【后效分析】从推送任务、日期、用户三大数据维度,提供清晰明了的数据报表,全面分析应用的推送转化、趋势及用户活跃情况,并提供消息从下发-到达-展示-点击各个阶段的折损原因分析,针对不同参考指标灵活选择解决方案,提高推送消息的转化率。
【广告投放】针对推送无法触达的用户,使用广告投放的方式进行消息补发,提升用户点击数量,进一步提升DAU。
分组对比
分组测试功能支持在Android及iOS全平台,设置2-5组测试组,“对比通知文案”或“对比用户群体”,通过对各测试组的到达、展示、点击数据的监测分析,筛选出最优文案/人群,并支持实时及定时地按最优测试组补发剩余用户,提高通知消息点击率,助力运营提效。

分组对比详情可见:https://ask.dcloud.net.cn/article/37762
后效分析
后效分析,从推送任务、日期、用户三大数据维度,提供清晰明了的数据报表,全面分析应用的推送转化、趋势及用户活跃情况,并提供消息从下发-到达-展示-点击各个阶段的折损原因分析,针对不同参考指标灵活选择解决方案,提高推送消息的转化率。主要分为【数据报表】【折损原因分析】【大盘分析】三个模块。
【数据报表】个推数据报表主要分为3个模块:推送数据、日推送数、用户数据,从推送任务、日期、用户三大数据维度,全面分析应用的推送转化、趋势及用户活跃情况;更有关闭通知率、卸载用户数等特色数据分析。

【折损原因分析】针对单个推送任务,提供消息从下发-到达-展示-点击各阶段,消息未成功触达的折损原因分析,比如:卸载、关闭通知、推送超限、参数超限、参数无效等。快速诊断定位折损原因,针对性解决问题。
【大盘分析】针对单个推送任务,提供每个任务的消息到达率和点击率,与应用自身的平均值及个推大盘的均值做比较,高效评估该推送任务的转化水平,调整推送运营策略。

完整报表使用说明,详情可见:http://docs.getui.com/report/
广告投放
针对推送无法触达的用户,使用广告投放的方式进行消息补发,提升用户点击数量,进一步提升DAU。


开通此功能请联系:lieg@getui.com
推送PLUS1.0主要从内容智选、数据归因、广告补发三大维度发力,以【分组对比】、【后效分析】、【广告补发】等功能模块为抓手,全方位助力运营提升推送消息转化率。
【分组对比】通过对各测试组的到达-展示-点击数据的监测分析,筛选出最优文案/人群,并支持实时及定时地按最优测试组补发剩余用户,提高通知消息点击率,助力运营提效。
【后效分析】从推送任务、日期、用户三大数据维度,提供清晰明了的数据报表,全面分析应用的推送转化、趋势及用户活跃情况,并提供消息从下发-到达-展示-点击各个阶段的折损原因分析,针对不同参考指标灵活选择解决方案,提高推送消息的转化率。
【广告投放】针对推送无法触达的用户,使用广告投放的方式进行消息补发,提升用户点击数量,进一步提升DAU。
分组对比
分组测试功能支持在Android及iOS全平台,设置2-5组测试组,“对比通知文案”或“对比用户群体”,通过对各测试组的到达、展示、点击数据的监测分析,筛选出最优文案/人群,并支持实时及定时地按最优测试组补发剩余用户,提高通知消息点击率,助力运营提效。
分组对比详情可见:https://ask.dcloud.net.cn/article/37762
后效分析
后效分析,从推送任务、日期、用户三大数据维度,提供清晰明了的数据报表,全面分析应用的推送转化、趋势及用户活跃情况,并提供消息从下发-到达-展示-点击各个阶段的折损原因分析,针对不同参考指标灵活选择解决方案,提高推送消息的转化率。主要分为【数据报表】【折损原因分析】【大盘分析】三个模块。
【数据报表】个推数据报表主要分为3个模块:推送数据、日推送数、用户数据,从推送任务、日期、用户三大数据维度,全面分析应用的推送转化、趋势及用户活跃情况;更有关闭通知率、卸载用户数等特色数据分析。
【折损原因分析】针对单个推送任务,提供消息从下发-到达-展示-点击各阶段,消息未成功触达的折损原因分析,比如:卸载、关闭通知、推送超限、参数超限、参数无效等。快速诊断定位折损原因,针对性解决问题。
【大盘分析】针对单个推送任务,提供每个任务的消息到达率和点击率,与应用自身的平均值及个推大盘的均值做比较,高效评估该推送任务的转化水平,调整推送运营策略。
完整报表使用说明,详情可见:http://docs.getui.com/report/
广告投放
针对推送无法触达的用户,使用广告投放的方式进行消息补发,提升用户点击数量,进一步提升DAU。
开通此功能请联系:lieg@getui.com 收起阅读 »
插件源码授权版购买流程
插件源码授权版购买流程
购买,购买时需要确认基本信息

如果未经过e签宝认证则点击确认生成e签宝实名认证链接,跳转去e签宝实名认证

认证完成后,生成电子协议

点击跳转到e签宝签署电子协议
签署完成后
等待插件作者签署电子协议
协议签署完成,购买者会收到e签宝 短信/邮件 签署完成通知
用户可以在我购买的插件订单-未完成订单-待付款看到该订单或者直接打开该插件地址进行支付购买
购买完成,下载/导入HX
什么是e签宝
e签宝实名认证流程
e签宝电子协议签署流程
插件源码授权版购买流程
购买,购买时需要确认基本信息
如果未经过e签宝认证则点击确认生成e签宝实名认证链接,跳转去e签宝实名认证
认证完成后,生成电子协议
点击跳转到e签宝签署电子协议
签署完成后
等待插件作者签署电子协议
协议签署完成,购买者会收到e签宝 短信/邮件 签署完成通知
用户可以在我购买的插件订单-未完成订单-待付款看到该订单或者直接打开该插件地址进行支付购买
购买完成,下载/导入HX
什么是e签宝
e签宝实名认证流程
e签宝电子协议签署流程
收起阅读 »数据修改页面不刷新问题记录
一般来说页面和数据是双向绑定的,数据改变页面就会改变,可是有时候页面数据改变后,APP上页面不刷新,但微信小程序开发工具上又是可以的,一般这种情况是在数组使用时遇到的,记录几个遇到的情况和解决办法:
一、数组值修改,页面样式不刷新。解决:尝试用this.$set()方法,里面三个参数,第一个传这个数组,第二个传要修改的那项的下标,第三个传修改后的那项内容。下面会根据数组中的state状态加载不同的样式:
this.model.answer[j].state = !this.model.answer[j].state;
this.$set(this.model.answer, j, this.model.answer[j])
//页面根据变量加载不同样式
<view  :class="item.state?'answer_yes':'answer_no'">{{item.name}}</view>
二、有一次我用this.$set()方法,数据改变后页面上的样式任然不刷新,奇怪的是,另一个页面一模一样的代码,刷新又正常,代码同上。询问了一圈,有老铁告诉我可能是数据太深了,然后我试着将answer数据从model中提取出来,新建一个数组来绑定页面:
this.model.answer[j].state = !this.model.answer[j].state;
this.$set(this.model.answer, j, this.model.answer[j])
//在上面的基础上添加下面这种操作,把页面上绑定的数组换成current_answer,测试时把上面一句注释竟然又失效了
this.current_answer = this.model.answer
最后就正常了,坑啊。。。。
三、还有一种情况是定义的全局变量,如果页面绑定的是定义在其他文件下的全局变量,变量修改的时候,页面也不会刷新,这种情况就在当前页面再定义一个变量,这个变量在页面加载的时候接收全局变量的值,然后页面绑定这个变量就好了。

本应用无法独立运行,需要与hbuilderX 搭配使用问题之一(使用SD卡)
- uni-app项目使用荣耀手机(本人是荣耀20)真机调试时,出现app运行时显示“本应用无法独立运行,需要与hbuilderX 搭配使用”,是因为将存储的默认存储位置设置为SanDisk存储卡引起的。解决方法是将手机默认存储位置设置为内部存储即可。感觉应该是HBuilderX存在的BUG,希望官方对此类问题进行测试并解决。
- 解决此问题时查询了很多类似的帖子,大概总结了一下,主要存在目录或文件名存在中文或者修改了存储位置引起,大家稍加注意应该可以解决,如还有其他情况请大家回复收集。
- 仅供大家参考。
- uni-app项目使用荣耀手机(本人是荣耀20)真机调试时,出现app运行时显示“本应用无法独立运行,需要与hbuilderX 搭配使用”,是因为将存储的默认存储位置设置为SanDisk存储卡引起的。解决方法是将手机默认存储位置设置为内部存储即可。感觉应该是HBuilderX存在的BUG,希望官方对此类问题进行测试并解决。
- 解决此问题时查询了很多类似的帖子,大概总结了一下,主要存在目录或文件名存在中文或者修改了存储位置引起,大家稍加注意应该可以解决,如还有其他情况请大家回复收集。
- 仅供大家参考。

nfc读取加密扇区
// 包路径
const package_NdefRecord = 'android.nfc.NdefRecord';
const package_NdefMessage = 'android.nfc.NdefMessage';
const package_TECH_DISCOVERED = 'android.nfc.action.TECH_DISCOVERED';
const package_Intent = 'android.content.Intent';
const package_Activity = 'android.app.Activity';
const package_PendingIntent = 'android.app.PendingIntent';
const package_IntentFilter = 'android.content.IntentFilter';
const package_NfcAdapter = 'android.nfc.NfcAdapter';
const package_Ndef = 'android.nfc.tech.Ndef';
const package_NdefFormatable = 'android.nfc.tech.NdefFormatable';
const package_Parcelable = 'android.os.Parcelable';
const package_String = 'java.lang.String';
let NfcAdapter;
let NdefRecord;
let NdefMessage;
let readyWriteData = false;
let readyRead = false;
let noNFC = false;
let techListsArray = [
["android.nfc.tech.IsoDep"],
["android.nfc.tech.NfcA"],
["android.nfc.tech.NfcB"],
["android.nfc.tech.NfcF"],
["android.nfc.tech.Ndef"],
["android.nfc.tech.NfcV"],
["android.nfc.tech.NdefFormatable"],
["android.nfc.tech.MifareClassic"],
["android.nfc.tech.MifareUltralight"]
];
// 要写入的数据
let text = '{id:123,name:nfc,stie:cssmini.com}';
let readResult = '';
export default {
listenNFCStatus: function() {
let that = this;
try {
let main = plus.android.runtimeMainActivity();
let Intent = plus.android.importClass('android.content.Intent');
let Activity = plus.android.importClass('android.app.Activity');
let PendingIntent = plus.android.importClass('android.app.PendingIntent');
let IntentFilter = plus.android.importClass('android.content.IntentFilter');
NfcAdapter = plus.android.importClass('android.nfc.NfcAdapter');
let nfcAdapter = NfcAdapter.getDefaultAdapter(main);
        if (nfcAdapter == null) {
            uni.showToast({
                title: '设备不支持NFC!',
                icon: 'none'
            })
            noNFC = true;
            return;
        }

        if (!nfcAdapter.isEnabled()) {
            uni.showToast({
                title: '请在系统设置中先启用NFC功能!',
                icon: 'none'
            });
            noNFC = true;
            return;
        } else {
            noNFC = false;
        }

        let intent = new Intent(main, main.getClass());
        intent.addFlags(Intent.FLAG_ACTIVITY_SINGLE_TOP);
        let pendingIntent = PendingIntent.getActivity(main, 0, intent, 0);
        let ndef = new IntentFilter("android.nfc.action.TECH_DISCOVERED");
        ndef.addDataType("*/*");
        let intentFiltersArray = [ndef];

        plus.globalEvent.addEventListener('newintent', function() {
            console.log('newintent running');
            // 监听 NFC
            setTimeout(that.nfcRuning(), 1000);
        });
        plus.globalEvent.addEventListener('pause', function(e) {
            console.log('pause running');
            if (nfcAdapter) {
                //关闭前台调度系统
                //恢复默认状态
                nfcAdapter.disableForegroundDispatch(main);
            }
        });
        plus.globalEvent.addEventListener('resume', function(e) {
            console.log('resume running');
            if (nfcAdapter) {
                //开启前台调度系统
                nfcAdapter.enableForegroundDispatch(main, pendingIntent, intentFiltersArray, techListsArray);
            }
        });
        nfcAdapter.enableForegroundDispatch(main, pendingIntent, intentFiltersArray, techListsArray);
    } catch (e) {
        console.error(e);
    }
},
nfcRuning: function() {
    NdefRecord = plus.android.importClass("android.nfc.NdefRecord");
    NdefMessage = plus.android.importClass("android.nfc.NdefMessage");
    let main = plus.android.runtimeMainActivity();
    let intent = main.getIntent();
    let that = this;

    console.log("action type:" + intent.getAction());

    if (package_TECH_DISCOVERED == intent.getAction()) {
        console.log("readyWriteData=" + readyWriteData + " readyRead=" + readyRead)
        if (readyWriteData) {
            that.write(intent);
            readyWriteData = false;
        } else if (readyRead) {

            that.read(intent);
            readyRead = false;
        }
    }
},
write(intent) {
    try {
        toast('请勿移开标签 正在写入...');
        console.log("text=" + text);

        let textBytes = plus.android.invoke(text, "getBytes");
        // image/jpeg text/plain
        let textRecord = new NdefRecord(NdefRecord.TNF_MIME_MEDIA,
            plus.android.invoke("text/plain", "getBytes"),
            plus.android.invoke("", "getBytes"), textBytes);
        let message = new NdefMessage([textRecord]);
        let Ndef = plus.android.importClass('android.nfc.tech.Ndef');
        let NdefFormatable = plus.android.importClass('android.nfc.tech.NdefFormatable');
        let tag = intent.getParcelableExtra(NfcAdapter.EXTRA_TAG);
        let ndef = Ndef.get(tag);
        if (ndef != null) {
            // 待写入的数据长度
            let size = message.toByteArray().length;
            ndef.connect();
            if (!ndef.isWritable()) {
                toast('tag不允许写入!');
                return;
            }
            if (ndef.getMaxSize() < size) {
                toast('文件大小超出容量!');
                return;
            }
            ndef.writeNdefMessage(message);
            toast('写入数据成功!');
            return;
        } else {
            let format = NdefFormatable.get(tag);
            if (format != null) {
                try {
                    format.connect();
                    format.format(message);
                    toast('格式化tag并且写入message');
                    return;
                } catch (e) {
                    toast('格式化tag失败.');
                    return;
                }
            } else {
                toast('Tag不支持NDEF');
                return;
            }
        }
    } catch (e) {
        toast('写入失败');
        console.log("error=" + e);
    }

},
read(intent) {
    this.getData(intent);
},
byteArrayToHexString: function(inarray) { // converts byte arrays to string
    let i, j, inn;
    let hex = ["0", "1", "2", "3", "4", "5", "6", "7", "8", "9", "A", "B", "C", "D", "E", "F"];
    let out = "";

    for (j = 0; j < inarray.length; ++j) {
        if(inarray[j]==0) continue;
        inn = inarray[j] & 0xff;
        i = (inn >>> 4) & 0x0f;
        out += hex[i];
        i = inn & 0x0f;
        out += hex[i];
    }
    return out;
},
writeData: function() {
    if (noNFC) {
        toast('请检查设备是否支持并开启 NFC 功能!');
        return;
    }
    // 监听事件,触发条件
    readyWriteData = true;
    toast('请将NFC标签靠近!');
},
readData: function() {
    if (noNFC) {
        toast('请检查设备是否支持并开启 NFC 功能!');
        return;
    }
    // 监听事件,触发条件
    readyRead = true;
    toast('请将NFC标签靠近!');

},
getData: function(intent) {
    var sector = 1;
    var tag = intent.getParcelableExtra(NfcAdapter.EXTRA_TAG);
    let mc = plus.android.importClass('android.nfc.tech.MifareClassic');
    let mfc = mc.get(tag);
    console.log('mfc', mfc)
    mfc.connect();
    var cmdBytes = [0x6A, 0x69, 0x61, 0x6A, 0x75, 0x6E]
    console.log('mfc', cmdBytes)
    var auth = mfc.authenticateSectorWithKeyA(sector, cmdBytes)

    console.log('auth', auth);
    if (!auth) return;
    try {
        var tmpRet,result;
        for (var i = 0; i < 3; i++) {
            tmpRet = mfc.readBlock(sector * 4 + i);
            result+=this.hexCharCodeToStr(this.byteArrayToHexString(tmpRet))
        }

        console.log('result',result);
    } catch (e) {
        this.ICERROR = e.message;
        console.error(e);
    } finally {
        mfc.close();
    }
},
//Key处理函数
HexStringToByteArray: function(instr) {
    var hexA = new Array();
    var pos = 0;
    var len = instr.length / 2;
    for (var i = 0; i < len; i++) {
        var s = instr.substr(pos, 2);
        var v = parseInt(s, 16);
        if (v >= 128)
            v = v - 256;
        hexA.push(v);
        pos += 2;
    }
    return hexA;
},
hexCharCodeToStr: function(hexCharCodeStr) {
    var trimedStr = hexCharCodeStr.trim();
    var rawStr =
        trimedStr.substr(0, 2).toLowerCase() === "0x" ?
        trimedStr.substr(2) :
        trimedStr;
    var len = rawStr.length;
    if (len % 2 !== 0) {
        alert("Illegal Format ASCII Code!");
        return "";
    }
    var curCharCode;
    var resultStr = [];
    for (var i = 0; i < len; i = i + 2) {
        curCharCode = parseInt(rawStr.substr(i, 2), 16); // ASCII Code Value
        resultStr.push(String.fromCharCode(curCharCode));
    }
    return resultStr.join("");
}
}
function toast(content) {
uni.showToast({
title: content,
icon: 'none'
})
}
plus 解决uni-app播放多音频背景音乐
plus 解决uni-app播放多音频背景音乐
播放音频文件
let audioPlayer = null;

// #ifdef APP-PLUS
// 背景音乐文件
let path = plus.io.convertLocalFileSystemURL("_www/static/audio/background_music.mp3");
if (plus.os.name == 'Android') {
    let MediaPlayer = plus.android.importClass("android.media.MediaPlayer");
    audioPlayer = new MediaPlayer()
    audioPlayer.setDataSource(path); //指定音频文件路径
    audioPlayer.setLooping(true); //设置为循环播放
    audioPlayer.prepare(); //初始化播放器MediaPlayer
    audioPlayer.start();
    // 获取音乐的总时长
    console.log(audioPlayer.getDuration());
}
if (plus.os.name == "iOS") {
    let NSData = plus.ios.importClass("NSData");
    let AVAudioPlayer = plus.ios.importClass("AVAudioPlayer");
    let pathFileData = NSData.dataWithContentsOfFile(path);
    audioPlayer = new AVAudioPlayer();
    audioPlayer.initWithDataerror(pathFileData, null);
    audioPlayer.setNumberOfLoops(-1); //-1:无限循环
    audioPlayer.prepareToPlay(); //初始化播放器
    audioPlayer.play();
    // 获取音乐的总时长
    console.log(audioPlayer.duration());
}
// #endif
调节系统媒体音量
let AudioManager = null;
let audioManager = null;

/// 获取系统音量控制
// #ifdef APP-PLUS
if (plus.os.name == 'Android') {
    let context = plus.android.importClass("android.content.Context");
    let main = plus.android.runtimeMainActivity();
    AudioManager = plus.android.importClass("android.media.AudioManager");
    audioManager = main.getSystemService(context.AUDIO_SERVICE);
    // 调节是否显示调节ui
    // audioManager.adjustStreamVolume (AudioManager.STREAM_MUSIC , AudioManager.ADJUST_RAISE, AudioManager.FLAG_SHOW_UI)
    // 音量最大范围
    let max = audioManager.getStreamMaxVolume(AudioManager.STREAM_MUSIC);
    // 当前音量值
    let current = audioManager.getStreamVolume(AudioManager.STREAM_MUSIC);
    console.log(max, current);
}
if (plus.os.name == "iOS") {
    // 暂无查找
}
// #endif

// 设置音量值
// #ifdef APP-PLUS
if (plus.os.name == 'Android') {
    audioManager.setStreamVolume(AudioManager.STREAM_MUSIC, 89, 0); // 89为音量值
}
if (plus.os.name == "iOS") {
    // 暂无查找
}
// #endif
