


【超快速开发经验分享】一种只写 SQL、做配置完成复杂业务系统开发的方法

一看这标题,你肯定会认为基本不可能,或者认为,不写代码最多只能做一些简单业务场景实现。
为了达成我们的目标,先来看看常规企业级应用开发的基本过程:
常规企业级应用开发基本过程
- 第一步,数据库建表建字段。
- 第二步,在应用代码里创建跟表对应的业务对象,并实现及涉及到对象之间关系的操作方法。
- 第三步,UI 层调用业务对象获取数据做渲染,或者通过业务对象做持久化操作。
受常规开发思维惯性,我们会理所当然地认为,要完成第二步、第三步,不写业务代码,而只写 SQL,做配置,就完成各种五花八门的业务逻辑,几乎是不可能。
回归业务系统开发本质
让我们需要回归一个业务系统的本质,来看看第二步和第三步到底做了什么。我们想象这样一种理想情况:如果终端用户自己就是 SQL 高手,那么他应该是完全有可能仅仅通过一个 SQL 客户端完成所有业务逻辑的。实际上,40 多年前,关系数据库的相关论文,就已经论证了基于关系运算理论来表达客观世界的完备性,所以上面的理想情况才变得那么合情合理。
那么我们不禁要问,在数据库上层开发出来的业务系统,究竟是要解决什么核心问题?
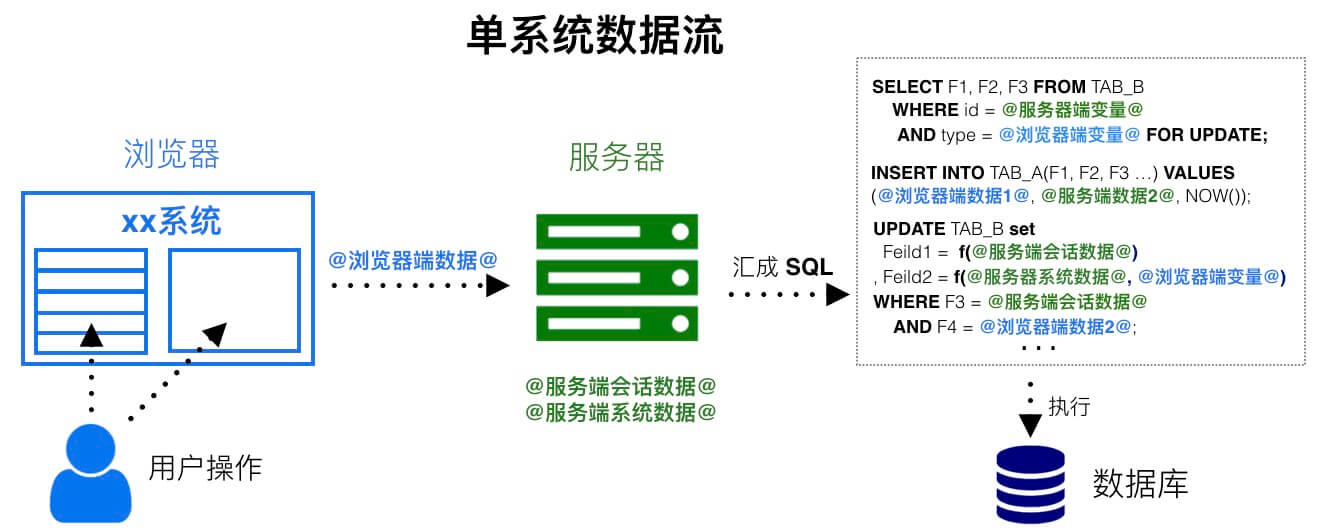
前面已陈述,关系运算理论及 SQL(已经非常接近自然语言) 以其本身的完备性,已经可以处理各种复杂的业务逻辑。那么显然,我们在上层创建的应用,不是为了解决数据库自身实现不了的业务逻辑,而额外做的代码工作,而是为了给不懂 SQL 的人提供的一个外壳,让他们基于这个相对固定交互的 UI 外壳,通过一些简单的操作比如点击鼠标,就能方便并正确地完成一些背后的 SQL 操作。
【图一 单系统数据流】
关系建模和面向对象的世界观冲突
为了实现上述固定交互的 UI 外壳,我们不得不在应用层,采用面向对象的方法去串接逻辑,此时又不得不做一些对象和实体关系映射(ORM)的工作。这也是关系建模体系和面向对象思维天生的冲突所在:前者是经过严格的数学和形式化推导论证过的完备建模体系,后者是编程开发模式上的一种最佳实践。虽然有一些优秀的 ORM 框架如 hibernate 和 mybatis 来解决这类问题,但不要忘记,我们完成业务逻辑的核心就在于 SQL 的执行。而为了达成这一目标,ORM 的做法似乎有些舍近求远。那么,能不能去掉第二步和第三步,只写 SQL 做配置就能完成系统开发呢?
解决之道
考察常规开发的第三步工作,会发现最终产出物实际上就是让用户在 UI 上操作完成背后对应的数据库的 IO 操作,所以我们可以从输入输出这两方面发掘本质需求:
- 一方面(OUTPUT),由于关系数据库基于表、字段的结构化表示,一条 SELECT 语句执行的结果是可以在没有中间代码加工的情况下直接在页面上呈现的。只要 UI 层的各个组件比如列表、表格、卡片支持对相关数据的渲染呈现即可。
- 另一方面(INPUT),用户做的相关持久化操作,此过程比较程式化,即从页面上取得各种各样的数据,汇总到后台执行 UPDATE、INSERT、DELETE 等一条或者多条 SQL(含事务) 操作,当然中间可能有一些 IF ELSE 的处理细节。
于是,为了达成本文的开题目标,我们做了无远开发平台,它是一个专门用于系统开发的一站式工作台,用户可以基于此工作台,基本只需要写 SQL 做配置,就能快速完成全部开发工作,并且获得可以私有部署的系统。这个工作台,作为具备完整开发功能的云 IDE,还主要做了以下两方面的工作来达成只写 SQL 做配置就能完成开发的目标:
- 一方面,它构建了一个标准化 UI 组件库(支持三方扩展),让组件的使用过程以配置化的形式呈现给开发者,直接对接 SQL 做数据组织或呈现。
- 另一方面,提供一套完备的变量数据体系和程式化的事件动作响应机制,让开发者根据这种程式化的模式,快速地完成各种复杂的业务数据持久化操作。
【图二 无远开发平台 所见即所得开发示意】
使用效果
经过实战检验,这种开发模式,比常规开发模式快至少 10 倍,并且迭代及维护成本都大大降低。目前已有上万名开发者使用该平台,完成了涵盖各个行业各种复杂信息管理应用场景的系统,
见案例。
与其他低代码(low-code)开发工具只能开发简单的业务系统不同,无远开发平台 基于Z-Model 理论在开发模型上的完备性,支持全业务场景开发,没有任何技术限制
欢迎尝试并指教。
一看这标题,你肯定会认为基本不可能,或者认为,不写代码最多只能做一些简单业务场景实现。
为了达成我们的目标,先来看看常规企业级应用开发的基本过程:
常规企业级应用开发基本过程
- 第一步,数据库建表建字段。
- 第二步,在应用代码里创建跟表对应的业务对象,并实现及涉及到对象之间关系的操作方法。
- 第三步,UI 层调用业务对象获取数据做渲染,或者通过业务对象做持久化操作。
受常规开发思维惯性,我们会理所当然地认为,要完成第二步、第三步,不写业务代码,而只写 SQL,做配置,就完成各种五花八门的业务逻辑,几乎是不可能。
回归业务系统开发本质
让我们需要回归一个业务系统的本质,来看看第二步和第三步到底做了什么。我们想象这样一种理想情况:如果终端用户自己就是 SQL 高手,那么他应该是完全有可能仅仅通过一个 SQL 客户端完成所有业务逻辑的。实际上,40 多年前,关系数据库的相关论文,就已经论证了基于关系运算理论来表达客观世界的完备性,所以上面的理想情况才变得那么合情合理。
那么我们不禁要问,在数据库上层开发出来的业务系统,究竟是要解决什么核心问题?
前面已陈述,关系运算理论及 SQL(已经非常接近自然语言) 以其本身的完备性,已经可以处理各种复杂的业务逻辑。那么显然,我们在上层创建的应用,不是为了解决数据库自身实现不了的业务逻辑,而额外做的代码工作,而是为了给不懂 SQL 的人提供的一个外壳,让他们基于这个相对固定交互的 UI 外壳,通过一些简单的操作比如点击鼠标,就能方便并正确地完成一些背后的 SQL 操作。
【图一 单系统数据流】
关系建模和面向对象的世界观冲突
为了实现上述固定交互的 UI 外壳,我们不得不在应用层,采用面向对象的方法去串接逻辑,此时又不得不做一些对象和实体关系映射(ORM)的工作。这也是关系建模体系和面向对象思维天生的冲突所在:前者是经过严格的数学和形式化推导论证过的完备建模体系,后者是编程开发模式上的一种最佳实践。虽然有一些优秀的 ORM 框架如 hibernate 和 mybatis 来解决这类问题,但不要忘记,我们完成业务逻辑的核心就在于 SQL 的执行。而为了达成这一目标,ORM 的做法似乎有些舍近求远。那么,能不能去掉第二步和第三步,只写 SQL 做配置就能完成系统开发呢?
解决之道
考察常规开发的第三步工作,会发现最终产出物实际上就是让用户在 UI 上操作完成背后对应的数据库的 IO 操作,所以我们可以从输入输出这两方面发掘本质需求:
- 一方面(OUTPUT),由于关系数据库基于表、字段的结构化表示,一条 SELECT 语句执行的结果是可以在没有中间代码加工的情况下直接在页面上呈现的。只要 UI 层的各个组件比如列表、表格、卡片支持对相关数据的渲染呈现即可。
- 另一方面(INPUT),用户做的相关持久化操作,此过程比较程式化,即从页面上取得各种各样的数据,汇总到后台执行 UPDATE、INSERT、DELETE 等一条或者多条 SQL(含事务) 操作,当然中间可能有一些 IF ELSE 的处理细节。
于是,为了达成本文的开题目标,我们做了无远开发平台,它是一个专门用于系统开发的一站式工作台,用户可以基于此工作台,基本只需要写 SQL 做配置,就能快速完成全部开发工作,并且获得可以私有部署的系统。这个工作台,作为具备完整开发功能的云 IDE,还主要做了以下两方面的工作来达成只写 SQL 做配置就能完成开发的目标:
- 一方面,它构建了一个标准化 UI 组件库(支持三方扩展),让组件的使用过程以配置化的形式呈现给开发者,直接对接 SQL 做数据组织或呈现。
- 另一方面,提供一套完备的变量数据体系和程式化的事件动作响应机制,让开发者根据这种程式化的模式,快速地完成各种复杂的业务数据持久化操作。
【图二 无远开发平台 所见即所得开发示意】
使用效果
经过实战检验,这种开发模式,比常规开发模式快至少 10 倍,并且迭代及维护成本都大大降低。目前已有上万名开发者使用该平台,完成了涵盖各个行业各种复杂信息管理应用场景的系统,
见案例。
与其他低代码(low-code)开发工具只能开发简单的业务系统不同,无远开发平台 基于Z-Model 理论在开发模型上的完备性,支持全业务场景开发,没有任何技术限制
欢迎尝试并指教。
收起阅读 »文件选择(ios11)
文件选择(ios11)https://ext.dcloud.net.cn/plugin?id=3298
文件选择(ios11)https://ext.dcloud.net.cn/plugin?id=3298
HBuilderX中习惯CSS文件格式化成一行
一、找到安装HBuilderX的目录,修改beautifier.js文件;
比如:D:\HBuilderX\plugins\format\node_modules\js-beautify\js\src\css\beautifier.js
1)先备份文件beautifier.js文件;
2)请把附件压缩包解压,找到beautifier.js文件;
修改方法:
1、修改 this.eatWhitespace(true) 为 this.eatWhitespace()
去除参数 true 则 清除空格但不插入换行
2、去除或注释掉 this._output.add_new_line();
不插入换行
修改
...} else if (this._ch === '{') {
[294] this.eatWhitespace(); 去除参数true
[295] // this._output.add_new_line(); 注释掉
} else if (this._ch === '}') {
...
[298] // this._output.add_new_line(); 注释掉
...
[314] this.eatWhitespace(); 去除参数true
...
} else if (this._ch === ';') {
...
[362] this.eatWhitespace(); 去除参数true
...
[369] this._output.add_new_line(); 注释掉
}
2、工具(T) --> 插件配置 --> 找到 jsbeautify 点击下方的 “打开文件jsbeautifyrc.js进行配置”:
在 options 里面 加
module.exports = {
parsers: {
...
},
options: {
...
"css": {
"newline_between_rules": false,
"selector_separator_newline": false,
"preserve_newlines": false
}
}
uniapp Sqllite 批量执行sql
function bathExecuteSql(sqlArray) {
        //开启事务
    beginTransaction();
        //使用Promise异步调用,避免其他函数阻塞
    new Promise((resolve, reject) => {
        for (var i = 0; i < sqlArray.length; i++) {
                         //如果出错,则终止执行,回调reject函数
            if (!executeSql(sqlArray[i])) {
                reject(false)
            }
        }
                //执行完成
        resolve(true);
    }).then(
        (res) => {
                       //执行完成,提交事务
            commitTransaction();
            return res;
        },
        (err) => {
                       //出错,回滚事务
            rollbackTransaction();
            return err;
        }
    )
}
图文讲解uni-app的pc宽屏适配方案
天下苦平台碎片化已久。
在移动互联网以前,开发者只需幸福的面对web。进入移动互联网时代,iOS、Android、H5以及各种小程序快应用层出不穷,开发者再也幸福不起来。
- 学习n个技术
- 开发n个版本
- 各版迭代混乱,无法拉齐,用户茫然、内部痛苦
- 开发测试成本n倍暴涨
结果就是工程师不停加班到头秃,但产品的需求仍然做不完、老板的预算一直压不下去,全都痛苦。
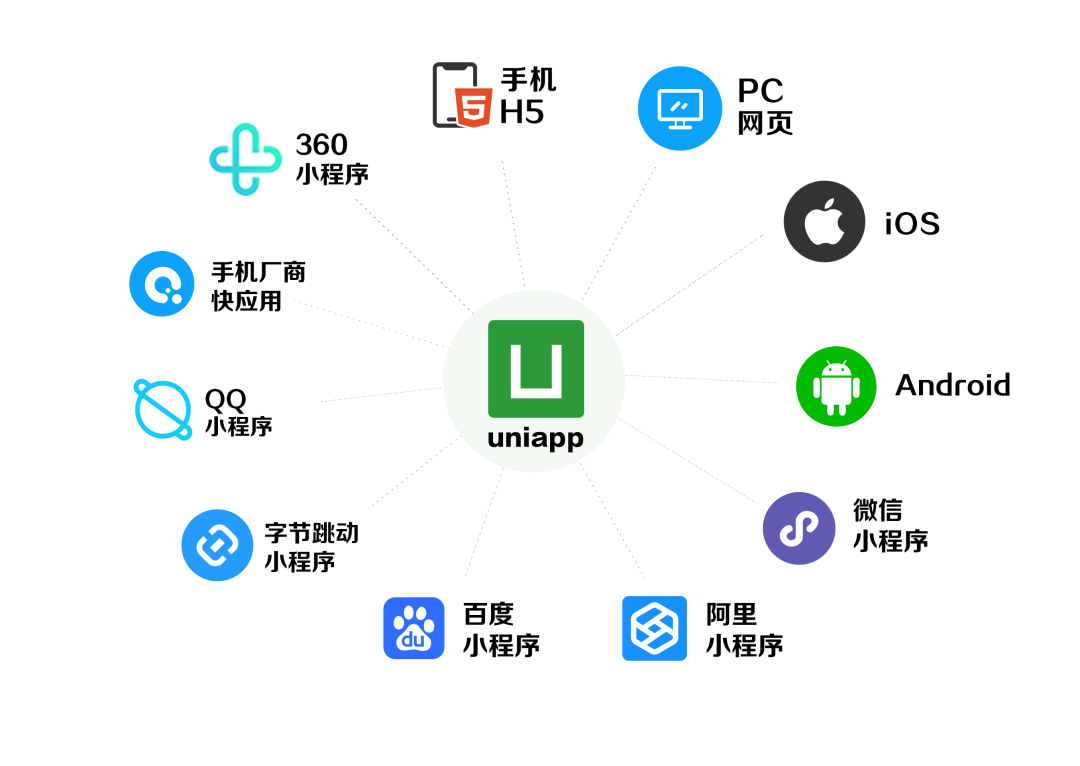
uni-app之前已经实现了手机端全覆盖,支持iOS、Android、H5、微信小程序、阿里小程序、百度小程序、字节跳动小程序、QQ小程序、快应用、360小程序,并且在各端均有优异的运行性能。
从2.9版本起,uni-app 进一步提供了PC等宽屏的适配方案,完成了大统一。
开发者终于可以做到使用一个框架,一把撸掉所有项目。
不说虚的,先来个实际示例,大家直观感受一下:
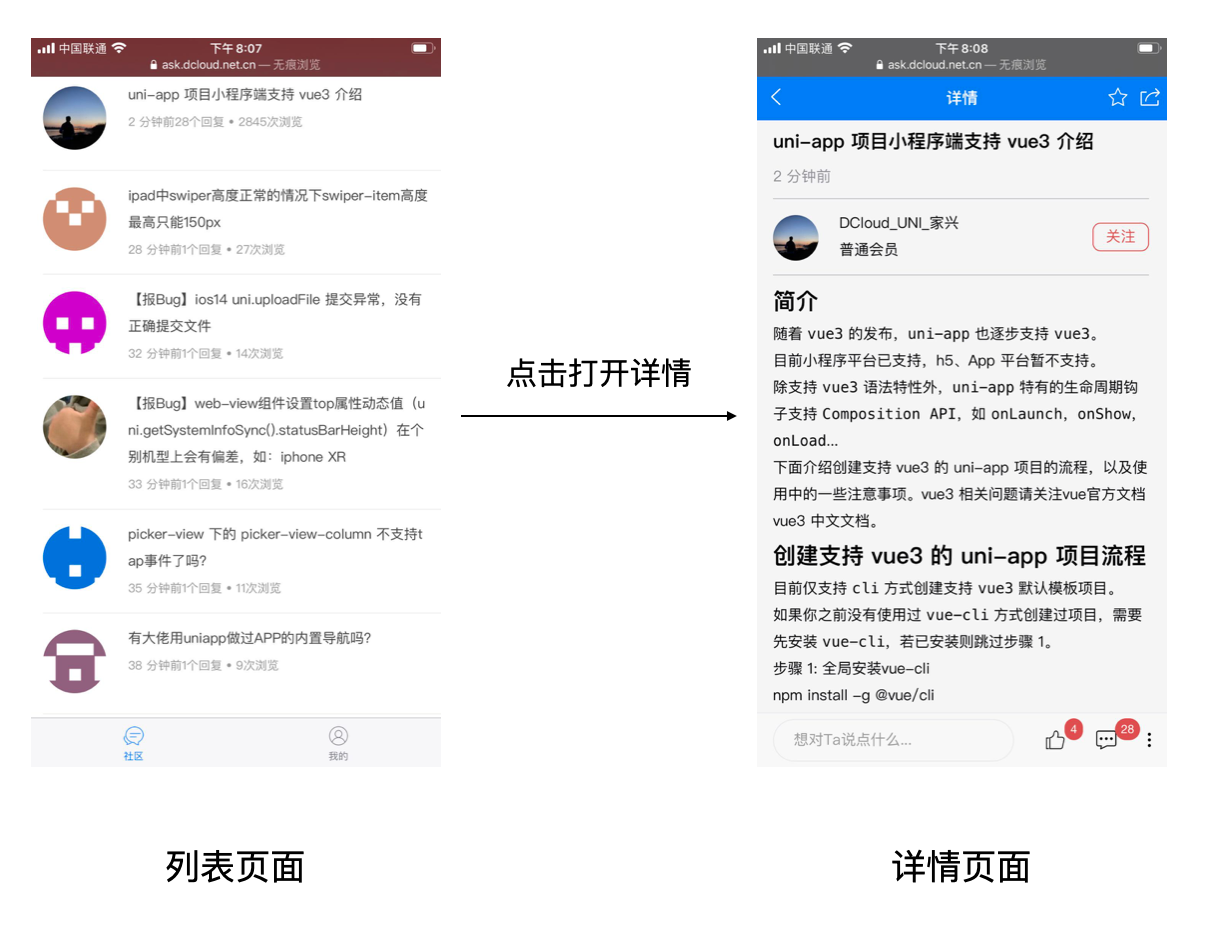
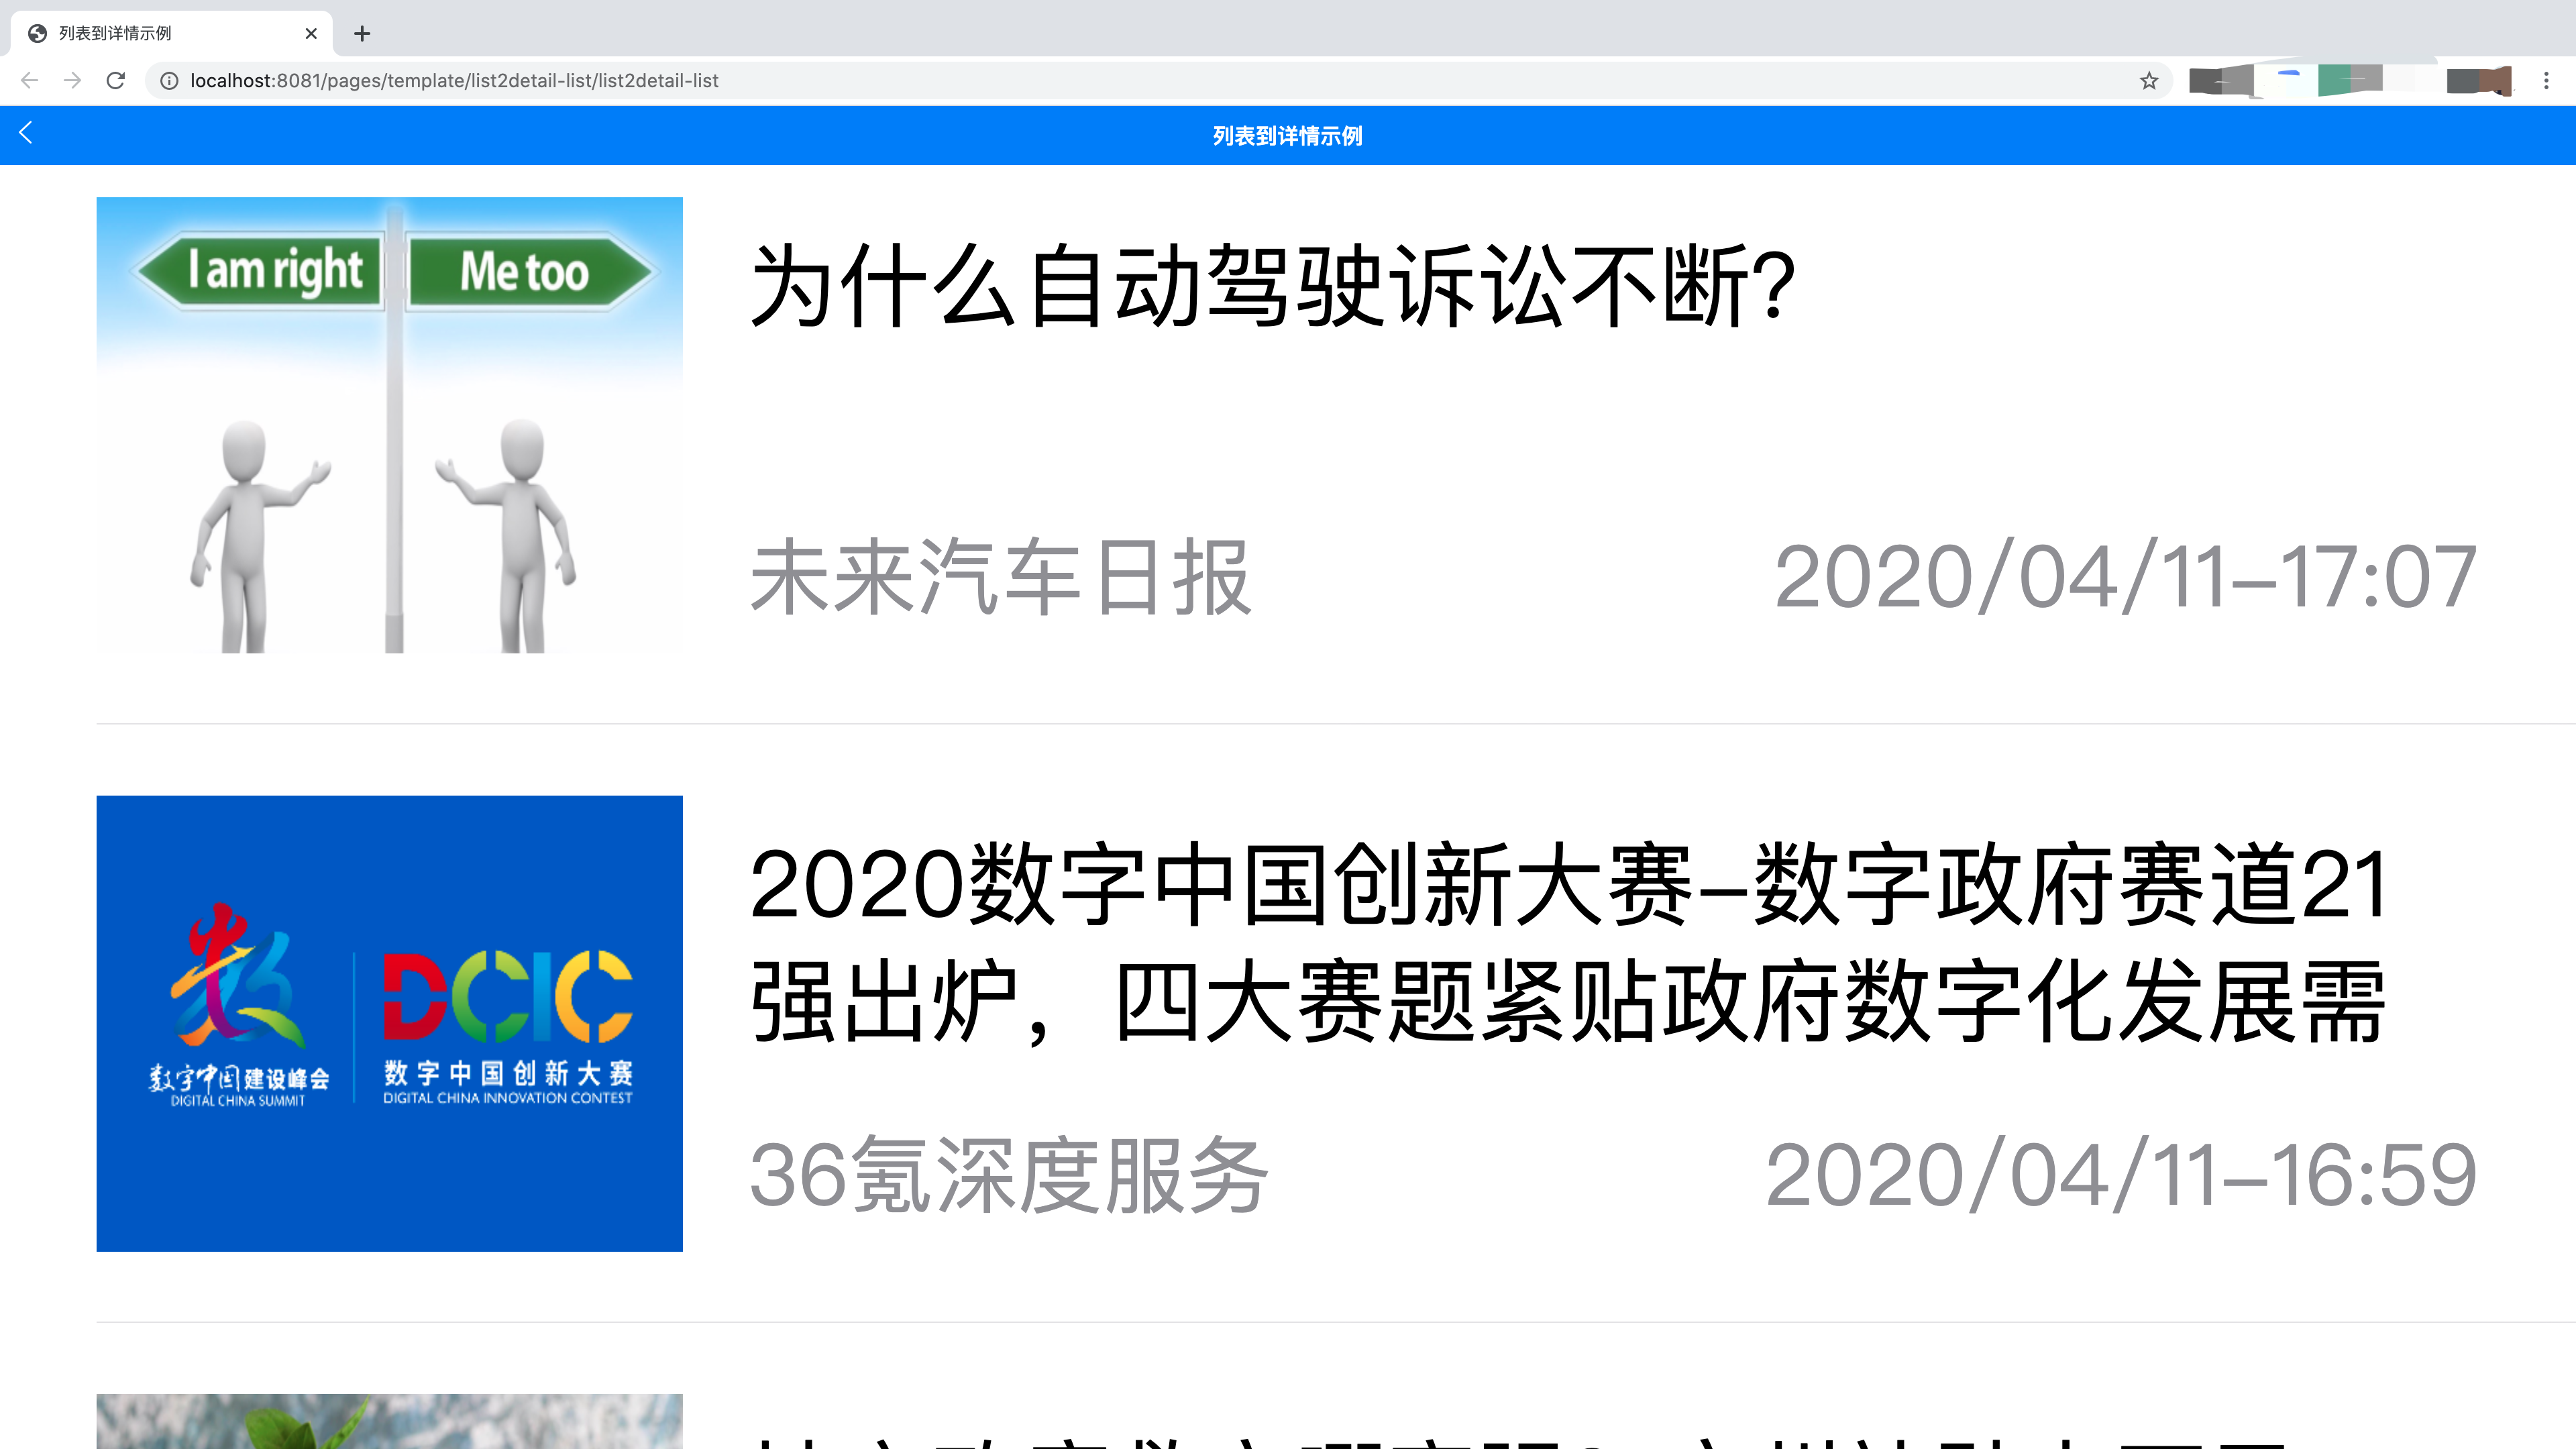
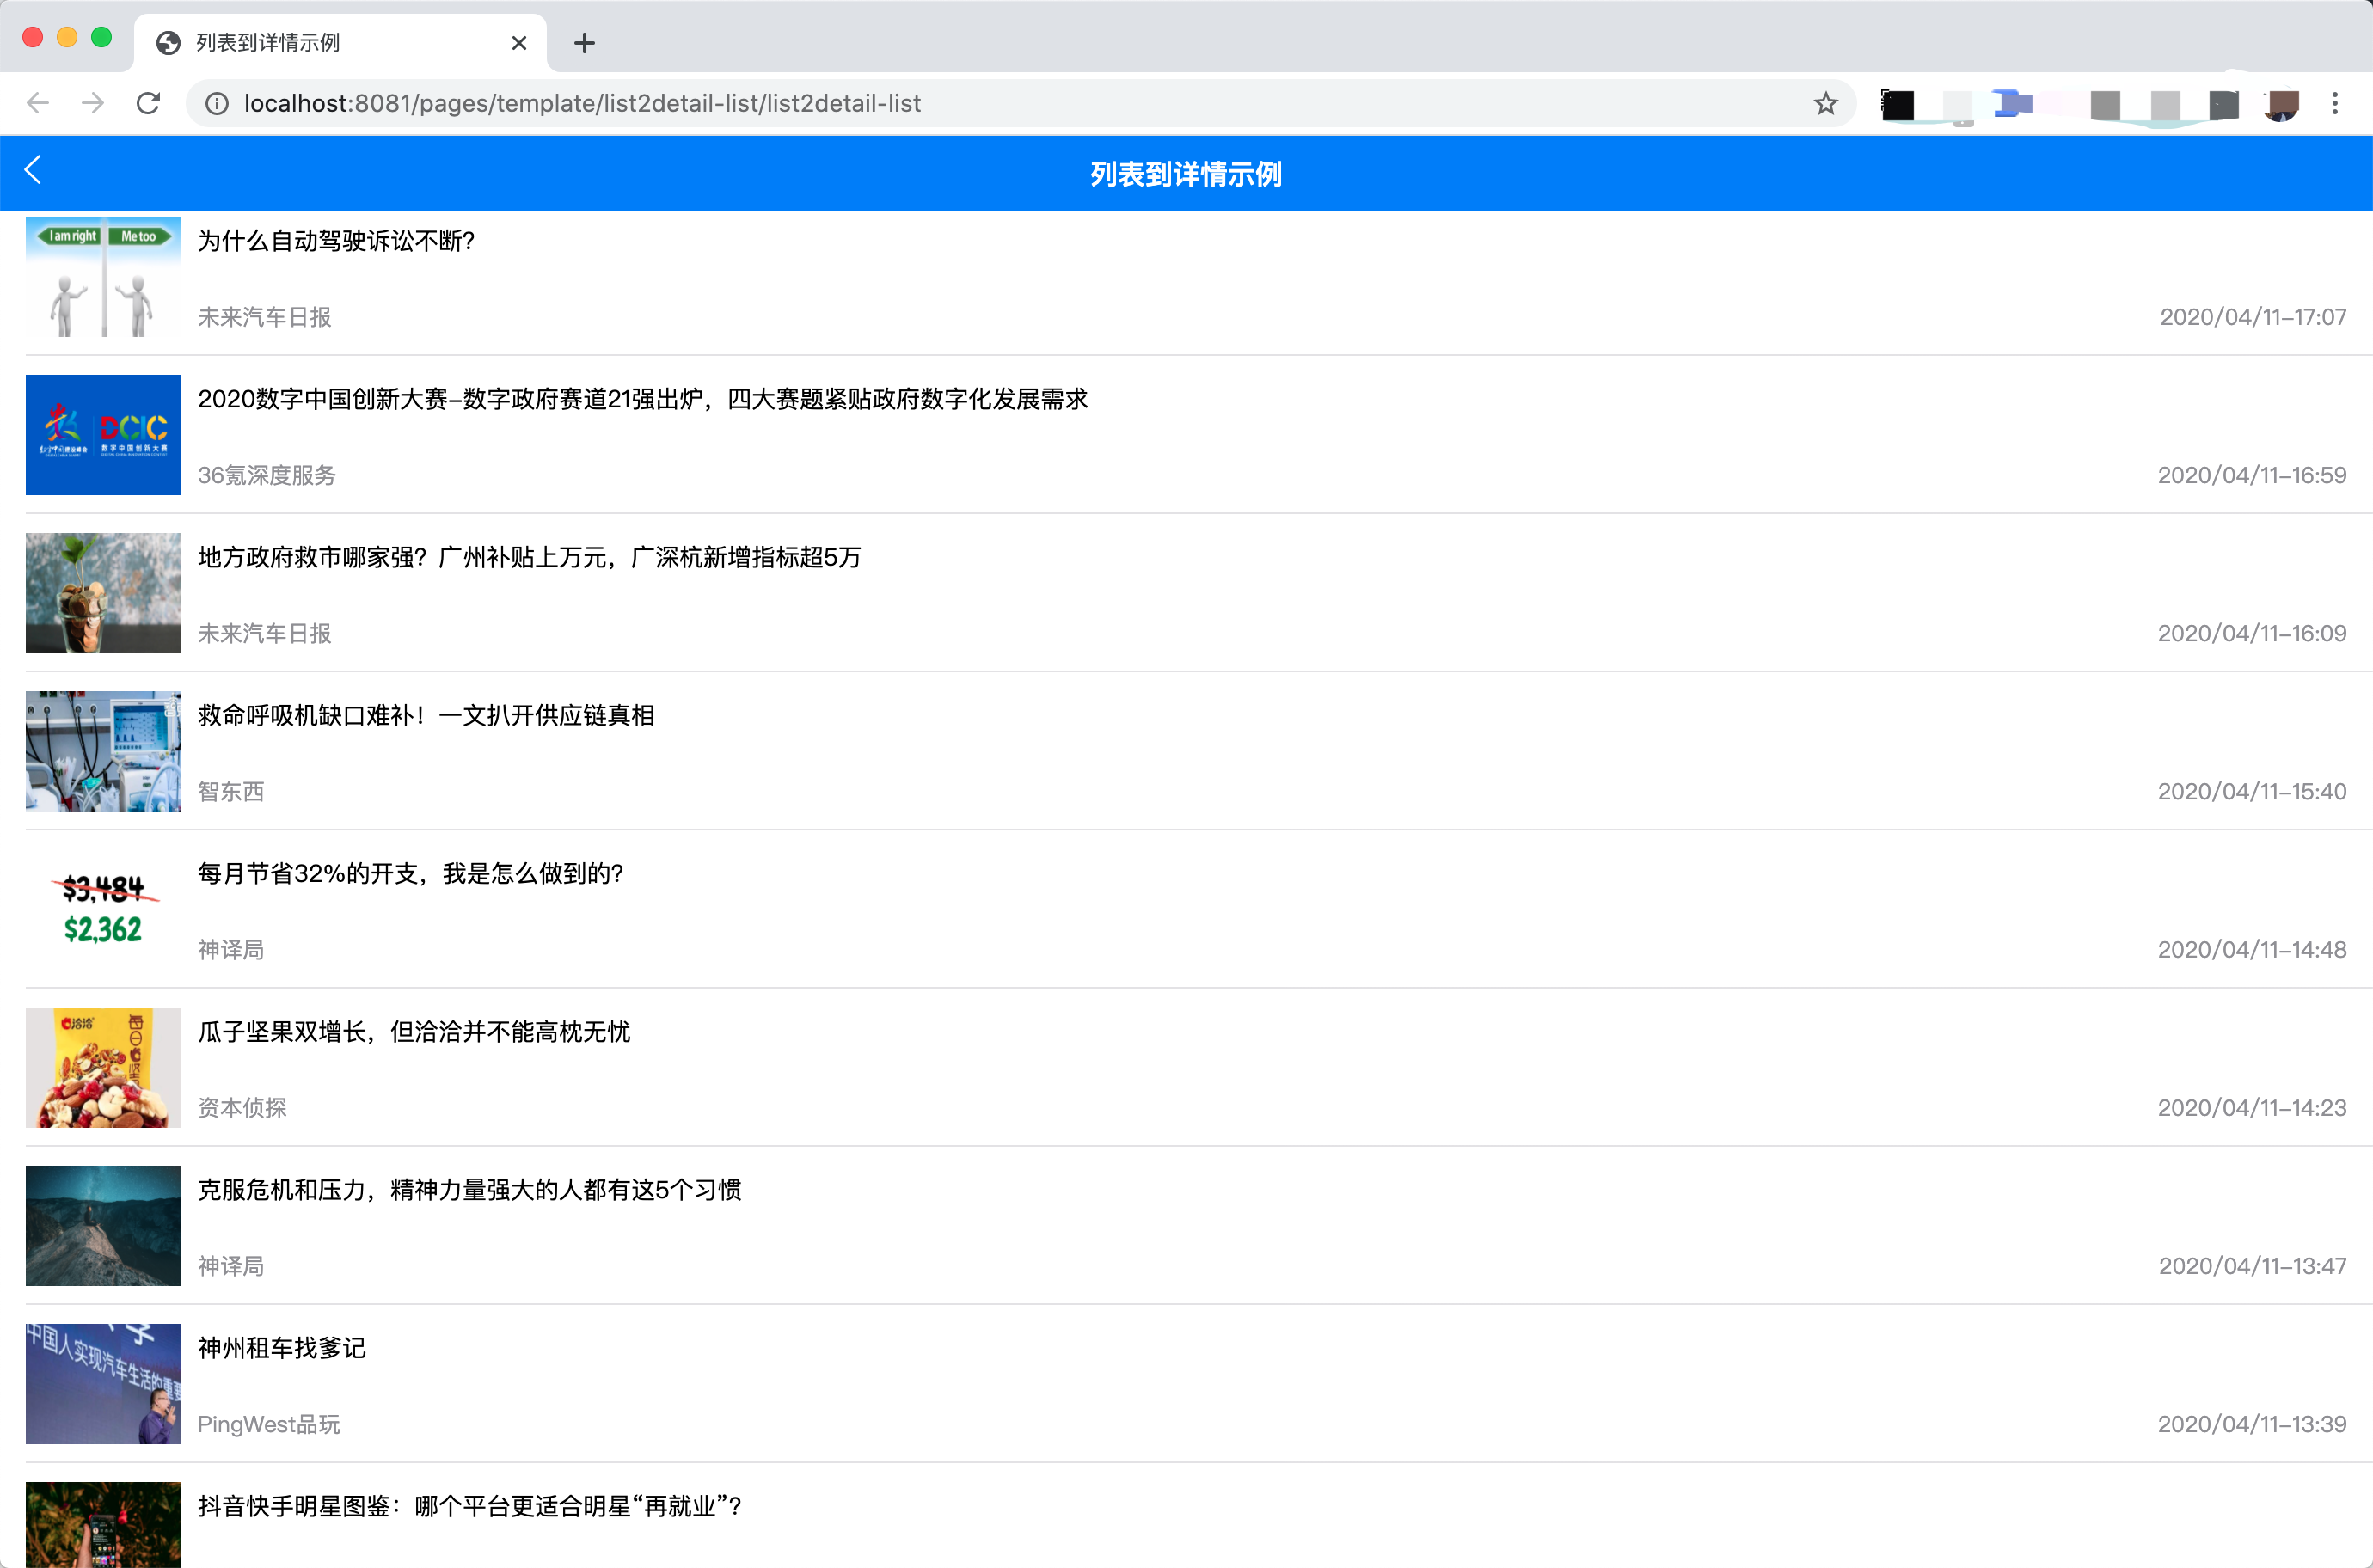
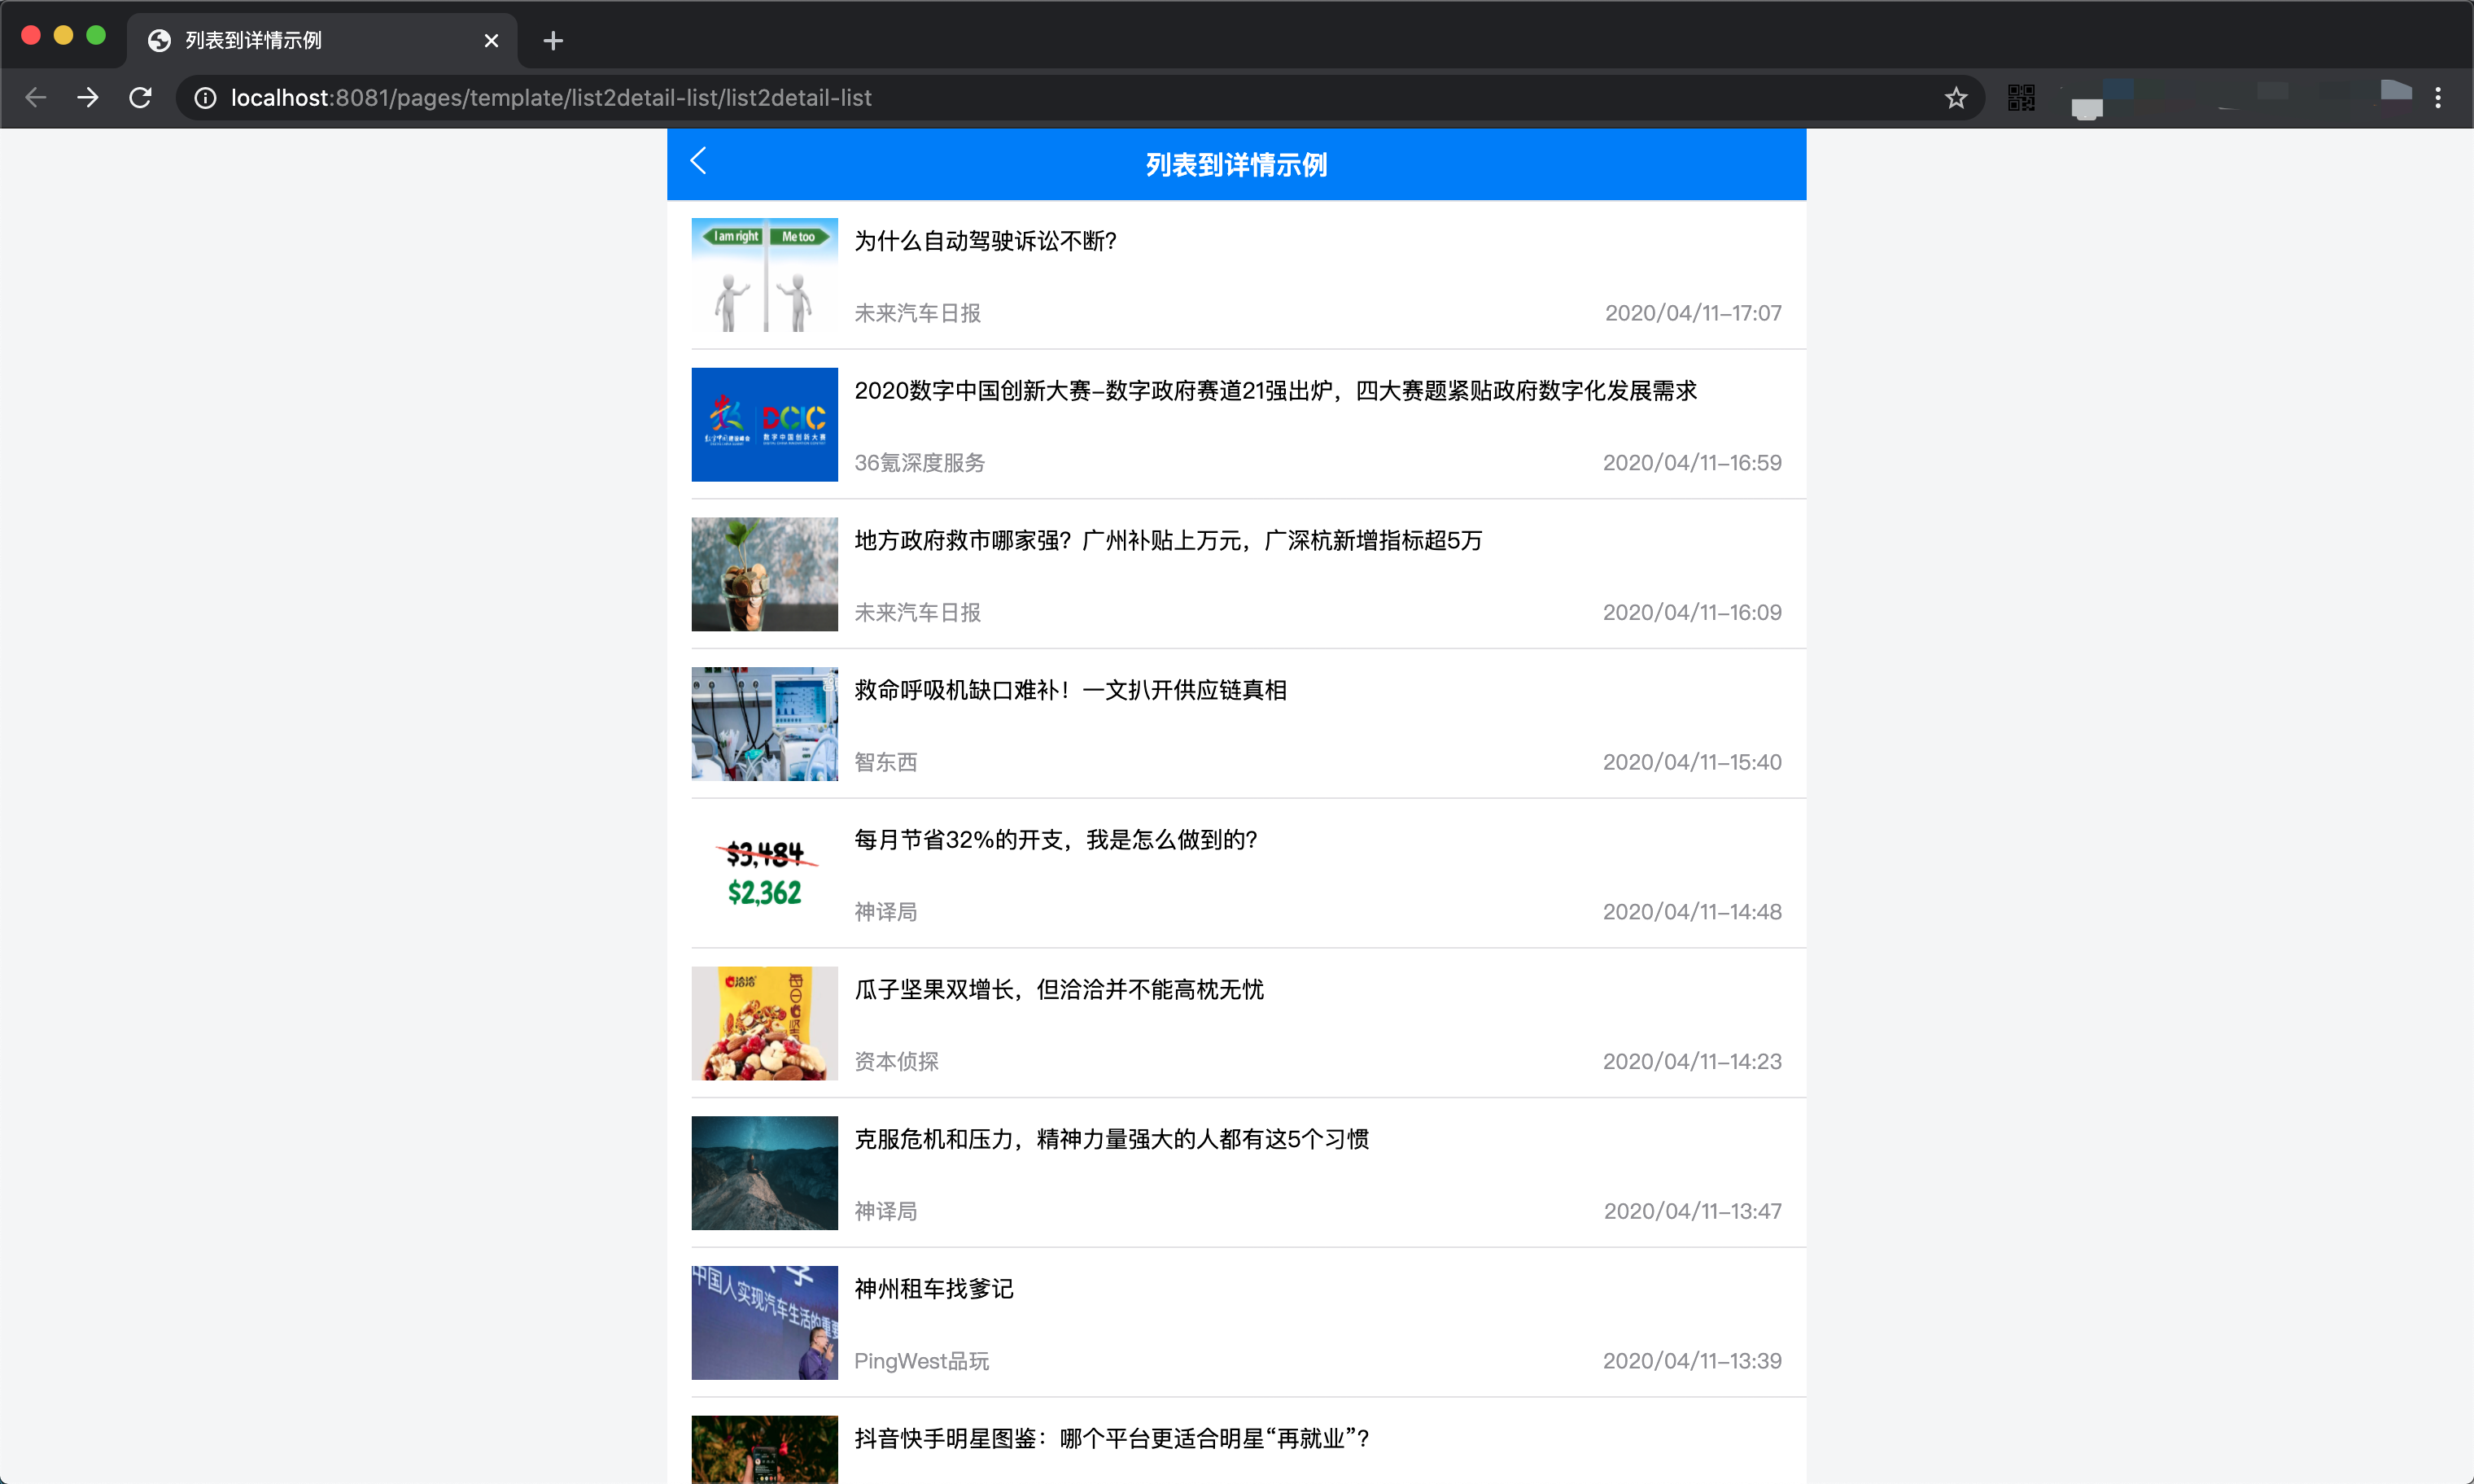
如下是基于uni-app的DCloud社区在mobile端的展示效果,列表、详情分为两个页面,点击列表中的帖子,打开详情页面:
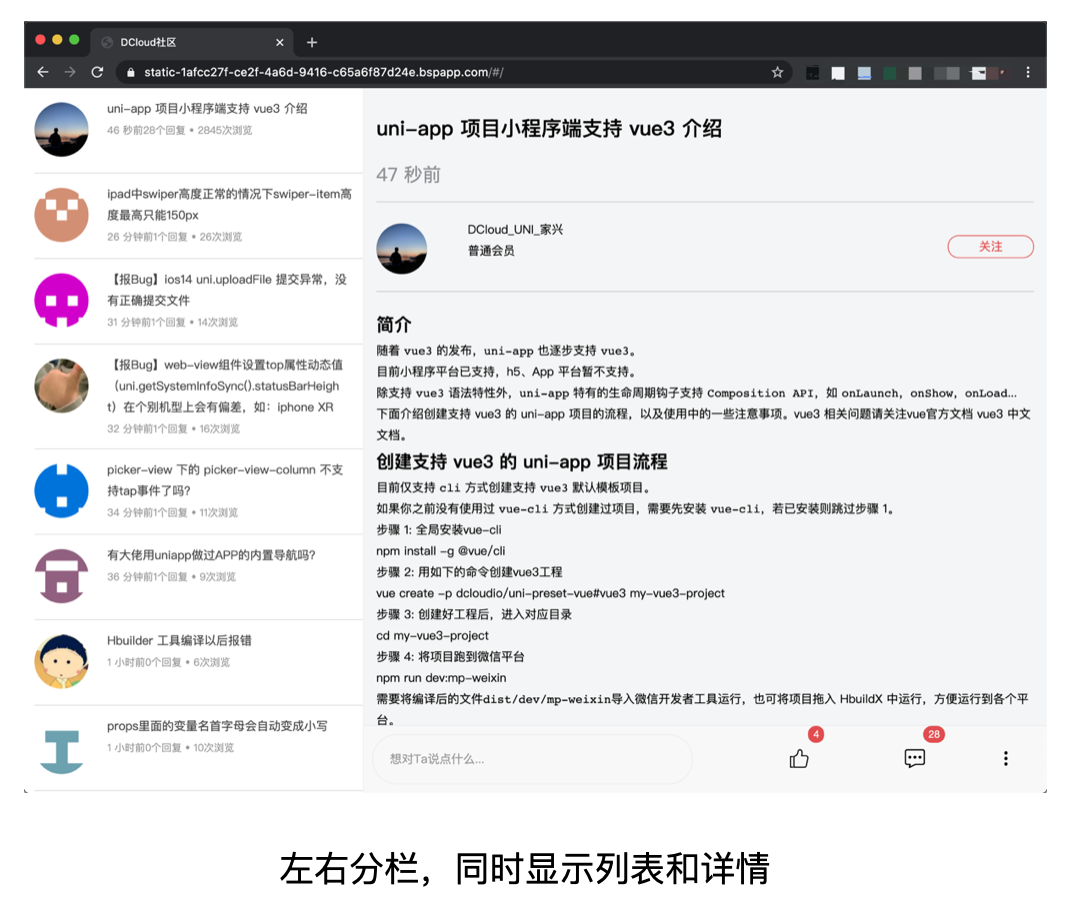
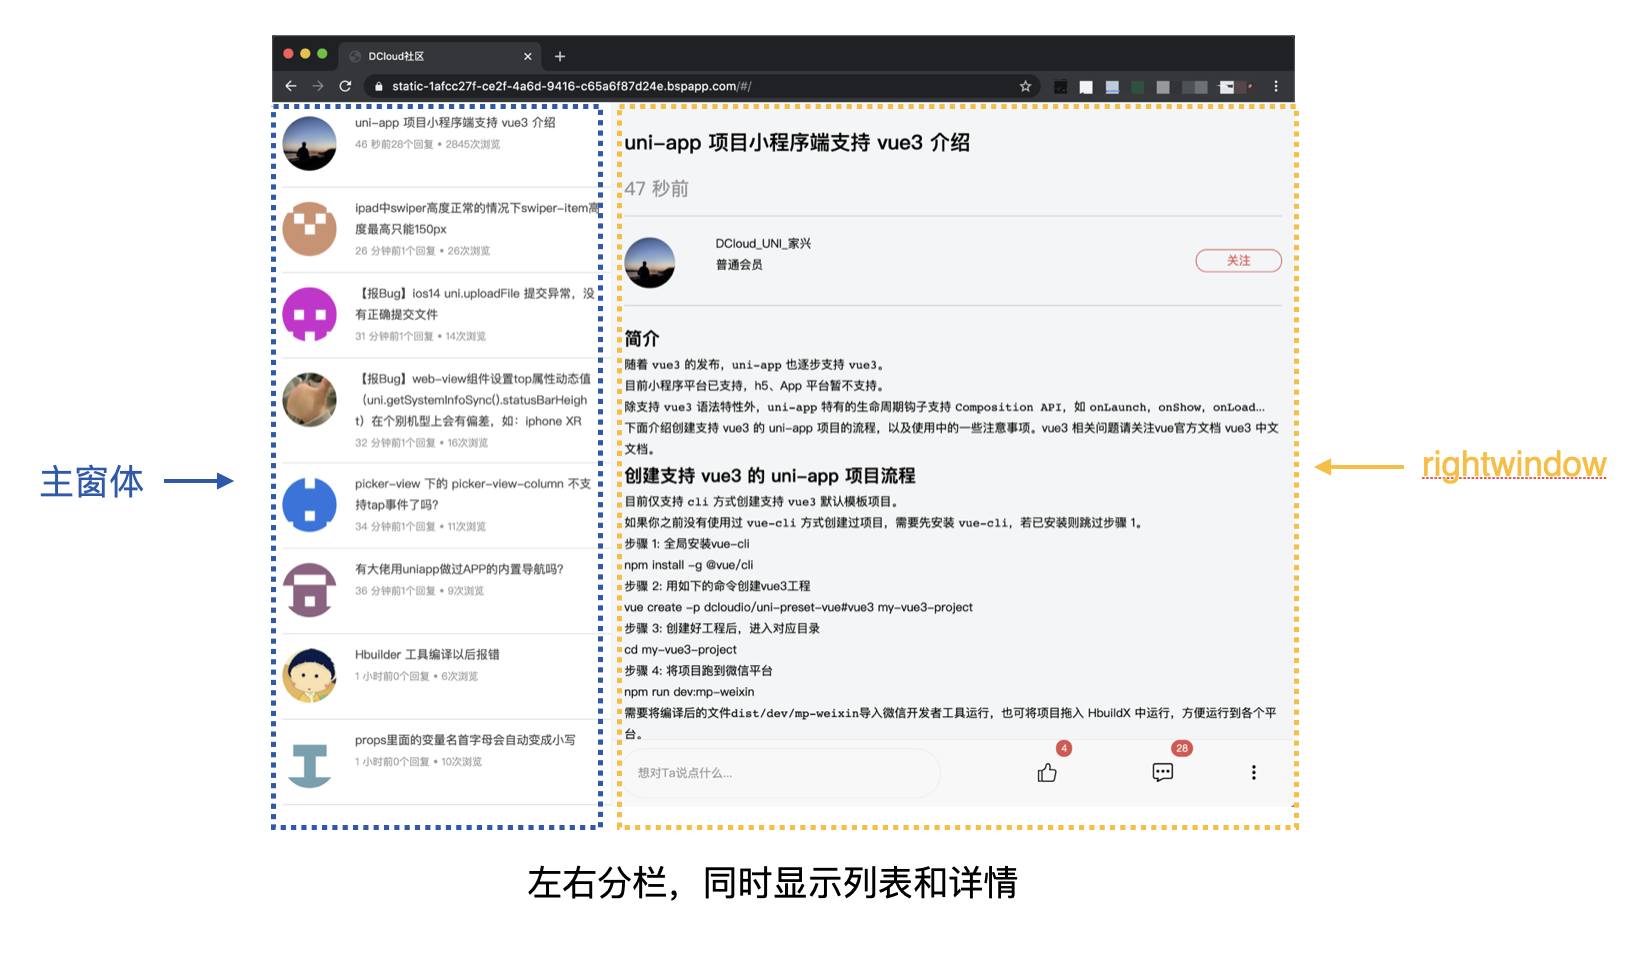
如下是基于uni-app的DCloud社区同一套代码,稍作配置后,在pc端的展示效果,列表、详情在同一个页面中左右分栏显示,点击左侧列表中的帖子,刷新右侧详情窗口的内容,这个UI更适合pc宽屏,也更有pc桌面App的体验。
Tips:点击 DCloud社区演示系统,自己感受PC和Mobile的自适应。
怎么样?有没有被酷到?
下面我们具体来讲讲uni-app的pc宽屏适配方案,总的来说,包括三个方面:
- 窗体级适配:leftwindow、rightwindow、topwindow等分栏
- 组件级适配:match-media组件
- rpx的宽屏响应
1. 窗体级适配:leftwindow分栏
手机屏幕和PC显示器的设计不同。为了方便手持及接听电话,大多手机的设备高度大于设备宽度(即为窄屏设计),故mobile App 多为竖屏/窄屏显示的UI。
而pc显示器多为宽屏设计,即设备宽度大于设备高度,在pc上的桌面应用,很多会采用左右分栏的UI设计。
uni-app以目前手机屏幕为主窗体(window),在左/右/上三个方向,新扩展 leftWindow、rightWindow、topWindow三个窗体,这三个窗体可设定在屏幕宽度大于某一阀值时自动出现(展现分栏的宽屏设计),屏幕宽度小于某一阀值后自动消失(恢复单窗口的窄屏设计)。
uni-app主窗体和扩展的三个窗体各自独立,支持互相通信,点击链接、切换页面时支持在相应的窗体内刷新,而不是整屏刷新。
我们以本文开头的DCloud社区为例,讲解如何在uni-app中快捷实现宽屏适配。
我们将社区的列表页作为主窗体,将详情内容扩展到rightWindow中,示意如下:
接下来分步说明,如何在uni-app项目中完成分栏实现。
step 1: 新建right-window.vue展现帖子详情
当然,rightWindow无需重写新闻详情页面,是可复用原有代码的,支持把已有详情页面当组件放到 rightWindow 页面中,如下:
<!-- responsive/right-window.vue -->
<template>
  <view>
    <!-- 将原来的详情页(/pages/detail/detail.vue),作为一个组件(pages-detail-detail)使用 -->
    <pages-detail-detail ref="detailPage"></pages-detail-detail>
  </view>
</template>

<script>
  export default {
    created(e) {
      //监听自定义事件,该事件由左侧列表页的点击触发
      uni.$on('updateDetail', (e) => {
        // 执行 detailPage组件,即:/pages/detail/detail.vue 页面的load方法
        this.$refs.detailPage.load(e.detail);
      })
    }
  }
</script>
step 2: 在列表页面,处理点击列表后与rightWindow交互通信的逻辑。
// 列表页的改造
goDetail(detail) {
    if (this._isWidescreen) {
        //若为宽屏,则触发右侧分栏详情页的自定义事件,通知右侧窗体刷新新闻详情
        uni.$emit('updateDetail', {
            detail: encodeURIComponent(JSON.stringify(detail))
        })
    } else {
        // 若为窄评,则打开新窗体,在新窗体打开详情页面
        uni.navigateTo({
            url: '/pages/detail/detail?query=' + encodeURIComponent(JSON.stringify(detail))
        });
    }
},
step 3: 在pages.json中注册rightWindow,如下:
{
  "rightWindow": {
    "path": "responsive/right-window.vue", // 指定 rightWindow 页面文件
    "style": {
      "width": "calc(100vw - 400px)" // 页面宽度
    },
    "matchMedia": {
      "minWidth": 768 //生效条件,当窗口宽度大于768px时显示
    }
  }
}
可以看到,无需太多工作量,就可以快速把一个为手机窄屏开发的应用,快速适配为PC宽屏应用。并且以后的代码维护,仍然是同一套,当业务迭代时不需要多处升级。
这套方案的实施,有如下特征:
- 原先为手机窄屏开发的代码,基本无需修改,可完全适配到pc宽屏上;后续新增的业务模块,也是一套代码,同时兼容款窄屏。
- 增加pc宽屏适配后,不影响原先mobile端的窄屏实现,窄屏上会自动隐藏leftWindow/rightWindow等扩展窗体。
- rightWindow里的页面是复用的,不需要重写新闻详情页面,支持把已有详情页面当组件放到 rightWindow 页面中。
更多配置细节,详见文档:https://uniapp.dcloud.net.cn/collocation/pages?id=topwindow
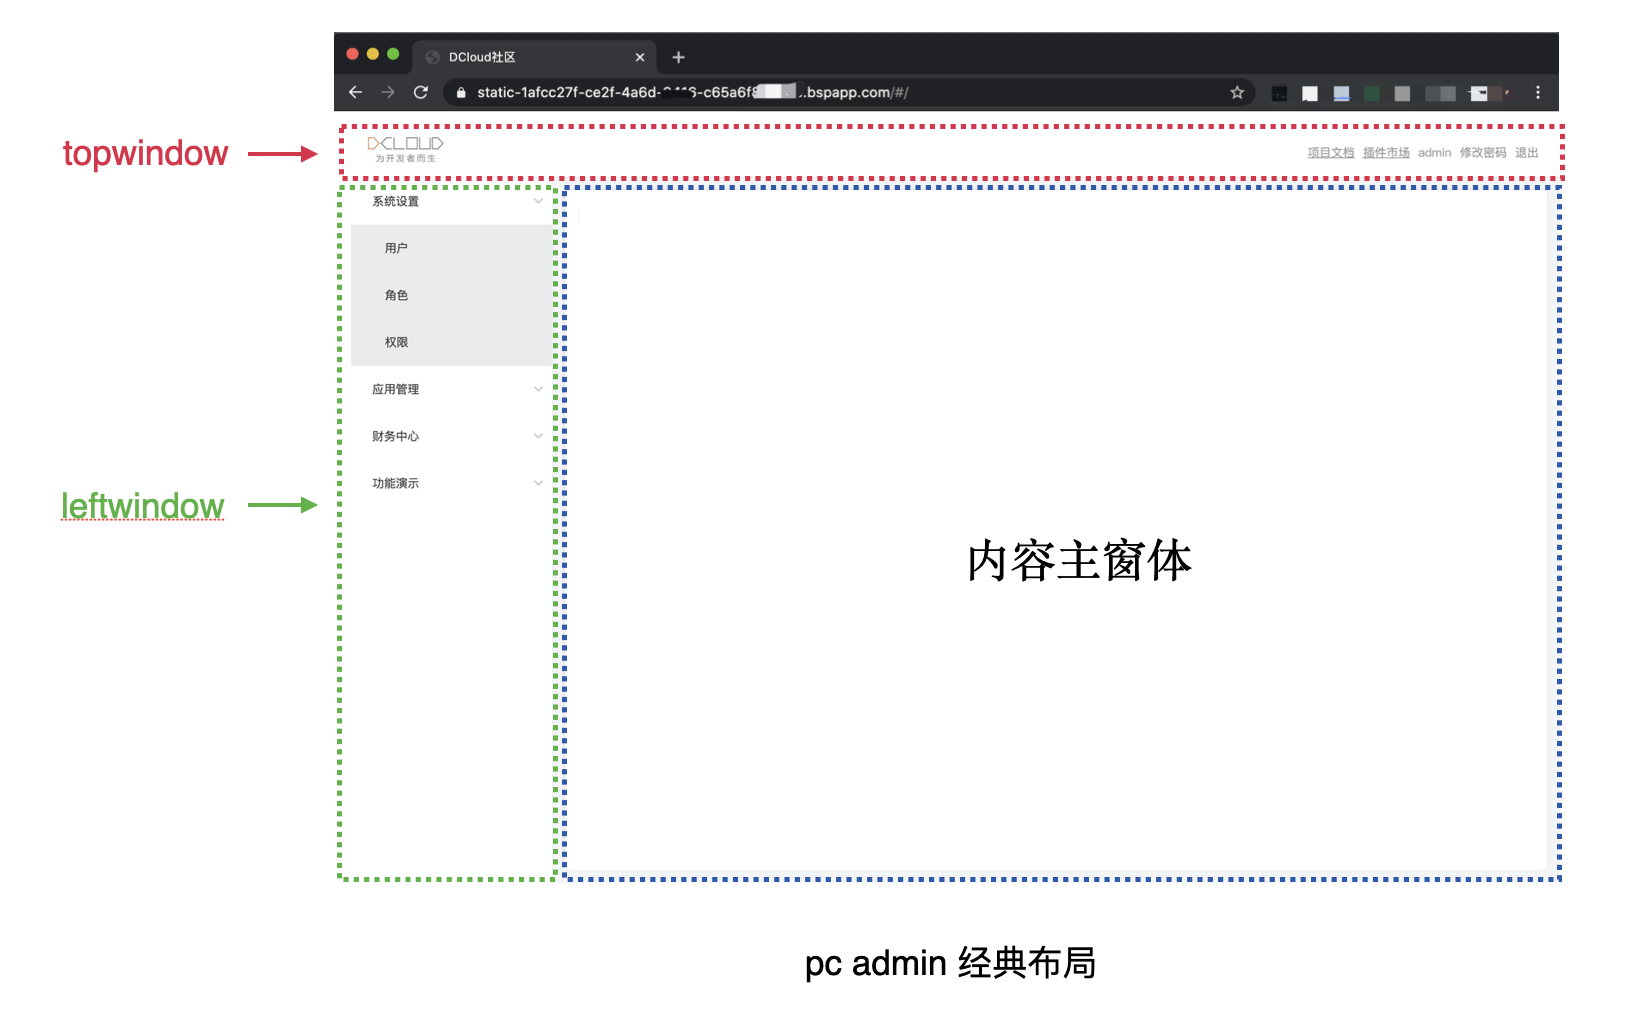
leftWindow方案除了适用于将原有的Mobile App适配到大屏显示,也适用于新开发的PC应用,尤其是PC Admin管理控制台。
如下是基于leftwindow、topwindow构建的经典pc admin布局:
2. 组件级适配:match-media组件
leftWindow等方案是页面窗体级适配方案,适用于多页面的组合分栏显示。
那么在同一个页面中,组件是否可以适配不同屏宽?当然可以,此时可以使用组件级适配方案。
除了传统的css媒体查询外,uni-app还提供了全平台兼容的 match-media组件 和配套的 uni.createMediaQueryObserver 方法。
match-media是一个媒体查询适配组件,可以更简单的用于动态屏幕适配。
在match-media组件中放置内容,并为该组件指定一组 media query 媒体查询规则,如屏幕宽度。运行时,如屏幕宽度满足查询条件,则这个组件就会被展示,反之则隐藏。
match-media组件的优势包括:
- 开发者能够更方便、显式地使用 Media Query 能力,而不是耦合在 CSS 文件中,难以复用。
- 能够在模板中结合数据绑定动态地使用,不仅能做到组件的显示或隐藏,在过程式 API 中可塑性也更高。
- 能够嵌套式地使用 Media Query 组件,即能够满足局部组件布局样式的改变。
- 组件化之后,封装性更强,能够隔离样式、模版以及绑定在模版上的交互事件,还能够提供更高的可复用性。
uni-app推荐采用运行时动态适配的方案,而不是为PC版单独编写条件编译(虽然你也可以通过自定义条件编译来实现单独的PC版)。这样设计的好处是在ipad等设备的浏览器上可以方便的横竖屏切换。
3. rpx的宽屏响应
设计Mobile App时,设计师常会以 iPhone6 作为视觉稿的标准,即按照750px屏幕宽度出图;程序员以750px作为基准,根据设备实际尺寸,动态换算(缩放)出适合当前设备屏幕的元素宽高。
这就是rpx(responsive pixel)的实现思路,只不过rpx由框架引擎动态换算元素尺寸,无需程序员写代码干预。
面向mobile端时,rpx是一种很理想的解决方案,因为各种移动设备的屏幕宽度差异不是很大,相对于750px微调缩放后的效果,可最大化的还原设计师的设计。
但是,一旦脱离移动设备,在pc屏幕,或者pad横屏状态下,因为屏幕宽度远大于750了。此时rpx根据屏幕宽度变化的结果就严重脱离了预期,大的惨不忍睹。
假设一个图文列表的展现,我们针对左侧缩略图定义如下css:
.uni-media-list-logo {
    width: 180rpx;
    height: 140rpx;411*(180/750)411*(180/750)411*(180/750)
}
在手机端,这个显示效果是比较理想的,如下:

当前选择 pixel 2作为模拟设备,屏幕宽度为411px,故缩略图的宽度变为:180*(411/750) = 98px,高度变为:140*(411/750) = 76px,这个理论计算和实际运行相符,且效果较佳。
同样的代码,如果运行到pc端,假设屏幕宽度为1920px,则缩略图的尺寸将变为:180*(1920/750) = 460px,高度变为:140*(1920/750) = 358px,这个惨不忍睹的大就出来了,一个1920*1080的显示器,只能显示2条记录(主要是缩略图高度放大导致的),效果如下:
为此,在uni-app 2.9+起,新增了 rpx 按750px做基准屏宽的生效范围控制,即屏幕宽度超过某阀值(默认为960px)后,将不再以屏幕实际宽度换算元素宽高,而改以固定屏幕宽度(默认为375px)计算元素宽高。
以上述图文列表为例,当屏幕宽度为1920px(大于960px)时,将采用固定的屏幕宽度(默认375px)计算缩略图的宽高,即:180*(375/750) = 90px,高度变为:140*(375/750) = 70px,按照这个机制,pc端运行效果如下,相比上图的放大变丑,展现更为理想优雅。
Tips:
- 750px生效的屏幕宽度阀值,及宽屏时计算所用的固定屏幕宽度,均支持自定义配置
{
  "globalStyle": {
    "rpxCalcMaxDeviceWidth": 960, // rpx 计算所支持的最大设备宽度,单位 px,默认值为 960
    "rpxCalcBaseDeviceWidth": 375, // 设备实际宽度超出 rpx 计算所支持的最大宽度时,rpx计算所采用的固定屏幕宽度,单位 px,默认值为 375
  }
}- 开发者可在rpx宽度管控的基础上,略作调整,实现更好的pc宽屏效果,如宽屏时,固定列表宽度且居中显示,如下图。当然,此处仅为了演示rpx在宽屏下的失控管理,实际应用中,可采用分栏窗口,将列表在左侧分栏中显示,如本文开篇示例截图。
4. 补充
4.1 通过electron打包为windows、mac、linux客户端
有了宽屏适配,uni-app的应用就可以方便的通过electron打包为电脑客户端应用,windows、mac、linux均支持。
开发者可以随意调用electron的API,以调用更多操作系统的能力(为方便多端兼容,可以将这些特殊API写在自定义的条件编译里)
uni-app插件市场有已经封装好的一些插件,详见:https://ext.dcloud.net.cn/search?q=electron
4.2 一个让手机版网页临时可用于pc浏览器的方案
如果你的h5版已经开发完毕,还没来得及适配pc,但想在pc上先用起来。那么可以在pc网页里使用iframe,约定好宽度,在里面套用uni-app的窄屏版。
当然还可以在iframe旁边放置二维码,提供手机版扫码地址,如下是一个实现示例:
5. 结语
uni-app团队将keep running,继续完善uni-app在pc、pad等宽屏设备上的更好适配,并会在ssr、serverless方向上重点投入,提供云端一体的更高效率的解决方案(详见uniCloud),帮助企业更高效,帮助开发者更轻松!
欢迎大家到https://github.com/dcloudio/uni-app上给我们star鼓励
天下苦平台碎片化已久。
在移动互联网以前,开发者只需幸福的面对web。进入移动互联网时代,iOS、Android、H5以及各种小程序快应用层出不穷,开发者再也幸福不起来。
- 学习n个技术
- 开发n个版本
- 各版迭代混乱,无法拉齐,用户茫然、内部痛苦
- 开发测试成本n倍暴涨
结果就是工程师不停加班到头秃,但产品的需求仍然做不完、老板的预算一直压不下去,全都痛苦。
uni-app之前已经实现了手机端全覆盖,支持iOS、Android、H5、微信小程序、阿里小程序、百度小程序、字节跳动小程序、QQ小程序、快应用、360小程序,并且在各端均有优异的运行性能。
从2.9版本起,uni-app 进一步提供了PC等宽屏的适配方案,完成了大统一。
开发者终于可以做到使用一个框架,一把撸掉所有项目。
不说虚的,先来个实际示例,大家直观感受一下:
如下是基于uni-app的DCloud社区在mobile端的展示效果,列表、详情分为两个页面,点击列表中的帖子,打开详情页面:
如下是基于uni-app的DCloud社区同一套代码,稍作配置后,在pc端的展示效果,列表、详情在同一个页面中左右分栏显示,点击左侧列表中的帖子,刷新右侧详情窗口的内容,这个UI更适合pc宽屏,也更有pc桌面App的体验。
Tips:点击 DCloud社区演示系统,自己感受PC和Mobile的自适应。
怎么样?有没有被酷到?
下面我们具体来讲讲uni-app的pc宽屏适配方案,总的来说,包括三个方面:
- 窗体级适配:leftwindow、rightwindow、topwindow等分栏
- 组件级适配:match-media组件
- rpx的宽屏响应
1. 窗体级适配:leftwindow分栏
手机屏幕和PC显示器的设计不同。为了方便手持及接听电话,大多手机的设备高度大于设备宽度(即为窄屏设计),故mobile App 多为竖屏/窄屏显示的UI。
而pc显示器多为宽屏设计,即设备宽度大于设备高度,在pc上的桌面应用,很多会采用左右分栏的UI设计。
uni-app以目前手机屏幕为主窗体(window),在左/右/上三个方向,新扩展 leftWindow、rightWindow、topWindow三个窗体,这三个窗体可设定在屏幕宽度大于某一阀值时自动出现(展现分栏的宽屏设计),屏幕宽度小于某一阀值后自动消失(恢复单窗口的窄屏设计)。
uni-app主窗体和扩展的三个窗体各自独立,支持互相通信,点击链接、切换页面时支持在相应的窗体内刷新,而不是整屏刷新。
我们以本文开头的DCloud社区为例,讲解如何在uni-app中快捷实现宽屏适配。
我们将社区的列表页作为主窗体,将详情内容扩展到rightWindow中,示意如下:
接下来分步说明,如何在uni-app项目中完成分栏实现。
step 1: 新建right-window.vue展现帖子详情
当然,rightWindow无需重写新闻详情页面,是可复用原有代码的,支持把已有详情页面当组件放到 rightWindow 页面中,如下:
<!-- responsive/right-window.vue -->
<template>
  <view>
    <!-- 将原来的详情页(/pages/detail/detail.vue),作为一个组件(pages-detail-detail)使用 -->
    <pages-detail-detail ref="detailPage"></pages-detail-detail>
  </view>
</template>

<script>
  export default {
    created(e) {
      //监听自定义事件,该事件由左侧列表页的点击触发
      uni.$on('updateDetail', (e) => {
        // 执行 detailPage组件,即:/pages/detail/detail.vue 页面的load方法
        this.$refs.detailPage.load(e.detail);
      })
    }
  }
</script>
step 2: 在列表页面,处理点击列表后与rightWindow交互通信的逻辑。
// 列表页的改造
goDetail(detail) {
    if (this._isWidescreen) {
        //若为宽屏,则触发右侧分栏详情页的自定义事件,通知右侧窗体刷新新闻详情
        uni.$emit('updateDetail', {
            detail: encodeURIComponent(JSON.stringify(detail))
        })
    } else {
        // 若为窄评,则打开新窗体,在新窗体打开详情页面
        uni.navigateTo({
            url: '/pages/detail/detail?query=' + encodeURIComponent(JSON.stringify(detail))
        });
    }
},
step 3: 在pages.json中注册rightWindow,如下:
{
  "rightWindow": {
    "path": "responsive/right-window.vue", // 指定 rightWindow 页面文件
    "style": {
      "width": "calc(100vw - 400px)" // 页面宽度
    },
    "matchMedia": {
      "minWidth": 768 //生效条件,当窗口宽度大于768px时显示
    }
  }
}
可以看到,无需太多工作量,就可以快速把一个为手机窄屏开发的应用,快速适配为PC宽屏应用。并且以后的代码维护,仍然是同一套,当业务迭代时不需要多处升级。
这套方案的实施,有如下特征:
- 原先为手机窄屏开发的代码,基本无需修改,可完全适配到pc宽屏上;后续新增的业务模块,也是一套代码,同时兼容款窄屏。
- 增加pc宽屏适配后,不影响原先mobile端的窄屏实现,窄屏上会自动隐藏leftWindow/rightWindow等扩展窗体。
- rightWindow里的页面是复用的,不需要重写新闻详情页面,支持把已有详情页面当组件放到 rightWindow 页面中。
更多配置细节,详见文档:https://uniapp.dcloud.net.cn/collocation/pages?id=topwindow
leftWindow方案除了适用于将原有的Mobile App适配到大屏显示,也适用于新开发的PC应用,尤其是PC Admin管理控制台。
如下是基于leftwindow、topwindow构建的经典pc admin布局:
2. 组件级适配:match-media组件
leftWindow等方案是页面窗体级适配方案,适用于多页面的组合分栏显示。
那么在同一个页面中,组件是否可以适配不同屏宽?当然可以,此时可以使用组件级适配方案。
除了传统的css媒体查询外,uni-app还提供了全平台兼容的 match-media组件 和配套的 uni.createMediaQueryObserver 方法。
match-media是一个媒体查询适配组件,可以更简单的用于动态屏幕适配。
在match-media组件中放置内容,并为该组件指定一组 media query 媒体查询规则,如屏幕宽度。运行时,如屏幕宽度满足查询条件,则这个组件就会被展示,反之则隐藏。
match-media组件的优势包括:
- 开发者能够更方便、显式地使用 Media Query 能力,而不是耦合在 CSS 文件中,难以复用。
- 能够在模板中结合数据绑定动态地使用,不仅能做到组件的显示或隐藏,在过程式 API 中可塑性也更高。
- 能够嵌套式地使用 Media Query 组件,即能够满足局部组件布局样式的改变。
- 组件化之后,封装性更强,能够隔离样式、模版以及绑定在模版上的交互事件,还能够提供更高的可复用性。
uni-app推荐采用运行时动态适配的方案,而不是为PC版单独编写条件编译(虽然你也可以通过自定义条件编译来实现单独的PC版)。这样设计的好处是在ipad等设备的浏览器上可以方便的横竖屏切换。
3. rpx的宽屏响应
设计Mobile App时,设计师常会以 iPhone6 作为视觉稿的标准,即按照750px屏幕宽度出图;程序员以750px作为基准,根据设备实际尺寸,动态换算(缩放)出适合当前设备屏幕的元素宽高。
这就是rpx(responsive pixel)的实现思路,只不过rpx由框架引擎动态换算元素尺寸,无需程序员写代码干预。
面向mobile端时,rpx是一种很理想的解决方案,因为各种移动设备的屏幕宽度差异不是很大,相对于750px微调缩放后的效果,可最大化的还原设计师的设计。
但是,一旦脱离移动设备,在pc屏幕,或者pad横屏状态下,因为屏幕宽度远大于750了。此时rpx根据屏幕宽度变化的结果就严重脱离了预期,大的惨不忍睹。
假设一个图文列表的展现,我们针对左侧缩略图定义如下css:
.uni-media-list-logo {
    width: 180rpx;
    height: 140rpx;411*(180/750)411*(180/750)411*(180/750)
}
在手机端,这个显示效果是比较理想的,如下:
当前选择 pixel 2作为模拟设备,屏幕宽度为411px,故缩略图的宽度变为:180*(411/750) = 98px,高度变为:140*(411/750) = 76px,这个理论计算和实际运行相符,且效果较佳。
同样的代码,如果运行到pc端,假设屏幕宽度为1920px,则缩略图的尺寸将变为:180*(1920/750) = 460px,高度变为:140*(1920/750) = 358px,这个惨不忍睹的大就出来了,一个1920*1080的显示器,只能显示2条记录(主要是缩略图高度放大导致的),效果如下:
为此,在uni-app 2.9+起,新增了 rpx 按750px做基准屏宽的生效范围控制,即屏幕宽度超过某阀值(默认为960px)后,将不再以屏幕实际宽度换算元素宽高,而改以固定屏幕宽度(默认为375px)计算元素宽高。
以上述图文列表为例,当屏幕宽度为1920px(大于960px)时,将采用固定的屏幕宽度(默认375px)计算缩略图的宽高,即:180*(375/750) = 90px,高度变为:140*(375/750) = 70px,按照这个机制,pc端运行效果如下,相比上图的放大变丑,展现更为理想优雅。
Tips:
- 750px生效的屏幕宽度阀值,及宽屏时计算所用的固定屏幕宽度,均支持自定义配置
{
  "globalStyle": {
    "rpxCalcMaxDeviceWidth": 960, // rpx 计算所支持的最大设备宽度,单位 px,默认值为 960
    "rpxCalcBaseDeviceWidth": 375, // 设备实际宽度超出 rpx 计算所支持的最大宽度时,rpx计算所采用的固定屏幕宽度,单位 px,默认值为 375
  }
}- 开发者可在rpx宽度管控的基础上,略作调整,实现更好的pc宽屏效果,如宽屏时,固定列表宽度且居中显示,如下图。当然,此处仅为了演示rpx在宽屏下的失控管理,实际应用中,可采用分栏窗口,将列表在左侧分栏中显示,如本文开篇示例截图。
4. 补充
4.1 通过electron打包为windows、mac、linux客户端
有了宽屏适配,uni-app的应用就可以方便的通过electron打包为电脑客户端应用,windows、mac、linux均支持。
开发者可以随意调用electron的API,以调用更多操作系统的能力(为方便多端兼容,可以将这些特殊API写在自定义的条件编译里)
uni-app插件市场有已经封装好的一些插件,详见:https://ext.dcloud.net.cn/search?q=electron
4.2 一个让手机版网页临时可用于pc浏览器的方案
如果你的h5版已经开发完毕,还没来得及适配pc,但想在pc上先用起来。那么可以在pc网页里使用iframe,约定好宽度,在里面套用uni-app的窄屏版。
当然还可以在iframe旁边放置二维码,提供手机版扫码地址,如下是一个实现示例:
5. 结语
uni-app团队将keep running,继续完善uni-app在pc、pad等宽屏设备上的更好适配,并会在ssr、serverless方向上重点投入,提供云端一体的更高效率的解决方案(详见uniCloud),帮助企业更高效,帮助开发者更轻松!
欢迎大家到https://github.com/dcloudio/uni-app上给我们star鼓励
收起阅读 »unipush推送实际开发遇到的问题
uniPush
对接这个推送真的是一波三折,各种坑层出不断。
详细步骤看文档
当前项目进度:
Android 各家厂商推送注册、ios推送证书(通用)已正确申请、配置、填写、上传等等前置操作也完成。
此处记录实际开发问题
注册监听click和receive事件
在App.vue 的生命周期 onLaunch 事件添加事件两个事件监听
   plus.push.addEventListener('receive',function(msg){

   },false)

   plus.push.addEventListener('click',function(msg){

   },false)
   //tips:推送需要设备唯一id(clientId)
事件触发逻辑(开发测试所得)
-
Android
app前台/后台运行会触发receive事件
app进程杀掉不会触发receive(走厂商推送) -
IOS
app前/台运行会触发receive事件
app后台运行(杀掉、锁屏)不会触发rereceive(走厂商推送)
简单点就是app还活着时候就能接受到receive事件,挂掉(进程结束)就没办法触发这事件了。
安卓真机调试修改以上内容需要重新编译后生效(热更新后没生效)华为手机。
click事件接收到的参数IOS和Android不同
IOS payload返回 对象,Android payload返回字符串;payload层级也有所区别。
如果正常情况下receive事件没有触发可以试试以下步骤
- 重新编译运行App(这个很重要)
- 登录Dcloud开发者后台测试(创建推送、故障排查)
- 如果第二步测试不成功,多半是配置问题。
- 如果第二步测试成功,请联系后台检查推送参数格式、推送策略等
IOS能收到recieve事件,但是收不到通知消息
在开发者后台创建通知消息推送收不到,请检查推送证书(xxx.p12),证书生成看文档。
在开发者后台发的推送可以收到,实际服务器发起的收不到,一般是后台配置问题,我遇到的就是后台没有设置推送策略导致的(默认值惹的祸,最好就是让后台加上)
IOS需要手动清除角标
先上代码:
function claerBadge(){
      if(plus.os.name.toLowerCase() == 'ios'){
        //导入ios UIApplication
        var UIApplication = plus.ios.import("UIApplication");
        var app = UIApplication.sharedApplication();
        //获取应用图标的数量
        // var oldNum = app.applicationIconBadgeNumber();
        // var newNum = oldNum - 1;
        //设置应用图标的数量
        plus.runtime.setBadgeNumber(0);
        //导入个推原生类
        var GeTuiSdk = plus.ios.importClass('GeTuiSdk');
        GeTuiSdk.setBadge(0);
      }
    }
IOS通知消息没有声音
后台推送消息需要填写sound:'default'
附:个推文档
文档写的不详细,这里花了不少时间。文档里对这个字段的描述是:
通知铃声文件名,无声设置为“com.gexin.ios.silence”
string类型,非必填、无默认值;
后台的同事按着文档来对接这个字段是没有设置的;
前端对接时候发现能收到消息,但就是没有声音。
首先第一感觉是前端代码是没有问题的,因为可以正常接收;
然后到Dcloud开发者后台测试,发送一条通知消息,正常接收,有声音。
再去检查代码,没有收获。
找后台同事要对接文档(上面链接),仔细查看,发现content-available这个字段,但是后台反馈这个字段是设置了0的,有截图无法反驳,囧。
在去开发者后台查看推送的配置、字段之类的。发现了sound这个字段是有值的(三选一,但都不为空),感觉抓到了点东西,跑去联系后台同事,把sound设成default一试。声音出来了。
PS:也不能说是文档的问题吧,毕竟文档也没有写错,只是没有写的详细而已。
最后附上自己写小段代码,仅供参考;
pushUtils.js
import store from "@/store"
// 获取设备token ,返回promise
const getClientId = function() {
    return new Promise((resolve, reject) => {
        uni.subscribePush({
            provider: 'unipush',
            success: () => {
                var inf = plus.push.getClientInfo();
                resolve(inf.clientid)
            },
            fail: (e) => {
                reject(e)
            }
        });
    })
}

// 添加receive监听事件,在APP.vue onLaunch 添加
const InitOnRecivePushMsg = function() {
    plus.push.addEventListener(
        "receive",
        function(msg) {
            let { content = '{}' } = msg
            console.log('receive',msg);
            content = JSON.parse(content)
            // 添加本地标识,防止本地创建的消息再次触发,导致无限循环
            if (content.isLocal) return
            content.isLocal = true
      // 判断是否要创建本地消息(app在后台时候才触发这个)
            if (store.getters.isShowPush) {
                plus.push.createMessage(content.body, JSON.stringify(content), {
                    title: content.title
                });
            }
        },
        false
    );
}

// 添加click监听事件,在APP.vue onLaunch 添加
const InitOnClickPushMsg = function() {
    plus.push.addEventListener(
        "click",
        function(msg) {
            console.log("点击了click=====================>", msg);
            let payload = toJson(msg.payload)
            let params = payload.params || payload // Android 和 IOS 返回的层级不一样,兼容性写法
            const sessionId = `p2p-${params.from_accid}`;
            clearMsg()
      // 判断是否在聊天界面
            let navigateMethod = store.getters.isChatBoxPage ? 'redirectTo' : 'navigateTo'
            uni[navigateMethod]({
                url: `/pages/chats/chatsbox/ChatsBox?to=${params.from_accid}&sessionId=${sessionId}`,
                success: function() {
                    uni.hideLoading()
                },
                fail: (e) => {
                    console.log("跳转失败e: ========>", e);
                }
            });
        },
        false
    );
}

// 工具函数、、、
const toJson = function(value) {
    let result
    try {
        result = JSON.parse(value)
    } catch (e) {
        result = value
    }
    return result
}

const playTipsSound = function(){
    //通知音播放
    let innerAudioContext = uni.createInnerAudioContext();
    innerAudioContext.autoplay = true;
    innerAudioContext.src = "/static/inform.mp3"; // 路径要写绝对路径,Android有时会报错 errCode:-5; 莫名其妙
    innerAudioContext.onPlay(() => {});
  // IOS播放时会先触发onError事件,乱七八糟,不知道什么原因
    innerAudioContext.onError((res) => {});
    innerAudioContext.onEnded(() => { innerAudioContext.destroy() })
}

const clearMsg = function(){
    plus.push.clear()
}

function claerBadge(){
        if(plus.os.name.toLowerCase() == 'ios'){
            //导入ios UIApplication
            var UIApplication = plus.ios.import("UIApplication");
            var app = UIApplication.sharedApplication();
            //获取应用图标的数量
            // var oldNum = app.applicationIconBadgeNumber();
            // var newNum = oldNum - 1;
            //设置应用图标的数量
            plus.runtime.setBadgeNumber(0);
            //导入个推原生类
            var GeTuiSdk = plus.ios.importClass('GeTuiSdk');
            GeTuiSdk.setBadge(0);
        }
    }

export default {
    getClientId,
    InitOnRecivePushMsg,
    InitOnClickPushMsg,
    clearMsg,
    claerBadge
}

标梵互动说也许你不理解app开发的悲哀...
老师,我马上就毕业了,不知道是学后端开发,web开发还是app开发,请指点吧。
后台开发:业务逻辑复杂,多端对接繁琐,还要考虑各种并发性,效率,各种数据库技术,学习难度大。
Web:前端框架层出不穷,不断的更新,杂乱无章的。
应用程序开发:相对简单,不外乎Web框架和UI。
所以,我选择了app开发,又因为穷,所以毅然踏上了Android开发的不归路。
目前。
小王啊,这个Android项目做得不错,但你也得考虑把一些简单的业务迁移到H5上,这样开发一个代码,浏览器,Android,ios都能使用,这对公司来说虽然节省了成本,但还是有很大的好处的,对你来说也是一个提高啊,现在招Android,会web开发都会优先考虑哦。

行,没问题!
心中想:老子Android原生开发还不够熟练,一个H5页面,你说的简单啊,不学习JavaScript就可以了,不学习html+css就可以了,不学习webapp框架就可以了。
所以,安卓还没掌握好,又开始学习web开发...
小王子啊,想必你也听说过reactnative技术吧,性能和体验都比H5强,仅次于原生app啊,据说是‘Writeonce,RunEverywhere’哦,跨平台!在ios和Android的两端,一个人可以完成开发任务,至少可以使公司的研发费用减少一半,这将是我们公司技术转移项目的方向啊,你要抓紧了,以后这手机端的技术经理不属于你了,对你自己来说也是一种提升啊,现在招Android,都要求有reactnative技术。
行,我学。
心中想:天哪,我只想安安静静地做Android原生开发啊,怎么那么难啊。
所以,放弃了刚开始的web开发,转向reactnative学习…
小啊,小啊,小啊,微信做了个大动作!程序!顺序!你们知道吗,几亿的用户流量,我们可不能错过,你们赶快了解一下,让我们的项目尽快上线,这将是我们公司今后发展的重点,目前公司的压力很大,考虑把重点放在小程序上,等积累了一定的用户后,再转到app上,这个app的研发成本确实有点高啊。以后的技术经理一定会是你,对你自己也是一种提升啊,现在招安卓,都是顺带开发小程序啊,你可不能落后啊。
额定数
老子只是想要安卓的原生开发混口饭吃,怎么那么多技术…
这样,reactnative开发环境刚刚搭建好,就又开始为小程序开发了。
快讯啊,小王,快应用出来了,九大手机厂商基于硬件平台联合推出的新应用生态,绝不逊色于小程序啊,上一次小程序项目上线已经有点晚了,这次你一定要抓住这个机会,在快应用全面开放之前,做好项目上线的准备。安卓原生开发的那个项目先放一放吧,这次对你和你的公司都是个机会,你一定要抓住,薪水翻倍指日可待啊,更需要学习更多的技术啊,现在公司不只是学习安卓原生开发,还需要学习其他的技术。
好吧,不管怎样,Android原生开发都被遗忘了...
本文来源:标梵互动
老师,我马上就毕业了,不知道是学后端开发,web开发还是app开发,请指点吧。
后台开发:业务逻辑复杂,多端对接繁琐,还要考虑各种并发性,效率,各种数据库技术,学习难度大。
Web:前端框架层出不穷,不断的更新,杂乱无章的。
应用程序开发:相对简单,不外乎Web框架和UI。
所以,我选择了app开发,又因为穷,所以毅然踏上了Android开发的不归路。
目前。
小王啊,这个Android项目做得不错,但你也得考虑把一些简单的业务迁移到H5上,这样开发一个代码,浏览器,Android,ios都能使用,这对公司来说虽然节省了成本,但还是有很大的好处的,对你来说也是一个提高啊,现在招Android,会web开发都会优先考虑哦。
行,没问题!
心中想:老子Android原生开发还不够熟练,一个H5页面,你说的简单啊,不学习JavaScript就可以了,不学习html+css就可以了,不学习webapp框架就可以了。
所以,安卓还没掌握好,又开始学习web开发...
小王子啊,想必你也听说过reactnative技术吧,性能和体验都比H5强,仅次于原生app啊,据说是‘Writeonce,RunEverywhere’哦,跨平台!在ios和Android的两端,一个人可以完成开发任务,至少可以使公司的研发费用减少一半,这将是我们公司技术转移项目的方向啊,你要抓紧了,以后这手机端的技术经理不属于你了,对你自己来说也是一种提升啊,现在招Android,都要求有reactnative技术。
行,我学。
心中想:天哪,我只想安安静静地做Android原生开发啊,怎么那么难啊。
所以,放弃了刚开始的web开发,转向reactnative学习…
小啊,小啊,小啊,微信做了个大动作!程序!顺序!你们知道吗,几亿的用户流量,我们可不能错过,你们赶快了解一下,让我们的项目尽快上线,这将是我们公司今后发展的重点,目前公司的压力很大,考虑把重点放在小程序上,等积累了一定的用户后,再转到app上,这个app的研发成本确实有点高啊。以后的技术经理一定会是你,对你自己也是一种提升啊,现在招安卓,都是顺带开发小程序啊,你可不能落后啊。
额定数
老子只是想要安卓的原生开发混口饭吃,怎么那么多技术…
这样,reactnative开发环境刚刚搭建好,就又开始为小程序开发了。
快讯啊,小王,快应用出来了,九大手机厂商基于硬件平台联合推出的新应用生态,绝不逊色于小程序啊,上一次小程序项目上线已经有点晚了,这次你一定要抓住这个机会,在快应用全面开放之前,做好项目上线的准备。安卓原生开发的那个项目先放一放吧,这次对你和你的公司都是个机会,你一定要抓住,薪水翻倍指日可待啊,更需要学习更多的技术啊,现在公司不只是学习安卓原生开发,还需要学习其他的技术。
好吧,不管怎样,Android原生开发都被遗忘了...
本文来源:标梵互动
建议DCloud官方取消插件市场对免费插件的评分功能,改为着重显示插件的收藏数;并对留言评论模块做一下优化,方便直接在社区上交流
建议DCloud官方取消插件市场对免费插件的评分功能,改为着重显示插件的收藏数;并对留言评论模块做一下优化,方便直接在社区上交流。
因为个人开发者免费维护的插件不应该接受到社区用户的评分,免费给你用你还好意思不打满分(所以评分没意义),觉得插件不好用不收藏就行了。
个别用户没搞清楚情况就胡乱给一星差评,严重影响开发者继续维护和开发新插件的欲望。
目前的留言评论板块没办法追加评论和回复,用户反交流馈插件问题不太方便,只能借助其他平台,建议做一下优化。
用户和插件作者直接就能在插件平台进行继续的沟通交流。
建议DCloud官方取消插件市场对免费插件的评分功能,改为着重显示插件的收藏数;并对留言评论模块做一下优化,方便直接在社区上交流。
因为个人开发者免费维护的插件不应该接受到社区用户的评分,免费给你用你还好意思不打满分(所以评分没意义),觉得插件不好用不收藏就行了。
个别用户没搞清楚情况就胡乱给一星差评,严重影响开发者继续维护和开发新插件的欲望。
目前的留言评论板块没办法追加评论和回复,用户反交流馈插件问题不太方便,只能借助其他平台,建议做一下优化。
用户和插件作者直接就能在插件平台进行继续的沟通交流。

【新手教程】一把梭,教你通过uniapp打造小程序全家桶(前置篇)
前言:
本文章全文918个字,阅读需要10分钟!如果您觉得本文章对您有用欢迎给我点赞留言转发。
大家好,我是归来!从今天开始,我将给大家分享开发支付宝小程序的全过程!通过我们的实际项目开发,给大家讲解如何从0到1开发一款属于自己的小程序!当然,开发一款小程序一定不只是涉及到前端这一点点知识。我们本次分享只针对前端开发,后面关于后端开发的过程我们在做另外解答!那我们先进入今天的正题。
正题:
一个公司前端开发中到底需要用到哪些软件呢?
开发工具:
- visual studio code
- Hbuilder(国内精品)
- 各种小程序开发工具
开发框架:
一、样式框架 - bootstrap
- layui
- mui
- sui
- iconfont(阿里免费图标管理样式)
二、Javascript框架 - jquery
- layui
- vue
- react
- angular
涉及到的通用软件:
一、服务器 - apache
- nginx
- node.js
二、项目管理软件 - svn
- git
三、其他管理软件 - ftp
以上工具及供参考不需要完全了解,标红的为重点掌握内容。具体可以自行百度!
一个标准的开发项目是什么样子的? - 确定需求:需求方(老板)提出需求(做什么)
- 分析需求:产品经理确定分析老板的需求,并绘制出相应的原型图和高保真(怎么做)
- 确定产品:老板确认完产品并将产品原型图交给UI设计师
- 画出界面:UI设计师做出产品交给前端
- 开发计划:开发经理确认开发流程并制定相应的开发计划
- 完成前端:根据UI提供的页面完成前端样式
- 数据渲染:根据后台提供的接口完成数据渲染
- 测试程序:测试产品并进行灰度测试
- 通过上线:测试通过,完成全部上线
本教程约定咱们对html css js有基础的了解!如果您完全不了解,推荐您先看菜鸟教程或者w3cschool的基础教程!
为什么是uniapp?
uni-app 是一个使用 Vue.js 开发所有前端应用的框架,开发者编写一套代码,可发布到iOS、Android、H5、以及各种小程序(微信/支付宝/百度/头条/QQ/钉钉/淘宝)、快应用等多个平台。目前uniapp已经支持全平台开发!从此一套代码,开发N端不是梦!
快速上手
uni-app支持通过 可视化界面、vue-cli命令行 两种方式快速创建项目。并且支付宝小程序官方开发编辑器也支持咱们的uniapp开发!大家可以去uniapp的官方查看相应的文档。传送链接
注意事项:页面样式与布局
结尾
大家可以通过编辑器创建一个属于自己的uniapp,明天我们正式开始讲解如何通过uniapp实现支付宝小程序并使用相应的组件。
如果您有任何疑问,欢迎给我留言,我会第一时间为大家解答!
最后,如果你需要开发网站,小程序,公众号等产品,欢迎和我们联系。
uniapp优点
本应用使用uni-app混合开发平台进行开发。uni-app在跨平台的过程中,不牺牲平台特色,不限制平台的能力使用;
uni-app打包成App后,支持webview渲染和weex原生渲染这2种引擎,可以任由开发者切换使用。
uni-app 是一个使用 Vue.js 开发所有前端应用的框架,开发者编写一套代码,可发布到iOS、Android、H5、以及各种小程序、快应用等多个平台。
在跨端的同时,通过条件编译+平台特有API调用,可以优雅的为某平台写个性化代码,调用专有能力而不影响其他平台。
uni-app支持原生代码混写和原生sdk集成,是体验更好的Hybrid框架,加载新页面速度更快,App端支持weex原生渲染,可支撑更流畅的用户体验。
Vue是一套用于构建用户界面的渐进式框架。与其它大型框架不同的是,Vue 被设计为可以自底向上逐层应用。
Vue 的核心库只关注视图层,不仅易于上手,还便于与第三方库或既有项目整合。
另一方面,当与现代化的工具链以及各种支持类库结合使用时,Vue 也完全能够为复杂的单页应用提供驱动。
