


hbuilder快速换行及查询单词代码快捷键
图一是未换行的代码,然后按ctrl + enter就会变成图二,轻轻松松换行不用动鼠标。
图三是按ctrl + F会跳出下面的框,可以查找也可以替换。
图一是未换行的代码,然后按ctrl + enter就会变成图二,轻轻松松换行不用动鼠标。
图三是按ctrl + F会跳出下面的框,可以查找也可以替换。
关于 1.9.0 调用 API 返回 Promise 对象不正确的临时解决方案
更新:此问题已于1.9.2版本修复,更新新版即可。
=============以下为历史内容==============
首先对于本次 1.9.0 更新引发的返回 Promise 对象不正确的问题表示抱歉,同时也感谢及时反馈问题的小伙伴。
解决方案
HBuilderX
首先,找到 HBuilderX 的安装目录,并访问至 HBuilderX/plugins/uniapp-cli/node_modules/@dcloudio/ 目录。
然后,下载附件压缩包解压。
最后,使用解压出来的资源,覆盖 HBuilderX 插件目录下的同名资源,即 uni-app-plus、uni-mp-weixin 目录。
cli
cli 创建的项目,访问 项目根目录/node_modules/@dcloudio/ 并替换即可。
也可以通过 npm update 更新依赖来解决此问题。
参考文档
关于 uni 对于 Promise 的封装策略,详细请参考:Promise 封装
1.9.1
若更新至 1.9.1 后,在 H5 平台依旧存在问题,请下载附件中的文件,仅覆盖 uni-h5 目录的资源即可。
最后
使用 HBuilderX 请先使用此方案临时解决下问题,今日会更新一个版本来彻底修复此问题。
收起阅读 »HBuilderX的几点萌新问题[是我使用姿势不对吗]
我用的是Mac版最新HBuilderX 1.9.0.20190412。
刚开始使用,体验如下:
- 文件改动没有任何的差异化标记。因为以前使用的编辑器里面都有文件是否改动,哪一行改动的标记,能看出这一次与上一次git提交后的差异。现在编辑器里面无法看,无法快速定位到改动过的地方,不得不通过git的gui工具去查看哪里改动了;
- 规范和错误提示并不是很友好的感觉。我写的代码,可能存在很多不规范的地方,虽然可能代码正确,但是不太符合规范,比如命名/空格/过时的语法等,但是没有提示我。然后我在编辑器里面随便敲错误的代码,并不能提示我错误,比如变量未定义就使用。编辑器里面也没有任何错误标记。而是需要我保存的时候进行代码检测,然后告诉我F4提示定位到下一出错误。虽然一般也不会写出什么神级错误,但是很显然有个时候会出现拼写错误的时候,这种情况似乎检测不出。if (plkj) {hello},这种东西在js文件里面没有任何的提示。我保存也不提示错误。plkj hello都没有定义;
- 书写vue文件的时候,我随便敲一个未引入的组建<hello-k></hello-k>也没有给我任何提示,我ctrl+s保存也没有触发什么提示。也没有那种比较便捷的<hello-k>然后输入</就自动补全的功能。因为我以前用WebStorm,各方面都体验很好。
因为刚刚入手,不知道这些问题是我使用的姿势不对,还是编辑器就是这么用的。不管怎么样,希望越做越好。
谢谢。
个推基于 Apache Pulsar 的优先级队列方案
作者:个推平台研发工程师 祥子

一、业务背景
在个推的推送场景中,消息队列在整个系统中占有非常重要的位置。
当 APP 有推送需求的时候, 会向个推发送一条推送命令,接到推送需求后,我们会把APP要求推送消息的用户放入下发队列中,进行消息下发;当同时有多个APP进行消息下发时,难免会出现资源竞争的情况, 因此就产生了优先级队列的需求,在下发资源固定的情况下, 高优先级的用户需要有更多的下发资源。
二、基于 Kafka 的优先级队列方案
针对以上场景,个推基于 Kafka 设计了第一版的优先级队列方案。Kafka 是 LinkedIn 开发的一个高性能、分布式消息系统;Kafka 在个推有非常广泛的应用,如日志收集、在线和离线消息分发等。
架构

在该方案中,个推将优先级统一设定为高、中、低三个级别。具体操作方案如下:
-
对某个优先级根据 task (单次推送任务)维度,存入不同的 Topic,一个 task 只写入一个 Topic,一个 Topic 可存多个 task;
-
消费模块根据优先级配额(如 6:3:1),获取不同优先级的消息数,同一优先级轮询获取消息;这样既保证了高优先级用户可以更快地发送消息,又避免了低优先级用户出现没有下发的情况。
二、Kafka 方案遇到的问题
随着个推业务的不断发展,接入的 APP 数量逐渐增多,第一版的优先级方案也逐渐暴露出一些问题:
- 当相同优先级的 APP 在同一时刻推送任务越来越多时,后面进入的 task 消息会因为前面 task 消息还存在队列情况而出现延迟。如下图所示, 当 task1 消息量过大时,在task1 消费结束前,taskN 将一直处于等待状态。

- Kafka 在 Topic 数量由 64 增长到 256 时,吞吐量下降严重,Kafka 的每个 Topic、每个分区都会对应一个物理文件。当 Topic 数量增加时,消息分散的落盘策略会导致磁盘 IO 竞争激烈,因此我们不能仅通过增加 Topic 数量来缓解第一点中的问题。
基于上述问题,个推进行了新一轮的技术选型, 我们需要可以创建大量的 Topic, 同时吞吐性能不能比 Kafka 逊色。经过一段时间的调研,Apache Pulsar 引起了我们的关注。
三、为什么是 Pulsar
Apache Pulsar 是一个企业级的分布式消息系统,最初由 Yahoo 开发,在 2016 年开源,并于2018年9月毕业成为 Apache 基金会的顶级项目。Pulsar 已经在 Yahoo 的生产环境使用了三年多,主要服务于Mail、Finance、Sports、 Flickr、 the Gemini Ads platform、 Sherpa (Yahoo 的 KV 存储)。
架构

Topic 数量
Pulsar 可以支持百万级别 Topic 数量的扩展,同时还能一直保持良好的性能。Topic 的伸缩性取决于它的内部组织和存储方式。Pulsar 的数据保存在 bookie (BookKeeper 服务器)上,处于写状态的不同 Topic 的消息,在内存中排序,最终聚合保存到大文件中,在 Bookie 中需要更少的文件句柄。另一方面 Bookie 的 IO 更少依赖于文件系统的 Pagecache,Pulsar 也因此能够支持大量的主题。
消费模型
Pulsar 支持三种消费模型:Exclusive、Shared 和Failover。

Exclusive (独享):一个 Topic 只能被一个消费者消费。Pulsar 默认使用这种模式。
Shared(共享):共享模式,多个消费者可以连接到同一个 Topic,消息依次分发给消费者。当一个消费者宕机或者主动断开连接时,那么分发给这个消费者的未确认(ack)的消息会得到重新调度,分发给其他消费者。
Failover (灾备):一个订阅同时只有一个消费者,可以有多个备份消费者。一旦主消费者故障,则备份消费者接管。不会出现同时有两个活跃的消费者。
Exclusive和Failover订阅,仅允许一个消费者来使用和消费每个订阅的Topic。这两种模式都按 Topic 分区顺序使用消息。它们最适用于需要严格消息顺序的流(Stream)用例。
Shared 允许每个主题分区有多个消费者。同一个订阅中的每个消费者仅接收Topic分区的一部分消息。Shared最适用于不需要保证消息顺序队列(Queue)的使用模式,并且可以按照需要任意扩展消费者的数量。
存储
Pulsar 引入了 Apache BookKeeper 作为存储层,BookKeeper 是一个专门为实时系统优化过的分布式存储系统,具有可扩展、高可用、低延迟等特性。具体介绍,请参考 BookKeeper官网。
Segment
BookKeeper以 Segment (在 BookKeeper 内部被称作 ledger) 作为存储的基本单元。从 Segment 到消息粒度,都会均匀分散到 BookKeeper 的集群中。这种机制保证了数据和服务均匀分散在 BookKeeper 集群中。
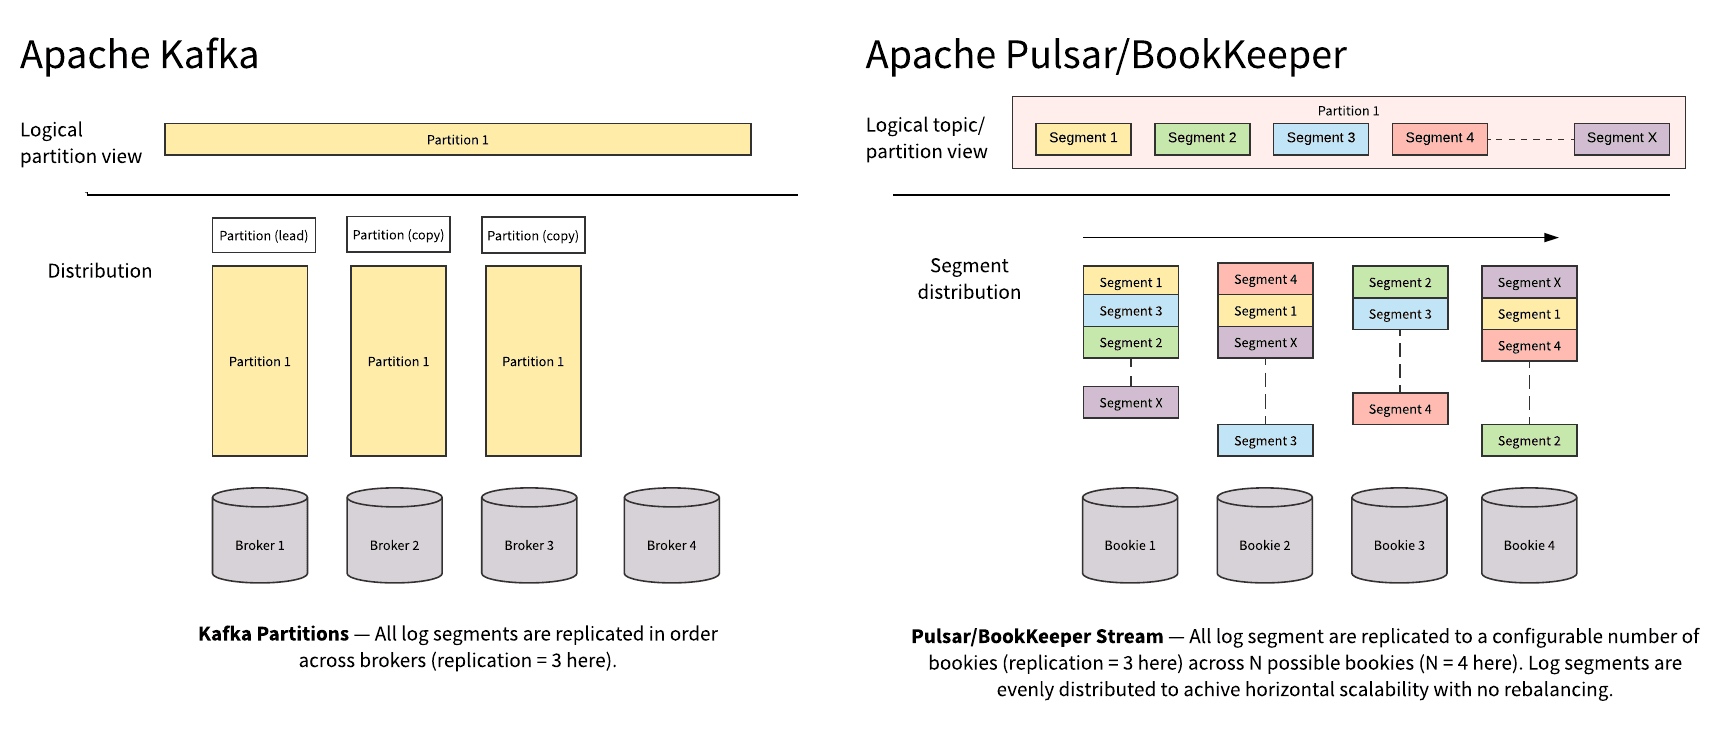
Pulsar 和 Kafka 都是基于 partition 的逻辑概念来做 Topic 存储的。最根本的不同是,Kafka 的物理存储是以 partition 为单位的,每个 partition 必须作为一个整体(一个目录)存储在某个 broker 上。 而 Pulsar 的 partition 是以 segment 作为物理存储的单位,每个 partition 会再被打散并均匀分散到多个 bookie 节点中。
这样的直接影响是,Kafka 的 partition 的大小,受制于单台 broker 的存储;而 Pulsar 的 partition 则可以利用整个集群的存储容量。
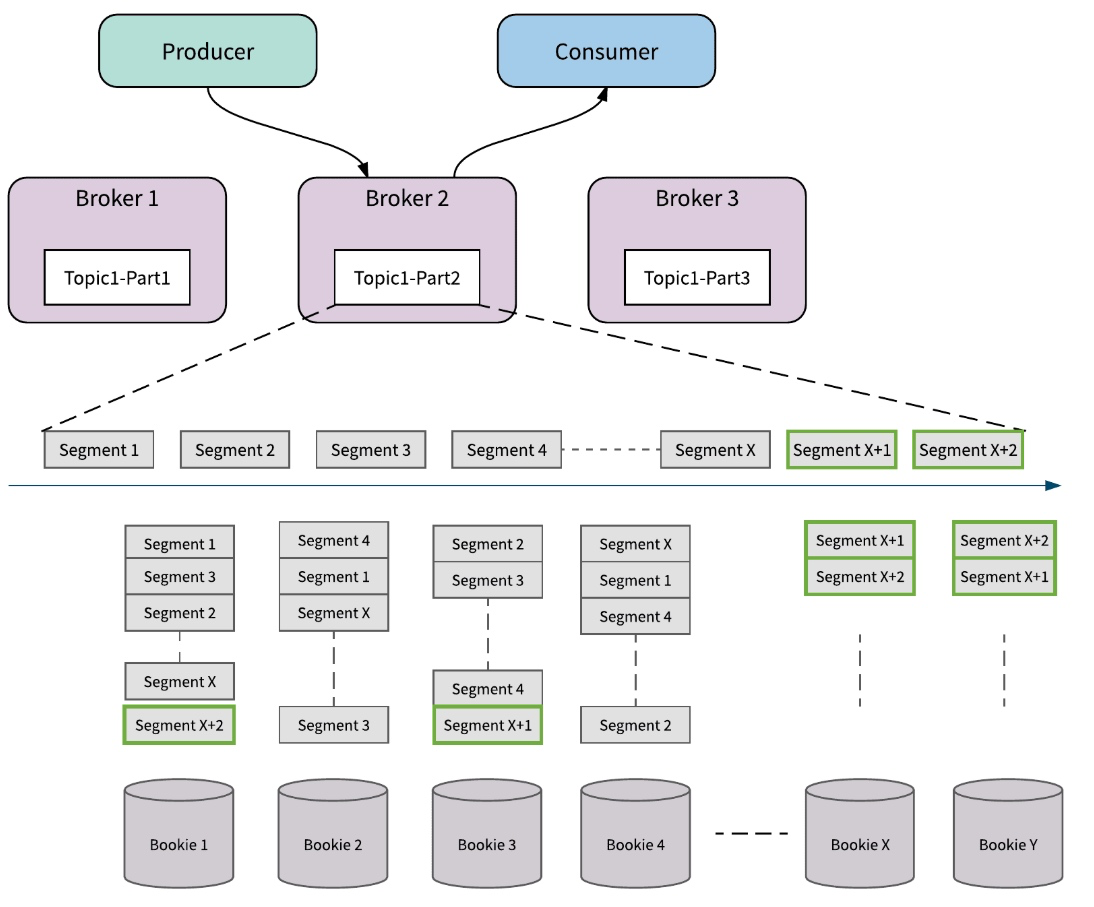
扩容
当 partition 的容量达到上限后,需要扩容的时候,如果现有的单台机器不能满足,Kafka 可能需要添加新的存储节点,并将 partition 的数据在节点之间搬移达到 rebalance 的状态。
而 Pulsar 只需添加新的 Bookie 存储节点即可。新加入的节点由于剩余空间大,会被优先使用,接收更多的新数据;整个扩容过程不涉及任何已有数据的拷贝和搬移。
Broker 故障
Pulsar 在单个节点失败时也会体现同样的优势。如果 Pulsar 的某个服务节点 broker 失效,由于 broker 是无状态的,其他的 broker 可以很快接管 Topic,不会涉及 Topic 数据的拷贝;如果存储节点 Bookie 失效,在集群后台中,其他的 Bookie 会从多个 Bookie 节点中并发读取数据,并对失效节点的数据自动进行恢复,对前端服务不会造成影响。

Bookie 故障
Apache BookKeeper 中的副本修复是 Segment (甚至是 Entry)级别的多对多快速修复。这种方式只会复制必须的数据,这比重新复制整个主题分区要精细。如下图所示,当错误发生时, Apache BookKeeper 可以从 bookie 3 和 bookie 4 中读取 Segment 4 中的消息,并在 bookie 1 处修复 Segment 4。所有的副本修复都在后台进行,对 Broker 和应用透明。
当某个 Bookie 节点出错时,BookKeeper会自动添加可用的新 Bookie 来替换失败的 Bookie,出错的 Bookie 中的数据在后台恢复,所有 Broker 的写入不会被打断,而且不会牺牲主题分区的可用性。

四、基于 Pulsar 的优先级队列方案
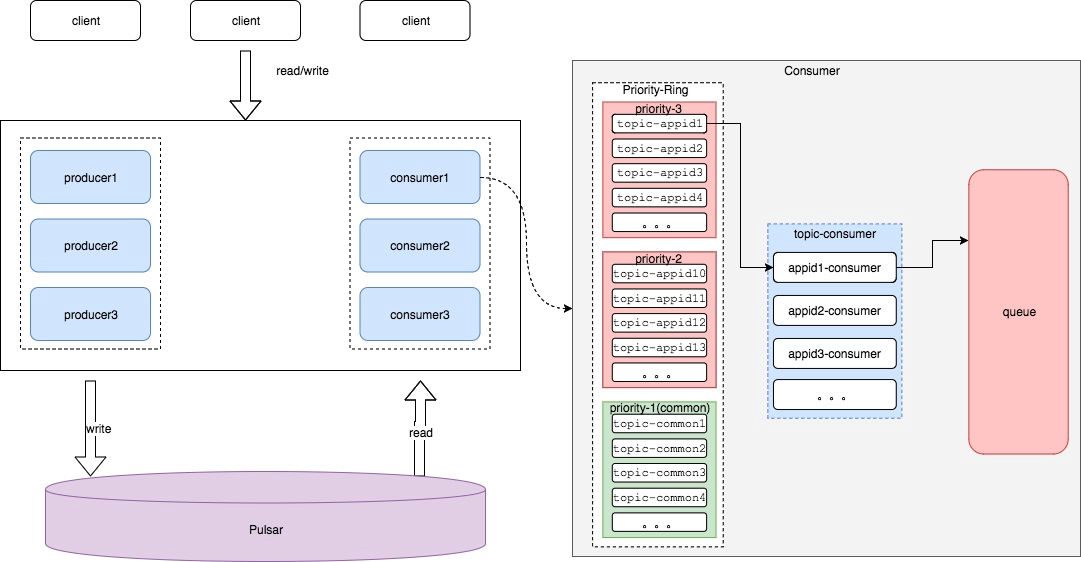
在设计思路上,Pulsar 方案和 Kafka 方案并没有多大区别。但在新方案中,个推技术团队借助 Pulsar 的特性,解决了 Kafka 方案中存在的问题。
- 根据 task 动态生成 Topic,保证了后进入的 task 不会因为其他 task 消息堆积而造成等待情况。
- 中高优先级 task 都独享一个 Topic,低优先级 task 共享 n 个 Topic。
- 相同优先级内,各个 task 轮询读取消息,配额满后流转至下一个优先级。
- 相同优先级内, 各个 task 可动态调整 quota, 在相同机会内,可读取更多消息。
- 利用 Shared 模式, 可以动态添加删除 consumer,且不会触发 Rebalance 情况。
- 利用 BookKeeper 特性,可以更灵活的添加存储资源。
五、Pulsar 其他实践
- 不同 subscription 之间相对独立,如果想要重复消费某个 Topic 的消息,需要使用不同的 subscriptionName 订阅;但是一直增加新的 subscriptionName,backlog 会不断累积。
- 如果 Topic 无人订阅,发给它的消息默认会被删除。因此如果 producer 先发送,consumer 后接收,一定要确保 producer 发送之前,Topic 有 subscription 存在(哪怕 subscribe 之后 close 掉),否则这段时间发送的消息会导致无人处理。
- 如果既没有人发送消息,又没有人订阅消息,一段时间后 Topic 会自动删除。
- Pulsar 的 TTL 等设置,是针对整个 namespace 起效的,无法针对单个 Topic。
- Pulsar 的键都建立在 zookeeper 的根目录上,在初始化时建议增加总节点名。
- 目前 Pulsar 的 java api 设计,消息默认需要显式确认,这一点跟 Kafka 不一样。
- Pulsar dashboard 上的 storage size 和 prometheus 上的 storage size (包含副本大小)概念不一样。
- 把
dbStorage_rocksDB_blockCacheSize设置的足够大;当消息体量大,出现backlog 大量堆积时, 使用默认大小(256M)会出现读耗时过大情况,导致消费变慢。 - 使用多 partition,提高吞吐。
- 在系统出现异常时,主动抓取 stats 和 stats-internal,里面有很多有用数据。
- 如果业务中会出现单 Topic 体量过大的情况,建议把
backlogQuotaDefaultLimitGB设置的足够大(默认10G), 避免因为默认使用producer_request_hold模式出现 block producer 的情况;当然可以根据实际业务选择合适的backlogQuotaDefaultRetentionPolicy。 - 根据实际业务场景主动选择 backlog quota。
- prometheus 内如果发现读耗时为空情况,可能是因为直接读取了缓存数据;Pulsar 在读取消息时会先读取 write cache, 然后读取 read cache;如果都没有命中, 则会在 RocksDB 中读取条目位子后,再从日志文件中读取该条目。
- 写入消息时, Pulsar 会同步写入 journal 和 write cache;write cache 再异步写入日志文件和 RocksDB; 所以有资源的话,建议 journal 盘使用SSD。
六、总结
现在, 个推针对优先级中间件的改造方案已经在部分现网业务中试运行,对于 Pulsar 的稳定性,我们还在持续关注中。
作为一个2016 年才开源的项目,Pulsar 拥有非常多吸引人的特性,也弥补了其他竞品的短板,例如跨地域复制、多租户、扩展性、读写隔离等。尽管在业内使用尚不广泛, 但从现有的特性来说, Pulsar 表现出了取代 Kafka 的趋势。在使用 Pulsar 过程中,我们也遇到了一些问题, 在此特别感谢翟佳和郭斯杰(两位均为 Stream Native 的核心工程师、开源项目 Apache Pulsar 的 PMC 成员)给我们提供的支持和帮助。
参考文献:
[1] 比拼 Kafka, 大数据分析新秀Pulsar 到底好在哪(https://www.infoq.cn/article/1UaxFKWUhUKTY1t_5gPq)
[2] 开源实时数据处理系统Pulsar:一套搞定Kafka+Flink+DB(https://juejin.im/post/5af414365188256717765441)
作者:个推平台研发工程师 祥子
一、业务背景
在个推的推送场景中,消息队列在整个系统中占有非常重要的位置。
当 APP 有推送需求的时候, 会向个推发送一条推送命令,接到推送需求后,我们会把APP要求推送消息的用户放入下发队列中,进行消息下发;当同时有多个APP进行消息下发时,难免会出现资源竞争的情况, 因此就产生了优先级队列的需求,在下发资源固定的情况下, 高优先级的用户需要有更多的下发资源。
二、基于 Kafka 的优先级队列方案
针对以上场景,个推基于 Kafka 设计了第一版的优先级队列方案。Kafka 是 LinkedIn 开发的一个高性能、分布式消息系统;Kafka 在个推有非常广泛的应用,如日志收集、在线和离线消息分发等。
架构
在该方案中,个推将优先级统一设定为高、中、低三个级别。具体操作方案如下:
-
对某个优先级根据 task (单次推送任务)维度,存入不同的 Topic,一个 task 只写入一个 Topic,一个 Topic 可存多个 task;
-
消费模块根据优先级配额(如 6:3:1),获取不同优先级的消息数,同一优先级轮询获取消息;这样既保证了高优先级用户可以更快地发送消息,又避免了低优先级用户出现没有下发的情况。
二、Kafka 方案遇到的问题
随着个推业务的不断发展,接入的 APP 数量逐渐增多,第一版的优先级方案也逐渐暴露出一些问题:
- 当相同优先级的 APP 在同一时刻推送任务越来越多时,后面进入的 task 消息会因为前面 task 消息还存在队列情况而出现延迟。如下图所示, 当 task1 消息量过大时,在task1 消费结束前,taskN 将一直处于等待状态。
- Kafka 在 Topic 数量由 64 增长到 256 时,吞吐量下降严重,Kafka 的每个 Topic、每个分区都会对应一个物理文件。当 Topic 数量增加时,消息分散的落盘策略会导致磁盘 IO 竞争激烈,因此我们不能仅通过增加 Topic 数量来缓解第一点中的问题。
基于上述问题,个推进行了新一轮的技术选型, 我们需要可以创建大量的 Topic, 同时吞吐性能不能比 Kafka 逊色。经过一段时间的调研,Apache Pulsar 引起了我们的关注。
三、为什么是 Pulsar
Apache Pulsar 是一个企业级的分布式消息系统,最初由 Yahoo 开发,在 2016 年开源,并于2018年9月毕业成为 Apache 基金会的顶级项目。Pulsar 已经在 Yahoo 的生产环境使用了三年多,主要服务于Mail、Finance、Sports、 Flickr、 the Gemini Ads platform、 Sherpa (Yahoo 的 KV 存储)。
架构
Topic 数量
Pulsar 可以支持百万级别 Topic 数量的扩展,同时还能一直保持良好的性能。Topic 的伸缩性取决于它的内部组织和存储方式。Pulsar 的数据保存在 bookie (BookKeeper 服务器)上,处于写状态的不同 Topic 的消息,在内存中排序,最终聚合保存到大文件中,在 Bookie 中需要更少的文件句柄。另一方面 Bookie 的 IO 更少依赖于文件系统的 Pagecache,Pulsar 也因此能够支持大量的主题。
消费模型
Pulsar 支持三种消费模型:Exclusive、Shared 和Failover。
Exclusive (独享):一个 Topic 只能被一个消费者消费。Pulsar 默认使用这种模式。
Shared(共享):共享模式,多个消费者可以连接到同一个 Topic,消息依次分发给消费者。当一个消费者宕机或者主动断开连接时,那么分发给这个消费者的未确认(ack)的消息会得到重新调度,分发给其他消费者。
Failover (灾备):一个订阅同时只有一个消费者,可以有多个备份消费者。一旦主消费者故障,则备份消费者接管。不会出现同时有两个活跃的消费者。
Exclusive和Failover订阅,仅允许一个消费者来使用和消费每个订阅的Topic。这两种模式都按 Topic 分区顺序使用消息。它们最适用于需要严格消息顺序的流(Stream)用例。
Shared 允许每个主题分区有多个消费者。同一个订阅中的每个消费者仅接收Topic分区的一部分消息。Shared最适用于不需要保证消息顺序队列(Queue)的使用模式,并且可以按照需要任意扩展消费者的数量。
存储
Pulsar 引入了 Apache BookKeeper 作为存储层,BookKeeper 是一个专门为实时系统优化过的分布式存储系统,具有可扩展、高可用、低延迟等特性。具体介绍,请参考 BookKeeper官网。
Segment
BookKeeper以 Segment (在 BookKeeper 内部被称作 ledger) 作为存储的基本单元。从 Segment 到消息粒度,都会均匀分散到 BookKeeper 的集群中。这种机制保证了数据和服务均匀分散在 BookKeeper 集群中。
Pulsar 和 Kafka 都是基于 partition 的逻辑概念来做 Topic 存储的。最根本的不同是,Kafka 的物理存储是以 partition 为单位的,每个 partition 必须作为一个整体(一个目录)存储在某个 broker 上。 而 Pulsar 的 partition 是以 segment 作为物理存储的单位,每个 partition 会再被打散并均匀分散到多个 bookie 节点中。
这样的直接影响是,Kafka 的 partition 的大小,受制于单台 broker 的存储;而 Pulsar 的 partition 则可以利用整个集群的存储容量。
扩容
当 partition 的容量达到上限后,需要扩容的时候,如果现有的单台机器不能满足,Kafka 可能需要添加新的存储节点,并将 partition 的数据在节点之间搬移达到 rebalance 的状态。
而 Pulsar 只需添加新的 Bookie 存储节点即可。新加入的节点由于剩余空间大,会被优先使用,接收更多的新数据;整个扩容过程不涉及任何已有数据的拷贝和搬移。
Broker 故障
Pulsar 在单个节点失败时也会体现同样的优势。如果 Pulsar 的某个服务节点 broker 失效,由于 broker 是无状态的,其他的 broker 可以很快接管 Topic,不会涉及 Topic 数据的拷贝;如果存储节点 Bookie 失效,在集群后台中,其他的 Bookie 会从多个 Bookie 节点中并发读取数据,并对失效节点的数据自动进行恢复,对前端服务不会造成影响。
Bookie 故障
Apache BookKeeper 中的副本修复是 Segment (甚至是 Entry)级别的多对多快速修复。这种方式只会复制必须的数据,这比重新复制整个主题分区要精细。如下图所示,当错误发生时, Apache BookKeeper 可以从 bookie 3 和 bookie 4 中读取 Segment 4 中的消息,并在 bookie 1 处修复 Segment 4。所有的副本修复都在后台进行,对 Broker 和应用透明。
当某个 Bookie 节点出错时,BookKeeper会自动添加可用的新 Bookie 来替换失败的 Bookie,出错的 Bookie 中的数据在后台恢复,所有 Broker 的写入不会被打断,而且不会牺牲主题分区的可用性。
四、基于 Pulsar 的优先级队列方案
在设计思路上,Pulsar 方案和 Kafka 方案并没有多大区别。但在新方案中,个推技术团队借助 Pulsar 的特性,解决了 Kafka 方案中存在的问题。
- 根据 task 动态生成 Topic,保证了后进入的 task 不会因为其他 task 消息堆积而造成等待情况。
- 中高优先级 task 都独享一个 Topic,低优先级 task 共享 n 个 Topic。
- 相同优先级内,各个 task 轮询读取消息,配额满后流转至下一个优先级。
- 相同优先级内, 各个 task 可动态调整 quota, 在相同机会内,可读取更多消息。
- 利用 Shared 模式, 可以动态添加删除 consumer,且不会触发 Rebalance 情况。
- 利用 BookKeeper 特性,可以更灵活的添加存储资源。
五、Pulsar 其他实践
- 不同 subscription 之间相对独立,如果想要重复消费某个 Topic 的消息,需要使用不同的 subscriptionName 订阅;但是一直增加新的 subscriptionName,backlog 会不断累积。
- 如果 Topic 无人订阅,发给它的消息默认会被删除。因此如果 producer 先发送,consumer 后接收,一定要确保 producer 发送之前,Topic 有 subscription 存在(哪怕 subscribe 之后 close 掉),否则这段时间发送的消息会导致无人处理。
- 如果既没有人发送消息,又没有人订阅消息,一段时间后 Topic 会自动删除。
- Pulsar 的 TTL 等设置,是针对整个 namespace 起效的,无法针对单个 Topic。
- Pulsar 的键都建立在 zookeeper 的根目录上,在初始化时建议增加总节点名。
- 目前 Pulsar 的 java api 设计,消息默认需要显式确认,这一点跟 Kafka 不一样。
- Pulsar dashboard 上的 storage size 和 prometheus 上的 storage size (包含副本大小)概念不一样。
- 把
dbStorage_rocksDB_blockCacheSize设置的足够大;当消息体量大,出现backlog 大量堆积时, 使用默认大小(256M)会出现读耗时过大情况,导致消费变慢。 - 使用多 partition,提高吞吐。
- 在系统出现异常时,主动抓取 stats 和 stats-internal,里面有很多有用数据。
- 如果业务中会出现单 Topic 体量过大的情况,建议把
backlogQuotaDefaultLimitGB设置的足够大(默认10G), 避免因为默认使用producer_request_hold模式出现 block producer 的情况;当然可以根据实际业务选择合适的backlogQuotaDefaultRetentionPolicy。 - 根据实际业务场景主动选择 backlog quota。
- prometheus 内如果发现读耗时为空情况,可能是因为直接读取了缓存数据;Pulsar 在读取消息时会先读取 write cache, 然后读取 read cache;如果都没有命中, 则会在 RocksDB 中读取条目位子后,再从日志文件中读取该条目。
- 写入消息时, Pulsar 会同步写入 journal 和 write cache;write cache 再异步写入日志文件和 RocksDB; 所以有资源的话,建议 journal 盘使用SSD。
六、总结
现在, 个推针对优先级中间件的改造方案已经在部分现网业务中试运行,对于 Pulsar 的稳定性,我们还在持续关注中。
作为一个2016 年才开源的项目,Pulsar 拥有非常多吸引人的特性,也弥补了其他竞品的短板,例如跨地域复制、多租户、扩展性、读写隔离等。尽管在业内使用尚不广泛, 但从现有的特性来说, Pulsar 表现出了取代 Kafka 的趋势。在使用 Pulsar 过程中,我们也遇到了一些问题, 在此特别感谢翟佳和郭斯杰(两位均为 Stream Native 的核心工程师、开源项目 Apache Pulsar 的 PMC 成员)给我们提供的支持和帮助。
参考文献:
[1] 比拼 Kafka, 大数据分析新秀Pulsar 到底好在哪(https://www.infoq.cn/article/1UaxFKWUhUKTY1t_5gPq)
[2] 开源实时数据处理系统Pulsar:一套搞定Kafka+Flink+DB(https://juejin.im/post/5af414365188256717765441)
收起阅读 »音频播放,兼容IOS网络路径播放和IOS静音模式下播放。
<div class="playAudio">播放</div>
<div class="stopAudio">停止</div>
<audio style="display:none;" id="audioPlay" src="http://fjdx.sc.chinaz.net/Files/DownLoad/sound1/201812/10962.mp3"></audio>
var audio;

document.addEventListener('plusready', function(){

    //防止IOS静音模式下播放没有声音,先播放一个静音的音效
    var loadAudio = plus.audio.createPlayer( "/audio/load.mp3" );
    loadAudio.play();

    audio = document.getElementById("audioPlay");
});

$(function(){
    $(".playAudio").click(function(){
        audio.load();
        audio.oncanplay = function () {
            audio.play();
            console.log(audio.duration); //音效时长
        }
    });

    $(".stopAudio").click(function(){
        audio.pause();
    });
});
建议UniApp的模板模式也可以支持Vue新语法,自定义组件模式兼容性问题太多了
一切都是bug呀。已经快做完的项目,没办法完全重构它这个自定义组件模式
一切都是bug呀。已经快做完的项目,没办法完全重构它这个自定义组件模式
uni-app 1.9发布,App平台升级为新版编译器(自定义组件模式),支持更多Vue语法
uni-app 1.8版重写框架,实现了微信端的性能翻倍,并增加了若干Vue语法支持,详见。
之后,众多开发者呼吁将新框架尽快迁移到App平台,经过2周8个Alpha版的迭代,uni-app团队完成新框架在App平台的迁移适配工作,至此1.9版正式发布。
新版特性
uni-app 1.9版主要改进包括:
- 插件市场支持付费原生插件,欢迎插件作者们踊跃提交原生插件,示例https://ext.dcloud.net.cn/plugin?id=135
- 引擎架构升级,提升App启动速度、减少js阻塞
- 支持
自定义组件模式的新编译器,大幅提升App端的组件性能、支持过滤器等更多vue语法 - 很多开发者报包括uni ui的折叠面板、swipeaction等组件中无法使用v-for也需要使用新版并配置新编译模式解决。
新版支持了更多 Vue 语法,详细如下:
- 支持过滤器
filter - 支持比较复杂的
JavaScript渲染表达式 - 支持在
template内使用methods中的函数 - 支持
v-html(同rich-text的解析) - 支持
v-slot新语法 - 支持解构插槽
Prop设置默认值 - 支持
slot后备内容 - 组件支持原生事件绑定,如:
@tap.native
新版不支持的 vue 语法
- class不支持绑定Obejct变量(使用字符串的形式绑定)
- 不支持事件修饰符:prevent、passive(在App与小程序平台,使用stop修饰符,既可以阻止冒泡也能阻止默认行为)
- 不支持render、inline-template、X-Templates、keep-alive、transition
- 不支持使用 Vue.use 的方式注册全局组件(在main.js使用Vue.component的方式引入)
新旧版本兼容策略
为兼容历史项目,uni-app 现阶段同时支持老的template模板模式、和新的自定义组件模式两种模式,默认策略如下:
- HBuilderX 1.9.0+ 新创建的项目,在微信端、App端默认会启用新的框架;
- 历史项目默认使用老框架。如需启动新框架请按下面配置开启。
- 注意HBuilderX Alpha版默认使用新框架,若改用1.9正式版后,也需要手动配置开启新框架。。
开发者可在manifest.json的源码视图里配置, manifest.json -> app-plus -> usingComponents切换编译模式,如下:
// manifest.json
{
    // ...
    /* App平台特有配置 */
    "app-plus": {
        "usingComponents":true //是否启用`自定义组件模式`,为true表示新的`自定义组件模式`,否则启用老的`template模板模式`
    }
    /* 微信小程序特有配置 */
    "mp-weixin": {
        "usingComponents":true //是否启用`自定义组件模式`,为true表示新的`自定义组件模式`,否则启用老的`template模板模式`
    }
}
Tips:
- 为保证自定义组件兼容性,运行到微信开发者工具时,建议将微信基础库设置为最新版本(微信工具项目设置中)。
- 如果你使用了新增的vue语法,请注意只有App、H5、微信三个平台支持这些新语法,编译到其他平台时,要用条件编译处理。
- 如发现新框架有bug,开发者可通过manifest.json切回老框架编译模式,同时欢迎在 ask 社区反馈bug
新版开发注意事项
开发者启用自定义组件模式后,需注意部分开发事项,参考https://ask.dcloud.net.cn/article/35851
Tips:新编译模式在App端,控制台打印的日志无法体现源码的准确行数的问题,需升级到1.9.2版本。
性能优化建议
- 模板中不建议直接使用
object
<!-- 低性能写法 -->
<uni-title title="标题文字" note="描述信息" show-extra-icon="true" :extra-icon="{color: '#4cd964',size: '22',type: 'spinner'}"></uni-title>
<!-- 高性能写法 -->
<template>
    <view>
        <uni-title title="标题文字" note="描述信息" show-extra-icon="true" :extra-icon="extraIcon"></uni-title>
    </view>
</template>
<script>
export default {
    data() {
        return {
            extraIcon:{color: '#4cd964',size: '22',type: 'spinner'}
        }
    }
}
</script>
- 在模板中未使用的数据不建议定义在
data中,未使用的数据一律移除到 vm 外边定义
<!-- 低性能写法 -->
<template>
    <view>
        {{name}}
    </view>
</template>
<script>
export default {
    data() {
        return {
            name:'',
            types:true
        }
    },
    onLoad(){
        if(this.types){
            this.name = '张三';
        } else {
            this.name = '李四';
        }
    }
}
</script>
<!-- 高性能写法 -->
<template>
<view>
{{name}}
</view>
</template>
<script>
let types = true ;
export default {
data() {
return {
name:''
}
},
onLoad(){
if(types){
this.name = '张三';
} else {
this.name = '李四';
}
}
}
</script>- 为提升开发体验,新版本增加了部分
Vue语法,其实这些语法在微信小程序中本身是不支持的;为支持这些语法,uni-app会在编译、运行时分别做一些额外的工作,若开发者希望追求性能极致,则建议尽量少用或者不用新增语法。
老项目改造注意
老版编译模式升级新版编译模式,可先在manifest的源码视图中,在微信下打开新编译模式,运行到小程序调试。然后再迁到app端。
请一定注意新版编译模式,必须与新版手机sdk、基座、打包机、cli绑定。即使HBuilderX升级,如果你的项目是cli方式、或使用了老的自定义基座、或本地sdk离线打包,则需手动升级这些,否则会造成白屏等多种异常。详见https://ask.dcloud.net.cn/article/35845
后续
新框架会陆续把新编译器迁移到其他端的小程序上,并同步进行App端的nvue的强化工作。
升级注意
如果你的项目是cli创建的,记得编译器在你的项目下,不会随着HBuilderX升级而升级,你需要npm update手动升级编译器。
收起阅读 »HBuilderX: vue doc使用教程
HBuilderX 1.9.0 新增了vue doc功能
什么是 vue doc ?
可以理解为,vue组件使用说明。
在其它文件,使用组件的时候,弹出代码提示。
什么是组件?组件是可复用的 Vue 实例,且带有一个名字。
语法
主要用在script部分,需要写在export default上面
/**
* 这里是一个组件描述,会在提示标签的时候显示
* @description 这里也是一个组件描述
* @tutorial https://uniapp.dcloud.io/api/media/image?id=chooseimage
* @property {String} type = [button|input|...值域] 这里是属性描述
* @event {Function} tap 这是是事件描述
* @example 这里是示例代码
*/其中@property和@event内{ }中间的是类型,event的类型必须是Function。
示例
<script>
/**
* 翻页组件
* @description 翻页组件
* @tutorial http://www.baidu.com
* @property {Number} total 翻页数据总数
* @property {String} size = [big|small] 组件大小
* @event {Function} close 关闭事件
* @example <Pagination @total="50" @close=""></Pagination>
*/
export default {
props: {
"total": Number,
"size": String
},
data () {
return {
pageSize: 10,
pageNumber: 0
}
},
methods: {
handleChange(data, event) {
this.$emit('PsPn', this.pageSize, this.pageNumber)
}
}
}
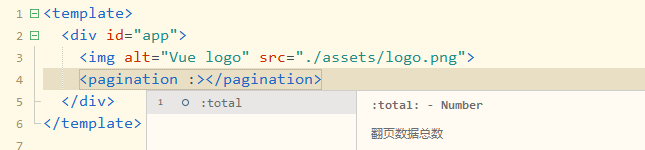
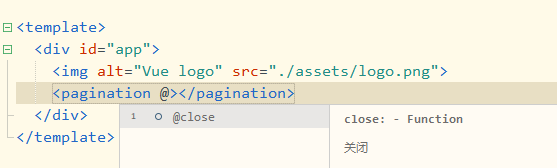
</script>组件提示,效果如下:
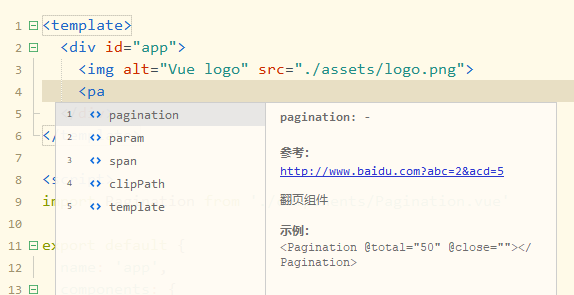

属性提示:
事件提示:
HBuilderX 1.9.0 新增了vue doc功能
什么是 vue doc ?
可以理解为,vue组件使用说明。
在其它文件,使用组件的时候,弹出代码提示。
什么是组件?组件是可复用的 Vue 实例,且带有一个名字。
语法
主要用在script部分,需要写在export default上面
/**
* 这里是一个组件描述,会在提示标签的时候显示
* @description 这里也是一个组件描述
* @tutorial https://uniapp.dcloud.io/api/media/image?id=chooseimage
* @property {String} type = [button|input|...值域] 这里是属性描述
* @event {Function} tap 这是是事件描述
* @example 这里是示例代码
*/其中@property和@event内{ }中间的是类型,event的类型必须是Function。
示例
<script>
  /**
   * 翻页组件
   * @description 翻页组件
   * @tutorial http://www.baidu.com
   * @property {Number} total 翻页数据总数
   * @property {String} size = [big|small] 组件大小
   * @event {Function} close 关闭事件
   * @example <Pagination @total="50" @close=""></Pagination>
   */
  export default {
    props: {
      "total": Number,
      "size": String
    },
    data () {
      return {
        pageSize: 10,
        pageNumber: 0
      }
    },
    methods: {
      handleChange(data, event) {
        this.$emit('PsPn', this.pageSize, this.pageNumber)
      }
    }
  }
</script>
组件提示,效果如下:
属性提示:
事件提示:

拍照,相册,读取图片转成File
/* global plus:true */
/* eslint prefer-promise-reject-errors: "error" */

/*
拍照 = capture = readFile + saveInGallery
*
相册 = readFile
*
readFile = compress + checkSize + turnToFile
         = 压缩》检查大小(this.maxSize)》转成File文件
*/

class UploadImg {
  constructor () {
    this.maxSize = 5 // 最大5M
    this.quality = 20 // 1-100,越高图越大
  }
  capture () {
    plus.nativeUI.showWaiting();
    const _this = this
    var cmr = plus.camera.getCamera();
    // res分辨率
    var res = cmr.supportedImageResolutions[0];
    // fmt文件格式
    var fmt = cmr.supportedImageFormats[0];
    return new Promise((resolve, reject) => {
      cmr.captureImage(function (p) {
        Promise.all([_this.saveInGallery(p), resolve(_this.readFile(p))])
          .then(() => plus.nativeUI.closeWaiting())
          .catch(() => plus.nativeUI.closeWaiting())
      },
      function (error) {
        reject(error)
        plus.nativeUI.closeWaiting()
      }, {
        resolution: res,
        format: fmt
      })
    })
  }
  gallery () {
    plus.nativeUI.showWaiting();
    const _this = this
    return new Promise((resolve, reject) => {
      plus.gallery.pick(
        function (p) {
          Promise.all([resolve(_this.readFile(p))])
            .then(() => plus.nativeUI.closeWaiting())
            .catch(() => plus.nativeUI.closeWaiting())
        },
        function (cancel) {
          reject(cancel)
          plus.nativeUI.closeWaiting()
        }, {
          filter: 'image'
        }
      )
    })
  }
  saveInGallery (p) {
    plus.gallery.save(p, function () {
      console.log('保存进相册-成功')
    },
    function () {
      console.log('保存进相册-失败')
    })
  }
  compress (p) {
    const _this = this
    return new Promise((resolve, reject) => {
      plus.zip.compressImage({
        src: p,
        dst: '_doc/compress.jpg',
        overwrite: true,
        quality: _this.quality
      },
      function (file) {
        resolve(file.target)
      },
      function (error) {
        console.log('压缩失败');
        reject(error)
      });
    })
  }
  checkSize (size) {
    const _this = this
    return new Promise((resolve, reject) => {
      const num = 1024;
      const fileSize = (size / Math.pow(num, 2)).toFixed(2);
      if (fileSize > _this.maxSize) {
        plus.nativeUI.alert(`图片不得超过${_this.maxSize}M`);
        reject(new Error('overSize'));
      } else {
        resolve()
      }
    })
  }
  readFile (p) {
    const _this = this
    return new Promise((resolve, reject) => {
      this.compress(p).then((p) => {
        plus.io.resolveLocalFileSystemURL(p, function (fs) {
          fs.file(function (file) {
            _this.checkSize(file.size)
              .then(() => {
                resolve(_this.turnToFile(fs, file))
              })
              .catch(error => {
                console.log(error)
              })
          });
        });
      })
    });
  }
  turnToFile (fs, oldFile) {
    return new Promise((resolve, reject) => {
      var reader = new plus.io.FileReader();
      reader.readAsDataURL(oldFile)
      reader.onloadend = function (e) {
        // e.target.result
        let data = e.target.result
        // object专成file
        let file = (function (path, name) {
          let arr = path.split(',')
          let mime = arr[0].match(/:(.*?);/)[1]
          let bstr = atob(arr[1])
          let n = bstr.length
          let u8arr = new Uint8Array(n)
          while (n--) {
            u8arr[n] = bstr.charCodeAt(n);
          }
          return new File([u8arr], name, {
            type: mime
          });
        })(e.target.result, fs.name);
        resolve({
          data: data,
          file: file
        })
      };
    })
  }
}
export const uploadImg = new UploadImg()/* global plus:true */
/* eslint prefer-promise-reject-errors: "error" */
/*
拍照 = capture = readFile + saveInGallery
*
相册 = readFile
*
readFile = compress + checkSize + turnToFile
= 压缩》检查大小(this.maxSize)》转成File文件
*/
class UploadImg {
constructor () {
this.maxSize = 5 // 最大5M
this.quality = 20 // 1-100,越高图越大
}
capture () {
plus.nativeUI.showWaiting();
const _this = this
var cmr = plus.camera.getCamera();
// res分辨率
var res = cmr.supportedImageResolutions[0];
// fmt文件格式
var fmt = cmr.supportedImageFormats[0];
return new Promise((resolve, reject) => {
cmr.captureImage(function (p) {
Promise.all([_this.saveInGallery(p), resolve(_this.readFile(p))])
.then(() => plus.nativeUI.closeWaiting())
.catch(() => plus.nativeUI.closeWaiting())
},
function (error) {
reject(error)
plus.nativeUI.closeWaiting()
}, {
resolution: res,
format: fmt
})
})
}
gallery () {
plus.nativeUI.showWaiting();
const _this = this
return new Promise((resolve, reject) => {
plus.gallery.pick(
function (p) {
Promise.all([resolve(_this.readFile(p))])
.then(() => plus.nativeUI.closeWaiting())
.catch(() => plus.nativeUI.closeWaiting())
},
function (cancel) {
reject(cancel)
plus.nativeUI.closeWaiting()
}, {
filter: 'image'
}
)
})
}
saveInGallery (p) {
plus.gallery.save(p, function () {
console.log('保存进相册-成功')
},
function () {
console.log('保存进相册-失败')
})
}
compress (p) {
const _this = this
return new Promise((resolve, reject) => {
plus.zip.compressImage({
src: p,
dst: '_doc/compress.jpg',
overwrite: true,
quality: _this.quality
},
function (file) {
resolve(file.target)
},
function (error) {
console.log('压缩失败');
reject(error)
});
})
}
checkSize (size) {
const _this = this
return new Promise((resolve, reject) => {
const num = 1024;
const fileSize = (size / Math.pow(num, 2)).toFixed(2);
if (fileSize > _this.maxSize) {
plus.nativeUI.alert(`图片不得超过${_this.maxSize}M`);
reject(new Error('overSize'));
} else {
resolve()
}
})
}
readFile (p) {
const _this = this
return new Promise((resolve, reject) => {
this.compress(p).then((p) => {
plus.io.resolveLocalFileSystemURL(p, function (fs) {
fs.file(function (file) {
_this.checkSize(file.size)
.then(() => {
resolve(_this.turnToFile(fs, file))
})
.catch(error => {
console.log(error)
})
});
});
})
});
}
turnToFile (fs, oldFile) {
return new Promise((resolve, reject) => {
var reader = new plus.io.FileReader();
reader.readAsDataURL(oldFile)
reader.onloadend = function (e) {
// e.target.result
let data = e.target.result
// object专成file
let file = (function (path, name) {
let arr = path.split(',')
let mime = arr[0].match(/:(.*?);/)[1]
let bstr = atob(arr[1])
let n = bstr.length
let u8arr = new Uint8Array(n)
while (n--) {
u8arr[n] = bstr.charCodeAt(n);
}
return new File([u8arr], name, {
type: mime
});
})(e.target.result, fs.name);
resolve({
data: data,
file: file
})
};
})
}
}
export const uploadImg = new UploadImg()


汽车钥匙怎么解码器原理(详细介绍)
汽车钥匙怎么解码器原理【136(电)310(微)87961】【诚.信.为.本】【质.量.保.证】【效.率.第.一】包您满意中新网6月20日电 据外媒报道,当地时间19日,美国宣布退出联合国人权理事会(UNHRC),指责人权理事会“长久以来对以色列存有偏见”。联合国对美国做
出该决定表示失望。
据报道,美国驻联合国大使妮基?黑莉(Nikki Haley)宣布美国退出人权理事会时,美国国务卿蓬佩奥就站在她旁边。对美国退出联合国人权理事会的行为,黑
莉抨击称,美国呼吁改革该机构,但呼声一直没有得到重视。
特朗普政府长久以来一直扬言,如果不彻底改革人权理事会,美国将退出。在小布什当政时期,美国曾以人权理事会充满以色列的敌人为由, 对其抵制长达
三年,直到2009年奥巴马当政才重回该组织。
联合国对美国的退出表示失望。联合国秘书长古特雷斯的发言人表示,“联合国秘书长更希望美国能继续留在联合国人权理事会”,“该机构在促进和保护全
世界的人权方面,发挥着非常重要的作用”。
此外,报道称,该举动立即遭到了十几个慈善团体的谴责,他们写信给国务卿蓬佩奥,称他们“对政府决定从联合国人权理事会中退出的决定深感失望”,称
该机构是全球级别的政府间人权机构。
据报道,联合国人权理事会总部设在日内瓦,是一个负责维护人权的、拥有47个成员的联合国机构。目前,美国因在美墨边界强制儿童和其移民父母分离而遭
受猛烈抨击。联合国人权事务高级专员胡笙昨天呼吁华盛顿停止这项“不合理”的政策
