


仿uc新闻列表源码分享
<template>
    <view class="body">
        <view class="tabbar" >
            <view class="tabbarlist"  >
                <view class="tab">
                    <text>推荐</text>
                </view>
                <view class="tab">
                    <text>财经</text>
                </view>
                <view class="tab">
                    <text>科技</text>
                </view>
                <view class="tab">
                    <text>娱乐</text>
                </view>
            </view>
        </view>
<!-- 数据是第三方的,如果自己的数据最好加一个type,通过type来分类排版,以下我是通过作者判断实现的 更多源码请加群 UniApp开源技术群 757988036 -->
        <view class="uni-list">
            <view class="uni-list-cell"  hover-class="uni-list-cell-hover" v-for="(value,key) in listData" :key="key" @click="goDetail(value)"  >
                <view  class="uni-media-list">
                    <image   :class="[(value.author_name)=='36氪的朋友们' ? 'uni-media-list-logo':'listhide']"  :src="value.cover"></image>
                    <view class="uni-media-list-body">
                        <view class="uni-media-list-text-top">{{value.title}}</view>
                        <view class="uni-media-list-text-bottom">
                            <text :class="[(value.author_name)=='全媒派' ? 'listhide':'']">{{value.author_name}}</text>
                            <text :class="[(value.author_name)=='36氪的朋友们' ? '':'listhide']" >{{value.published_at}}</text>
                            <image  :class="[(value.author_name)=='全媒派' ? 'list3':'listhide']"  :src="value.cover"></image>
                            <image  :class="[(value.author_name)=='全媒派' ? 'list3':'listhide']"  :src="value.cover"></image>
                            <image  :class="[(value.author_name)=='全媒派' ? 'list3':'listhide']"  :src="value.cover"></image>
                        </view>
                    </view>
                    <image   :class="[(value.author_name)!=='36氪的朋友们' && (value.author_name)!=='全媒派'  ? 'uni-media-list-logo':'listhide']"  :src="value.cover"></image>
                </view>
            </view>
        </view>
    </view>
</template>
<script>
    var dateUtils = require('../../../common/util.js').dateUtils;
    export default {
        data() {

            return {
                listData: [],
                last_id: "",
                reload: false

            }
        },
        onLoad() {
            this.getList();
        },
        onPullDownRefresh() {
            this.reload = true;
            this.last_id = "";
            this.getList();
        },
        onReachBottom() {
            this.getList();
        },
        methods: {
            getList() {
                var data = {
                    column: "id,post_id,title,author_name,cover,published_at" //需要的字段名
                };
                if (this.last_id) { //说明已有数据,目前处于上拉加载
                    data.minId = this.last_id;
                    data.time = new Date().getTime() + "";
                    data.pageSize = 10;
                }
                uni.request({
                    url: 'https://unidemo.dcloud.net.cn/api/news',
                    data: data,
                    success: (data) => {
                        if (data.statusCode == 200) {
                            let list = this.setTime(data.data);
                            this.listData = this.reload ? list : this.listData.concat(list);
                            this.last_id = list[list.length - 1].id;
                            this.reload = false;
                        }
                    },
                    fail: (data, code) => {
                        console.log('fail' + JSON.stringify(data));
                    }
                })
            },
            goDetail: function (e) {
//              if (!/前|刚刚/.test(e.published_at)) {
//                  e.published_at = dateUtils.format(e.published_at);
//              }
                let detail = {
                    author_name: e.author_name,
                    cover: e.cover,
                    id: e.id,
                    post_id: e.post_id,
                    published_at: e.published_at,
                    title: e.title
                }
                uni.navigateTo({
                    url: "../list2detail-detail/list2detail-detail?detailDate=" + encodeURIComponent(JSON.stringify(detail))
                })
            },
            setTime: function (items) {
                var newItems = [];
                items.forEach((e) => {
                    newItems.push({
                        author_name: e.author_name,
                        cover: e.cover,
                        id: e.id,
                        post_id: e.post_id,
                        published_at: dateUtils.format(e.published_at),
                        title: e.title
                    });
                });
                return newItems;
            }
        },
    }
</script>
</script>
<style>
.tabbar{width: 100%;height: 100upx; /* border-top: solid #eee 1upx; */    }
.tabbarlist{width: 100%;height: 100upx;position: fixed;background:#ffffff; z-index: 999999;border-bottom: solid #eee 1upx; }
.tabbarlist .tab{width: 20%;height: 100upx;/* background: #007AFF; */float: left;display: block;text-align: center;line-height: 100upx;color: #000;}
.listhide{display: none;}
.listshow{display: block;}
.list3{height: 140upx;margin-left: 4upx;}
.uni-media-list-logo {
            width: 180upx;
            height: 140upx;
        }

        .uni-media-list-body {
            height: auto;
            justify-content: space-around;
        }

        .uni-media-list-text-top {
            height: 74upx;
            font-size: 28upx;
            overflow: hidden;
        }

        .uni-media-list-text-bottom {
            display: flex;
            flex-direction: row;
            justify-content: space-between;
        }
</style>
uniapp开源网http://uniapp.red 欢迎 uniapp开源技术群 757988036
演示地址:http://wx1.sinaimg.cn/mw690/0060lm7Tly1fyapsl1l03j30k00qojtn.jpg
base64转amr文件
function dataURL2Audio(fname, base64Str, callback) { //base64转amr文件
var mv = base64Str || '';
if(typeof callback != 'function' || mv == '') return;
fname = fname || ((new Date()).getTime());
fname = (fname.indexOf('.amr') == fname.length - 4) ? fname : fname + '.amr';
var audioName = '_doc/audio/' + fname;
plus.io.requestFileSystem(plus.io.PRIVATE_DOC, function(fs) {
fs.root.getFile(audioName, {
create: true
}, function(entry) {
var fullPath = entry.fullPath;
if(mui.os.android) {
var Str = plus.android.importClass("java.lang.String");
var FileOutputStream = plus.android.importClass("java.io.FileOutputStream");
try {
var myatb, bstr;
var out = new FileOutputStream(fullPath);
var mystr = atob(mv);
var mlen = mystr.length;
var sstr = '';
while(mlen > 0) {
mysub = mystr.substr(0, 1000);
mystr = mystr.substr(1000);
mlen = mystr.length;
myatb = new Str(mysub);
bstr = myatb.getBytes("ISO8859-1");
out.write(bstr);
}
out.close();
callback && callback(entry); // 回调
} catch(ex) {
console.log('写入失败');
}
} else if(mui.os.ios) {
var NSData = plus.ios.importClass('NSData');
var nsData = new NSData();
nsData = nsData.initWithBase64EncodedStringoptions(mv, 0);
if(nsData) {
nsData.plusCallMethod({
writeToFile: fullPath,
atomically: true
});
plus.ios.deleteObject(nsData);
}
callback && callback(entry); // 回调
}
})
})
}
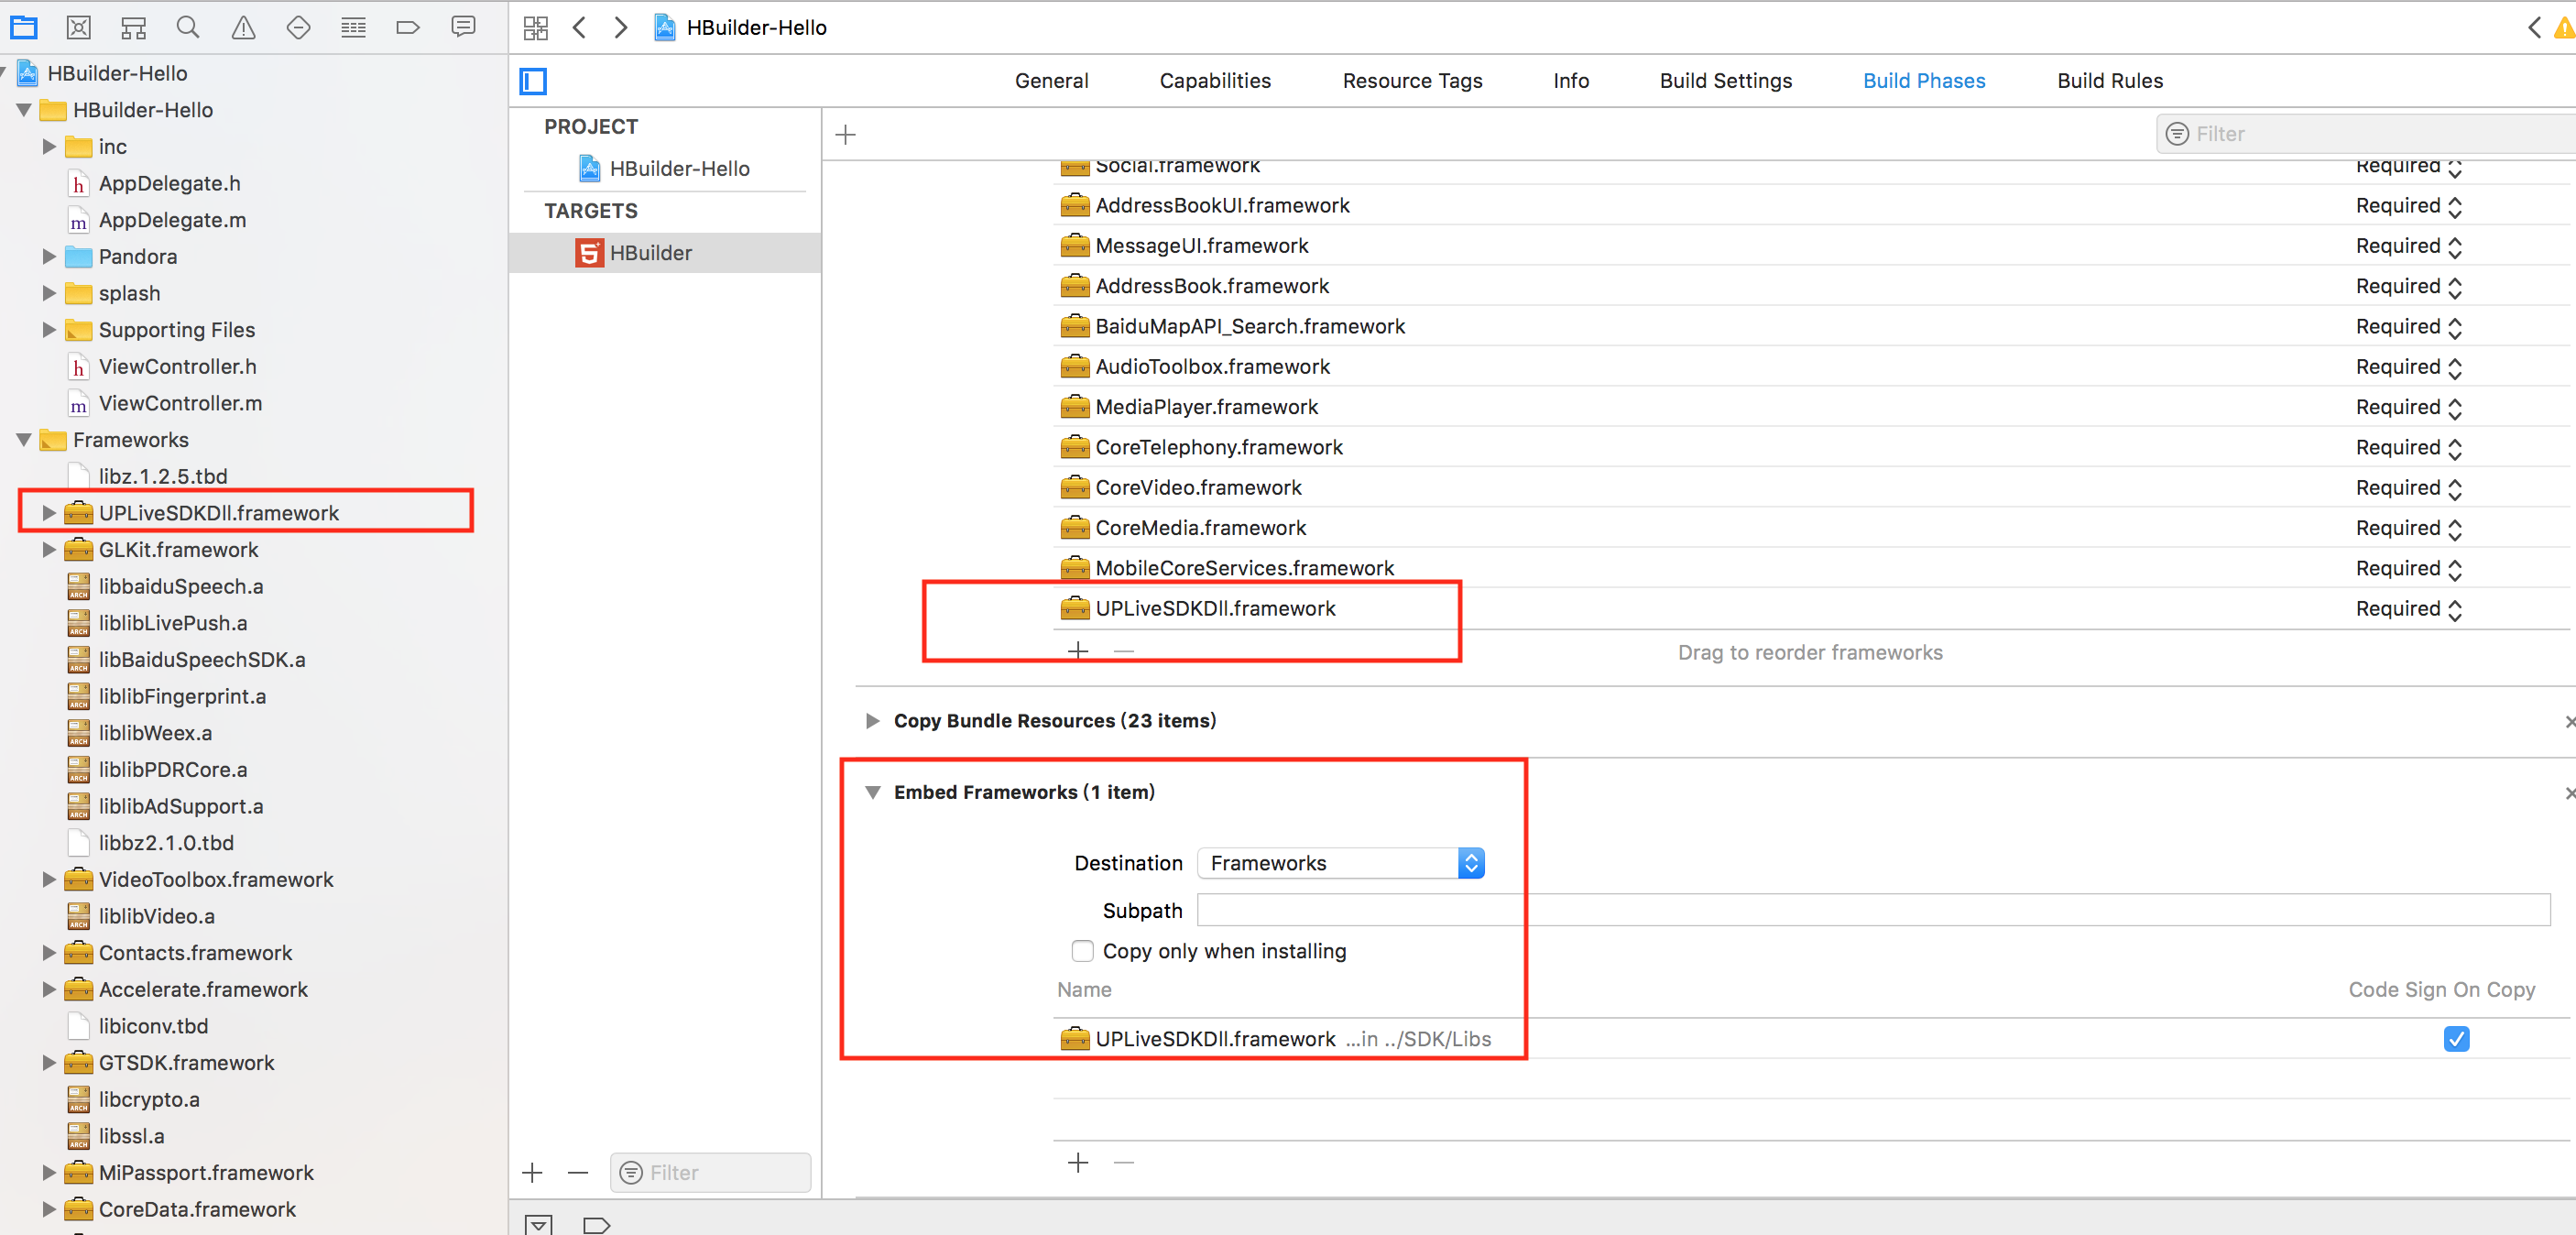
iOS离线打包 - LivePusher直播推流插件配置
LivePusher直播推流配置
添加LivePusher直播推流插件
注: Linker Flags、framework添加方法参考该文档
- 依次添加下列Linker Flags: -llibLivePush。
- 添加下列库:
liblibLivePush.a
libDCUniGPUImage.a
"UPLiveSDKDll.framework",
"AVFoundation.framework",
"QuartzCore.framework",
"OpenGLES.framework",
"AudioToolbox.framework",
"VideoToolbox.framework",
"Accelerate.framework",
"CoreMedia.framework",
"CoreTelephony.framework",
"SystemConfiguration.framework",
"CoreMotion.framework",
"libc++.dylib",
"libbz2.1.0.dylib",
"libiconv.dylib",
"libz.dylib"
注意:如果是自定义组件模式下的live-pusher组件,需要再加上libDCUniLivePush.a库
3."UPLiveSDKDll.framework"这个库是动态库并且不支持模拟器,需要添加到如下图所示的地方:

【全开源+免费更新】doodoo.js快速入门教程
简介
Doodoo.js -- 中文最佳实践Node.js快速开发框架。支持Koa.js, Express.js中间件,支持模块机制,插件机制,钩子机制,让开发 Node.js 项目更加简单、高效、灵活。
特性
支持koa全部中间件
支持使用 ES6+ 全部特性来开发项目
支持断点调试 ES6+ 项目
支持多种项目结构和多种项目环境
支持 Route, Controller 中使用Koa.js的所有API
支持多级 Controller
支持模块化开发
支持钩子机制
支持插件机制
支持错误处理
支持全局 doodoo 变量
支持 mysql, mongodb 数据库
支持前置,后置操作
支持 Restful 设计
支持启动自定义
支持环境加载配置
...
安装
环境要求:node >= 7.6.0
//npm
npm install doodoo.js --save
//yarn
yarn add doodoo.js
使用 ES6/7 特性来开发项目
//base controller, app/demo/controller/base.js
module.exports = class extends doodoo.Controller {

    async _initialize() {
        console.log('base _initialize');
    }

    async isLogin() {
        console.log('base isLogin');
    }
}

//index controller, app/demo/controller/index.js
const base = require('./base');
module.exports = class extends base {

    async _initialize() {
        await super._initialize();
    }

    async index() {
        this.success("Hello Doodoo.js");
    }

    async index2() {
        this.fail("Hello Doodoo.js");
    }
}
详细的日志
服务 启动日志
[doodoo] Version: 2.0.0
[doodoo] Website: 127.0.0.1
[doodoo] Nodejs Version: v8.12.0
[doodoo] Nodejs Platform: darwin x64
[doodoo] Server Enviroment: development
[doodoo] Server Startup Time: 212ms
[doodoo] Server Current Time: 2018-08-21 11:17:19
[doodoo] Server Running At: http://127.0.0.1:3000
HTTP 请求日志
<-- GET /demo/index/index
--> GET /demo/index/index 200 4ms
doodoo.js官方文档:https://doodooke.github.io/doodoo.js/#/
【案例】多多客小程序官网:doodooke.com
uni-app在App端动态修改原生导航栏
在App端可以通过得到webview对象,通过当前 webview 对象的 setTitleNViewButtonBadge, setTitleNViewButtonStyle, setTitleNViewSearchInputFocus,setTitleNViewSearchInputText 分别对 TitleNView 上的按钮角标,按钮,输入框等组件的样式进行修改。
对于 searchInput 还支持: 通过 webview的getStyle(),得到一个json对象,然后用json的.来获取titleNView,拿到的还是json对象,然后修改json对象,再用webview的setstyle方法把这个json对象赋值进去。
具体实现如下:
// #ifdef APP-PLUS
var webView = this.$mp.page.$getAppWebview();

// 修改buttons
// index: 按钮索引, style {WebviewTitleNViewButtonStyles }
webView.setTitleNViewButtonStyle(0, {
    text: 'hello',
});

// 修改按钮上的角标
// index: 按钮索引, text: 角标文本内容
webView.setTitleNViewButtonBadge({
    index: 0,
    text: 10,
});

// 设置 searchInput的 focus
// focus: true | false
webView.setTitleNViewSearchInputFocus(true)

// 设置 searchInput的 text
webView.setTitleNViewSearchInputText(text)

// searchInput 通过 webview 的 setStyle 方法进行更新
var tn = currentWebview.getStyle().titleNView;
if (tn.buttons) {
uni.getSystemInfo({
    success:function(res){
        if (res.platform=="ios") { // 这里在HBuilderX 1.9.9版本有个bug,searchInput的I变小写了 ,临时绕过下。更高版本会修复此bug
            tn.searchinput.placeholder = 'test';
            currentWebview.setStyle({
                titleNView: tn
            });
        } else{
            tn.searchInput.placeholder = 'test'; //这里有个已知bug,HBuilderX 1.9.9上,当searchInput位于首页时,动态设置placehold会导致buttons的点击事件消失。更高版本会修复此bug
            currentWebview.setStyle({
                titleNView: tn
            });
        }
    }
})
}

// #endif
参考这个原理,可以任意修改titleNView的所有内容,titleNView的style内容详见:
https://www.html5plus.org/doc/zh_cn/webview.html#plus.webview.WebviewTitleNViewStyles
button的相关属性参考:http://www.html5plus.org/doc/zh_cn/webview.html#plus.webview.WebviewTitleNViewButtonStyles
searchInput的相关属性参考:https://www.html5plus.org/doc/zh_cn/webview.html#plus.webview.WebviewTitleNViewSearchInputStyles
附件为测试buttons的demo,可下载体验。
收起阅读 »
city.data-3.js 根据国家统计局数据生成的最新地区三级联动数据
刚刚发现 city.data-3.js 数据比较老,有些新增的区域没有显示!! 然后我重新做了一份,分享给需要的大家!!!
刚刚发现 city.data-3.js 数据比较老,有些新增的区域没有显示!! 然后我重新做了一份,分享给需要的大家!!!

小米推送
小米推送的配置对吗
"mipush": {
"appid_android": "288230334457912743",
"appkey_android": "54451230743",
}
还是下面的这种配置
"mkeypush":{
"appid":"必选,mkey推送应用标示",
"appkey":"必选,mkey推送应用的appkey",
"server" :"必选,mkey推送服务器地址"
},
怎么小米推送一直收不到。 两总方式试过了,都收不到
小米推送的配置对吗
"mipush": {
"appid_android": "288230334457912743",
"appkey_android": "54451230743",
}
还是下面的这种配置
"mkeypush":{
"appid":"必选,mkey推送应用标示",
"appkey":"必选,mkey推送应用的appkey",
"server" :"必选,mkey推送服务器地址"
},
怎么小米推送一直收不到。 两总方式试过了,都收不到
收起阅读 »
uni-app number-box组件引用 动态控制数值
再引用number-box组件时,使用过程中根据业务需要,数值的增加比如商城需要考虑实时库存?虽然在列表中增加max库存数,但根据业务需要使用的时增加数量先查询库存的业务,因此就需要动态控制数量值!
只需要做一个小小的优化就可以了!
组件原文件:
<template>
    <view class="uni-numbox">
        <view class="uni-numbox-minus" :class="{'uni-numbox-disabled': disableSubtract}" @click="_calcValue('subtract')">-</view>
        <input class="uni-numbox-value" type="number" :disabled="disabled" :value="inputValue" @blur="_onBlur">
        <view class="uni-numbox-plus" :class="{'uni-numbox-disabled': disableAdd}" @click="_calcValue('add')">+</view>
    </view>
</template>
<script>
    export default {
        name: 'uni-number-box',
        props: {
            value: {
                type: Number,
                default: 0
            },
            min: {
                type: Number,
                default: -Infinity
            },
            max: {
                type: Number,
                default: Infinity
            },
            step: {
                type: Number,
                default: 1
            },
            disabled: {
                type: Boolean,
                default: false
            }
        },
        data() {
            return {
                inputValue: this.value
            }
        },
        computed: {
            disableSubtract() {
                return this.value <= this.min
            },
            disableAdd() {
                return this.value >= this.max
            }
        },
        watch: {
            value(val) {
                this.inputValue = val;
            },
            inputValue(val) {
                this.$emit('change', val);
            }
        },
        methods: {
            _calcValue(type) {
                const scale = this._getDecimalScale();
                let value = this.inputValue * scale;
                let step = this.step * scale;

                if (type === 'subtract') {
                    value -= step
                } else if (type === 'add') {
                    value += step
                }
                if (value < this.min || value > this.max) {
                    return
                }
                this.inputValue = value / scale;
            },
            _getDecimalScale() {
                let scale = 1;
                // 浮点型
                if (~~this.step !== this.step) {
                    scale = Math.pow(10, (this.step + '').split('.')[1].length);
                }
                return scale;
            },
            _onBlur(event) {
                let value = event.detail.value;
                if (!value) {
                    this.inputValue = 0;
                    return
                }
                value = +value;
                if (value > this.max) {
                    value = this.max;
                } else if (value < this.min) {
                    value = this.min
                }
                this.inputValue = value
            }
        }
    }
</script>
<style>
    .uni-numbox {
        display: flex;
        flex-direction: row;
        justify-content: flex-start;
        height: 70upx;
    }

    .uni-numbox-minus,
    .uni-numbox-plus {
        margin: 0;
        background-color: #f9f9f9;
        width: 80upx;
        height: 100%;
        line-height: 70upx;
        text-align: center;
        color: #555555;
    }

    .uni-numbox-minus {
        border: 2upx solid #cccccc;
        border-right: none;
        border-top-left-radius: 6upx;
        border-bottom-left-radius: 6upx;
    }

    .uni-numbox-plus {
        border: 2upx solid #cccccc;
        border-left: none;
        border-top-right-radius: 6upx;
        border-bottom-right-radius: 6upx;
    }

    .uni-numbox-value {
        border: 2upx solid #cccccc;
        background-color: #ffffff;
        width: 80upx;
        height: 100%;
        text-align: center;
    }

    .uni-numbox-disabled {
        color: #c0c0c0;
    }
</style>
引用组件web中代码:(其中item.num为动态值,item为列表循环项目)
<block v-for="(item,index) in cartList" :key="index">
<uni-number-box :value="item.num" :min="1" v-on:change="onNumberChange($event,item)"></uni-number-box>
</block>
组件返回的信息
            onNumberChange(value,e) {
                if(value==e.num){ //防止重复传送
                    return false;
                }
                uni.request({
                    url: '',
                    method: 'POST',
                    header: {'content-type': 'application/x-www-form-urlencoded'},
                    data: {},
                    success: res => {
                        if(!res.data.datas.error){
                            e.num = res.data.datas.num; //服务器返回值 根据业务需要写
                            }else{
                                uni.showToast({ title: res.data.datas.error,icon:"none"});
                            }
                    }
                });
            }
使用过程中,我们会发现,服务器接受了数量后才会同意该值,当不接受的时候 我们就得把后来增加的值恢复到没增加之前,动态改变item.num为原来的值的时候,而组件并为更新,原来才原值没有变化或相同的情况下组件并不会更新!
那么我们就需要修改一下组件,让它能实时更新和掌控
找到组件中以下代码
        watch: {
            value(val) {
                this.inputValue = val;
            },
            inputValue(val) {
                this.$emit('change', val);
            }
        }
修改为:
        watch: {
            value(val) {
                this.inputValue = val;
            },
            inputValue(val) {
                this.$emit('change', val);
                if(this.value){
                if(this.value!=this.inputValue){
                    this.inputValue = this.value;
                }}
            }
        }
这样就完成了后端控制数量的增减过程
收起阅读 »
关于Mac Mojave系统,权限控制的问题
Mac Mojave系统,增强了权限控制。应用程序,访问照片、访达、磁盘、通讯录、网络等都需要授权。
如果你首次安装HBuilderX, 打开后,进行文件删除操作,会弹窗提示是否授权(如下图1)
Mac Mojave: 文件创建、重命名等是不需要授权的,只有删除操作,系统会弹窗要求授权
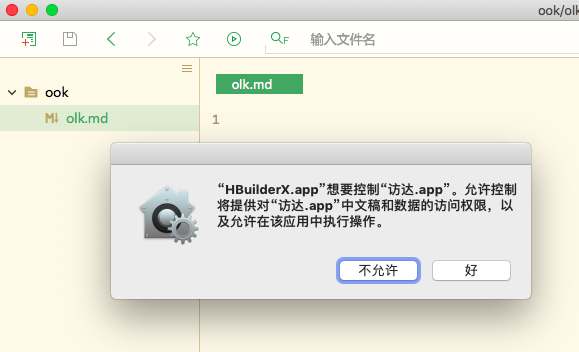
如果不允许操作,HBuilderX会出现无法删除文件的情况。
如果不小心点了不允许,怎么办?
方法1:
打开【设置】--->【安全性与隐私】--->【隐私】--->【自动化】,如下图: 把HBuilderX勾选上
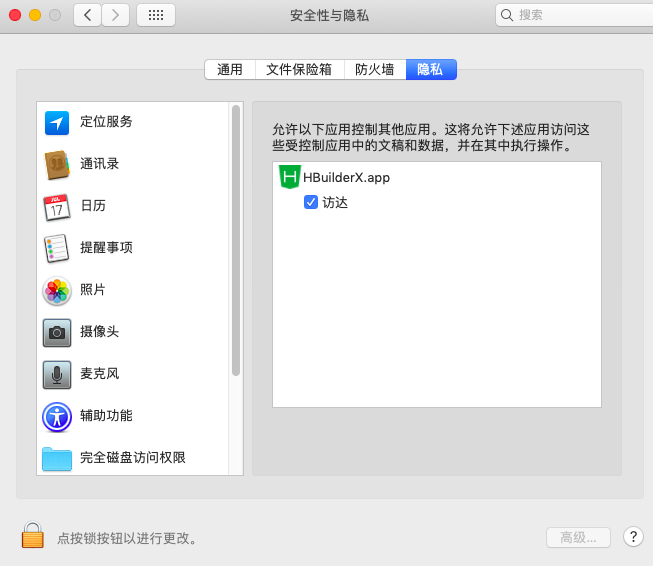
方法2:
打开终端,重置一下权限,重置命令:
tccutil reset AppleEvents 方法3:
重新安装HBuilderX
Mac Mojave系统,增强了权限控制。应用程序,访问照片、访达、磁盘、通讯录、网络等都需要授权。
如果你首次安装HBuilderX, 打开后,进行文件删除操作,会弹窗提示是否授权(如下图1)
Mac Mojave: 文件创建、重命名等是不需要授权的,只有删除操作,系统会弹窗要求授权
如果不允许操作,HBuilderX会出现无法删除文件的情况。
如果不小心点了不允许,怎么办?
方法1:
打开【设置】--->【安全性与隐私】--->【隐私】--->【自动化】,如下图: 把HBuilderX勾选上
方法2:
打开终端,重置一下权限,重置命令:
tccutil reset AppleEvents 方法3:
重新安装HBuilderX
收起阅读 »
HTML5+ plus.navigator cookie 安卓版本兼容性的问题
这个问题在我开发时快要逼疯我了,官方文档也没写
http://www.html5plus.org/doc/zh_cn/navigator.html#plus.navigator.getCookie
只能人肉排雷了,话说html+的接口都没有测过吗?
平台 genymotion 模拟器 android 6.0/android 7.0 window10 1803
- 新建项目
- 打开7.0 模拟器
- hbuilderx 运行.运行到模拟器, 自动安装基座
- 打开webview调试
- 打开Application选项卡,找到cookie,可以看到,里面有一条name为sessionid的记录
- 打开Console 执行 plus.navigator.getCookie(url); 返回null
重复以上步骤,用的是6.0的模拟器 可以得到cookie记录
关于 HTML+ cookie 的api还有很多问题,而且官网上也没写
希望官方能尽快核实
这是我人肉趟雷一星期,才发现的. 开发的时候用的是6.0的系统,装7.0系统上不管用,悲哀啊
收起阅读 »关于uni-app中试用 vuex 的 moduls 的问题
如果按照 vuex 的 modules 写法,在组件中拿不到 modules 中 state 中定义的数据 ,
写到 store/index 的 state 才可以,
有没有遇到这样的问题,对 vuex 中 支持是不是有限?
如果按照 vuex 的 modules 写法,在组件中拿不到 modules 中 state 中定义的数据 ,
写到 store/index 的 state 才可以,
有没有遇到这样的问题,对 vuex 中 支持是不是有限?
