


让 dtpicker 可选择秒钟
让 dtpicker 可选择秒钟
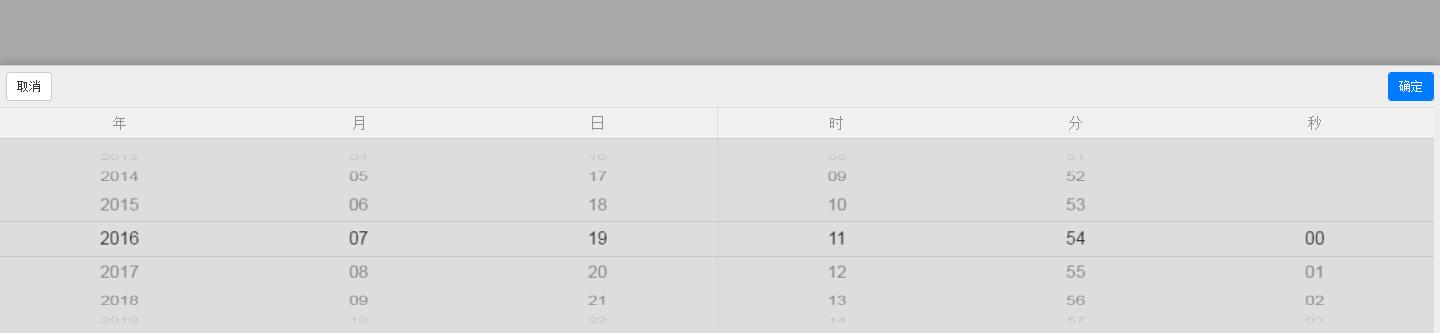
效果图
使用方法
1.引入js
2.type =fulldatetime
     <link href="../../css/mui.picker.min.css" rel="stylesheet"/>
     <script src="../../js/mui.picker.js"></script>

      <link href="../../css/mui.ext.dtpicker.css" rel="stylesheet"/>
     <script src="../../js/mui.ext.dtpicker.js"></script>

<span  class="mui-badge mui-badge-inverted mui-badge-none mui-custom-date" data-options='{"type":"fulldatetime"}'  data-current='false'></span>
下面有附件可以下在 mui.ext.dtpicker.css 及 mui.ext.dtpicker.js
让 dtpicker 可选择秒钟
效果图
使用方法
1.引入js
2.type =fulldatetime
     <link href="../../css/mui.picker.min.css" rel="stylesheet"/>
     <script src="../../js/mui.picker.js"></script>

      <link href="../../css/mui.ext.dtpicker.css" rel="stylesheet"/>
     <script src="../../js/mui.ext.dtpicker.js"></script>

<span  class="mui-badge mui-badge-inverted mui-badge-none mui-custom-date" data-options='{"type":"fulldatetime"}'  data-current='false'></span>
下面有附件可以下在 mui.ext.dtpicker.css 及 mui.ext.dtpicker.js
收起阅读 »
东翌学院和Dcloud官方合作跨平台APP开发培训机构
  东翌学院是Dcloud的合作培训机构,跨平台APP开发整体课程在线直播+课程源码+全套视频,最新最全的APP开发,HB和MUI的全套视频,零基础都可以学习,更有高级进修课程,30天最快速的开发跨平台APP!
  东翌学院也成立了外包团队,跨平台APP开发、管理软件定制、手机软件开发、微信开发、网页设计 我们以专业的技术、勇于创新的责任感、真诚的服务态度,赢得了客户的信任与尊重;东翌学院提供的设计解决方案正影响越来越多的客户,并让他们的产品拥有了更加良好的交互方式与用户体验 。
咨询报名QQ:3391832203 欢迎有意向学习的朋友加好友咨询! 谢谢Dcloud提供这么好的平台! 东翌学院是Dcloud的合作培训机构,跨平台APP开发整体课程在线直播+课程源码+全套视频,最新最全的APP开发,HB和MUI的全套视频,零基础都可以学习,更有高级进修课程,30天最快速的开发跨平台APP!
东翌学院也成立了外包团队,跨平台APP开发、管理软件定制、手机软件开发、微信开发、网页设计 我们以专业的技术、勇于创新的责任感、真诚的服务态度,赢得了客户的信任与尊重;东翌学院提供的设计解决方案正影响越来越多的客户,并让他们的产品拥有了更加良好的交互方式与用户体验 。
咨询报名QQ:3391832203 欢迎有意向学习的朋友加好友咨询! 谢谢Dcloud提供这么好的平台!东翌学院和Dcloud官方合作跨平台APP开发培训机构
东翌学院是Dcloud的合作培训机构,跨平台APP开发整体课程在线直播+课程源码+全套视频,最新最全的APP开发,
HB和MUI的全套视频,零基础都可以学习,更有高级进修课程,30天最快速的开发跨平台APP!
咨询报名QQ:2971611409欢迎有意向学习的朋友加好友咨询!
东翌学院也成立了外包团队,跨平台APP开发、管理软件定制、手机软件开发、微信开发、网页设计 我们以专业的技术、勇于创新的责任感、真诚的服务态度,赢得了客户的信任与尊重;
东翌学院提供的设计解决方案正影响越来越多的客户,并让他们的产品拥有了更加良好的交互方式与用户体验 ,
今天就晚上vip课程八点就要开班了,没有报名学习的小伙伴们抓紧时间报名学习啦,没有钱报名vip也可以学习的,可以分期0首付 12个月免利息 一个月也就是316. 是vip学员没有开权限的同学联系我给你们开权限!详情咨询QQ :2971611409Tel:17090057793
谢谢Dcloud提供这么好的平台!
收起阅读 »
东翌学院和Dcloud官方合作跨平台APP开发培训机构
东翌学院是Dcloud的合作培训机构,跨平台APP开发整体课程在线直播+课程源码+全套视频,最新最全的APP开发, HB和MUI的全套视频,零基础都可以学习,更有高级进修课程,30天最快速的开发跨平台APP!
东翌学院也成立了外包团队,跨平台APP开发、管理软件定制、手机软件开发、微信开发、网页设计 我们以专业的技术、勇于创新的责任感、真诚的服务态度,赢得了客户的信任与尊重;东翌学院提供的设计解决方案正影响越来越多的客户,并让他们的产品拥有了更加良好的交互方式与用户体验。
咨询报名QQ:3391832203 欢迎有意向学习的朋友加好友咨询! 谢谢Dcloud提供这么好的平台!
东翌学院是Dcloud的合作培训机构,跨平台APP开发整体课程在线直播+课程源码+全套视频,最新最全的APP开发, HB和MUI的全套视频,零基础都可以学习,更有高级进修课程,30天最快速的开发跨平台APP!
东翌学院也成立了外包团队,跨平台APP开发、管理软件定制、手机软件开发、微信开发、网页设计 我们以专业的技术、勇于创新的责任感、真诚的服务态度,赢得了客户的信任与尊重;东翌学院提供的设计解决方案正影响越来越多的客户,并让他们的产品拥有了更加良好的交互方式与用户体验。
咨询报名QQ:3391832203 欢迎有意向学习的朋友加好友咨询! 谢谢Dcloud提供这么好的平台!
【交流分享】从小白的角度谈谈Android集成5+SDK的几种方式的应用场景
背景
前一段时间因为项目需求,需要从Hbuilder中转移到原生层做开发,无奈只是熟悉一些java概念,但几乎没接触过Android开发,所以折腾了好久的离线打包。在你决定看这片文章之前,应该也要做好使劲折腾的心理准备。同时,最好看这篇文章之前对集成5 +sdk要有一些基本的概念,所以最好先看看下面这几篇文章,可能就不用继续看我的这点东西了。
1. 官方文档
- 最新SDK下载地址
- 独立应用方式集成
- Android平台以Widget方式集成HTML5 SDK方法
- Android平台以WebView方式集成HTML5 SDK方法
- Android平台使用AndroidStudio离线打包说明
- Android平台第三方插件开发指导
2.开发者分享文章 - 【交流分享】Android独立应用方式集成HTML5 SDK,Widget方式离线打包,空项目讲解
- 【交流分享】Android集成HTML5 SDK,Runtime方式离线打包,空项目讲解
- Android以Widget方式集成自己的hbuilder项目-----Anroid Studio版
相关集成概念
结合所有的官方文档以及官方SDK中的Hello-Integrate项目。我认为,官方对于离线打包有下面的这几种概念(叫法):
1.WebView集成方式 2. Widget集成方式 3. 独立应用集成方式 4. runtime集成方式 5. webApp集成方式

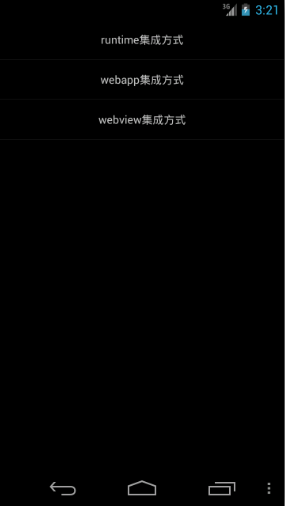 (截图取自官方文档及运行后的Hello-Integrate项目)

相信我,对于我这种首次接触集成SDK的小白来说,看到这一大堆名词及概念的时候,我是这样的


我猜想这么多的概念(叫法)也许是HB的开发者在开发的过程中遗留的问题,可能是项目组成员变动啊,文档整理人员变动啊巴拉巴拉导致的最终概念没有统一,纯属瞎猜。but……项目需求摆在那里,任务摆在那里,你总要解决对吧,懵逼也得硬着头皮上啊。我们开始折腾吧,先不管上面提到的五种叫法或者概念,直接开搞。
开搞
参照上面的那些文档中的方式,每一种集成弄他至少一遍,折腾的过程中可以查查资料,了解一下安卓原生开发的一些基本概念,比如Activity(关于Activity此处可以参考@AronWOng 分享的文章,简洁的介绍了Activity的意思 Android开机自启应用)。或者熟悉下项目的包结构,哪些文件是干啥的,比如Androidmanifest.xml是个什么鬼。折腾了好长一段时间之后,得出了以下的几个结论,注意此结论中并未指定集成方式的叫法(概念),暂时先直接讲要怎么做:
-
如果你只需要离线打包,比如在无法使用HB的云端打包情况下,那么就使用该篇文章中的方式 集成方式a1, 或者集成方式a2,该模式下,不涉及到自己写原生代码,只要按照官方介绍,将自己HB中的项目集成到eclipse或者Android Studio中打包。换种说法就是,如果你没有任何涉及原生开发的需求,并且需要在eclipse或者Android Studio中打包,就采用该模式。
-
如果你有需求会涉及到原生开发,同时又要集成5 + app。以我的项目需求为例,我需要在PDA上开发5 + app,这款PDA就是个基于Android的手机,但是多了一个硬件:扫描器。我需要在App中监听到PDA上的扫描器相关事件,初始化扫描头,开始扫描,获取扫描结果等,并将扫描结果传入5 + App。由于NJS无法实现(或者可以说我不知道怎么使用NJS实现),这个时候我就要采用下面的文章中的做法 集成方式b1或者 集成方式b2。具体实现思路是,我在5 + App对应的Activity中,用java实现对扫描头的监听,并将扫描结果传入5 + app指定的webView,触发js事件,实现5 +app的监听(关于如何在集成SDK后,从java层获取指定webView并传入参数、触发js方法,参考android webApp集成方式 原生主动调用JS方法,此处感谢@DCloud_SDK_骁骑 和 @杰世 的无私帮助与解答)
-
如果你已经在原生层开发好了了App,但是可能在原生层的某些需求中,比如单个页面需要使用5 + 的能力,这种时候采用下面文章中的做法集成方式c。
-
如果你需要在5 +App或者说5 +App的某个特定的webView中,通过js调用原生层的方法,并将原生层方法的执行结果返回至js。还是以我的项目为例,还是说PDA,我需要在5 App中主动调用扫描头,并将扫描头扫描的结果传回5 +App,触发相关js方法。那么采用下面文章中的的方式集成方式d。
总结
讲到这里,相信大家会对目前官方的提供的几种操作方式有一定的了解,那么,现在用我的理解来套用官方的概念(叫法)
-
离线打包:只要不是在HB中进行云端打包,其他方式我们都可以理解为离线打包,因为你都要涉及到将5 +SDK集成到原生层。即便是最傻瓜式的该方法 集成方式a1,也是相当于把集成的工作给你做好了而已。
-
独立应用集成方式,就是Widget集成方式,就是官方SDK中的Hello-Integrate项目里的webApp集成方式,就是 集成方式b1,就是 集成方式b2
-
WebView集成方式,就是集成方式c,也可以理解为集成方式d,此处参考官方SDK中的Hello-Integrate项目里的WebView集成方式
-
Android平台第三方插件开发指导,就是集成方式d。
最后的话
作为HB的用户已经三个月了,感谢DC提供一款如此好用的工具,衷心希望DC越走越好。同时,该文章参考了论坛中很多其他开发者的总结,在此一并感谢。第一次写,文章格式看起来有点乱,审美比较差导致……最后如果我的总结没有太严重的错误的话,那我觉得官方文档中关于5 +SDK的部分概念说明,是时候改改了,也希望大家指出我的错误
背景
前一段时间因为项目需求,需要从Hbuilder中转移到原生层做开发,无奈只是熟悉一些java概念,但几乎没接触过Android开发,所以折腾了好久的离线打包。在你决定看这片文章之前,应该也要做好使劲折腾的心理准备。同时,最好看这篇文章之前对集成5 +sdk要有一些基本的概念,所以最好先看看下面这几篇文章,可能就不用继续看我的这点东西了。
1. 官方文档
- 最新SDK下载地址
- 独立应用方式集成
- Android平台以Widget方式集成HTML5 SDK方法
- Android平台以WebView方式集成HTML5 SDK方法
- Android平台使用AndroidStudio离线打包说明
- Android平台第三方插件开发指导
2.开发者分享文章 - 【交流分享】Android独立应用方式集成HTML5 SDK,Widget方式离线打包,空项目讲解
- 【交流分享】Android集成HTML5 SDK,Runtime方式离线打包,空项目讲解
- Android以Widget方式集成自己的hbuilder项目-----Anroid Studio版
相关集成概念
结合所有的官方文档以及官方SDK中的Hello-Integrate项目。我认为,官方对于离线打包有下面的这几种概念(叫法):
1.WebView集成方式 2. Widget集成方式 3. 独立应用集成方式 4. runtime集成方式 5. webApp集成方式
(截图取自官方文档及运行后的Hello-Integrate项目) 相信我,对于我这种首次接触集成SDK的小白来说,看到这一大堆名词及概念的时候,我是这样的
我猜想这么多的概念(叫法)也许是HB的开发者在开发的过程中遗留的问题,可能是项目组成员变动啊,文档整理人员变动啊巴拉巴拉导致的最终概念没有统一,纯属瞎猜。but……项目需求摆在那里,任务摆在那里,你总要解决对吧,懵逼也得硬着头皮上啊。我们开始折腾吧,先不管上面提到的五种叫法或者概念,直接开搞。
开搞
参照上面的那些文档中的方式,每一种集成弄他至少一遍,折腾的过程中可以查查资料,了解一下安卓原生开发的一些基本概念,比如Activity(关于Activity此处可以参考@AronWOng 分享的文章,简洁的介绍了Activity的意思 Android开机自启应用)。或者熟悉下项目的包结构,哪些文件是干啥的,比如Androidmanifest.xml是个什么鬼。折腾了好长一段时间之后,得出了以下的几个结论,注意此结论中并未指定集成方式的叫法(概念),暂时先直接讲要怎么做:
-
如果你只需要离线打包,比如在无法使用HB的云端打包情况下,那么就使用该篇文章中的方式 集成方式a1, 或者集成方式a2,该模式下,不涉及到自己写原生代码,只要按照官方介绍,将自己HB中的项目集成到eclipse或者Android Studio中打包。换种说法就是,如果你没有任何涉及原生开发的需求,并且需要在eclipse或者Android Studio中打包,就采用该模式。
-
如果你有需求会涉及到原生开发,同时又要集成5 + app。以我的项目需求为例,我需要在PDA上开发5 + app,这款PDA就是个基于Android的手机,但是多了一个硬件:扫描器。我需要在App中监听到PDA上的扫描器相关事件,初始化扫描头,开始扫描,获取扫描结果等,并将扫描结果传入5 + App。由于NJS无法实现(或者可以说我不知道怎么使用NJS实现),这个时候我就要采用下面的文章中的做法 集成方式b1或者 集成方式b2。具体实现思路是,我在5 + App对应的Activity中,用java实现对扫描头的监听,并将扫描结果传入5 + app指定的webView,触发js事件,实现5 +app的监听(关于如何在集成SDK后,从java层获取指定webView并传入参数、触发js方法,参考android webApp集成方式 原生主动调用JS方法,此处感谢@DCloud_SDK_骁骑 和 @杰世 的无私帮助与解答)
-
如果你已经在原生层开发好了了App,但是可能在原生层的某些需求中,比如单个页面需要使用5 + 的能力,这种时候采用下面文章中的做法集成方式c。
-
如果你需要在5 +App或者说5 +App的某个特定的webView中,通过js调用原生层的方法,并将原生层方法的执行结果返回至js。还是以我的项目为例,还是说PDA,我需要在5 App中主动调用扫描头,并将扫描头扫描的结果传回5 +App,触发相关js方法。那么采用下面文章中的的方式集成方式d。
总结
讲到这里,相信大家会对目前官方的提供的几种操作方式有一定的了解,那么,现在用我的理解来套用官方的概念(叫法)
-
离线打包:只要不是在HB中进行云端打包,其他方式我们都可以理解为离线打包,因为你都要涉及到将5 +SDK集成到原生层。即便是最傻瓜式的该方法 集成方式a1,也是相当于把集成的工作给你做好了而已。
-
独立应用集成方式,就是Widget集成方式,就是官方SDK中的Hello-Integrate项目里的webApp集成方式,就是 集成方式b1,就是 集成方式b2
-
WebView集成方式,就是集成方式c,也可以理解为集成方式d,此处参考官方SDK中的Hello-Integrate项目里的WebView集成方式
-
Android平台第三方插件开发指导,就是集成方式d。
最后的话
作为HB的用户已经三个月了,感谢DC提供一款如此好用的工具,衷心希望DC越走越好。同时,该文章参考了论坛中很多其他开发者的总结,在此一并感谢。第一次写,文章格式看起来有点乱,审美比较差导致……最后如果我的总结没有太严重的错误的话,那我觉得官方文档中关于5 +SDK的部分概念说明,是时候改改了,也希望大家指出我的错误
收起阅读 »
图像(头像)选择,截取,压缩,上传的分享
思路:
- 通过拍照或者选择一张照片
- 将照片作为底,一个正方形容器作为边界。通过移动正方形容器获取所需图形的边界。
- 截取图片,并压缩到指定大小。
- 上传到服务器。
具体实现:
-
获取照片资源
1.1 从相册选择function chooseImgFromAlbums() { plus.gallery.pick(function(file) { changeToLocalUrl(file); }, function(err) { console.log(JSON.stringify(err)); }, { filter: 'image', multiple: false }); }1.2 拍照
function chooseImgFromPictures() {
var cmr = plus.camera.getCamera();

cmr.captureImage(function(file) {
changeToLocalUrl(file);
}, function(err) {
console.log(JSON.stringify(err));
}, {
index: '2',
});
}
1.3 相册选择和拍照选择返回的路径都是绝对路径,为了让其显示在img里面,我们需要转换为本地路径URL地址。此处打开一张新页面来对图片进行处理
function changeToLocalUrl(path) { plus.io.resolveLocalFileSystemURL(path, function(entry) { openWindow('uploadImg.html?src=' entry.toLocalURL()); }); } -
以一个正方形容器截取图片。
此处,自己写了一些简单的js来做图像截取,这些js修改起来也很方便。
首先,看一下整个页面:
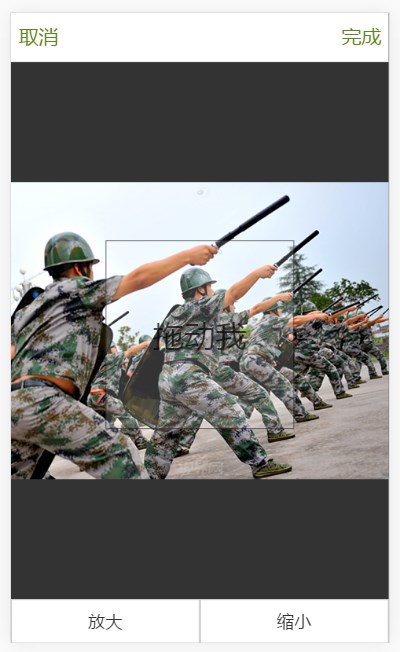
功能很简单:点击放大,缩小可以放大缩小正方形的区域。用手指移动正方形,来改变正方形所包含的内容。
实现的思路:通过监听正方形的touchstart和touchmove事件,改变它的top,left值。实现移动。
具体代码如下:
var Clip = {
  size: 12, //这个表示正方形目前的边长,乘上一个基数就是当前的像素值
  range: {}, //用来控制正方形left和top的极限值,以免移出边界
  topCss: 0,  //表示当前的top值
  leftCss: 0,  //表示当前的left值
  touchX: 0,  //当前的手指所处的X坐标
  touchY: 0, //当前手指的Y坐标
  timer: null,  //用来做touchmove的函数节流,以免连续触发touchmove事件导致的效率问题
  changeBase: function(index) {  //这个函数用来改变正方形的边长,一般还需要设置最大边长和最小边长
    this.size  = index;

    $('#clip').css({
      height: this.size   'rem',
      width: this.size   'rem',
      lineHeight: this.size   'rem'
    });

    this.changeRange();  //边长改变,将引起当前top, left和range的变化,统一调changeRange的方法来修改
  },
  changeRange: function() {  //这个方法用来计算初始top, left以及边界值。其算法收到当前页面布局影响,需要自行修改
    this.topCss =($('body').height() - baseSize * extraHeight - baseSize * this.size) / 2   baseSize * headerHeight;
    this.leftCss = ($('body').width() - baseSize * this.size) / 2;
    this.changeClipStyle(this.leftCss, this.topCss);

    //极限值,需控制不超出图片区域
    var minTop = ($('body').height() - baseSize * extraHeight - $('#img').height()) / 2   baseSize * headerHeight;
    var maxTop = $('body').height() - ($('body').height() - baseSize * extraHeight - $('#img').height()) / 2 -
              baseSize * footerHeght - baseSize * this.size;

    var minLeft = 0;
    var maxLeft = $('body').width() - baseSize * this.size;
    this.range = {
      minTop: minTop,
      maxTop: maxTop,
      minLeft: minLeft,
      maxLeft: maxLeft
    };

  },
  initEvent: function() {  //事件初始化
    mui('body').on('tap', '#enlarge', function(e) {
      Clip.changeBase(1);
    });
    mui('body').on('tap', '#reduce', function(e) {
      Clip.changeBase(-1);
    })

    var clip = document.getElementById('clip');

    //开始接触的时候,记录当前的手指位置
    clip.addEventListener('touchstart', function(event) {
      Clip.touchX = event.touches ? event.touches[0].clientX : event.screenX;
      Clip.touchY = event.touches ? event.touches[0].clientY : event.screenY;
      event.preventDefault();
    });

    //移动后,记录新的位置,设置新的top和left值
    clip.addEventListener('touchmove', function(event) {
      //设置20ms的事件
      if(Clip.timer != null) {  //函数节流
        return;
      }
      Clip.timer = setTimeout(function() {
        var x = event.touches ? event.touches[0].clientX : event.screenX;
        var y = event.touches ? event.touches[0].clientY : event.screenY;

        var disX = x - Clip.touchX;
        var disY = y - Clip.touchY;

        var nowLeft = Clip.leftCss   disX;
        var nowTop = Clip.topCss   disY;

        if(nowLeft < Clip.range.minLeft) {
          nowLeft = Clip.range.minLeft;
        }
        if(nowLeft > Clip.range.maxLeft) {
          nowLeft = Clip.range.maxLeft;
        }
        if(nowTop < Clip.range.minTop) {
          nowTop = Clip.range.minTop;
        }
        if(nowTop > Clip.range.maxTop) {
          nowTop = Clip.range.maxTop;
        }

        Clip.changeClipStyle(nowLeft, nowTop);

        Clip.touchX = x;
        Clip.touchY = y;
        Clip.timer = null;
      }, 20);

    });

  },
  //设置新的样式,并改变当前的top和left值
  changeClipStyle: function(leftCss, topCss) {
    $('#clip').css({
      left: leftCss   'px',
      top: topCss   'px'
    });
    Clip.leftCss = leftCss;
    Clip.topCss = topCss;
  }
}- 移动到正方形到合适的区域后,点击完成,就将完成截取图片和压缩图片的功能。
主要思路是: 调用plus.zip.compressImage函数来完成截取和压缩
3.1. 首先,需要计算出宽高的百分比和离图片左上角的top和left的百分比。同样根据布局不同,计算方式不同。
//获取width和height的百分比
var widthPix = (Clip.size * baseSize / $('#img').width()).toFixed(2) * 100;
var heightPix = (Clip.size * baseSize / $('#img').height()).toFixed(2) * 100;
//获取左上角位置百分比
var topPix = ((Clip.topCss - Clip.range.minTop) / $('#img').height()).toFixed(2) * 100;
var leftPix = (Clip.leftCss / $('#img').width()).toFixed(2) * 100;
3.2 截取
//对图片进行裁剪
plus.zip.compressImage(
  {
    src: search.src, //src在这里是第一步Url里的src。也就是本地路径
    dst: '_doc/a.jpg',
    overwrite: true,
    clip: {
      top: topPix   '%',
      left: leftPix   '%',
      width: widthPix   '%',
      height: heightPix   '%'
    }
  },
  function(e) {
    resizeImage(e.target); //压缩图片
  }
);
3.3 截取图片之后,我们还需要进行压缩。
//再对图片进行压缩为270*270,再上传到服务器
function resizeImage(src) {
  plus.zip.compressImage(
    {
      src: src,
      dst: '_doc/a.jpg',
      overwrite: true,
      width: '270px', //这里指定了宽度,同样可以修改
      format: 'jpg',
      quality: 100  //图片质量不再修改,以免失真
    },
    function(e) {
      plus.nativeUI.closeWaiting();
      uploadImg(e.target);  //上传图片, e.target存的是本地路径!
    },
    function(err) {
      plus.nativeUI.alert('未知错误!',function() {
        mui.back();
      });
    }
  );
}-
上传图片到服务器。上传图片用的是plus.uploader,数据格式符合Multipart/form-data规范,也就是平时input type='file'那样一样
function uploadImg(src) {
var task = plus.uploader.createUpload(ajaxUrl, {
method: 'post',
blocksize:204800,
timeout: 10
});

task.addFile(src, {key: 'headImg'});

task.addData('type', 'uploadImg');
task.addData('userId', );
task.addEventListener('statechanged', stateChanged, false);
task.start();

function stateChanged(upload, status) {
if ( upload.state == 4 && status == 200 ) {
  plus.uploader.clear();  //清除上传
  console.log(upload.responseText);  //服务器返回存在这里
}
}
}
好了,就这么多,代码比较简单,如果有其他能用的,欢迎修改。源码就不上传了,因为是公司项目的一个子功能,主要代码实现都在这里了。直接用了jQuery和mui。当然用原生写也OK。
思路:
- 通过拍照或者选择一张照片
- 将照片作为底,一个正方形容器作为边界。通过移动正方形容器获取所需图形的边界。
- 截取图片,并压缩到指定大小。
- 上传到服务器。
具体实现:
-
获取照片资源
1.1 从相册选择function chooseImgFromAlbums() { plus.gallery.pick(function(file) { changeToLocalUrl(file); }, function(err) { console.log(JSON.stringify(err)); }, { filter: 'image', multiple: false }); }1.2 拍照
function chooseImgFromPictures() {
var cmr = plus.camera.getCamera();

cmr.captureImage(function(file) {
changeToLocalUrl(file);
}, function(err) {
console.log(JSON.stringify(err));
}, {
index: '2',
});
}
1.3 相册选择和拍照选择返回的路径都是绝对路径,为了让其显示在img里面,我们需要转换为本地路径URL地址。此处打开一张新页面来对图片进行处理
function changeToLocalUrl(path) { plus.io.resolveLocalFileSystemURL(path, function(entry) { openWindow('uploadImg.html?src=' entry.toLocalURL()); }); } -
以一个正方形容器截取图片。
此处,自己写了一些简单的js来做图像截取,这些js修改起来也很方便。
首先,看一下整个页面:
功能很简单:点击放大,缩小可以放大缩小正方形的区域。用手指移动正方形,来改变正方形所包含的内容。
实现的思路:通过监听正方形的touchstart和touchmove事件,改变它的top,left值。实现移动。
具体代码如下:
var Clip = {
  size: 12, //这个表示正方形目前的边长,乘上一个基数就是当前的像素值
  range: {}, //用来控制正方形left和top的极限值,以免移出边界
  topCss: 0,  //表示当前的top值
  leftCss: 0,  //表示当前的left值
  touchX: 0,  //当前的手指所处的X坐标
  touchY: 0, //当前手指的Y坐标
  timer: null,  //用来做touchmove的函数节流,以免连续触发touchmove事件导致的效率问题
  changeBase: function(index) {  //这个函数用来改变正方形的边长,一般还需要设置最大边长和最小边长
    this.size  = index;

    $('#clip').css({
      height: this.size   'rem',
      width: this.size   'rem',
      lineHeight: this.size   'rem'
    });

    this.changeRange();  //边长改变,将引起当前top, left和range的变化,统一调changeRange的方法来修改
  },
  changeRange: function() {  //这个方法用来计算初始top, left以及边界值。其算法收到当前页面布局影响,需要自行修改
    this.topCss =($('body').height() - baseSize * extraHeight - baseSize * this.size) / 2   baseSize * headerHeight;
    this.leftCss = ($('body').width() - baseSize * this.size) / 2;
    this.changeClipStyle(this.leftCss, this.topCss);

    //极限值,需控制不超出图片区域
    var minTop = ($('body').height() - baseSize * extraHeight - $('#img').height()) / 2   baseSize * headerHeight;
    var maxTop = $('body').height() - ($('body').height() - baseSize * extraHeight - $('#img').height()) / 2 -
              baseSize * footerHeght - baseSize * this.size;

    var minLeft = 0;
    var maxLeft = $('body').width() - baseSize * this.size;
    this.range = {
      minTop: minTop,
      maxTop: maxTop,
      minLeft: minLeft,
      maxLeft: maxLeft
    };

  },
  initEvent: function() {  //事件初始化
    mui('body').on('tap', '#enlarge', function(e) {
      Clip.changeBase(1);
    });
    mui('body').on('tap', '#reduce', function(e) {
      Clip.changeBase(-1);
    })

    var clip = document.getElementById('clip');

    //开始接触的时候,记录当前的手指位置
    clip.addEventListener('touchstart', function(event) {
      Clip.touchX = event.touches ? event.touches[0].clientX : event.screenX;
      Clip.touchY = event.touches ? event.touches[0].clientY : event.screenY;
      event.preventDefault();
    });

    //移动后,记录新的位置,设置新的top和left值
    clip.addEventListener('touchmove', function(event) {
      //设置20ms的事件
      if(Clip.timer != null) {  //函数节流
        return;
      }
      Clip.timer = setTimeout(function() {
        var x = event.touches ? event.touches[0].clientX : event.screenX;
        var y = event.touches ? event.touches[0].clientY : event.screenY;

        var disX = x - Clip.touchX;
        var disY = y - Clip.touchY;

        var nowLeft = Clip.leftCss   disX;
        var nowTop = Clip.topCss   disY;

        if(nowLeft < Clip.range.minLeft) {
          nowLeft = Clip.range.minLeft;
        }
        if(nowLeft > Clip.range.maxLeft) {
          nowLeft = Clip.range.maxLeft;
        }
        if(nowTop < Clip.range.minTop) {
          nowTop = Clip.range.minTop;
        }
        if(nowTop > Clip.range.maxTop) {
          nowTop = Clip.range.maxTop;
        }

        Clip.changeClipStyle(nowLeft, nowTop);

        Clip.touchX = x;
        Clip.touchY = y;
        Clip.timer = null;
      }, 20);

    });

  },
  //设置新的样式,并改变当前的top和left值
  changeClipStyle: function(leftCss, topCss) {
    $('#clip').css({
      left: leftCss   'px',
      top: topCss   'px'
    });
    Clip.leftCss = leftCss;
    Clip.topCss = topCss;
  }
}- 移动到正方形到合适的区域后,点击完成,就将完成截取图片和压缩图片的功能。
主要思路是: 调用plus.zip.compressImage函数来完成截取和压缩
3.1. 首先,需要计算出宽高的百分比和离图片左上角的top和left的百分比。同样根据布局不同,计算方式不同。
//获取width和height的百分比
var widthPix = (Clip.size * baseSize / $('#img').width()).toFixed(2) * 100;
var heightPix = (Clip.size * baseSize / $('#img').height()).toFixed(2) * 100;
//获取左上角位置百分比
var topPix = ((Clip.topCss - Clip.range.minTop) / $('#img').height()).toFixed(2) * 100;
var leftPix = (Clip.leftCss / $('#img').width()).toFixed(2) * 100;
3.2 截取
//对图片进行裁剪
plus.zip.compressImage(
  {
    src: search.src, //src在这里是第一步Url里的src。也就是本地路径
    dst: '_doc/a.jpg',
    overwrite: true,
    clip: {
      top: topPix   '%',
      left: leftPix   '%',
      width: widthPix   '%',
      height: heightPix   '%'
    }
  },
  function(e) {
    resizeImage(e.target); //压缩图片
  }
);
3.3 截取图片之后,我们还需要进行压缩。
//再对图片进行压缩为270*270,再上传到服务器
function resizeImage(src) {
  plus.zip.compressImage(
    {
      src: src,
      dst: '_doc/a.jpg',
      overwrite: true,
      width: '270px', //这里指定了宽度,同样可以修改
      format: 'jpg',
      quality: 100  //图片质量不再修改,以免失真
    },
    function(e) {
      plus.nativeUI.closeWaiting();
      uploadImg(e.target);  //上传图片, e.target存的是本地路径!
    },
    function(err) {
      plus.nativeUI.alert('未知错误!',function() {
        mui.back();
      });
    }
  );
}-
上传图片到服务器。上传图片用的是plus.uploader,数据格式符合Multipart/form-data规范,也就是平时input type='file'那样一样
function uploadImg(src) {
var task = plus.uploader.createUpload(ajaxUrl, {
method: 'post',
blocksize:204800,
timeout: 10
});

task.addFile(src, {key: 'headImg'});

task.addData('type', 'uploadImg');
task.addData('userId', );
task.addEventListener('statechanged', stateChanged, false);
task.start();

function stateChanged(upload, status) {
if ( upload.state == 4 && status == 200 ) {
  plus.uploader.clear();  //清除上传
  console.log(upload.responseText);  //服务器返回存在这里
}
}
}
好了,就这么多,代码比较简单,如果有其他能用的,欢迎修改。源码就不上传了,因为是公司项目的一个子功能,主要代码实现都在这里了。直接用了jQuery和mui。当然用原生写也OK。
轻松快速学习全套跨平台APP开发课程—东翌学院
 东翌学院是Dcloud的合作培训机构,跨平台APP开发整体课程在线直播+课程源码+全套视频,最新最全的APP开发,HB和MUI的全套视频,零基础都可以学习,更有高级进修课程,30天最快速的开发跨平台APP!
 东翌学院也成立了外包团队,跨平台APP开发、管理软件定制、手机软件开发、微信开发、网页设计 我们以专业的技术、勇于创新的责任感、真诚的服务态度,赢得了客户的信任与尊重;东翌学院提供的设计解决方案正影响越来越多的客户,并让他们的产品拥有了更加良好的交互方式与用户体验。
 咨询报名QQ:3391832203  欢迎有意向学习的朋友加好友咨询!
谢谢Dcloud提供这么好的平台! 东翌学院是Dcloud的合作培训机构,跨平台APP开发整体课程在线直播+课程源码+全套视频,最新最全的APP开发,HB和MUI的全套视频,零基础都可以学习,更有高级进修课程,30天最快速的开发跨平台APP!
东翌学院也成立了外包团队,跨平台APP开发、管理软件定制、手机软件开发、微信开发、网页设计 我们以专业的技术、勇于创新的责任感、真诚的服务态度,赢得了客户的信任与尊重;东翌学院提供的设计解决方案正影响越来越多的客户,并让他们的产品拥有了更加良好的交互方式与用户体验。
咨询报名QQ:3391832203 欢迎有意向学习的朋友加好友咨询!
谢谢Dcloud提供这么好的平台!
hbuilder使用心得
使用hbuilder开发移动端APP已经有一段时间了,自我感觉还是挺不错的,可以这么说,与同类产品相比,已经有大师的风范了。
使用hbuilder开发移动端APP已经有一段时间了,自我感觉还是挺不错的,可以这么说,与同类产品相比,已经有大师的风范了。
东翌学院和Dcloud官方合作跨平台APP开发培训机构
东翌学院是Dcloud的合作培训机构,跨平台APP开发整体课程在线直播+课程源码+全套视频,最新最全的APP开发, HB和MUI的全套视频,零基础都可以学习,更有高级进修课程,30天最快速的开发跨平台APP!
咨询报名QQ:3391832203 欢迎有意向学习的朋友加好友咨询!
东翌学院也成立了外包团队,跨平台APP开发、管理软件定制、手机软件开发、微信开发、网页设计 我们以专业的技术、勇于创新的责任感、真诚的服务态度,赢得了客户的信任与尊重;
东翌学院提供的设计解决方案正影响越来越多的客户,并让他们的产品拥有了更加良好的交互方式与用户体验 ,谢谢Dcloud提供这么好的平台!
东翌学院是Dcloud的合作培训机构,跨平台APP开发整体课程在线直播+课程源码+全套视频,最新最全的APP开发, HB和MUI的全套视频,零基础都可以学习,更有高级进修课程,30天最快速的开发跨平台APP!
咨询报名QQ:3391832203 欢迎有意向学习的朋友加好友咨询!
东翌学院也成立了外包团队,跨平台APP开发、管理软件定制、手机软件开发、微信开发、网页设计 我们以专业的技术、勇于创新的责任感、真诚的服务态度,赢得了客户的信任与尊重;
东翌学院提供的设计解决方案正影响越来越多的客户,并让他们的产品拥有了更加良好的交互方式与用户体验 ,谢谢Dcloud提供这么好的平台!
7月11日-7月15日抽奖活动中奖名单
7月11日中奖名单
机械键盘
695982168@qq.com
固态硬盘
277728783@qq.cm
鼠标垫
919735105@qq.com、5938299@qq.com、15364917078@163.com、616035668@qq.com、llb_ganker@163.com、cycles@126.com、tangyouhua@gmail.com、1317821900@qq.com、1328512497@qq.com、xiangwencheng@outlook.com、zjl1129840091@163.com、hliang@ixcv.com、2628514866@qq.com
流应用体验红包
896982138@qq.com、1060111349@qq.com、799481056@qq.com、roccsky@163.com、898013383@qq.com、1284985620@qq.com、2323646018@qq.com、1924572697@qq.com、415850557@qq.com、1114942636@qq.com、408958321@qq.com、xf0608z@163.com、380783939@qq.com、1041320245@qq.com、1149598913@qq.com、idevs@foxmail.com、759156016@qq.com、1358627726@qq.com、、826960002@qq.com、787604778@qq.com、1038502038@qq.com、liangqi1993910@163.com、zhu1259863653@qq.com、diwucun@163.com、lxbin6819@vip.qq.com、lifehw@163.com、cs99619@gmail.com、727237038@qq.com、157076485@qq.com、291034387@qq.com、1640844463@qq.com、534684218@qq.com、331298616@qq.com、chenyuliang210@163.com、769886972@qq.com、791167386@qq.com、937991452@qq.com、735405280@qq.com、hongyi6677@163.com
7月12日中奖名单
机械键盘
1158916441@qq.com
固态硬盘
nsn_liyahui@163.com
鼠标垫
1361321858@qq.com、1002955411@qq.com、314544320@qq.com、1192215@qq.com、670628483@qq.com、592792610@qq.com、601825728@qq.com、327354705@qq.com、wangzeyang10000@163.com、544356147@qq.com、samulez@126.com、593582402@qq.com、liuhaiyuan1992@qq.com、18530021301@163.com、fd2020_wyy@163.com、649780121@qq.com、371690244@qq.com、15890381082@163.com、339201521@qq.com、453159575@qq.com、970903552@qq.com、oukunqing@126.com、li897179204@163.com、mrsy@foxmail.com、472938471@qq.com、opush.developer@outlook.com、xiangwencheng@outlook.com
流应用体验红包
252362598@qq.com、923399727@qq.com、976683240@qq.com、opticalsampling@126.com、710043370@qq.com、13467933659@163.com、henbo@vip.qq.com、909559682@qq.com、851347180@qq.com、945252844@qq.com、zhang_kai@outlook.com、251300066@qq.com、snjeje@163.com、617105706@qq.com、66504391@qq.com、xiaochen1021@163.com、qianchuanbilv@126.com、helong0911@hotmail.com、zx635298205@163.com、chen00054788@163.com、849179402@qq.com、176614444@qq.com、1652337423@qq.com、316664795@qq.com、971422669@qq.com、453435171@qq.com、silentech@sina.com、1247609231@qq.com、357713623@qq.com、lanyuansheng@gmail.com、renhui_sx_cn@163.com、623023808@qq.com、kf@thunk.cn、249803567@qq.com、546645474@qq.com、1257049723@qq.com、904678748@qq.com、13910006222@139.com、1429400128@qq.com、1171418699@qq.com、1149183529@qq.com、taifu5522@126.com、chenmingjie121@163.com、931627699@qq.com、chrens@foxmail.com、852151774@qq.com、btdi@qq.com、ma1362347@sina.com、672390127@qq.com、463107164@qq.com、443679562@qq.com、1290460235@qq.com、939211316@qq.com、449768563@qq.com、lll12379@163.com、webxiaohaining@163.com、40822570@qq.com、sidbe9@qq.com、315751970@qq.com、nan4575@126.com、374857968@qq.com、1500527791@qq.com、511327004@qq.com、357818535q@qq.com、exq80730@qq.com、xin709717837@163.com、1017865002@qq.com、964213653@qq.com、billzhang001@yeah.net、1037358769@qq.com、770515313@qq.com、panhaiwei812@qq.com、531998898@qq.com、519171742@qq.com、2633576815@qq.com、2430272240@qq.com、352686980@qq.com、hg9981@126.com、、407601955@qq.com、651739222@qq.com、xpengchanghuai@163.com、649947382@qq.com、xuelin_luo@163.com、123303841@qq.com、353025497@qq.com、maxl960@163.com、qiuguixi@qq.com、1055140417@qq.com、895227005@qq.com、403856871@qq.com、1066515769@qq.com、904790204@qq.com、390669156@qq.com、afengxg@163.com、592555804@qq.com、754375280@qq.com、583641232@qq.com、ccfto@163.com、421219034@qq.com、2162262411@qq.com、wzdszxf@126.com、ingdear@yeah.net、elvis-presley@163.com、1095094567@qq.com、891779683@qq.com、276657532@qq.com、912166450@qq.com、yanjiaxing@live.com、1216292683@qq.com、lqstshw@sina.com、1037535316@qq.com、366707523@qq.com、672266462@qq.com、1121827098@qq.com、Dawei@speakez.cn、907468866@qq.com、1584418688@qq.com、stk_gsf@163.com、1211198853@qq.com、chadlia96@163.com、mycnxp@qq.com、lewis922@163.com、cph19912006@163.com、fuze@163.com、290945010@qq.com、1747051448@qq.com、ww1185205689@163.com、13643642791@163.com、510841875@qq.com、13163302217@163.com、15849361022@139.com、306445619@qq.com、1047745910@qq.com、sub_gh@sina.com、15070440156@163.com、917106609@qq.com、363248783@qq.com、luy0829@sina.com、fanyingyingai@163.com、xianwenqiang@baidu.com、coldstarer@163.com、1062513262@qq.com、945646444@qq.com、、qiu_wenxing@foxmail.com、782093540@qq.com、2629383709@qq.com、gbqfsq@126.com、bin7819552@163.com、694187979@qq.com、759782491@qq.com、wangzhe2596@163.com、zhonghu2012@126.com、lopo1983@foxmail.com、519688153@qq.com、81711506@qq.com、kai5896@vip.qq.com、1017462553@qq.com、1076191982@qq.com、476048435@qq.com、zhiweidekitty@sina.com、294389739@qq.com
7月13日中奖名单
机械键盘
shuangbrother@126.com
固态硬盘
yuewei19930312@vip.qq.com
鼠标垫
511327004@qq.com、593116240@qq.com、z521zc@qq.com、371690694@qq.com、gentiana@163.com、jufeng_466@163.com、937032802@qq.com、liuyubo@mftcc.cn、474555539@qq.com、1023842684@qq.com、wwanghuiying@126.com、dangerrei@qq.com、229202170@qq.com、514409150@qq.com、835758172@qq.com、274282629@qq.com、panxu163@163.com、angelzhezhe215@163.com、729491901@qq.com、1280396971@qq.com
流应用体验红包
Charles2Song@gmail.com、fuguangdong@qq.com、lzl0825@163.com、1346824976@qq.com、411008725@qq.com、859666370@qq.com、754796787@qq.com、yhj19710126@163.com、176834797@qq.com、wt_13579@163.com、17750667571@163.com、601303373@qq.com、lzl102872@163.com、15233679781@163.com、ityao0325@sina.com、1440350643@qq.com、aimelluly@126.com、514150793@qq.com、18201189891@163.com、1021322156@qq.com、jessicamavip@163.com、13641547736@sina.com、runkof007@163.com、haiyang0com@126.com、1311427547@qq.com、2249565243@qq.com、ajiao71@163.com、76136209@qq.com、1045219406@qq.com、814841277@qq.com、269850785@qq.com、791092326@qq.com、raoxiaoxi1989@163.com、923619458@qq.com、457802359@qq.com、1023842684@qq.com、biandaojian@163.com、441423715@qq.com、390363886@qq.com、lcl6659@163.com、2947685678@qq.com、823602243@qq.com、2559880803@qq.com、1372156068@qq.com、490972226@qq.com、2770412748@qq.com、markzjf@vip.qq.com、443413922@qq.com、450861493@qq.com、279077393@qq.com、pangjianhui_jlu@126.com、736299029@qq.com、zouy16@163.com、xjemiya@yeah.net、83165421@qq.com、ss290ss@163.com、2315406287@qq.com、liulong215@163.com、xzzll@vip.qq.com、wxyyfcto@163.com、lzsamuel@hotmail.com、18810410814@163.com、461495501@qq.com、569443642@qq.com、15639448544@163.com、184364921@qq.com、wujabon@163.com、293599505@qq.com、296361319@qq.com、191020813@qq.com、18272850686@163.com、hejueshan@163.com、duanhoukui@icloud.com、562603922@qq.com、785114691@qq.com、248245506@qq.com、1055131388@qq.com、anchen.happy@163.com、1505586488@qq.com、will.zhang.sd@outlook.com、iid99@qq.com、278882232@qq.com、369484399@qq.com、694686111@qq.com、207668802@qq.com、baianje@126.com、13268138382@163.com、thugs5895382@163.com、570730628@qq.com、1030637659@qq.com、798206849@qq.com、357278513@qq.com、1466726972@qq.com、345048305@qq.com、805886007@qq.com、478960515@qq.com、1076212909@qq.com、yuchangchen1983@163.com、yaokaigo@163.com、meimeigu@hotmail.com
7月14日中奖名单
机械键盘
532640777@qq.com
固态硬盘
2290943865@qq.com
鼠标垫
184872515@qq.com、15951672275@163.com、563643902@qq.com、834394651@qq.com、974513334@qq.com、535546185@qq.com、783629220@qq.com、、240288709@qq.com、349389405@qq.com、417717972@qq.com、2713160674@qq.com、2066808847@qq.com、1426477664@qq.com、glszht@21cn.com、250899930@qq.com、15074814437@163.com、hjdlshowtime000001@qq.com、wangqi0902@vip.qq.com、116996043@qq.com、415614987@qq.com
流应用体验红包
52381702@qq.com、64568616@163.com、751471703@qq.com、404645605@qq.com、35127884@qq.com、760027037@qq.com、zgxglx@163.com、250503986@qq.com、1219541174@qq.com、lbking666666@qq.com、1012844629@qq.com、200598067@qq.com、970473068@qq.com、godmap@sohu.com、24371216@qq.com、849214382@qq.com、df74@foxmail.com、zhaotongyuan@126.com、286810279@qq.com、sundafei2012@163.com、381282095@qq.com、415623574@qq.com、feiyuflyme@163.com、243313576@qq.com、1316926096@qq.com、425250386@qq.com、359001014@qq.com、bacg2137@126.com、idesign521@gmail.com、519089279@qq.com、572389066@qq.com、1193005330@qq.com、1107774262@qq.com、1154309574@qq.com、haojing1123@163.com、yueyue_6301@163.com、1144366105@qq.com、solomon.zjf@qq.com、1138593285@qq.com、xiena623@163.com、gbkhero@163.com、todayliu@hotmail.com、qwuxinhua@163.com、15167115113@163.com、708940108@qq.com、dingding5656@163.com、songszw315@live.com、1985730254@qq.com、caizhuorong@vip.qq.com、ranjian2010@yeah.net、mominghuan@qq.com、sunny_LD@yeah.net、1810205506@qq.com、316412258@qq.com、303559459@qq.com、123222119@qq.com、641583946@qq.com、1048412261@qq.com、942958320@qq.com、283325360@qq.com、939545842@qq.com、fd2020_wyy@163.com、2352180590@qq.com、315991942@qq.com、704175885@qq.com、314958617@qq.com、1286865813@qq.com、616159597@qq.com、897325483@qq.com、779276707@qq.com、byby01a@163.com、774616130@qq.com、903187702@qq.com、417439361@qq.com、416474849@qq.com、394010283@qq.com、592713255@qq.com、dongzhensong@126.com、879978713@qq.com、1148892079@qq.com、740619027@qq.com、451446771@qq.com、977952764@qq.com、30486634@qq.com、jaysionlue@vip.qq.com、447692862@qq.com、519204100@qq.com、naleyuan@sina.cn、1400101666@qq.com、1094790311@qq.com、icnhome@sina.com、470999709@qq.com、979448629@qq.com、247547749@qq.com、907953320@qq.com、majorgai@vip.qq.com、991243324@qq.com、632374191@qq.com、821218800@qq.com、77967552@qq.com
7月15日中奖名单
机械键盘
356402808@qq.com
固态硬盘
12377834@qq.com
鼠标垫
1432014230@qq.com、yl523146@163.com、2051758853@qq.com、1354226774@qq.com、li1261991@163.com、weikedw@163.com、jifeng118@163.com、1092792553@qq.com、871379171@qq.com、1757120988@qq.com、675733981@qq.com、921147687@qq.com、nnbabi@163.com
流应用体验红包
imzhpe@qq.com、1058902822@qq.com、zhangxueying0225@126.com、349389405@qq.com、1129445935@qq.com、819332405@qq.com、ifood8@foxmail.com、junjiemei87@163.com、369225994@qq.com、732005030@qq.com、pannj@outlook.com、406951272@qq.com、ylazxj@163.com、350801869@qq.com、809058362@qq.com、liyunsi99@163.com、961900832@qq.com、249048722@qq.com、justnow33@163.com、1282000569@qq.com、1476386060@qq.com、startdawn@126.com、278017459@qq.com、386763956@qq.com、1490410882@qq.com、1355180575@qq.com、2939446764@qq.com、hongliangmail@126.com、luomole@yeah.net、1073556814@qq.com、33390008@qq.com、582295447@qq.com、907416623@qq.com、51990145@qq.com、397070855@qq.com、jinqfg@126.com、1633308769@qq.com、1129248052@qq.com、xtm0001@sina.com、153736126@qq.com、jc198651@qq.com、1543860399@qq.com、、49030746@qq.com、pypzengqs@126.com、5377864@qq.com、912119013@qq.com、741679568@qq.com、ysq15849886222@qq.com、490846669@qq.com、xingfeng_sun@163.com、799610747@qq.com、164634334@qq.com、zhuogaopeng@163.com、lakshya@sohu.com、1317011208@qq.com、1598111569@qq.com、lxq88888888vip@163.com、276279299@qq.com、1020952183@qq.com、ljp_2005263@126.com、704969448@qq.com、andrewxsg@sina.com、524566125@qq.com、29571935@qq.com
活动说明及领奖办法
见http://ask.dcloud.net.cn/article/744·
收起阅读 »