


希望uni-app打包成app的时候能够把webview内核打包进去
在一些手机上经常会遇到,因为手机自带webview内核过低,导致页面上的一些问题,希望uni-app能自己打包上,调用自己的。
在一些手机上经常会遇到,因为手机自带webview内核过低,导致页面上的一些问题,希望uni-app能自己打包上,调用自己的。

uni-app中在同一个页面使用多个picker组件出现的一些问题以及解决方法
作为一个刚刚了解一点微信小程序就被迫改用uni-app的人来说,这个框架给我的感觉就是哪里都是坑。倒不是说框架本身问题很多,而是自己没有太多的参考对象。当初学微信的时候,遇到一点问题上百度搜真的是一搜一大把,而现在就是屈指可数。而且也没有什么教学视频,至少我当初入坑时,能搜到的视频还是要收费的。总之这一路走得不平坦,但也感觉收获了不少。现在依然有很多问题,但是学会了用微信小程序来转化成uni-app,很多时候思路都是一样的,至少具体写法有些不同。这也会让我很抓狂,毕竟,我真的是个新手,很多基础知识都不熟,文档也是看得头痛还不能理解。
这不,刚刚就把一个困扰了许久的问题解决了,思路正是来自微信小程序的。这是思路来源,感谢!https://segmentfault.com/a/1190000009797083
<block v-for="(student,index) in studentlist2" :key="index">
<view class="student-list-item padding-sm">
<image class="avatar" :src="student.avatar">
</image>
<view class="student-info padding-sm">
<view class="name font-md">{{student.name}}<span class="iconfont icon-yezi"></span></view>
<view class="student-id font-sm grey main-font-color">{{student.id}}</view>
</view>
<picker @change="bindPickerChange" :value="student.newindex" :range="array" :data-current="index">
<view class="uni-input">{{array[student.newindex]}}</view>
</picker>
</view>
<view class="border"></view>
</block>
这是视图层,用到是for循环实现一个学生列表。对没有及时签到的学生可以进行选择,故需要用到picker。可是问题就来了,有多个picker,里面的{{array[index]}}显示的内容都是由data中的同一个index控制的,这样,每一次改变其中一个picker的值时,所有的picker都会改变值。这个问题困扰了我许久。当时我就想如果可以得到当前改变的picker的index就好了,这样就可以指定改变的picker了。但是当时的我不知道如何获取。
我的疑点有以下几点:
1.如何获取当前的index?本来也是可以的,用一个函数,参数为student,然后在函数里写index=e.index不就好了?可是这里绑定的函数是@change="bindPickerChange",和普通的绑定不一样,我不知道如何传参。
- 然后就是我不知到为何在method中的bindPickerChange又是有一个参数e的。我知道是自己基础不好,对e的认识很浅。我试图用console.log来获取e,看看其内部究竟有哪些值,但结果并不好。
- 能不能用data-XXX呢?其实如果是在微信小程序里面,我肯定首选这个,但是在uni-app里,我一直以为不能用data-XXX,因为官方文档似乎没有,网上也没有找到(我的搜索水平太差了),或者说这是默认就可以的。总之,我直到看了搭档这样用以后才知道原来uni-app是可以用的。当时我还很惊讶地问他是怎么知道的,他说还是当初学小程序的时候我教他的。卧槽,这么interesting的吗?
今天终于在一篇解决微信小程序的文章里找到了思路,也解决了之前的疑点。
其实以上三点都是一样的。因为data-xxx是可以用的,而在e里面就是可以看到data-xxx的,这就是答案。
studentlist2: [
                    {
                        newindex:0,
                        avatar: '/static/lishi.jpg',
                        name: '楚秋然',
                        id: '2017082314'
                    },
                    {
                        newindex:1,
                        avatar: '/static/xinli.jpg',
                        name: '愧泽',
                        id: '2017082315'
                    }
                ]

bindPickerChange: function(e) {
                 const curindex = e.target.dataset.current
                console.log('picker发送选择改变,携带值为', e.target.value)
                console.log('picker发送选择改变,携带值为', curindex)
                this.studentlist2[curindex].newindex = e.target.value
                console.log("index="+this.studentlist.index)
            }
感觉自己是基础太差了。又没有人带,不然,这么easy的问题真的不该被卡住这么久。一个小白之所以会不自量力地写一篇文章也是想积累一些经验,和大家交流一下。而且,这个问题似乎都没有人写过,想着可能是太简单了没有必要写。但是如果有像我一样的小白,希望能对你有帮助。毕竟,当初的我是多么渴望有这么一篇文章来帮助我。
收起阅读 »开了一个WordPress使用uni-app开发app和小程序的教程,来捧个场吧。
如题,开了一个WordPress使用uni-app开发app和小程序的教程,各位大神都来捧个场吧,主要巩固一下技术,顺便回馈一下小白,超级超级大神绕道,不喜勿喷啊!
看完此教程,你将学到什么:
- WordPress深度二开
- WordPress主题制作基础
- PHP基础
- 接口设计基础
- 用uni-app做一个属于你自己的app
教程目录(长期更新)
1、WordPress安装
2、开发一个简单的WordPress主题
3、使用uni-app框架创建一个app项目
4、用uni-app制作首页幻灯片
5、用WordPress编写app幻灯片接口
6、uni-app请求接口以及生命周期函数
7、uni-app渲染幻灯片数据
8、用uni-app制作首页文章列表
9、WordPress开发首页文章列表接口
10、uni-app:渲染app的首页文章数据
11、uni-app制作app底部导航栏
12、uni-app新建发现页面并加入底部tab
13、uni-app开发发现界面(九宫格布局)
14、WordPress开发发现界面接口
15、uni-app渲染发现界面
16、uni-app新建用户页面并加入tab
17、开始登录与注册
18、uni-app制作登录页面
19、WordPress开发登录接口
20、uni-app登录
21、uni-app开发注册页面【包含视频】
22、用WordPress开发注册接口【包含视频】(2020年02月19日,更新注册接口)
23、 实现注册功能
24、用户中心:为什么要使用Token?
25、实现Token第一步
27、实现Token第二步
28、封装Token类
29、uni-app实现用户是否登录的判断
30、uni-app实现登录保存Token
番外
官方交流群:824144151
问题解决
1、关于接口跨域问题
教程地址:
WordPress开发app(小程序)接口开发教程
技术援助
教程看不懂?需要一对一技术援助服务?点击这里
收起阅读 »针对plus.runtime.install在安卓9.0+上无法执行的解决方案
先确保你的IDE使用的是HBuilderX, 老HBuilder用户请升级HBuilderX。
云打包配置
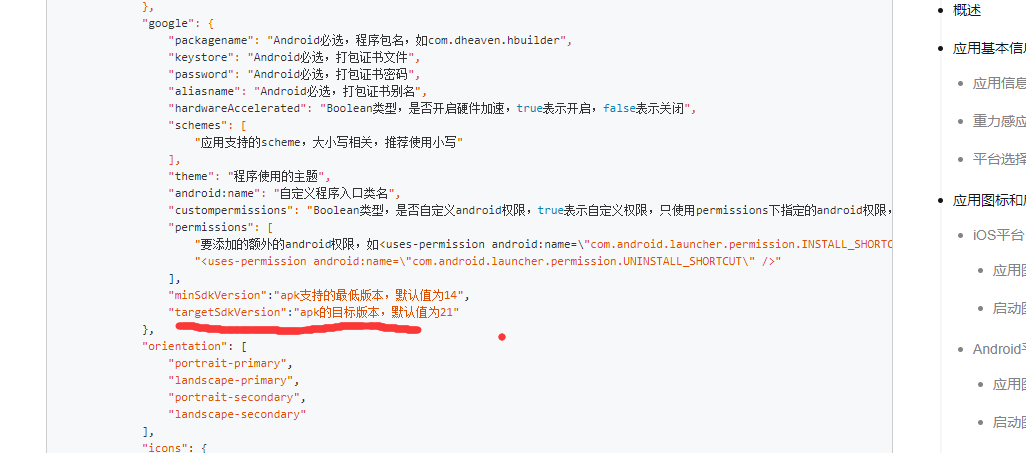
云打包时配置manifest.json将targetSdkVersion改为26或更高 最高建议28。
5+应用:
http://ask.dcloud.net.cn/article/94
uniapp:
https://uniapp.dcloud.io/collocation/manifest

如果提交云端打包后调用plus.runtime.install无法安装apk文件,请添加以下权限
<uses-permission android:name=\"android.permission.INSTALL_PACKAGES\"/>
<uses-permission android:name=\"android.permission.REQUEST_INSTALL_PACKAGES\"/>如何添加权限?可参考。
TIPS
云打包配置修改完毕后。请重新提交云端打包。生成你的APK,该APK才有调用plus.runtime.install安装APK的能力。
离线打包配置
-
将build.gradle中的targetSdkVersion调到26或者更高。
-
在Androidmanifest.xml添加provider节点,将里面的io.dcloud.HBuilder改成自己应用的包名。
<provider android:name="io.dcloud.common.util.DCloud_FileProvider" android:authorities="XXXX.XXX.XX(当前的应用包名).dc.fileprovider" android:exported="false" android:grantUriPermissions="true"> <meta-data android:name="android.support.FILE_PROVIDER_PATHS" android:resource="@xml/dcloud_file_provider" /> </provider> -
在Androidmanifest.xml中添加权限。
注:最新版SDK已经将权限加入基础库里面使用时请下载最新版SDK<uses-permission android:name="android.permission.REQUEST_INSTALL_PACKAGES"/>
配置完权限请重新编译生成APK。该APK才有调用plus.runtime.install安装APK的能力。
先确保你的IDE使用的是HBuilderX, 老HBuilder用户请升级HBuilderX。
云打包配置
云打包时配置manifest.json将targetSdkVersion改为26或更高 最高建议28。
5+应用:
http://ask.dcloud.net.cn/article/94
uniapp:
https://uniapp.dcloud.io/collocation/manifest
如果提交云端打包后调用plus.runtime.install无法安装apk文件,请添加以下权限
<uses-permission android:name=\"android.permission.INSTALL_PACKAGES\"/>
<uses-permission android:name=\"android.permission.REQUEST_INSTALL_PACKAGES\"/>如何添加权限?可参考。
TIPS
云打包配置修改完毕后。请重新提交云端打包。生成你的APK,该APK才有调用plus.runtime.install安装APK的能力。
离线打包配置
-
将build.gradle中的targetSdkVersion调到26或者更高。
-
在Androidmanifest.xml添加provider节点,将里面的io.dcloud.HBuilder改成自己应用的包名。
<provider android:name="io.dcloud.common.util.DCloud_FileProvider" android:authorities="XXXX.XXX.XX(当前的应用包名).dc.fileprovider" android:exported="false" android:grantUriPermissions="true"> <meta-data android:name="android.support.FILE_PROVIDER_PATHS" android:resource="@xml/dcloud_file_provider" /> </provider> -
在Androidmanifest.xml中添加权限。
注:最新版SDK已经将权限加入基础库里面使用时请下载最新版SDK<uses-permission android:name="android.permission.REQUEST_INSTALL_PACKAGES"/>
配置完权限请重新编译生成APK。该APK才有调用plus.runtime.install安装APK的能力。
收起阅读 »
uni-app/mpvue 插件开发大赛启动,iPhone Xs Max等奖品等你来拿!
更新:大赛评奖结果揭晓,详见:https://ask.dcloud.net.cn/article/35939

基于vue,开发H5、小程序及App等多端应用,已经成为前端技术界的热门话题。
但vue周边生态很多组件都因为操作dom、window而无法跨多端。
为进一步活跃vue多端开发生态,为开发者提供更多方便的轮子,作为vue开发多端框架的2大主力,uni-app与mpvue团队,联合举办插件开发大赛。
这些插件中涉及小程序的均可用于uni-app和mpvue的开发者。涉及H5和App多端使用的,仅限于uni-app(mpvue不支持h5和App)
大赛活动时间及评奖方式
- 即日起至2019年4月30日,参赛插件提交发布。超过4月30日的插件可以提交但不再评奖。
- 2019年5月15日起,评委开始根据插件的下载量、插件市场评分、github star(如有)、评委主观评价等综合权重打分,评选获奖者。
- 2019年5月20日,公布获奖名单并发放奖品
奖品设置
一等奖:
iphone Xs Max 3名
二等奖:
Samsung 32寸4k显示器 8名
三等奖:
Kindle Paperwhite 16名
贡献奖:
未获得以上奖项,仍有机会评选贡献奖,奖品为uni-app纪念T恤,50名。
其他:
获奖作者将进入DCloud的vip开发者群,享受优先的技术支持和bug受理。
获奖作者将得到宣传报道,有助于为简历或接外包资质添彩。
参赛方式
- 登陆插件市场,https://ext.dcloud.net.cn/
- 点击发布插件,插件开发指南参考:https://ask.dcloud.net.cn/article/35408
- 填写插件描述信息并提交发布
- 插件有多种类型,包括组件、js sdk、项目/页面模板、原生插件,均可参赛。但不接受只能用于h5端的插件。
其他注意事项
- 越早提交插件,下载量越大,有利于被评选获奖
- 插件市场可以同时提交npm地址,但必须有zip包。由于npm下载量可以刷,无法作为评选依据,请理解
- 插件市场的下载和评分都有反作弊系统,欢迎向朋友正常推广你的插件,但不要刷数据,违规者取消参赛资格
- 插件市场提供了赞赏,并即将上线付费插件购买,插件作者可以有更多收益
- 一位作者提交多个插件,每个插件都独立参与评奖。允许一位作者领取多个奖品
如果你想了解广大开发者都需要什么插件,可以点击插件市场右上角的已发布需求
本活动解释权归DCloud uni-app团队和mpvue团队
更新:感谢尤雨溪对大赛的宣传支持

更新:大赛评奖结果揭晓,详见:https://ask.dcloud.net.cn/article/35939
基于vue,开发H5、小程序及App等多端应用,已经成为前端技术界的热门话题。
但vue周边生态很多组件都因为操作dom、window而无法跨多端。
为进一步活跃vue多端开发生态,为开发者提供更多方便的轮子,作为vue开发多端框架的2大主力,uni-app与mpvue团队,联合举办插件开发大赛。
这些插件中涉及小程序的均可用于uni-app和mpvue的开发者。涉及H5和App多端使用的,仅限于uni-app(mpvue不支持h5和App)
大赛活动时间及评奖方式
- 即日起至2019年4月30日,参赛插件提交发布。超过4月30日的插件可以提交但不再评奖。
- 2019年5月15日起,评委开始根据插件的下载量、插件市场评分、github star(如有)、评委主观评价等综合权重打分,评选获奖者。
- 2019年5月20日,公布获奖名单并发放奖品
奖品设置
一等奖:
iphone Xs Max 3名
二等奖:
Samsung 32寸4k显示器 8名
三等奖:
Kindle Paperwhite 16名
贡献奖:
未获得以上奖项,仍有机会评选贡献奖,奖品为uni-app纪念T恤,50名。
其他:
获奖作者将进入DCloud的vip开发者群,享受优先的技术支持和bug受理。
获奖作者将得到宣传报道,有助于为简历或接外包资质添彩。
参赛方式
- 登陆插件市场,https://ext.dcloud.net.cn/
- 点击发布插件,插件开发指南参考:https://ask.dcloud.net.cn/article/35408
- 填写插件描述信息并提交发布
- 插件有多种类型,包括组件、js sdk、项目/页面模板、原生插件,均可参赛。但不接受只能用于h5端的插件。
其他注意事项
- 越早提交插件,下载量越大,有利于被评选获奖
- 插件市场可以同时提交npm地址,但必须有zip包。由于npm下载量可以刷,无法作为评选依据,请理解
- 插件市场的下载和评分都有反作弊系统,欢迎向朋友正常推广你的插件,但不要刷数据,违规者取消参赛资格
- 插件市场提供了赞赏,并即将上线付费插件购买,插件作者可以有更多收益
- 一位作者提交多个插件,每个插件都独立参与评奖。允许一位作者领取多个奖品
如果你想了解广大开发者都需要什么插件,可以点击插件市场右上角的已发布需求
本活动解释权归DCloud uni-app团队和mpvue团队
更新:感谢尤雨溪对大赛的宣传支持
uni-app 1.8发布,微信端性能翻倍,并增加若干 Vue 语法支持
背景
uni-app在初期借鉴了mpvue,实现了微信小程序端的快速兼容,感谢美团点评团队对于开源社区的贡献!
但不少开发者抱怨mpvue支持的vue语法少,某些场景性能有问题。
为了让uni-app的开发者更满意,uni-app团队经过数月研发,全新重写框架,大幅提升了微信端运行性能、支持了更多vue语法。
新版特性1:性能翻倍
基于mpvue的老框架和新框架是两种编译模式,主要区别在于组件化开发的实现机制不同;
mpvue将用户编写的Vue组件,编译为WXML中的模板(template),变相实现组件化开发;我们称这种编译模式为template模板模式;uni-app新框架则将用户编写的Vue组件,编译为微信小程序自定义组件,实现了更高的性能;我们称这种编译模式为自定义组件模式
基于自定义组件的新框架完成后,我们构造了如下测试模型:
- 构造一个列表界面,每个列表项为一个自定义组件
- 上拉加载触发数据更新,每次从本地读取静态数据,屏蔽网络差异
然后分别使用template模板模式、自定义组件模式,在同一台手机(vivo nex)上进行多次测试,然后求其平均值,获取如下结果:
| 组件数量 | 老框架(mpvue) | 新框架 |
|---|---|---|
| 200 | 204ms | 129ms |
| 400 | 280ms | 139ms |
| 800 | 341ms | 180ms |
| 1000 | 653ms | 196ms |
上表时间毫秒是指,从给变量赋值,到界面更新渲染完毕之间的耗时。
从测试数据来看,自定义组件模式(新框架)在复杂页面下,性能有翻倍提升!特别是数据越多、组件越复杂的页面,性能提升越大!
新版特性2:更多Vue语法支持
新版支持了更多 Vue 语法,详细如下:
- 支持过滤器
filter - 支持比较复杂的
JavaScript渲染表达式 - 支持在
template内使用methods中的函数 - 支持
v-html(同rich-text的解析) - 支持
v-slot新语法 - 支持解构插槽
Prop设置默认值 - 支持
slot后备内容 - 组件支持原生事件绑定,如:
@tap.native
新版不支持的 vue 语法
- class不支持绑定Obejct变量(使用字符串的形式绑定)
- 不支持事件修饰符:prevent、passive(在App与小程序平台,使用stop修饰符,既可以阻止冒泡也能阻止默认行为)
- 不支持render、inline-template、X-Templates、keep-alive、transition
- 不支持使用 Vue.use 的方式注册全局组件(在main.js使用Vue.component的方式引入)
新旧版本兼容策略
为兼容历史项目,uni-app 现阶段同时支持老的template模板模式、和新的自定义组件模式两种模式,默认策略如下:
- HBuilderX 1.8.0+ 新创建的项目,在微信端默认会启用新的框架;
- 历史项目默认使用老框架。如需启动新框架请按下面配置开启。
- 但注意1.7.3群测版默认使用了新框架,升级到1.8后,也需要手动配置开启新框架。
开发者可在manifest.json的源码视图里配置, manifest.json -> mp-weixin -> usingComponents切换编译模式,如下:
// manifest.json
{
    // ...
    /* 小程序特有相关 */
    "mp-weixin": {
        "usingComponents":true //是否启用`自定义组件模式`,为true表示新的`自定义组件模式`,否则启用老的`template模板模式`
    }
}
Tips:
- 为保证自定义组件兼容性,运行到微信开发者工具时,建议将微信基础库设置为最新版本。
- 如果你使用了新增的vue语法,请注意只有h5和微信支持这些新语法,编译到其他平台时,要用条件编译处理。
新版开发注意事项
新框架基于微信小程序自定义组件实现,在进行自定义组件开发(页面开发不影响)时,需注意部分约束,详见:https://ask.dcloud.net.cn/article/35851
性能优化建议
- 模板中不建议直接使用
object
<!-- 低性能写法 -->
<uni-title title="标题文字" note="描述信息" show-extra-icon="true" :extra-icon="{color: '#4cd964',size: '22',type: 'spinner'}"></uni-title>
<!-- 高性能写法 -->
<template>
    <view>
        <uni-title title="标题文字" note="描述信息" show-extra-icon="true" :extra-icon="extraIcon"></uni-title>
    </view>
</template>
<script>
export default {
    data() {
        return {
            extraIcon:{color: '#4cd964',size: '22',type: 'spinner'}
        }
    }
}
</script>
- 在模板中未使用的数据不建议定义在
data中,未使用的数据一律移除到 vm 外边定义
<!-- 低性能写法 -->
<template>
    <view>
        {{name}}
    </view>
</template>
<script>
export default {
    data() {
        return {
            name:'',
            types:true
        }
    },
    onLoad(){
        if(this.types){
            this.name = '张三';
        } else {
            this.name = '李四';
        }
    }
}
</script>
<!-- 高性能写法 -->
<template>
<view>
{{name}}
</view>
</template>
<script>
let types = true ;
export default {
data() {
return {
name:''
}
},
onLoad(){
if(types){
this.name = '张三';
} else {
this.name = '李四';
}
}
}
</script>- 为提升开发体验,新版本增加了部分
Vue语法,其实这些语法在微信小程序中本身是不支持的;为支持这些语法,uni-app会在编译、运行时分别做一些额外的工作,若开发者希望追求性能极致,则建议尽量少用或者不用新增语法。
后续
新框架会陆续把新编译器迁移到其他小程序端上。
升级注意
如果你的项目是cli创建的,记得编译器在你的项目下,不会随着HBuilderX升级而升级,你需要npm update手动升级编译器。
收起阅读 »uni-app 解决 app中调用微信支付一直返回 -1 的错误
官方文档和示例并没有写清楚。导致app中调用微信支付一直返回 -1 的错误,最终通过百度找到一位大佬成功接通iOS版微信支付、支付宝的案例,结合文档iOS和安卓版orderInfo字段数据格式不一致的情况,稍加修改后调用微信支付成功。以下为安卓版微信支付的调用代码。苹果版请参考点击此处查看iOS版完整案例
                // 安卓调用微信支付
                uni.requestPayment({
                    provider: "wxpay",
                    timeStamp: JSON.stringify(result2.timestamp),
                    nonceStr: result2.noncestr,
                    package: result2.package,
                    signType:"MD5",
                    paySign: result2.sign,
                    orderInfo: JSON.stringify({
                        appid: result2.appid,
                        noncestr: result2.noncestr,
                        package: result2.package,
                        partnerid: result2.partnerid,
                        prepayid: result2.prepayid,
                        timestamp: result2.timestamp,
                        sign: result2.sign,
                    }),
                    success:function(res){
                        uni.showToast({
                            title:"支付成功",
                            icon:"success",
                            duration:2000,
                            complete:function(){

                            }
                        });
                    },
                    fail:function(res){
                        // console.log(JSON.stringify(res));
                        uni.showModal({
                             content: "支付失败,原因为: "   res.errMsg,
                             showCancel: false
                         })
                        console.log('fail:'   JSON.stringify(res));
                    }
});官方文档和示例并没有写清楚。导致app中调用微信支付一直返回 -1 的错误,最终通过百度找到一位大佬成功接通iOS版微信支付、支付宝的案例,结合文档iOS和安卓版orderInfo字段数据格式不一致的情况,稍加修改后调用微信支付成功。以下为安卓版微信支付的调用代码。苹果版请参考点击此处查看iOS版完整案例
                // 安卓调用微信支付
                uni.requestPayment({
                    provider: "wxpay",
                    timeStamp: JSON.stringify(result2.timestamp),
                    nonceStr: result2.noncestr,
                    package: result2.package,
                    signType:"MD5",
                    paySign: result2.sign,
                    orderInfo: JSON.stringify({
                        appid: result2.appid,
                        noncestr: result2.noncestr,
                        package: result2.package,
                        partnerid: result2.partnerid,
                        prepayid: result2.prepayid,
                        timestamp: result2.timestamp,
                        sign: result2.sign,
                    }),
                    success:function(res){
                        uni.showToast({
                            title:"支付成功",
                            icon:"success",
                            duration:2000,
                            complete:function(){

                            }
                        });
                    },
                    fail:function(res){
                        // console.log(JSON.stringify(res));
                        uni.showModal({
                             content: "支付失败,原因为: "   res.errMsg,
                             showCancel: false
                         })
                        console.log('fail:'   JSON.stringify(res));
                    }
                });
【经验分享】pickers 省市区多级联动设置默认值
【介绍】
当我们使用 mui.PopPicker 创建省、市、区三级联动,并且想要选中默认值的时候,
会出现只能选中第一级,无法选择第二级、第三级。
【原因】
这是因为 pickers 在设置默认值的时候是异步执行,并且有动画效果,我们就不能直接通过以下代码设置:
picker.pickers[0].setSelectedValue(100);
picker.pickers[1].setSelectedValue(120);
picker.pickers[2].setSelectedValue(123);
【解决】
如何解决?使用递归的方式调用即可
// 初始化选择器默认值
function initAddressSelector(index) {
if (index < picker.pickers.length && defaultData[index]) {
picker.pickers[index].setSelectedValue(defaultData[index], 0, initAddressSelector(index+1));
}
}
说明:调用的时候默认 index 传 0 ,这样代码会从第一个 picker 开始选择,setSelectedValue 的 第二参数为动画时长,这里设置 0 (单位:毫秒)即可,
setSelectedValue 的第三个参数为设置默认值成功之后回调,这里我们回调自己,并且下标 +1,这样就可以以此把 1、2、3 级全部设置上。
要设置的默认值可以放入一个数组里面,这样在递归的时候可以通过 index 下标获取到每一级的默认值。
【解决办法】打开文件服务失败,请尝试拔掉数据线后重新连接手机
当使用 HBuilder 真机运行编写好的 app 时,若遇到以下提示,重启手机即可解决:
正在建立手机连接...
正在同步手机端程序文件...
打开文件服务失败,请尝试拔掉数据线后重新连接手机
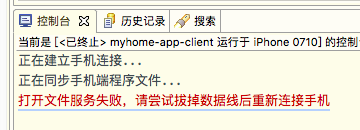
使用 iPhone6s 连接电脑,正常真机运行,当直接拔掉数据线之后重新连接电脑会出现此问题,
遇到此问题时只需要重启手机重新运行即可,或者尽量避免直接拔数据线,而是采用停止运行之后再拔。
当使用 HBuilder 真机运行编写好的 app 时,若遇到以下提示,重启手机即可解决:
正在建立手机连接...
正在同步手机端程序文件...
打开文件服务失败,请尝试拔掉数据线后重新连接手机
使用 iPhone6s 连接电脑,正常真机运行,当直接拔掉数据线之后重新连接电脑会出现此问题,
遇到此问题时只需要重启手机重新运行即可,或者尽量避免直接拔数据线,而是采用停止运行之后再拔。

android 多渠道打包白屏问题的解决
多渠道打包,当applicationId ,与包名不一致时,Uni-app会出现白屏问题
原因,PdrR 不能引用到 包资源文件
解决方案:
1、在工程 新建包io.dcloud ,创建PdrR.java
2、复制源码到创建的java文件里面,修改 init()方法
public static void init(Context var0) {
if (var0 != null) {
a = " ";//你的包名,Androidmanifest里的包名
}
}
3、Rebuild project 一下,会报错,因为同时存在两个PdrR.java文件(忽略报的警告)
4、去app/build/intermediates/javac/ 你的app包名/ 目录下找到 编译生成的PdrR.class文件
5、用压缩器打开5plus.aar 包,打开里面的classes.jar,把自己生成的PdrR.class 进行替换
直接用解压文件打开,然后找到原先的PdrR.class删除,然后复制进去jar包里面即可
6、重新导入修改的aar包
