


关于地图组件拿不到中心点 getCenterLocation 问题,解决方案
可以在APP下使用 plus 5+ 方法获取
// #ifdef APP-PLUS
this.mapContext.$getAppMap().getCurrentCenter((state, point) => {
    console.log(state, point);
    if (0 == state) {
           this.geocodeRegeo(point)
    } else {
          console.log("Failed!");
    }
    });
// #endif
// #ifdef H5
this.mapContext.getCenterLocation({
    success: (res) => {
        this.geocodeRegeo(res)
    }
    });
// #endif 可以在APP下使用 plus 5+ 方法获取
// #ifdef APP-PLUS
this.mapContext.$getAppMap().getCurrentCenter((state, point) => {
    console.log(state, point);
    if (0 == state) {
           this.geocodeRegeo(point)
    } else {
          console.log("Failed!");
    }
    });
// #endif
// #ifdef H5
this.mapContext.getCenterLocation({
    success: (res) => {
        this.geocodeRegeo(res)
    }
    });
// #endif 
uni-app 能否搞一套声明式UI呢,声明式UI是趋势呢,能极大的提高开发效率呢
鸿蒙的开发思路就是: 声明式UI + TS 这种模式用着很舒服呢
鸿蒙的开发思路就是: 声明式UI + TS 这种模式用着很舒服呢
flutter3.32调用deepseek客户端ai流式模板
flutter3-win-deepseek:最新研发 flutter3.32+dio+deepseek-v3+window_manager 接入 deepseek-v3 大模型。支持侧边栏收缩、本地会话存储、代码块高亮、代码块横向滚动、表格边框线、图片100%宽度渲染、图片预览、链接跳转。
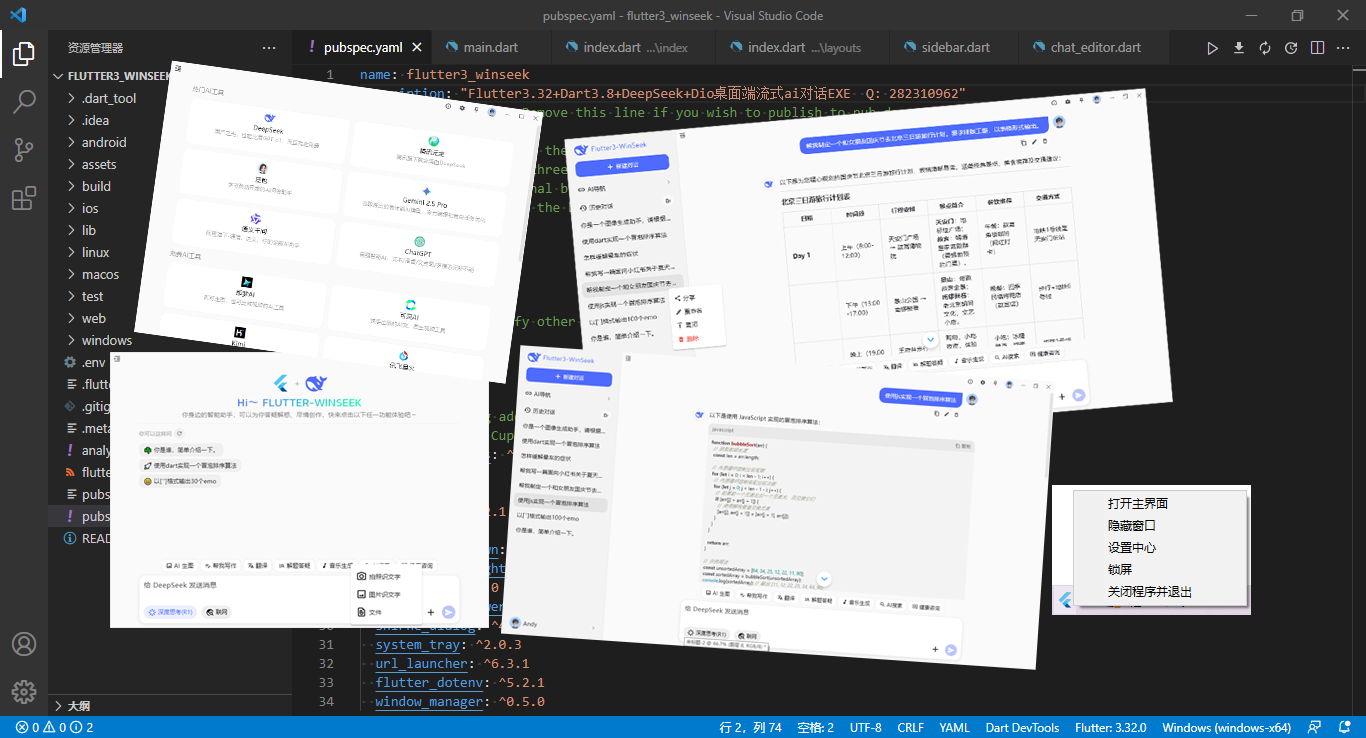
技术栈
- 开发工具:VScode
- 技术框架:flutter3.32.0+dart3.8.0
- 对话大模型:deepseek-v3
- 流请求:dio^5.8.0+1
- 窗口管理:window_manager^0.5.0
- 托盘管理:system_tray^2.0.3
- 路由/状态管理:get^4.7.2
- 存储服务:get_storage^2.1.1
- markdown解析:flutter_markdown^0.7.7
- 高亮组件:flutter_highlight^0.7.0
- 环境变量配置:flutter_dotenv^5.2.1

项目特性
- 支持侧边栏收缩/展开
- 支持多轮对话、代码高亮、本地存储会话
- 支持代码块横向滚动、复制代码功能
- 支持图片100%宽度渲染、在线图片预览
- 支持网络链接跳转、表格功能
- 自定义无边框窗口、托盘图标


项目框架目录

flutter3-winseek桌面端ai对话系统已经更新到我的原创作品集。
flutter3.32+deepseek+dio客户端ai流式对话Exe


如果想要了解更多的技术实现细节的话,可以去看看下面这篇分享文章。
flutter3-winseek客户端AI实例|Flutter3.32+DeepSeek流式ai对话模板Exe
热文推荐
flutter3-deepseek流式AI模板|Flutter3.27+Dio+DeepSeeek聊天ai助手
uniapp+vue3+deepseek+uv-ui跨端实战仿deepseek/豆包流式ai聊天对话助手
vue3-webseek网页版AI问答|Vite6+DeepSeek+Arco流式ai聊天打字效果
Electron35-DeepSeek桌面端AI系统|vue3.5+electron+arco客户端ai模板
Vue3-DeepSeek-Chat流式AI对话|vite6+vant4+deepseek智能ai聊天助手
flutter3-dymall仿抖音直播商城|Flutter3.27短视频+直播+聊天App实例
Vite5+Electron聊天室|electron31跨平台仿微信EXE客户端|vue3聊天程序
Tauri2.0-Vue3OS桌面端os平台|tauri2+vite6+arco电脑版OS管理系统
uniapp+vue3聊天室|uni-app+vite4+uv-ui跨端仿微信app聊天语音/朋友圈
flutter3-win-deepseek:最新研发 flutter3.32+dio+deepseek-v3+window_manager 接入 deepseek-v3 大模型。支持侧边栏收缩、本地会话存储、代码块高亮、代码块横向滚动、表格边框线、图片100%宽度渲染、图片预览、链接跳转。
技术栈
- 开发工具:VScode
- 技术框架:flutter3.32.0+dart3.8.0
- 对话大模型:deepseek-v3
- 流请求:dio^5.8.0+1
- 窗口管理:window_manager^0.5.0
- 托盘管理:system_tray^2.0.3
- 路由/状态管理:get^4.7.2
- 存储服务:get_storage^2.1.1
- markdown解析:flutter_markdown^0.7.7
- 高亮组件:flutter_highlight^0.7.0
- 环境变量配置:flutter_dotenv^5.2.1
项目特性
- 支持侧边栏收缩/展开
- 支持多轮对话、代码高亮、本地存储会话
- 支持代码块横向滚动、复制代码功能
- 支持图片100%宽度渲染、在线图片预览
- 支持网络链接跳转、表格功能
- 自定义无边框窗口、托盘图标
项目框架目录
flutter3-winseek桌面端ai对话系统已经更新到我的原创作品集。
flutter3.32+deepseek+dio客户端ai流式对话Exe
如果想要了解更多的技术实现细节的话,可以去看看下面这篇分享文章。
flutter3-winseek客户端AI实例|Flutter3.32+DeepSeek流式ai对话模板Exe
热文推荐
flutter3-deepseek流式AI模板|Flutter3.27+Dio+DeepSeeek聊天ai助手
uniapp+vue3+deepseek+uv-ui跨端实战仿deepseek/豆包流式ai聊天对话助手
vue3-webseek网页版AI问答|Vite6+DeepSeek+Arco流式ai聊天打字效果
Electron35-DeepSeek桌面端AI系统|vue3.5+electron+arco客户端ai模板
Vue3-DeepSeek-Chat流式AI对话|vite6+vant4+deepseek智能ai聊天助手
flutter3-dymall仿抖音直播商城|Flutter3.27短视频+直播+聊天App实例
Vite5+Electron聊天室|electron31跨平台仿微信EXE客户端|vue3聊天程序
Tauri2.0-Vue3OS桌面端os平台|tauri2+vite6+arco电脑版OS管理系统
uniapp+vue3聊天室|uni-app+vite4+uv-ui跨端仿微信app聊天语音/朋友圈
unipp---HarmonyOS 应用开发实战
HarmonyOS 应用开发实战指南
1. 开篇:为什么选择 HarmonyOS?
最近在开发鸿蒙应用时,发现很多开发者都在问:为什么要选择 HarmonyOS?这里分享一下我的看法:
-
生态优势
- 华为手机用户基数大,市场潜力大
- 开发者支持力度大,文档更新及时
- 应用场景丰富,从手机到智能家居都有覆盖
-
技术优势
- 分布式架构确实好用,一次开发多端运行
- 性能表现不错,特别是启动速度
- 安全机制做得很到位,对开发者友好
-
开发体验
- Vue 3 开发模式,上手快
- TypeScript 支持,代码质量有保障
- 原生能力调用方便,API 设计合理
2. 为什么选择 uni-app x 开发鸿蒙应用?
2.1 降低开发门槛
-
不用学鸿蒙原生开发
- 不用学 ArkTS,省时省力
- 不用研究鸿蒙原生组件,直接用 Vue 组件
- 不用适应鸿蒙特有的开发模式,保持原有开发习惯
-
用熟悉的技术栈
- Vue 3 语法,写起来顺手
- TypeScript 类型检查,减少 bug
- 组件化开发,代码复用方便
-
上手快
- 有 Vue 经验的直接开干
- 学习成本低,一周就能上手
- 遇到问题社区都能找到答案
2.2 开发效率提升
-
跨平台开发
- 一套代码,iOS、Android、鸿蒙都能跑
- 不用为每个平台写一套代码
- 维护成本大大降低
-
组件库丰富
- 内置组件够用,不用重复造轮子
- 自定义组件方便,复用性强
- 社区组件多,能解决大部分需求
-
工具链完善
- HBuilderX 开发体验好
- 调试方便,问题定位快
- 插件生态丰富,开发效率高
2.3 实际开发优势
-
代码维护
- 代码风格统一,团队协作方便
- 目录结构清晰,找文件快
- 代码复用性强,减少重复工作
-
性能表现
- 性能接近原生,用户体验好
- 渲染机制优化得不错
- 内存管理做得好,不容易卡顿
-
发布部署
- 打包流程简单,一键发布
- 版本管理方便,回滚容易
- 更新机制完善,用户无感知
2.4 实际案例分享
-
开发周期
- 原生开发:2-3个月
- uni-app x:1个月搞定
- 效率提升:50%以上
-
团队配置
- 原生开发:需要专门的鸿蒙工程师
- uni-app x:前端工程师就能干
- 人力成本:省了30%以上
-
维护成本
- 原生开发:要维护多套代码
- uni-app x:一套代码搞定
- 维护效率:提升40%以上
2.5 踩过的坑
-
性能优化
- 组件不要嵌套太深
- 注意内存泄漏问题
- 长列表要用虚拟列表
-
兼容性
- 不同设备表现可能不一样
- 横竖屏切换要测试
- 不同系统版本要适配
-
原生能力
- API 可能有兼容性问题
- 错误处理要做好
- 权限申请要规范
3. 开发环境准备
3.1 必需工具
-
DevEco Studio
- 下载地址:https://developer.harmonyos.com/cn/develop/deveco-studio
- 建议版本:最新稳定版
-
HBuilderX
- 下载地址:https://www.dcloud.io/hbuilderx.html
- 建议版本:3.8.0 及以上
- 安装注意:需要安装 uni-app x 插件
3.2 环境配置
# 检查 Node.js 版本
node -v  # 建议 16.x 以上

# 检查 npm 版本
npm -v   # 建议 8.x 以上

# 安装 uni-app x 命令行工具
npm install -g @dcloudio/uni-app-x-cli
4. 实战:系统信息展示应用
4.1 项目结构
project/
├── src/
│   ├── pages/
│   │   └── index/
│   │       ├── index.uvue    # 主页面
│   │       └── index.uts     # 页面逻辑
│   │
│   ├── static/              # 静态资源
│   └── manifest.json        # 项目配置
└── package.json
4.2 核心代码实现
4.2.1 页面结构(index.uvue)
<template>
  <view>
    <!-- 顶部标题 -->
    <view class="header">
      <text class="title">系统信息</text>
    </view>

    <!-- 系统信息展示区 -->
    <scroll-view class="system-info" scroll-y="true">
      <!-- 应用信息卡片 -->
      <view class="info-section">
        <text class="section-title">应用信息</text>
        <view class="info-item">
          <text class="label">应用名称:</text>
          <text class="value">{{systemInfo.appName}}</text>
        </view>
        <!-- 其他应用信息... -->
      </view>

      <!-- 其他信息卡片... -->
    </scroll-view>
  </view>
</template>
4.2.2 业务逻辑(index.uts)
// 系统信息接口定义
interface SystemInfo {
  // 应用信息
  appId: string;
  appName: string;
  appVersion: string;
  // ... 其他属性
}

export default {
  data() {
    return {
      systemInfo: {} as SystemInfo
    }
  },

  onLoad() {
    // 获取系统信息
    this.getSystemInfo()
  },

  methods: {
    getSystemInfo() {
      uni.getSystemInfo({
        success: (res: SystemInfo) => {
          this.systemInfo = res
          console.log('系统信息获取成功:', res)
        },
        fail: (err) => {
          console.error('系统信息获取失败:', err)
          uni.showToast({
            title: '获取系统信息失败',
            icon: 'none'
          })
        }
      })
    }
  }
}
4.3 样式优化
/* 卡片样式 */
.info-section {
  margin: 10px;
  padding: 15px;
  background-color: #fff;
  border-radius: 8px;
  box-shadow: 0 2px 4px rgba(0,0,0,0.1);
}

/* 标题样式 */
.section-title {
  font-size: 16px;
  font-weight: bold;
  color: #333;
  margin-bottom: 12px;
  padding-bottom: 8px;
  border-bottom: 1px solid #eee;
}

/* 信息项样式 */
.info-item {
  margin: 8px 0;
  display: flex;
  align-items: center;
}

.label {
  color: #666;
  width: 100px;
  font-size: 14px;
}

.value {
  color: #333;
  flex: 1;
  font-size: 14px;
  word-break: break-all;
}
5. 开发经验分享
5.1 常见坑点
-
系统信息获取
- 某些设备可能不支持部分属性
- 需要做好空值处理
- 建议添加错误处理
-
界面适配
- 不同设备屏幕尺寸差异大
- 需要适配横竖屏
- 注意安全区域
-
性能优化
- 避免频繁获取系统信息
- 合理使用缓存
- 注意内存管理
5.2 调试技巧
-
日志输出
// 开发环境日志 if (process.env.NODE_ENV === 'development') { console.log('调试信息:', data) } -
错误处理
try {
// 可能出错的代码
} catch (error) {
console.error('错误信息:', error)
uni.showToast({
title: '操作失败',
icon: 'none'
})
}
5.3 发布注意事项
-
版本号管理
- 遵循语义化版本
- 记录更新日志
- 做好版本兼容
-
性能测试
- 多设备测试
- 压力测试
- 内存泄漏检测
-
安全考虑
- 敏感信息加密
- 权限最小化
- 数据安全存储
6. 进阶开发
6.1 原生能力调用
// 调用相机示例
uni.chooseImage({
  count: 1,
  success: (res) => {
    console.log('图片选择成功:', res)
  }
})

// 调用传感器示例
uni.startAccelerometer({
  interval: 'game',
  success: () => {
    console.log('加速度传感器启动成功')
  }
})
6.2 性能优化实践
-
图片优化
- 使用适当的图片格式
- 控制图片大小
- 实现懒加载
-
列表优化
- 使用虚拟列表
- 分页加载
- 数据缓存
-
启动优化
- 减少启动时加载
- 使用预加载
- 优化资源加载
7. 实用资源
7.1 开发工具
- DevEco Studio:https://developer.harmonyos.com
- HBuilderX:https://www.dcloud.io
- 调试工具:Chrome DevTools
7.2 学习资源
- 官方文档:https://developer.harmonyos.com
- 示例代码:https://github.com/harmonyos
- 技术社区:https://developer.huawei.com
7.3 开发规范
- 代码规范:ESLint + Prettier
- 提交规范:Git Commit Message
- 文档规范:Markdown
8. 结语
通过这个实战项目,我们学习了:
- 如何搭建开发环境
- 如何获取系统信息
- 如何优化界面展示
- 如何处理常见问题
希望这个指南能帮助您更好地开发 HarmonyOS 应用。记住:
- 保持代码简洁
- 注重用户体验
- 重视性能优化
- 持续学习进步
如果您有任何问题,欢迎在评论区讨论。祝您开发愉快!
收起阅读 »uni-app/uniappx 中调用鸿蒙原生扫码能力的实践
uni-app/uniappx 中调用鸿蒙原生扫码能力的实践
一、背景介绍
最近在开发一个鸿蒙应用时,遇到了扫码功能的需求。之前用过很多扫码方案,但都不太理想。直到发现了 hmos-scan 这个插件,终于解决了我们的痛点。下面分享一下使用心得。
1.1 为什么选择 hmos-scan?
说实话,之前踩过不少坑:
-
传统扫码方案太坑了:
- WebView 扫码慢得要死,经常卡住
- 引入第三方库后,应用体积直接翻倍
- 不同手机表现不一样,有的能扫,有的扫不了
- 稍微模糊一点的码就识别不出来,用户体验太差
-
原生开发太痛苦:
- 写原生代码太费时间了
- 每个平台都要写一遍,累死
- 维护起来特别麻烦
- 开发周期太长,老板等不及
-
hmos-scan 真香:
- 用鸿蒙原生能力,扫码贼快
- 识别率特别高,歪着扫都能识别
- 几行代码就搞定了,太方便了
- 性能好,不占内存
- 还能从相册选图,太贴心了
1.2 实际使用案例
-
电商比价:
// 扫商品码比价 async function scanProduct() { try { const barcode = await scanapiSync() // 调用比价接口 const priceInfo = await comparePrice(barcode) showPriceResult(priceInfo) } catch (error) { showError('扫码失败,重试一下') } } -
快递扫描:
// 扫快递单号 async function scanExpress() { try { const trackingNumber = await scanapiSync() // 查物流信息 const expressInfo = await queryExpress(trackingNumber) showExpressInfo(expressInfo) } catch (error) { showError('扫码失败,重试一下') } } -
会议签到:
// 扫会议码签到
async function scanMeeting() {
 try {
   const meetingCode = await scanapiSync()
   // 验证会议码
   const checkInResult = await verifyMeeting(meetingCode)
   showCheckInResult(checkInResult)
 } catch (error) {
   showError('签到失败,重试一下')
 }
}
二、环境准备
-
开发工具:
- HBuilderX 3.8.0 或以上版本
- DevEco Studio(鸿蒙开发必备)
-
项目要求:
- 用 uni-app x 框架
- 选 Vue 3 就对了
三、插件使用
1. 插件安装
- 去插件市场:hmos-scan 插件
- 下载后导入 HBuilderX 就完事了
四、在项目中使用
1. 基础示例
<!-- pages/index/index.uvue -->
<template>
  <view class="content">
    <button @click="startScan">开始扫描</button>
    <text v-if="scanResult">扫描结果:{{scanResult}}</text>
  </view>
</template>

<script>
import { scanapiSync } from "@/uni_modules/hmos-scan/utssdk/app-harmony";

export default {
  data() {
    return {
      scanResult: ''
    }
  },
  methods: {
    async startScan() {
      try {
        const result = await scanapiSync()
        this.scanResult = result
        console.log('扫描结果:', result)
      } catch (error) {
        console.error('扫描失败:', error)
        this.scanResult = '扫描失败'
      }
    }
  }
}
</script>

<style>
.content {
  padding: 20px;
}
button {
  margin: 20px 0;
}
</style>
2. 高级示例(带历史记录)
<!-- pages/advanced/index.uvue -->
<template>
  <view class="container">
    <view class="scan-area">
      <button @click="startScan" :disabled="isScanning">
        {{isScanning ? '扫描中...' : '开始扫描'}}
      </button>
    </view>

    <view class="result-area" v-if="scanHistory.length > 0">
      <text class="title">扫描历史</text>
      <view v-for="(item, index) in scanHistory" :key="index" class="history-item">
        <text class="time">{{item.time}}</text>
        <text class="content">{{item.content}}</text>
      </view>
    </view>
  </view>
</template>

<script>
import { scanapiSync } from "@/uni_modules/hmos-scan/utssdk/app-harmony";

export default {
  data() {
    return {
      isScanning: false,
      scanHistory: []
    }
  },
  methods: {
    async startScan() {
      if (this.isScanning) return

      this.isScanning = true
      try {
        const result = await scanapiSync()
        this.scanHistory.unshift({
          time: new Date().toLocaleTimeString(),
          content: result
        })
      } catch (error) {
        console.error('扫描失败:', error)
      } finally {
        this.isScanning = false
      }
    }
  }
}
</script>

<style>
.container {
  padding: 20px;
}
.scan-area {
  margin-bottom: 20px;
}
.result-area {
  border-top: 1px solid #eee;
  padding-top: 20px;
}
.title {
  font-size: 16px;
  font-weight: bold;
  margin-bottom: 10px;
}
.history-item {
  padding: 10px;
  border-bottom: 1px solid #eee;
}
.time {
  font-size: 12px;
  color: #999;
}
.content {
  margin-top: 5px;
}
</style>
五、功能特点
-
多模式支持:
- 二维码、条形码都能扫
- 相册选图也支持
-
错误处理:
- 各种异常都处理好了
- 提示信息很友好
- 日志记录很详细
-
用户体验:
- 操作简单,一看就会
- 有状态反馈,不会卡住
- 异步处理,不阻塞界面
六、注意事项
-
兼容性:
- 只支持鸿蒙系统
- 确保设备有扫码功能
-
性能优化:
- 注意内存使用
- 及时释放资源
- 别重复扫描
七、常见问题
-
扫描失败:
- 看看设备支不支持
- 查查日志找原因
-
结果解析错误:
- 检查结果格式
- 处理各种返回类型
- 加好错误处理
八、总结
用了 hmos-scan 插件后,扫码功能开发变得特别简单。原生功能完整保留,开发体验又好,强烈推荐!
九、参考资料
收起阅读 »打开多窗体项目里的项目列表可以删除吗
在hbuildx中,由于项目比较多,使用打开多窗体项目打开的项目就多了,有时候想把不再开发的项目去掉,但是没有查到任何可以改的方式,有没有人知道啊
在hbuildx中,由于项目比较多,使用打开多窗体项目打开的项目就多了,有时候想把不再开发的项目去掉,但是没有查到任何可以改的方式,有没有人知道啊
uniapp- UTS 插件鸿蒙端开发示例 虽然我们这个示例简单 但是这个是难住很多人的一大步
UTS 插件鸿蒙端开发示例
以上示例已开源
项目地址 请参考 示例代码。
前言
虽然这个 UTS 插件鸿蒙端的示例看起来很简单,但说实话,这一步其实难住了不少开发者。很多人第一次做 UTS 插件,尤其是要跑通鸿蒙端,都会在这里卡壳。希望这份文档能帮你少走弯路,顺利迈过这道坎。
基础知识补充
什么是 UTS 插件?
UTS 插件其实就是 uni-app x 扩展 API 的标准插件形式。你可以把它理解成"写一份 TypeScript 风格的代码,编译后在不同平台都能用"。
说个实话,刚接触 uni-app x 的时候,很多人一看到"插件"两个字就头大,觉得一定很复杂。其实 UTS 插件的本质,就是把你想要的原生能力用 TypeScript 包一层,剩下的交给编译器搞定。
UTS 与 ArkTS 的关系
UTS 和 ArkTS 都是基于 TypeScript 的扩展,但有些细节不同。特别注意:鸿蒙端开发时,所有对象字面量都必须定义类型,不能用 any 类型,否则会直接编译报错。
比如 ArkTS 不允许无类型的对象字面量,UTS 会自动帮你加上类型,但你自己写代码时一定要养成良好习惯:
// 错误写法(鸿蒙端会报错)
const obj = { a: 1 };

// 正确写法
interface Obj { a: number }
const obj: Obj = { a: 1 };
// 或
const obj = { a: 1 } as Obj;
你只需要记住:UTS 写的代码,最终会被编译成 ArkTS(.ets)文件,然后就能愉快地调用鸿蒙的原生 API 了。
配置鸿蒙依赖
鸿蒙的依赖管理工具叫 ohpm,和 npm 很像。三方 SDK 用 .har 文件(有点像 Android 的 .aar)。
配置依赖时,记得在 utssdk/app-harmony/config.json 里写清楚:
{
  "dependencies": {
    "@cashier_alipay/cashiersdk": "15.8.26",
    "local-deps": "./libs/local-deps.har"
  }
}
注意:config.json 不能有注释,本地依赖路径是相对的。
资源文件与权限配置
- 插件资源(图片、字体等)放在
utssdk/app-harmony/resources。 - 权限、模块信息等写在
utssdk/app-harmony/module.json5。
比如你要用定位权限,可以这样写:
{
  "module": {
    "requestPermissions": [
      {
        "name": "ohos.permission.LOCATION",
        "usedScene": { "when": "inuse" },
        "reason": "$string:permission_location_reason"
      }
    ]
  }
}
context 获取
很多鸿蒙原生 API 需要 context。大多数场景下直接用 getContext() 就行:
import settings from '@ohos.settings';
const context: Context = getContext();
settings.getValue(context, settings.display.SCREEN_BRIGHTNESS_STATUS, (err, value) => {
  if (err) {
    console.error(`Failed to get the setting. ${err.message}`);
    return;
  }
  console.log(`SCREEN_BRIGHTNESS_STATUS: ${JSON.stringify(value)}`)
});
有一次小王同学写插件,死活拿不到 context,结果发现是忘了在页面生命周期里调用,调试了半天才恍然大悟。遇到问题别慌,先查查官方文档和社区经验,很多"坑"其实大家都踩过。
更多细节和常见问题,建议随时查阅官方文档:UTS for HarmonyOS
步骤详解
友情提示:
虽然下面的步骤看起来很基础,但每一步都很关键。尤其是接口定义和鸿蒙端实现,很多人就是在这里卡住的。别嫌简单,能跑通才是王道。
再次强调:鸿蒙端开发时,所有对象字面量都必须定义类型,不能用 any 类型!
第一步:定义插件接口(interface.uts)
目的:
- 明确插件对外暴露的 API 规范,方便多端实现和 IDE 智能提示。
- 这是 UTS 插件开发的基础,所有端的实现都要遵循这里定义的接口。
操作:
- 在
uni_modules/你的插件名/utssdk/下新建或编辑interface.uts文件。 - 定义你要暴露的类型、方法签名。例如:
// uni_modules/tt-ost/utssdk/interface.uts
export type MyApiSync1 = (paramA: string) => string;
第二步:鸿蒙端实现接口(app-harmony/index.uts)
目的:
- 按照接口定义,实现鸿蒙端的具体逻辑。
- 这是很多开发者卡壳的地方,需注意导入接口类型、调用鸿蒙 API、正确导出方法。
- 注意:所有对象字面量都要定义类型,不能用 any!
操作:
- 在
uni_modules/你的插件名/utssdk/app-harmony/下新建或编辑index.uts文件。 - 按照接口定义,实现方法。例如:
// uni_modules/tt-ost/utssdk/app-harmony/index.uts
import { MyApiSync1 } from '../interface.uts';
import { promptAction } from '@kit.ArkUI';

interface ShowToastOptions {
  message: string;
}

export const myApiSync1: MyApiSync1 = function (paramA: string): string {
  let ddd: ShowToastOptions = { message: paramA };
  promptAction.showToast(ddd);
  return paramA;
}- 这里以 Toast 弹窗为例,实际可根据业务需求调用鸿蒙原生能力。
第三步:在页面中调用插件方法
目的:
- 验证插件功能是否生效。
- 体验 UTS 跨端调用的便捷性。
操作:
- 在页面脚本中引入并调用插件方法。例如:
<script>
import { myApiSync1 } from '@/uni_modules/tt-ost';
export default {
  methods: {
    showToast() {
      const msg = 'Hello Harmony!';
      const result = myApiSync1(msg);
      console.log(result); // 输出: Hello Harmony!
    }
  }
}
</script>
说明
- 该插件支持多端,鸿蒙端实现了
myApiSync1,会调用 ArkUI 的promptAction.showToast。 - 其他端(如 Android/iOS)可根据需要实现对应方法。
- 适合演示 UTS 跨端插件的基本用法。
如需更多信息,请参考 uni-app x 官方 UTS 插件开发文档。
收起阅读 »
关于van-picker用在uniapp上出现的若干问题解决方法
事故一:设置了 value-key,在网页或者小程序代码正常,到了uniapp上出现弹出来空白内容。
问题原因:在uniapp中,需要改为text,value。
解决方案一(不推荐):直接改为text,value。如下:
const columns = [
  {
    merchantName: '用户1',
    merchantNo: 'uid001'
  },
  {
    merchantName: '用户2',
    merchantNo: 'uid002'
  }
]
改为:
const columns = [
  {
    text: '用户1',
    value: 'u001'
  },
  {
    text: '用户2',
    value: 'u002'
  }
]
解决方案二(推荐):改为columns-field-names来实现。如:
<van-picker :columns="columns" :columns-field-names="{ text: 'merchantName', value: 'merchantNo'}" />事故二:滚动选择了其他行,点确定。结果返回来的结果依旧是第一行结果。
问题原因:columns-field-names 没有设置value,导致所有数据没有唯一的value。
解决方案:columns-field-names一定要设置唯一的value。

记录cli从2.0.2-3090920231225001升级到2.0.2-4060620250520001遇到的问题
vue2
升级原因是打包ios app时提示cli版本与打包机器的版本不一致,即使打包成功也无法上传appstore
先在这里cv一遍配置文件:https://uniapp.dcloud.net.cn/vue2-cli-release.html
然后又发现这里的还不是最新版本,又运行命令升级到最新版本:npx @dcloudio/uvm@latest
启动项目,报错:
ValidationError: Invalid options object. Dev Server has been initialized using an options object that does not match the API schema.
 - options has an unknown property 'disableHostCheck'. These properties are valid:
   object { allowedHosts?, bonjour?, client?, compress?, devMiddleware?, headers?, historyApiFallback?, host?, hot?, http2?, https?, ipc?, liveReload?, magicHtml?, onAfterSetupMiddleware?, onBeforeSetupMiddleware?, onListening?, open?, port?, proxy?, server?, setupExitSignals?, setupMiddlewares?, static?, watchFiles?, webSocketServer? }
修改vue.config.js,把disableHostCheck: true,修改为allowedHosts: 'all',
启动项目,F12报错:
Reason: Error: ES Modules may not assign module.exports or exports.*, Use ESM export syntax, instead: 42百度半天,找到解决方法:
原因是自定义的业务代码的js文件里存在module.exports={},新版好像不支持这种写法了,只能全部替换成export function xxxxx。百度说babel能解决这个问题,看了半天直接放弃,直接替换吧
删除devDependencies里的"@babel/runtime": "~7.12.0",删除node_modules文件夹,重新install
改了半天js,终于能看到页面了
随便点几个地方测试,页面出现
之前是没有这玩意的,只有控制台打印的异常,解决方法是修改vue.config.js,增加
config.devServer = {
                client: {
                    overlay: false
                }
}
终于一切正常了,dev启动一切正常,发ios,真机运行发现tabbar没了
原因:编译的时候出现一堆这种警告Deprecation Warning [import]: Sass @import rules are deprecated and will be removed in Dart Sass 3.0.0.
,看不到这个一开始就打印的重要报错:
[webpack-dev-server] Project is running at:
TypeError: Cannot read property 'compress' of undefined
又是webpack的锅,如图修改:
收起阅读 »
