


iOS升级SDK后插件不能执行或者报错
升级了最新sdk后通过Safari调试发现在调用插件的地方崩溃,升级前插件是好的,折腾了好长时间,无奈只能找客服,通过咨询发现:
最新的SDK注册插件不需要document.addEventListener("plusready", function(){},true);中注册插件,直接放外面注册就可以了
方法调用最好还是放在plusready事件之后, 是document.addEventListener('plusready') 不要用mui.plusready,或者加一个timeout也可以
希望帮到各位!
升级了最新sdk后通过Safari调试发现在调用插件的地方崩溃,升级前插件是好的,折腾了好长时间,无奈只能找客服,通过咨询发现:
最新的SDK注册插件不需要document.addEventListener("plusready", function(){},true);中注册插件,直接放外面注册就可以了
方法调用最好还是放在plusready事件之后, 是document.addEventListener('plusready') 不要用mui.plusready,或者加一个timeout也可以
希望帮到各位!
收起阅读 »iOS开发提交app关于定位问题被拒
app里加入定位功能,info.plist里只是写了获取定位信息,没有写的更具体,开始也没有认真的区分实时定位和使用时定位,用的实时定位,其实项目需求来说使用时定位就可以了,结果就被苹果拒了。
收到了一份邮件在提交两天之后(苹果的效果提高了,两天就给审核了)。
- 1.5 Legal: Privacy - Location Services
Guideline 5.1.5 - Legal - Privacy - Location Services
Your app uses location services but does not clarify the purpose of its use in the location modal alert as required in the iOS Human Interface Guidelines.
Please see attached screenshots for details.
Next Steps
To resolve this issue, please specify the intended purpose of using the user's location in the location permission modal alert.
Resources
For additional information and instructions on configuring and presenting an alert, please review the Requesting Permission section of the iOS Human Interface Guidelines and the Information Property List Key Reference. You may also want to review the Technical Q&A QA1937: Resolving the Privacy-Sensitive Data App Rejection page for details on how to provide a usage description for permission request alerts.
收到的邮件内容
翻译:我们给你发了一个新消息关于你的应用,查看或回复消息,去解决中心在iTunes上连接。
点击Resolution Center,跳转到iTunes Connect,这个消息如下:
发件人 Apple
4.5 - Apps using background location services must provide a reason that clarifies the purpose of the use, using mechanisms described in the Human Interface Guidelines
解决:
1、增加一个提示:在info.plist文件里,NSLocationAlwaysUsageDescription 配上简洁的文字说明,告诉用户你为什么要访问他的位置!
2、回复邮件告诉苹果你的定位的使用:为什么加入了定位,在什么地方使用了定位
3、重新打一个上传包。
4、如果你的 app是实时定位,在 app描述里加上:使用后台定位会减少电池的使用寿命
作者:Sudoke
链接:http://www.jianshu.com/p/e9438ee7fee0
來源:简书
著作权归作者所有。商业转载请联系作者获得授权,非商业转载请注明出处。
Javascript Math 和 ceil()、floor()、round()三个函数的区别
Math.ceil()执行向上舍入,即它总是将数值向上舍入为最接近的整数;
Math.floor()执行向下舍入,即它总是将数值向下舍入为最接近的整数;
Math.round()执行标准舍入,即它总是将数值四舍五入为最接近的整数。
alert(Math.ceil(25.9)); //26
alert(Math.ceil(25.5)); //26
alert(Math.ceil(25.1)); //26
alert(Math.round(25.9)); //26
alert(Math.round(25.5)); //26
alert(Math.round(25.1)); //25
alert(Math.floor(25.9)); //25
alert(Math.floor(25.5)); //25
alert(Math.floor(25.1)); //25
ECMAScript为保存数学公式和信息提供了公共位置,即Math对象。
Math对象提供的计算功能比我们自己直接在js中编写的计算功能快得多。
1.Math对象的属性
Math.E     // 自然对数的底数,即常量e的值
Math.LN10  //10的自然对数
Math.LN2     //2的自然对数
Math.LOG2E   //以2为底e的对数
Math.LOG10E // 以10为底的e的对数
Math.PI              //π的值
Math.SQRT1_2   //1/2的平方根(即2的平凡根的倒数)
Math.SQRT2     //  2的平方根
2.min()和max()方法
这两个方法用于确定一组数组中的最小值和最大值。这两个方法都可以接收任意多个数值参数。
var max = Max.max(3,54,32,16);
alert(max); //54
这两个方法经常用于避免多余的循环和if语句中确定一组数的最大值。
要找到数组中的最大或最小值,可以像下面这样使用apply()方法。
```javascript
   var values = [1,2,3,5,7,9];
var max = Math.max.apply(Math,values);
这个技巧的关键是把Math对象作为apply()的第一个参数,从而正确的设置this值。然后,可以将任何数组作为第二个参数。
3.舍入方法
Math.ceil( ) //向上舍入
Math.floor( ) //向下舍入
Math.round( )  //四舍五入
4.random()方法
Math.random()方法返回大于等于0小于1的一个随机数。对于某些站点来说,这个方法非常实用,因为可以利用它来随机显示一些名人名言和新闻事件。套用下面的公式。就可以从某个整数范围内随机选择一个值。
值 = Math.floor(Math.random( ) * 可能值的总数 + 第一个可能的值)
公式中用到了Math.floor()方法,这是因为Math.random()总返回一个小数值
公式中用到了Math.floor()方法,这是因为Math.random()总返回一个小数值。而用这个小数值乘以一个整数,然后再加上一个整数,最终结果仍然还是一个小数。例如:
var num = Math.floor(Math.random() * 10 + 1);//获取1到10之间的随机数如果想要选择一个介于2到10之间的值,如下:
var num = Math.floor(Math.random( ) * 9 + 2); //思考,无限接近于0时是2,无限接近于1时是11,但由于永远小于1,因此Math.floor的最大值为10。从2数到10要数9个数,因此可能值的总数就是9,而第一个可能的值就是2。
多数情况下,其实都可以通过一个函数来计算可能值的总数和第一个可能的值。
function selectFrom(lowerValue,upperValue) {
    var choices = upperValue - lowerValue+ 1;
    return Math.floor(Math.random() * choices + lowerValue);
}
var num = selectFrom(2,10);
alert(num); //介于2和10之间(包括2和10)的一个数值
函数selectFrom()
函数selectFrom()接受两个参数:应该返回的是最大值和最小值。而用最大值减最小值再加上1得到了可能值的总和,然后它又把这些数值套用了前面的公式中。利用这个函数,可以方便地从数组中随机取出一项。例如:
var colors = ["red","green","blue","yellow","purple"];
var color = colors[selectFrom(0,colors.length-1)];
alert(color);  //任何一个颜色
5.其他方法
Math.abs(num)  //返回num的绝对值
Math.exp(num)     //返回Math.E的num次幂
Math.log(num)       //返回num的自然对数
Math.pow(num,power) //返回num的power次幂
Math.sqrt(num)   //返回num的平方根
Math.acos(x)     //返回x的反余弦值
Math.asin(x)     //返回x的反正弦值
Math.atan(x)     //返回x的反正切值
Math.atan2(y,x)  //返回y/x的反正切值
Math.cons(x)     //返回x的余弦值
Math.sin(x)      //返回x的正弦值
Math.tan(x) //返回x的正切值Math.ceil()执行向上舍入,即它总是将数值向上舍入为最接近的整数;
Math.floor()执行向下舍入,即它总是将数值向下舍入为最接近的整数;
Math.round()执行标准舍入,即它总是将数值四舍五入为最接近的整数。
alert(Math.ceil(25.9)); //26
alert(Math.ceil(25.5)); //26
alert(Math.ceil(25.1)); //26
alert(Math.round(25.9)); //26
alert(Math.round(25.5)); //26
alert(Math.round(25.1)); //25
alert(Math.floor(25.9)); //25
alert(Math.floor(25.5)); //25
alert(Math.floor(25.1)); //25ECMAScript为保存数学公式和信息提供了公共位置,即Math对象。
Math对象提供的计算功能比我们自己直接在js中编写的计算功能快得多。
1.Math对象的属性
Math.E     // 自然对数的底数,即常量e的值
Math.LN10  //10的自然对数
Math.LN2     //2的自然对数
Math.LOG2E   //以2为底e的对数
Math.LOG10E // 以10为底的e的对数
Math.PI              //π的值
Math.SQRT1_2   //1/2的平方根(即2的平凡根的倒数)
Math.SQRT2     //  2的平方根
2.min()和max()方法
这两个方法用于确定一组数组中的最小值和最大值。这两个方法都可以接收任意多个数值参数。
var max = Max.max(3,54,32,16);
alert(max); //54
这两个方法经常用于避免多余的循环和if语句中确定一组数的最大值。
要找到数组中的最大或最小值,可以像下面这样使用apply()方法。
```javascript
   var values = [1,2,3,5,7,9];
var max = Math.max.apply(Math,values);
这个技巧的关键是把Math对象作为apply()的第一个参数,从而正确的设置this值。然后,可以将任何数组作为第二个参数。
3.舍入方法
Math.ceil( ) //向上舍入
Math.floor( ) //向下舍入
Math.round( )  //四舍五入
4.random()方法
Math.random()方法返回大于等于0小于1的一个随机数。对于某些站点来说,这个方法非常实用,因为可以利用它来随机显示一些名人名言和新闻事件。套用下面的公式。就可以从某个整数范围内随机选择一个值。
值 = Math.floor(Math.random( ) * 可能值的总数 + 第一个可能的值)
公式中用到了Math.floor()方法,这是因为Math.random()总返回一个小数值
公式中用到了Math.floor()方法,这是因为Math.random()总返回一个小数值。而用这个小数值乘以一个整数,然后再加上一个整数,最终结果仍然还是一个小数。例如:
var num = Math.floor(Math.random() * 10 + 1);//获取1到10之间的随机数如果想要选择一个介于2到10之间的值,如下:
var num = Math.floor(Math.random( ) * 9 + 2); //思考,无限接近于0时是2,无限接近于1时是11,但由于永远小于1,因此Math.floor的最大值为10。从2数到10要数9个数,因此可能值的总数就是9,而第一个可能的值就是2。
多数情况下,其实都可以通过一个函数来计算可能值的总数和第一个可能的值。
function selectFrom(lowerValue,upperValue) {
    var choices = upperValue - lowerValue+ 1;
    return Math.floor(Math.random() * choices + lowerValue);
}
var num = selectFrom(2,10);
alert(num); //介于2和10之间(包括2和10)的一个数值
函数selectFrom()
函数selectFrom()接受两个参数:应该返回的是最大值和最小值。而用最大值减最小值再加上1得到了可能值的总和,然后它又把这些数值套用了前面的公式中。利用这个函数,可以方便地从数组中随机取出一项。例如:
var colors = ["red","green","blue","yellow","purple"];
var color = colors[selectFrom(0,colors.length-1)];
alert(color);  //任何一个颜色
5.其他方法
Math.abs(num)  //返回num的绝对值
Math.exp(num)     //返回Math.E的num次幂
Math.log(num)       //返回num的自然对数
Math.pow(num,power) //返回num的power次幂
Math.sqrt(num)   //返回num的平方根
Math.acos(x)     //返回x的反余弦值
Math.asin(x)     //返回x的反正弦值
Math.atan(x)     //返回x的反正切值
Math.atan2(y,x)  //返回y/x的反正切值
Math.cons(x)     //返回x的余弦值
Math.sin(x)      //返回x的正弦值
Math.tan(x) //返回x的正切值js的reduce()方法
reduce()和reduceRight()
var numbers= [65,44,12,4];
function getSum (total,num) {
return total+num;
}
function myFunction(item) {
document.getElementById("demo").innerHTML = numbers.reduce(getSum);
}
p158 7.9.5
数值的数组
var a = [1,2,3,4,5];
var sum = a.reduce(function(x,y){return x+y});//15
var product = a.reduce(function(x,y){return xy});//数组求积
var max = a.reduce(function(x,y){return (x>y)?x:y});//求最大值
对象
/
返回一个新对象,这个对象同时拥有o的属性和p的属性
如果o和p中有重名属性,使用p中的属性值
/
function union(o,p){return extend(extend({},o),p);}
/
把p中的可枚举属性复制到o中,并返回o
如果o和p中含有同名属性,则覆盖o中的属性
这个函数并不处理getter和setter以及复制属性
/
function extend(o,p) {
for (prop in p){ //遍历p中的所有属性
o[prop] = p[prop]; //将属性添加至o中
}
return o;
}
var objects = [{x:1},{y:2},{z:3}];
var merged = objects.reduce(union); // {xL1,y:2,z:3}
var objects = [{x:1,a:1},{y:2,a:2},{z:3,a:3}];
var leftunion = objects.reduce(union); //{x:1,y:2,z:3,a:1}
var rightunion = objects.recuceRight(union);// {x:1,y:2,z:3,a:3}
js对象取值的两种方式
var obj ={a:3,b:4,c:5};
1.使用点的方式
var v = obj.a;
2. 使用中括号的方式
配合模板字符串可以动态取值${key}
var m = obj["a"];
在实际项目中,一般使用点会方便许多,但是如果是变量的话就不能使用点了,js会
理解为对象的key值,造成混淆
key是一个变量
var n = obj[key];
js 深层对象取值
var obj = {
a: {
a3: {
a31: 1,
}
}
};
var arr = ['a', 'a3', 'a31'];
// 返回1
arr.reduce(function (acc, key) { return acc && key in acc ? acc[key] : null; }, obj);
var arr2 = ['a', 'a3', 'a32'];
// 返回null
arr2.reduce(function (acc, key) { return acc && key in acc ? acc[key] : null; }, obj);
vue搭建脚手架入门
一、那么我们就从最简单的环境搭建开始:
安装node.js,从node.js官网下载并安装node,安装过程很简单,一路“下一步”就可以了(傻瓜式安装)。安装完成之后,打开命令行工具(win+r,然后输入cmd),输入 node -v,如下图,如果出现相应的版本号,则说明安装成功。
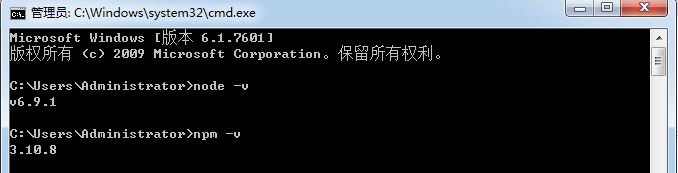
这里需要说明下,因为在官网下载安装node.js后,就已经自带npm(包管理工具)了,另需要注意的是npm的版本最好是3.x.x以上,以免对后续产生影响。
安装淘宝镜像,打开命令行工具,把这个(npm install -g cnpm --registry= https://registry.npm.taobao.org)复制(这里要手动复制就是用鼠标右键那个,具体为啥不多解释),安装这里是因为我们用的npm的服务器是外国,有的时候我们安装“依赖”的时候很很慢很慢超级慢,所以就用这个cnpm来安装我们说需要的“依赖”。安装完成之后输入 cnpm -v,如下图,如果出现相应的版本号,则说明安装成功。

安装webpack,打开命令行工具输入:npm install webpack -g,安装完成之后输入 webpack -v,如下图,如果出现相应的版本号,则说明安装成功。

安装vue-cli脚手架构建工具,打开命令行工具输入:npm install vue-cli -g,安装完成之后输入 vue -V(注意这里是大写的“V”),如下图,如果出现相应的版本号,则说明安装成功。

二、通过以上四步,我们需要准备的环境和工具都准备好了,接下来就开始使用vue-cli来构建项目
在硬盘上找一个文件夹放工程用的。这里有两种方式指定到相关目录:①cd 目录路径 ②如果以安装git的,在相关目录右键选择Git Bash Here
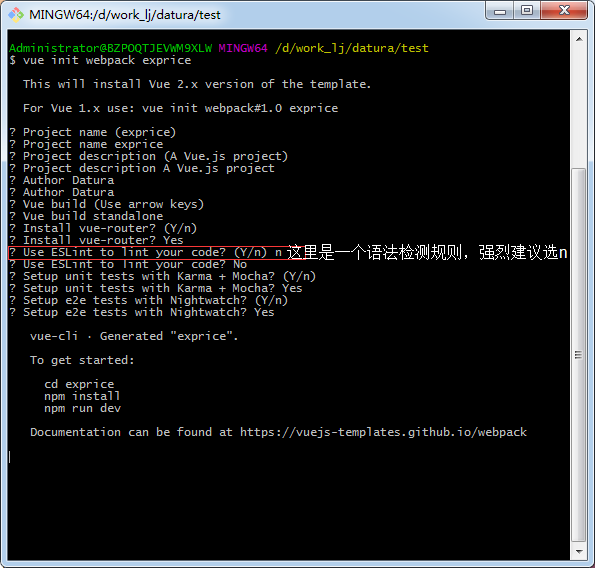
安装vue脚手架输入:vue init webpack exprice ,注意这里的“exprice” 是项目的名称可以说是随便的起名,但是需要主要的是“不能用中文”。
$ vue init webpack exprice --------------------- 这个是那个安装vue脚手架的命令
This will install Vue 2.x version of the template. ---------------------这里说明将要创建一个vue 2.x版本的项目
For Vue 1.x use: vue init webpack#1.0 exprice
? Project name (exprice) ---------------------项目名称
? Project name exprice
? Project description (A Vue.js project) ---------------------项目描述
? Project description A Vue.js project
? Author Datura --------------------- 项目创建者
? Author Datura
? Vue build (Use arrow keys)
? Vue build standalone
? Install vue-router? (Y/n) --------------------- 是否安装Vue路由,也就是以后是spa(但页面应用需要的模块)
? Install vue-router? Yes
? Use ESLint to lint your code? (Y/n) n ---------------------是否启用eslint检测规则,这里个人建议选no
? Use ESLint to lint your code? No
? Setup unit tests with Karma + Mocha? (Y/n)
? Setup unit tests with Karma + Mocha? Yes
? Setup e2e tests with Nightwatch? (Y/n)
? Setup e2e tests with Nightwatch? Yes
vue-cli · Generated "exprice".
To get started: --------------------- 这里说明如何启动这个服务
cd exprice
npm install
npm run dev
如下图:
cd 命令进入创建的工程目录,首先cd exprice(这里是自己建工程的名字);
安装项目依赖:npm install,因为自动构建过程中已存在package.json文件,所以这里直接安装依赖就行。不要从国内镜像cnpm安装(会导致后面缺了很多依赖库),但是但是如果真的安装“个把”小时也没成功那就用:cnpm install 吧
安装 vue 路由模块 vue-router 和网络请求模块 vue-resource,输入:cnpm install vue-router vue-resource --save。
创建完成的“exprice”目录如下:

下面我简单的说明下各个目录都是干嘛的:

启动项目,输入:npm run dev。服务启动成功后浏览器会默认打开一个“欢迎页面”,如下图:

注意:这里是默认服务启动的是本地的8080端口,所以请确保你的8080端口不被别的程序所占用。
作者:datura_lj
链接:http://www.jianshu.com/p/1626b8643676
來源:简书
一、那么我们就从最简单的环境搭建开始:
安装node.js,从node.js官网下载并安装node,安装过程很简单,一路“下一步”就可以了(傻瓜式安装)。安装完成之后,打开命令行工具(win+r,然后输入cmd),输入 node -v,如下图,如果出现相应的版本号,则说明安装成功。
这里需要说明下,因为在官网下载安装node.js后,就已经自带npm(包管理工具)了,另需要注意的是npm的版本最好是3.x.x以上,以免对后续产生影响。
安装淘宝镜像,打开命令行工具,把这个(npm install -g cnpm --registry= https://registry.npm.taobao.org)复制(这里要手动复制就是用鼠标右键那个,具体为啥不多解释),安装这里是因为我们用的npm的服务器是外国,有的时候我们安装“依赖”的时候很很慢很慢超级慢,所以就用这个cnpm来安装我们说需要的“依赖”。安装完成之后输入 cnpm -v,如下图,如果出现相应的版本号,则说明安装成功。
安装webpack,打开命令行工具输入:npm install webpack -g,安装完成之后输入 webpack -v,如下图,如果出现相应的版本号,则说明安装成功。
安装vue-cli脚手架构建工具,打开命令行工具输入:npm install vue-cli -g,安装完成之后输入 vue -V(注意这里是大写的“V”),如下图,如果出现相应的版本号,则说明安装成功。
二、通过以上四步,我们需要准备的环境和工具都准备好了,接下来就开始使用vue-cli来构建项目
在硬盘上找一个文件夹放工程用的。这里有两种方式指定到相关目录:①cd 目录路径 ②如果以安装git的,在相关目录右键选择Git Bash Here
安装vue脚手架输入:vue init webpack exprice ,注意这里的“exprice” 是项目的名称可以说是随便的起名,但是需要主要的是“不能用中文”。
$ vue init webpack exprice --------------------- 这个是那个安装vue脚手架的命令
This will install Vue 2.x version of the template. ---------------------这里说明将要创建一个vue 2.x版本的项目
For Vue 1.x use: vue init webpack#1.0 exprice
? Project name (exprice) ---------------------项目名称
? Project name exprice
? Project description (A Vue.js project) ---------------------项目描述
? Project description A Vue.js project
? Author Datura --------------------- 项目创建者
? Author Datura
? Vue build (Use arrow keys)
? Vue build standalone
? Install vue-router? (Y/n) --------------------- 是否安装Vue路由,也就是以后是spa(但页面应用需要的模块)
? Install vue-router? Yes
? Use ESLint to lint your code? (Y/n) n ---------------------是否启用eslint检测规则,这里个人建议选no
? Use ESLint to lint your code? No
? Setup unit tests with Karma + Mocha? (Y/n)
? Setup unit tests with Karma + Mocha? Yes
? Setup e2e tests with Nightwatch? (Y/n)
? Setup e2e tests with Nightwatch? Yes
vue-cli · Generated "exprice".
To get started: --------------------- 这里说明如何启动这个服务
cd exprice
npm install
npm run dev
如下图:
cd 命令进入创建的工程目录,首先cd exprice(这里是自己建工程的名字);
安装项目依赖:npm install,因为自动构建过程中已存在package.json文件,所以这里直接安装依赖就行。不要从国内镜像cnpm安装(会导致后面缺了很多依赖库),但是但是如果真的安装“个把”小时也没成功那就用:cnpm install 吧
安装 vue 路由模块 vue-router 和网络请求模块 vue-resource,输入:cnpm install vue-router vue-resource --save。
创建完成的“exprice”目录如下:
下面我简单的说明下各个目录都是干嘛的:
启动项目,输入:npm run dev。服务启动成功后浏览器会默认打开一个“欢迎页面”,如下图:
注意:这里是默认服务启动的是本地的8080端口,所以请确保你的8080端口不被别的程序所占用。
作者:datura_lj
链接:http://www.jianshu.com/p/1626b8643676
來源:简书
关于mui.ajax的设置,以及php取不到data值的问题的方法
代码小白,好不容易做到ajax这一步,又遇到坑了。
找了n多网站,也参考了论坛里面的文章。
最开始完全按照官方的demo来,直接报失败,如下:
[LOG] : SyntaxError: JSON Parse error: Unrecognized token '<'
取消json格式限制后,发现这个'<'token错误是来源于php错误报告的html标签。报告内容就是$post['username']找不到username,也就是说:
我发送的data格式和php获取的格式不一致。
经过无数次的撞墙实验后,发现这样成功了:
mui.ajax('http://server-name/login.php',{
    data:{
        username:'username',
        password:'password'
    },
    dataType:'json',//服务器返回json格式数据
    type:'post',//HTTP请求类型
    timeout:10000,//超时时间设置为10秒;
        crossDomain: true,
    success:function(data){
        //服务器返回响应,根据响应结果,分析是否登录成功;
        ...
    },
    error:function(xhr,type,errorThrown){
        //异常处理;
        console.log(type);
    }
});
想想看既然data不认识,很可能header也不认识,
那就删掉header这一项吧,有这个header,怎么写怎么错 (不知道是我学艺不精,还是bug?)。然后写在php里:
<?php
header('Access-Control-Allow-Origin:*');
header('Access-Control-Allow-Methods:POST,GET');
header('Access-Control-Allow-Credentials:true');
header("Content-Type: application/json;charset=utf-8");

//下面该怎么写怎么写
这样php就能读取到data并且 app能顺利的获取php的返回值了。
收起阅读 »
HBuilder编写代码中大量的词组都没有自动提示,比如 mysqli
今天第一次下载HBuilder代码编辑器发现,这么强大的编辑器连 mysql。。。这样的很基础的语句都无法自动提示出来,别的编辑器,只需要输入my 后面都提示出来了,是我设置不对吗? 但是 像echo这样的词组可以提示出来,输入ec就可以了
今天第一次下载HBuilder代码编辑器发现,这么强大的编辑器连 mysql。。。这样的很基础的语句都无法自动提示出来,别的编辑器,只需要输入my 后面都提示出来了,是我设置不对吗? 但是 像echo这样的词组可以提示出来,输入ec就可以了
jsHint详解
jshint是一个javaScript语法和风格的检查工具,但检查不出逻辑问题。
安装
一、在sublime text 中使用jshint插件步骤:
(注:在为Sublime Text编辑器安装Sublime-JSHint插件之前,要首先确保安装了node.js)
方法1:
1 Ctrl+Shift+P 呼出Sublime命令面板
2 键入install,并选择Package Control:Install Package
3 键入js gutter,并选择JSHint Gutter
方法2:
1 获取Sublime Text,可通过git命令。
git clone https://github.com/victorporof/Sublime-JSHint.git
2 打开 Sublime Text Package 文件夹。Preferences -> Browse Packages。
3 将步骤1中获取到的 Sublime-JSHint 文件夹移到 Packages 文件夹中。
4 重启 Sublime Text。
Sublime-JSHint使用
方法1:由菜单 Tools -> Command Palette(或快捷键 Ctrl+Shift+P)打开命令面板。键入 jshint 并选择 JSHint。
方法2:打开一 js 文件,并打开控制台(View -> Show Console),在控制台中键入 view.run_command("jshint")。
方法3:Ctrl+Shift+J(或者Mac使用Cmd+Shift+J)
方法4:右键选择JSHint
设置
"lint_on_edit": false,
// Configurable duration before re-linting.
"lint_on_edit_timeout": 5,
// Automatically lint when a file is loaded.
"lint_on_load": false,
// Automatically lint when a file is saved.
"lint_on_save": false,
// Highlight problematic regions when selected.
"highlight_selected_regions": false,
// Log the settings passed to JSHint from .jshintrc.
"print_diagnostics": true
配置选项
"strict": true, //严格模式 参考文章(http://www.ruanyifeng.com/blog/2013/01/javascript_strict_mode.html)
"asi": true, //允许省略分号(写上这条,规避检查出很多警告 可以去掉)
"bitwise": true, //禁止使用位运算符,比如经常把&&写错& 规避此错误
"noarg": true, //禁止使用.caller 和 .callee (ECMS5已经禁用了此 可以去掉)
"eqeqeq": true, //禁止使用== 和 != 强制使用=== 和 !==
"undef": true, //禁止使用不在全局变量列表中的未定义变量
"curly": true, //循环或者条件语句必须使用花括号包住
"devel": true, //定义用于调试的全局变量:console,alert
"jquery": true, //定义全局暴露的jQuery库 (可以去掉)
"browser": true, //暴露浏览器属性的全局变量 如window document
"evil": true, //禁止使用eval (可以去掉)
"quotemark":true (商榷)
"globals": {"$":true,"require":true,"FastClick":true,"Swiper"},
编辑器 VS Gulp_jshint
1 个人偏向于在编辑器中使用jshint,这样不用在每个项目都配置,同时也能约束项目之外的编辑。
2 在编辑器中使用jshint 比在Gulp_jshint 的更实时,更清晰。jshint有错误,会在每一行有提示。而后者会在命令窗口提示,不方便。
3 Gulp_jshint 还需要进一步探查。
项目中一些问题
无法识别的一些问题:
1 //= require chartjs/chart.core (解决掉了)
2 封闭空间上面的(未解决);
3 引入插件的实例化:comRadar = new Chart(ctx).Radar()(解决掉了);
//配置参数
"globals": {"$":true,"require":true,"FastClick":true,"Swiper"},
4 var CardPopup = function(el, opts) {
this.el = el;
this.defaults = {};
this.options = $.extend({}, this.defaults, opts);
} (此处加封号)
CardPopup.prototype = {
init: function() {
var me = this,
el = me.el;
return me;
},
} (此处加封号)
$.fn.CardPopup = function(opts) {
var com;
} (此处加封号)
5 A && B
//要么写成 if(A) B
//或者 / jshint expr: true /
6 jshint 中希望 A.B 而不希望A[B]
7 / jshint ignore:start /
var optionTemplate = Hogan.compile('<ul class="items options clearfix count-{{count}}">\
{{#options}}\
<li class="item option {{#selected}}selected{{/selected}}">\
<div class="pie">\
<canvas class="canvas-outer" data-percent="{{value}}"></canvas>\
<div class="num">{{value}}%</div>\
</div>\
<p class="text">{{text}}</p>\
</li>\
{{/options}}\
</ul>');
/ jshint ignore:end /
8 /jshint scripturl:true/
data.top[i].redirect_url = data.top[i].redirect_url || 'javascript:void(0);';
9 $(subscribeData).each(function(index, element) {
if (element == specialColumnId) {
elSubscribe.removeClass('icon-jiadingyue').addClass('icon-yidingyue');
}
}) (是否加)
10
/jshint -W018 /
if (!!elForm.find('[name="comment[parent_id]"]').val() == true) {
isReplyComment = true;
}
日记本
來源:http://www.jianshu.com/p/9c26c61da146
收起阅读 »怎么解决tomcat占用8080端口问题图文教程
怎么解决tomcat占用8080端口问题
相信很多朋友都遇到过这样的问题吧,tomcat死机了,重启eclipse之后,发现
Several ports (8080, 8009) required by Tomcat v6.0 Server at localhost are already in use.The server may already be running in another process, or a system process may be using the port. To start this server you will need to stop the other
process or change the port number(s).
是不是很多人教你重启电脑呢,下面教大家一个不用重启计算机 的方法。

此方法也可以解决,windows上如何结束进程的详细过程,下面附详细,图文说明
在dos下,输入 netstat -ano|findstr 8080
//说明:查看占用8080端口的进程
显示占用端口的进程
taskkill /pid 6856 /f
//说明,运行windows自带taskkill命令,将上面显示的进程号,结束掉。
下面有图为证

怎么解决tomcat占用8080端口问题图文教程,到此结束,希望对大家有所帮助。祝大家,工作愉快,
不用重启计算机了,次方法也可以解决其他类似问题,在编程当中对大家的困扰。
怎么解决tomcat占用8080端口问题
相信很多朋友都遇到过这样的问题吧,tomcat死机了,重启eclipse之后,发现
Several ports (8080, 8009) required by Tomcat v6.0 Server at localhost are already in use.The server may already be running in another process, or a system process may be using the port. To start this server you will need to stop the other
process or change the port number(s).
是不是很多人教你重启电脑呢,下面教大家一个不用重启计算机 的方法。
此方法也可以解决,windows上如何结束进程的详细过程,下面附详细,图文说明
在dos下,输入 netstat -ano|findstr 8080
//说明:查看占用8080端口的进程
显示占用端口的进程
taskkill /pid 6856 /f
//说明,运行windows自带taskkill命令,将上面显示的进程号,结束掉。
下面有图为证
怎么解决tomcat占用8080端口问题图文教程,到此结束,希望对大家有所帮助。祝大家,工作愉快,
不用重启计算机了,次方法也可以解决其他类似问题,在编程当中对大家的困扰。
