


福利!原生tabbar代码分享
由于众所周知的原因,html写的tabbar十分卡顿,一直在寻求更高效的解决方案(用户才不管什么情怀不情怀,只认性能)
现在分享用js调用原生画tabbar的功能,看附件.
一来分享给大家,少走弯路;二来给自己做个备份.
由于众所周知的原因,html写的tabbar十分卡顿,一直在寻求更高效的解决方案(用户才不管什么情怀不情怀,只认性能)
现在分享用js调用原生画tabbar的功能,看附件.
一来分享给大家,少走弯路;二来给自己做个备份.

求混合开发 需要把geturl获取到的地址传到php数据库
需要把geturl获取到的地址传到php数据库
function getURL() {
alert( "页面地址为:"+embed.getURL() );
}
把上面这段代码获取到的url发送到PHP的数据库 现在页面有用户ID的变量 变量已经赋值好 用户登陆以后就能得到用户ID 把获取到的URL 发送到数据库的url字段保存到对应的用户下即可 有能做的大神联系 QQ95026686
需要把geturl获取到的地址传到php数据库
function getURL() {
alert( "页面地址为:"+embed.getURL() );
}
把上面这段代码获取到的url发送到PHP的数据库 现在页面有用户ID的变量 变量已经赋值好 用户登陆以后就能得到用户ID 把获取到的URL 发送到数据库的url字段保存到对应的用户下即可 有能做的大神联系 QQ95026686

MUI 用了这么久感觉没有一个单独的文档来说明各种mui的css类
MUI 用了这么久感觉没有一个单独的文档来说明各种mui的css类,都是在文档中偶尔夹杂进行点说明,或者是我太笨没发现。比如:mui-action-menu是干什么的,mui-bar我知道是标题栏的,加上它后标栏就置顶不会动了,还有很多MUI的CSS类不知道怎么用,也不知道是什么意思。或者在MUI 文档加个搜索功能,一个一个点开来用浏览器搜也比较麻烦。
MUI 用了这么久感觉没有一个单独的文档来说明各种mui的css类,都是在文档中偶尔夹杂进行点说明,或者是我太笨没发现。比如:mui-action-menu是干什么的,mui-bar我知道是标题栏的,加上它后标栏就置顶不会动了,还有很多MUI的CSS类不知道怎么用,也不知道是什么意思。或者在MUI 文档加个搜索功能,一个一个点开来用浏览器搜也比较麻烦。
收起阅读 »
android 单个大文件断点续传
最近公司项目需求做大文件的单点续传
分享下
java类代码
后台异步切割文件 切完返回true
/**
     * 切割文件保存到指定目录 根据指定名称保存
     * @param pWebview
     * @param array
     */
    public void cutFile(final IWebview pWebview, JSONArray array){
        final String CallBackID = array.optString(0);
        final String filePath = array.optString(2);
        final String cutPath = array.optString(3);

        AsyncTask<String, Void, String> execute = new AsyncTask<String, Void, String>() {
            public void execute(String taskId, String filePath, String cutPath) {
            }

            @Override
            protected String doInBackground(String... params) {
                java.net.HttpURLConnection connection = null;

                byte[] buffer = new byte[readStep];
                FileInputStream file = null;
                File f =new File(filePath);
                String fileName=f.getName();
                try {
                    file = new FileInputStream(filePath);
                    int len = 0;
                    int AllLen = 0;
                    try {
                        FileInputStream fs = new FileInputStream(filePath);
                        fileSize = fs.available();
                        AllLen = fileSize / (readStep);
                        if(fileSize % (readStep) > 0){
                            AllLen++;
                        }
                    } catch (IOException e) {
                        // TODO Auto-generated catch block
                        e.printStackTrace();
                    }
                    int nowCount = 1;
                    while ((len = file.read(buffer)) > 0) {
                        String strFilePath = cutPath+fileName+".part";
                        try {
                            File cutfile = new File(strFilePath);
                            if (!cutfile.exists()) {
                                Log.e("TestFile", "Create the file:" + strFilePath);
                                cutfile.getParentFile().mkdirs();
                                cutfile.createNewFile();
                            }
                            RandomAccessFile raf = new RandomAccessFile(cutfile, "rwd");
                            raf.seek(0);
                            raf.write(buffer,0,(int)len);
                            raf.close();
                        } catch (Exception e) {
                            Log.e("TestFile", "Error on write File:" + e);
                        }
                        nowCount++;
                    };
                } catch (FileNotFoundException e) {
                    e.printStackTrace();
                } catch (IOException e) {
                    e.printStackTrace();
                }

                return "abc";
            }

            protected void onPostExecute(String result) {
                Log.e("result",result);
                if(result == "abc"){
                    JSONArray newArray = new JSONArray();
                    newArray.put(true);
                    JSUtil.execCallback(pWebview, CallBackID, newArray, JSUtil.OK, true);
                }

            }

        }.execute();

    }
后台异步提交文件夹中所有文件碎片
/**
     *
     * @param pWebview
     * @param array
     *
     *    taskId    temp[0]
     *    AllLen    temp[1]
     *    nowCount  temp[2]
     */
    public void sendTempFile(IWebview pWebview, JSONArray array){
        String CallBackID = array.optString(0);
        String cutPath = array.optString(1);
        String URLPath = array.optString(2);

        byte[] buffer = new byte[readStep];
        File file = new File(cutPath);
        File[] fs = file.listFiles();
        for (File f : fs){
            String newString = f.getName().toString().replace(".part","");

            Pattern pen = Pattern.compile("_");

            String[] temp = pen.split(newString);

            String fileName = temp[3];
            Log.e("fileName",temp[3]);
            //获取文件大小
            FileInputStream fst = null;
            try {
                fst = new FileInputStream(f.getPath());
            } catch (FileNotFoundException e) {
                e.printStackTrace();
            }
            try {
                fileSize = fst.available();
            } catch (IOException e) {
                e.printStackTrace();
            }
            //执行异步上传提交
            asyncSendTempFiles(URLPath+"&task_id="+temp[0]+"&fileSize="+fileSize,f.getPath(),fileName,buffer,0,Integer.parseInt(temp[1]),Integer.parseInt(temp[2]),pWebview,CallBackID);
        }
    }

    public void asyncSendTempFiles(final String urlPath, final String filePath, final String fileName, final byte[] buffer, final int count, final int allLength, final int nowCount, final IWebview pWebview, final String CallBackID){

        AsyncTask<String, Void, String> execute = new AsyncTask<String, Void, String>() {
            public void execute(String urlPath, String filePath, String fileName, byte[] buffer, int count, int allLength, int nowCount) {
            }

            @Override
            protected String doInBackground(String... params) {
                java.net.HttpURLConnection connection = null;

                try {
                    Log.e("urlPath",urlPath+"&allLength="+allLength+"&nowCount="+nowCount+"&fileName="+URLEncoder.encode(fileName, "UTF-8"));
                    URL url = new URL(urlPath+"&allLength="+allLength+"&nowCount="+nowCount+"&fileName="+URLEncoder.encode(fileName, "UTF-8"));
                    connection = (java.net.HttpURLConnection) url.openConnection();
                    connection.setRequestMethod("POST");
                    connection.setUseCaches(false);
                    connection.setDoOutput(true);

                    FileInputStream is = new FileInputStream(filePath);
                    byte[] b = new byte[is.available()];
                    Log.e("available",is.available()+"");
                    is.read(b);
                    OutputStream os = connection.getOutputStream();
                    os.write(b);
                    os.flush();
                    os.close();
                    if(connection.getResponseCode() == 200){
                        Log.e("ResponseMessage",connection.getResponseMessage());
                        return changeInputStream(connection.getInputStream(),"UTF-8");
                    }else{
                    }
                } catch (IOException e) {
                    Log.e("urlPath","url error");
                    e.printStackTrace();
                }
                return "";
            }

            protected void onPostExecute(String result) {
                Log.e("result",result);
                try {
                    JSONObject jsonObject = new JSONObject(result);
                    //int resultCode = jsonObject.getInt("resultcode");
                    String data = jsonObject.getString("status");
                    Log.e("result-data",data);
                    if(data == "0"){
                        //传输成功 删除当前文件
                        File file=new File(filePath);
                        //文件是否存在
                        if(file.exists())
                        {
                            file.delete();
                            Log.e("result-data","文件已经被删除了");
                        }
                    }

                } catch (JSONException e) {
                    Log.e("result",result);
                    e.printStackTrace();
                }
//                JSONArray newArray = new JSONArray();
//                newArray.put(result);
//                JSUtil.execCallback(pWebview, CallBackID, newArray, JSUtil.OK, true);

            }

        }.execute();
    }

    /**
     * 将一个输入流转换成指定编码的字符串
     *
     * @param inputStream
     * @param encode
     * @return
     */
    private static String changeInputStream(InputStream inputStream,
                                            String encode) {

        // 内存流
        ByteArrayOutputStream byteArrayOutputStream = new ByteArrayOutputStream();
        byte[] data = new byte[1024];
        int len = 0;
        String result = null;
        if (inputStream != null) {
            try {
                while ((len = inputStream.read(data)) != -1) {
                    byteArrayOutputStream.write(data, 0, len);
                }
                result = new String(byteArrayOutputStream.toByteArray(), encode);
            } catch (IOException e) {
                e.printStackTrace();
            }
        }
        return result;
    }
初学一个多月,终于制作完成了一个简陋的app并上架了!
首先,感谢社区里的大神们和QQ群里的大神们的帮助,自己摸爬滚打制作的简易APP终于上线了。
苹果的app store也顺利上线!

感觉自己又有信心了!
首先,感谢社区里的大神们和QQ群里的大神们的帮助,自己摸爬滚打制作的简易APP终于上线了。
苹果的app store也顺利上线!
感觉自己又有信心了!

【公告】关于HBuilder 8.1.2不能正常启动,Android平台地图滑动卡顿、地图POI搜索后不显示数据等问题的解决办法
IDE
HBuilder不能正常启动
HBuilder启动时长时间停留在启动界面或闪退。
Android
Android平台地图滑动卡顿
Android平台下,创建plus.maps.Map控件时,不设置position参数默认使用static,会使得地图控件滑动非常卡顿,影响使用
Android平台修复地图POI搜索后不显示数据的问题
Android平台下,plus.maps.Map控件中搜索地点后数据不能正确标识在地图
解决办法
8.1.3及以上版本的HBuilder已修复以上问题,请更新或下载最新版HBuilder。
IDE
HBuilder不能正常启动
HBuilder启动时长时间停留在启动界面或闪退。
Android
Android平台地图滑动卡顿
Android平台下,创建plus.maps.Map控件时,不设置position参数默认使用static,会使得地图控件滑动非常卡顿,影响使用
Android平台修复地图POI搜索后不显示数据的问题
Android平台下,plus.maps.Map控件中搜索地点后数据不能正确标识在地图
解决办法
8.1.3及以上版本的HBuilder已修复以上问题,请更新或下载最新版HBuilder。
收起阅读 »HBuilder 工具条插件 新手必备插件 【终身免费的】
HBuilder 工具条插件 新手必备插件
管理大大 觉得可以给加个精哦~!
功能:
1、集成常用网页开发手册 php js css jq 等
PHP超级手册【核心功能: 直接将常用近千个常用PHP命令汉化中文 解决很多新手小白 知道某些函数功能 但是苦于不知道是哪个命令 去百度搜索又不能很快的找到说明 那么此功能就帮助很大了 你只要知道你需要写的功能的大概汉语意思 就可以直接定位搜索出 英文函数命令哦】
2、工具 集成了常用的一些计算机工具 省却了在开发途中需要打开某些东西影响效率
3、编码 集成常用的一些文本编码换算 适合快速操作。
安装:
直接解压覆盖到HBuilder 根目录覆盖即可
请将此文件直接复制到 HBuilder安装根目录下。 直接替换。
启动办法:F10 或者HOME都可以呼出 呼出区别 F10 不吸附窗体 HOME键 吸附内嵌到HBuilder软件工具条
拖放移动:本软件上述两种模式均支持随意移动 鼠标移动到绿色工具条顶部边缘 鼠标按着不放 可以随意移动
作者:九六重生
QQ:14434001
作者官网:96wk.com
祝您使用愉悦!
下面贴上插件部分截图 喜欢的就下载吧


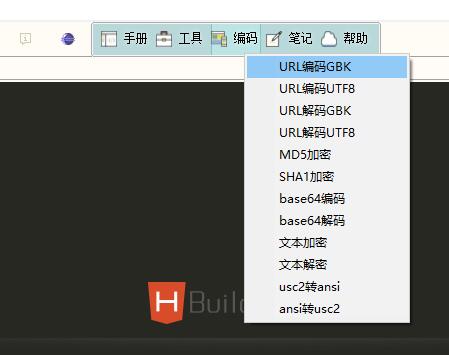
插件下载见附件 最底部哦
HBuilder 工具条插件 新手必备插件
管理大大 觉得可以给加个精哦~!
功能:
1、集成常用网页开发手册 php js css jq 等
PHP超级手册【核心功能: 直接将常用近千个常用PHP命令汉化中文 解决很多新手小白 知道某些函数功能 但是苦于不知道是哪个命令 去百度搜索又不能很快的找到说明 那么此功能就帮助很大了 你只要知道你需要写的功能的大概汉语意思 就可以直接定位搜索出 英文函数命令哦】
2、工具 集成了常用的一些计算机工具 省却了在开发途中需要打开某些东西影响效率
3、编码 集成常用的一些文本编码换算 适合快速操作。
安装:
直接解压覆盖到HBuilder 根目录覆盖即可
请将此文件直接复制到 HBuilder安装根目录下。 直接替换。
启动办法:F10 或者HOME都可以呼出 呼出区别 F10 不吸附窗体 HOME键 吸附内嵌到HBuilder软件工具条
拖放移动:本软件上述两种模式均支持随意移动 鼠标移动到绿色工具条顶部边缘 鼠标按着不放 可以随意移动
作者:九六重生
QQ:14434001
作者官网:96wk.com
祝您使用愉悦!
下面贴上插件部分截图 喜欢的就下载吧
插件下载见附件 最底部哦
收起阅读 »【5+】跨webview多页面 触发事件
本文源地址:https://segmentfault.com/a/1190000008844889
在日常撸功能中,很多情况都需要用到通知页面,mui呢给我们已经内置写好啦,当当当,就是 mui.fire
我们来看看之前所写的用法
mui.fire
耶?这时候有童鞋就会问了,咋了之前不是写了mui.fire的文章了吗?为啥又有了这一篇捏?
哈哈,这篇文章我们主要来讲解5+的实现方案,不用mui.fire,就相当于自己写一个通知的js功能,让大家更明白其原理,以及更好地不止是拘束于非得用到mui.js
原理介绍
关键词
- plus.webview.evalJS
- dispatchEvent
在B页面通知A页面,我们暂时不管通知A页面的内容,只是希望B页面调用一段代码,能让A页面弹出一个alert
这时候我们就要用到webview的evalJS方法了
A.html
        <header class="mui-bar mui-bar-nav">
            <h1 class="mui-title">我是A页面</h1>
        </header>
        <div class="mui-content">
            <button type="button" class="mui-btn mui-btn-blue">打开B页面</button>
        </div>
        <script src="js/mui.min.js"></script>
        <script type="text/javascript">
            mui.init()
            mui.plusReady(function(){
                document.querySelector("button").addEventListener('tap',function(){
                    mui.openWindow('B.html')
                })
            })
        </script>
B.html
        <header class="mui-bar mui-bar-nav">
            <a class="mui-action-back mui-icon mui-icon-left-nav mui-pull-left"></a>
            <h1 class="mui-title">我是B页面</h1>
        </header>
        <div class="mui-content">
            <button type="button" class="mui-btn mui-btn-blue">通知A页面</button>
        </div>
        <script src="js/mui.min.js"></script>
        <script type="text/javascript">
            mui.init()
            mui.plusReady(function(){
                document.querySelector("button").addEventListener('tap',function(){
                    // 通知A页面的方法
                })
            })
        </script>
那么,怎么才能通知A弹出框呢?我们需要用到关键词所提到的 plus.webview.evalJS
嘿嘿, 我们现在B获取到A的Webview对象,然后通过evalJS来向A页面发送一段代码让其执行
// 通知A页面的方法
var A = plus.webview.getLaunchWebview()
A.evalJS('alert("我是被B的")')
点击一下按钮,果不其然,我们的弹出框就显示出来,当然我们也还可以定义其它的函数来接收响应
A
function faqme(){
    alert('啊,乖乖站好!')
}
B
// 通知A页面的方法
var A = plus.webview.getLaunchWebview()
A.evalJS('faqme()')
当然,A页面执行了faqme函数,弹出了乖乖站好
其实,mui.fire的内部实现就是其原理
我们可以看一下其代码
这个 dispatchEvent 是什么呢?
我们可以将这个方法理解为用来触发dom事件
相关详细文档:
事件触发器-----dispatchEvent
这下条理就很清楚拉!
A页面自定义事件 => B页面触发A页面事件回调并传参
嘿嘿,就是这么简单,但是本文章还没有结束,既然都到这了,干脆我们来自己封装一下这个通知功能吧!
造轮子
我们新建一个文件,美其名曰:Broadcast.js
在这里我采用ES6 Class的方式编写
//页面通知

class Broadcast{
    /**
     * 构造器函数
     */
    constructor(){

    }

}
我们先来实现最基础的两个功能
- 监听事件(订阅)
- 触发事件(发布)
//页面通知
class Broadcast{
/**
* 构造器函数
*/
constructor(){
}
/**
* 事件监听
* @param {String} eventName 事件名称
* @param {Function} callback 事件触发后执行的回调函数
* @return {Broadcast} this
*/
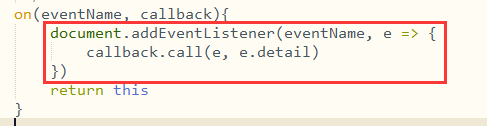
on(eventName, callback){
document.addEventListener(eventName, e => {
callback.call(e, e.detail)
})
return this
}
/**
* 事件触发
* @param {String} eventName 事件名称
* @param {Object} data 参数
* @return {Broadcast} this
*/
emit(eventName, data){
// 获取所有的webview
var all = plus.webview.all()
// 遍历全部页面
for(var w in all){
// 挨个来evalJS
all[w].evalJS(`document.dispatchEvent(new CustomEvent('${eventName}', {
detail:JSON.parse('${JSON.stringify(data)}'),
bubbles: true,
cancelable: true
}));`)
}
return this
}
}
ok, 我们在页面中引用并尝试用一下
A
        <header class="mui-bar mui-bar-nav">
            <h1 class="mui-title">我是A页面</h1>
        </header>
        <div class="mui-content">
            <button type="button" class="mui-btn mui-btn-blue">打开B页面</button>
        </div>
        <script src="js/mui.min.js"></script>
        <script type="text/javascript" src="js/Broadcast.js" ></script>
        <script type="text/javascript">
            mui.init()
            mui.plusReady(function(){
                document.querySelector("button").addEventListener('tap',function(){
                    mui.openWindow('B.html')
                })
            })
            new Broadcast().on('say', function(data){
                alert(JSON.stringify(data))
            })
        </script>
B
<header class="mui-bar mui-bar-nav">
<a class="mui-action-back mui-icon mui-icon-left-nav mui-pull-left"></a>
<h1 class="mui-title">我是B页面</h1>
</header>
<div class="mui-content">
<button type="button" class="mui-btn mui-btn-blue">通知A页面</button>
</div>
<script src="js/mui.min.js"></script>
<script type="text/javascript" src="js/Broadcast.js" ></script>
<script type="text/javascript">
mui.init()
mui.plusReady(function(){
document.querySelector("button").addEventListener('tap',function(){
// 通知A页面的方法
//var A = plus.webview.getLaunchWebview()
//A.evalJS('alert("我是被B的")')
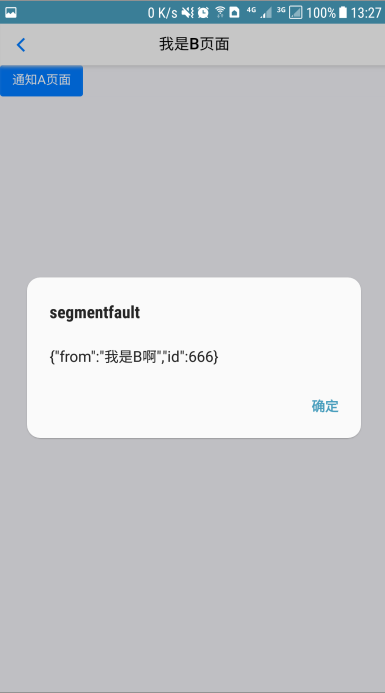
new Broadcast().emit('say', {
from: '我是B啊',
id: 666
})
})
})
</script>点击B页面的按钮
哇哈哈,基础功能已经实现了怎么样,
当然,这只是最基础的实现了监听,触发而已,后续还需要更多的优化,以及管理,辣么,下章见
上一章我们了解到通过webview evalJS的方法来跨页面通知事件,但是在其中还是有需要优化的地方,接下来我们慢慢的来分析。
上节回顾:【5+】跨webview多页面 触发事件(一)
代码:
//页面通知

class Broadcast{
    /**
     * 构造器函数
     */
    constructor(){

    }

    /**
     * 事件监听
     * @param {String} eventName 事件名称
     * @param {Function} callback 事件触发后执行的回调函数
     * @return {Broadcast} this
     */
    on(eventName, callback){
        document.addEventListener(eventName, e => {
            callback.call(e, e.detail)
        })
        return this
    }

    /**
     * 事件触发
     * @param {String} eventName 事件名称
     * @param {Object} data 参数
     * @return {Broadcast} this
     */
    emit(eventName, data){
        // 获取所有的webview
        var all = plus.webview.all()
        // 遍历全部页面
        for(var w in all){
            // 挨个来evalJS
            all[w].evalJS(`document.dispatchEvent(new CustomEvent('${eventName}', {
                detail:JSON.parse('${JSON.stringify(data)}'),
                bubbles: true,
                cancelable: true
            }));`)
        }
        return this
    }

}
自定义需要通知页面
可以看到,之前我们emit发送通知时,是对所有的webview进行获取通知,但是有时候我们并不想通知所有的页面,而且通知别人的时候也不想通知自己啊,怎么办,在这里我们在emit方法参数多加一个配置项
    /**
     * 事件触发
     * @param {String} eventName 事件名称
     * @param {Object} data 传参参数值
     * @param {Object} options 其它配置参数
     */
    emit(eventName, data, {
        self = false, // 是否通知自己,默认不通知
        views = [], // 为空数组时,默认通知全部,为string数组时,认为是id,为object时,认为是webview对象
    } = {}) {
        //code...
    }
然后我们针对传进来的拓展参数,进行逻辑判断,得到最终我们需要通知的webview list
    /**
     * 事件触发
     * @param {String} eventName 事件名称
     * @param {Object} data 传参参数值
     * @param {Object} options 其它配置参数
     */
    emit(eventName, data, {
        self = false, // 是否通知自己,默认不通知
        views = [], // 为空数组时,默认通知全部,为string数组时,认为是id,为object时,认为是webview对象
    } = {}) {
        let all = []
        // 获取 特定 webview 数组
        if(views.length > 0) {
            // 如果是string 类型,则统一处理获取为 webview对象
            all.map(item => typeof item === 'string' ? plus.webview.getWebviewById(item) : item)
        } else {
            // 不特定通知的webview数组时,直接获取全部已存在的webview
            all = plus.webview.all()
        }
        // 如果不需要通知到当前webview 则过滤
        if(!self) {
            let v =  plus.webview.currentWebview()
            all = all.filter(item => item.id !== v.id)
        }
        // 遍历所有需要通知的页面
        for(let v of all) {
            v.evalJS(`document.dispatchEvent(new CustomEvent('${eventName}', {
                detail:JSON.parse('${JSON.stringify(data)}'),
                bubbles: true,
                cancelable: true
            }));`)
        }
    }
如何调用
new Broadcast().emit('say',{
    name: 'newsning',
    age: 26
},{
    self: true, // 通知当前页面 默认不通知
    views: ['A.html','C.html'] // 默认通知所有页面,但不包括当前页面
})
// 如上代码就只通知到了3个页面, 当前页面, A页面, C页面
事件 - [ 订阅 | 发布 | 取消 ]
如果你遇到那种还需要移除监听事件,亦或者Once只监听一次的事件,再或是你看个代码不爽

ok!我们来撸一套简单的 守望先锋模式,哦不,是观察者模式
事件订阅
瞧瞧我们之前的代码,on方法是直接把传进来的函数作为调用,这样子在外部调用时移除事件就没路子了,包括Once也很是蛋疼
    /**
     * 事件监听
     * @param {String} eventName 事件名称
     * @param {Function} callback 事件触发后执行的回调函数
     * @return {Broadcast} this
     */
    on(eventName, callback){
        document.addEventListener(eventName, e => {
            callback.call(e, e.detail)
        })
        return this
    }
我们先来定义好2个专门放置事件的存储对象,碧如 :
    // 事件列表
    const events = {
        // 事件名称 : 事件方法数组
    },
    // 单次事件列表
    events_one = {

    }
之后我们修改一下on方法,并新增一个once方法
    /**
     * 事件监听
     * @param {String} eventName 事件名称
     * @param {Function} callback 事件触发后执行的回调函数
     */
    on(eventName, callback) {
        // 获取已存在的事件列表
        if(!events[eventName]) {
            events[eventName] = []
        }
        // 添加至数组
        events[eventName].push(callback)
    }

    /**
     * 事件监听 (单次)
     * @param {String} eventName 事件名称
     * @param {Function} callback 事件触发后执行的回调函数
     */
    once(eventName, callback) {
        // 获取已存在的单次事件列表
        if(!events_one[eventName]) {
            events_one[eventName] = []
        }
        // 添加至数组
        events_one[eventName].push(callback)
    }
酱紫,每次添加事件时,都会放入我们的事件列表中,但是!我们并没有给任何dom添加事件,而仅仅是放入所对应的事件列表中,奇怪了,看看我们之前的添加事件方法
给document监听一个事件
触发document事件
nonono , 我们不这么借助document亦或者其它dom的事件监听,还记得上一章的 evalJS('faqme()')么?我们就用亲切的函数来触发事件
事件发布
在事件订阅当中,我们仅仅只是把事件放入了事件列表中,我们该如何触发?
编写一个静态方法,用来触发当前页面的事件, 然后通过
    static _emitSelf(eventName, data) {
        if(typeof data === 'string') {
            data = JSON.parse(data)
        }
        // 获取全部事件列表 和 单次事件列表,并且合并
        let es = [...(events[eventName] || []), ...(events_one[eventName] || [])]
        // 遍历触发
        for(let f of es) {
            f && f.call(f, data)
        }
        // 单次事件清空
        events_one[eventName] = []
    }
再配合修改一下 emit 里面的 evalJS
    /**
     * 事件触发
     * @param {String} eventName 事件名称
     * @param {Object} data 传参参数值
     * @param {Object} options 其它配置参数
     */
    emit(eventName, data, {
        self = false, // 是否通知自己,默认不通知
        views = [], // 为空数组时,默认通知全部,为string数组时,认为是id,为object时,认为是webview对象
    } = {}) {
        let all = []
        // 获取 特定 webview 数组
        if(views.length > 0) {
            // 如果是string 类型,则统一处理获取为 webview对象
            all.map(item => typeof item === 'string' ? plus.webview.getWebviewById(item) : item)
        } else {
            // 不特定通知的webview数组时,直接获取全部已存在的webview
            all = plus.webview.all()
        }
        // 如果不需要通知到当前webview 则过滤
        if(!self) {
            let v =  plus.webview.currentWebview()
            all = all.filter(item => item.id !== v.id)
        }
        // 遍历所有需要通知的页面
        for(let v of all) {
            /////////////////////////
            ////////////////这里是重点, 调用Broadcast的静态方法
            /////////////////////////
            v.evalJS(`Broadcast && Broadcast._emitSelf && Broadcast._emitSelf('${eventName}', '${JSON.stringify(data)}')`)
        }
    }
这样子,就巧妙的触发了每个webview页面 相对应的事件,并且单次事件也得到了清除
事件移除
我们知道前面的事件订阅只是将事件存起来了,事件移除相应的就是把事件列表清空
    static _offSelf(eventName) {
        //清空事件列表
        events[eventName] = []
        events_one[eventName] = []
    }
最后收尾
所定义的2个静态方法,触发 和 移除 事件,我们在内部代理2个相应的方法
    /**
     * 当前页面事件触发
     * @param {String} eventName 事件名称
     * @param {Object} data 传参参数值
     */
    emitSelf(eventName) {
        Broadcast._emitSelf(eventName, data)
    }

    /**
     * 清空当前页面事件
     * @param {String} eventName 事件名称
     */
    offSelf(eventName) {
        Broadcast._offSelf(eventName)
    }
最后,成果已经出现
A.html
            var b = new Broadcast()

            b.on('say', function(data){
                alert(JSON.stringify(data))

                // 删除本页面say事件
                //b.offSelf('say')
            })

            b.once('say', function(data){
                //单次
                alert('单次:'+JSON.stringify(data))
            })
B.html
            new Broadcast().emit('say', {
                from: '我是B啊',
                id: 666
            })
最后附上源码:
/**
 * 5+ Broadcast.js by NewsNing 宁大大
 */

// 获取当前webview
const getIndexView = (() => {
        // 缓存
        let indexView = null
        return(update = false) => {
            if(update || indexView === null) {
                indexView = plus.webview.currentWebview()
            }
            return indexView
        }
    })(),
    // 获取全部webview
    getAllWebview = (() => {
        // 缓存
        let allView = null
        return(update = false) => {
            if(update || allView === null) {
                allView = plus.webview.all()
            }
            return allView
        }
    })()

// 事件列表
const events = {

    },
    // 单次事件列表
    events_one = {

    }

//页面通知类
class Broadcast {
    /**
     * 构造器函数
     */
    constructor() {

    }

    /**
     * 事件监听
     * @param {String} eventName 事件名称
     * @param {Function} callback 事件触发后执行的回调函数
     */
    on(eventName, callback) {
        // 获取已存在的事件列表
        if(!events[eventName]) {
            events[eventName] = []
        }
        // 添加至数组
        events[eventName].push(callback)
    }

    /**
     * 事件监听 (单次)
     * @param {String} eventName 事件名称
     * @param {Function} callback 事件触发后执行的回调函数
     */
    once(eventName, callback) {
        // 获取已存在的单次事件列表
        if(!events_one[eventName]) {
            events_one[eventName] = []
        }
        // 添加至数组
        events_one[eventName].push(callback)
    }

    /**
     * 事件触发
     * @param {String} eventName 事件名称
     * @param {Object} data 传参参数值
     * @param {Object} options 其它配置参数
     */
    emit(eventName, data, {
        self = false, // 是否通知自己,默认不通知
        views = [], // 为空数组时,默认通知全部,为string数组时,认为是id,为object时,认为是webview对象
    } = {}) {
        let jsstr = `Broadcast && Broadcast._emitSelf && Broadcast._emitSelf('${eventName}', '${JSON.stringify(data)}')`
        this._sendMessage(jsstr, self, views)
    }

    /**
     * 当前页面事件触发
     * @param {String} eventName 事件名称
     * @param {Object} data 传参参数值
     */
    emitSelf(eventName) {
        Broadcast._emitSelf(eventName, data)
    }

    /**
     * 事件关闭移除
     * @param {String} eventName 事件名称
     * @param {Object} options 其它配置参数
     */
    off(eventName, {
        self = false, // 是否通知自己,默认不通知
        views = [] // 为空数组时,默认通知全部,为string数组时,认为是id,为object时,认为是webview对象
    } = {}) {
        let jsstr = `Broadcast && Broadcast._offSelf && Broadcast._offSelf('${eventName}')`
        this._sendMessage(jsstr, self, views)
    }

    /**
     * 清空当前页面事件
     * @param {String} eventName 事件名称
     */
    offSelf(eventName) {
        Broadcast._offSelf(eventName)
    }

    /**
     * 页面通知
     * @param {String} jsstr 需要运行的js代码
     * @param {Boolean} self 是否通知自己,默认不通知
     * @param {Array} views 为空数组时,默认通知全部,为string数组时,认为是id,为object时,认为是webview对象
     */
    _sendMessage(
        jsstr = '',
        self = false,
        views = []
    ) {
        let all = []
        // 获取 特定 webview 数组
        if(views.length > 0) {
            // 如果是string 类型,则统一处理获取为 webview对象
            all.map(item => typeof item === 'string' ? plus.webview.getWebviewById(item) : item)
        } else {
            // 不特定通知的webview数组时,直接获取全部已存在的webview
            all = getAllWebview(true)
        }
        // 如果不需要通知到当前webview 则过滤
        if(!self) {
            let v = getIndexView()
            all = all.filter(item => item.id !== v.id)
        }
        // 遍历全部页面
        for(let v of all) {
            v.evalJS(jsstr)
        }
    }

    static _emitSelf(eventName, data) {
        if(typeof data === 'string') {
            data = JSON.parse(data)
        }
        // 获取全部事件列表 和 单次事件列表,并且合并
        let es = [...(events[eventName] || []), ...(events_one[eventName] || [])]
        // 遍历触发
        for(let f of es) {
            f && f.call(f, data)
        }
        // 单次事件清空
        events_one[eventName] = []
    }

    static _offSelf(eventName) {
        //清空事件列表
        events[eventName] = []
        events_one[eventName] = []
    }

}
您也可以通过babel在线转化成es5 在线转换地址

最后您还可以在github上看到一些其它5+ Api封装的源码 [5+ api整合]
https://github.com/NewsNIng/ni
class Man{
    constructor(){
        this.name = 'newsning'
    }
    say(){
        console.log('天行健, 君子以自强不息. ')
    }
}本文源地址:https://segmentfault.com/a/1190000008844889
在日常撸功能中,很多情况都需要用到通知页面,mui呢给我们已经内置写好啦,当当当,就是 mui.fire
我们来看看之前所写的用法
mui.fire
耶?这时候有童鞋就会问了,咋了之前不是写了mui.fire的文章了吗?为啥又有了这一篇捏?
哈哈,这篇文章我们主要来讲解5+的实现方案,不用mui.fire,就相当于自己写一个通知的js功能,让大家更明白其原理,以及更好地不止是拘束于非得用到mui.js
原理介绍
关键词
- plus.webview.evalJS
- dispatchEvent
在B页面通知A页面,我们暂时不管通知A页面的内容,只是希望B页面调用一段代码,能让A页面弹出一个alert
这时候我们就要用到webview的evalJS方法了
A.html
        <header class="mui-bar mui-bar-nav">
            <h1 class="mui-title">我是A页面</h1>
        </header>
        <div class="mui-content">
            <button type="button" class="mui-btn mui-btn-blue">打开B页面</button>
        </div>
        <script src="js/mui.min.js"></script>
        <script type="text/javascript">
            mui.init()
            mui.plusReady(function(){
                document.querySelector("button").addEventListener('tap',function(){
                    mui.openWindow('B.html')
                })
            })
        </script>
B.html
        <header class="mui-bar mui-bar-nav">
            <a class="mui-action-back mui-icon mui-icon-left-nav mui-pull-left"></a>
            <h1 class="mui-title">我是B页面</h1>
        </header>
        <div class="mui-content">
            <button type="button" class="mui-btn mui-btn-blue">通知A页面</button>
        </div>
        <script src="js/mui.min.js"></script>
        <script type="text/javascript">
            mui.init()
            mui.plusReady(function(){
                document.querySelector("button").addEventListener('tap',function(){
                    // 通知A页面的方法
                })
            })
        </script>
那么,怎么才能通知A弹出框呢?我们需要用到关键词所提到的 plus.webview.evalJS
嘿嘿, 我们现在B获取到A的Webview对象,然后通过evalJS来向A页面发送一段代码让其执行
// 通知A页面的方法
var A = plus.webview.getLaunchWebview()
A.evalJS('alert("我是被B的")')
点击一下按钮,果不其然,我们的弹出框就显示出来,当然我们也还可以定义其它的函数来接收响应
A
function faqme(){
    alert('啊,乖乖站好!')
}
B
// 通知A页面的方法
var A = plus.webview.getLaunchWebview()
A.evalJS('faqme()')
当然,A页面执行了faqme函数,弹出了乖乖站好
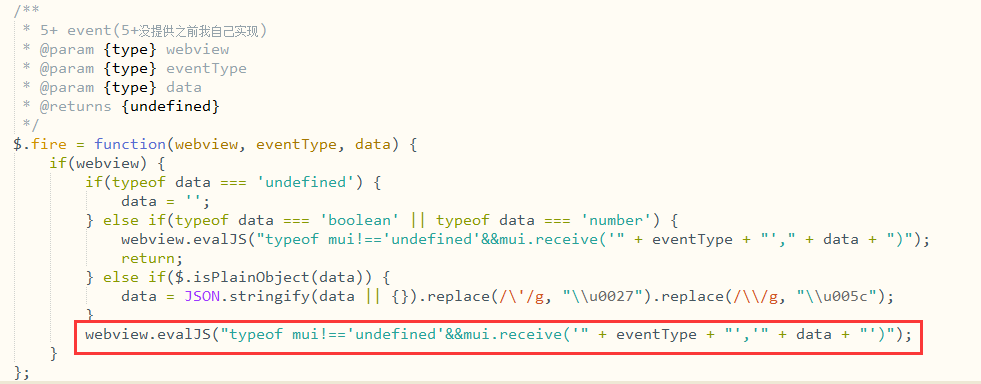
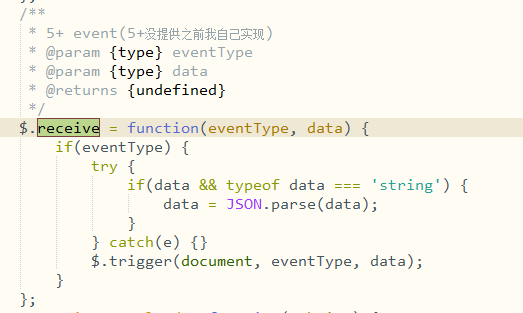
其实,mui.fire的内部实现就是其原理
我们可以看一下其代码
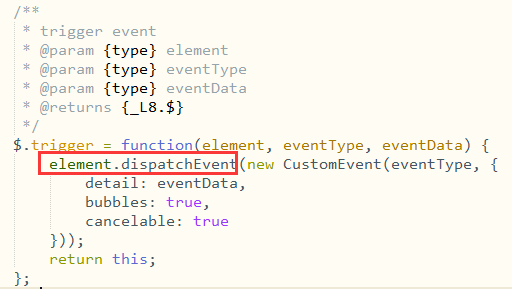
这个 dispatchEvent 是什么呢?
我们可以将这个方法理解为用来触发dom事件
相关详细文档:
事件触发器-----dispatchEvent
这下条理就很清楚拉!
A页面自定义事件 => B页面触发A页面事件回调并传参
嘿嘿,就是这么简单,但是本文章还没有结束,既然都到这了,干脆我们来自己封装一下这个通知功能吧!
造轮子
我们新建一个文件,美其名曰:Broadcast.js
在这里我采用ES6 Class的方式编写
//页面通知

class Broadcast{
    /**
     * 构造器函数
     */
    constructor(){

    }

}
我们先来实现最基础的两个功能
- 监听事件(订阅)
- 触发事件(发布)
//页面通知

class Broadcast{
    /**
     * 构造器函数
     */
    constructor(){

    }

    /**
     * 事件监听
     * @param {String} eventName 事件名称
     * @param {Function} callback 事件触发后执行的回调函数
     * @return {Broadcast} this
     */
    on(eventName, callback){
        document.addEventListener(eventName, e => {
            callback.call(e, e.detail)
        })
        return this
    }

    /**
     * 事件触发
     * @param {String} eventName 事件名称
     * @param {Object} data 参数
     * @return {Broadcast} this
     */
    emit(eventName, data){
        // 获取所有的webview
        var all = plus.webview.all()
        // 遍历全部页面
        for(var w in all){
            // 挨个来evalJS
            all[w].evalJS(`document.dispatchEvent(new CustomEvent('${eventName}', {
                detail:JSON.parse('${JSON.stringify(data)}'),
                bubbles: true,
                cancelable: true
            }));`)
        }
        return this
    }

}
ok, 我们在页面中引用并尝试用一下
A
        <header class="mui-bar mui-bar-nav">
            <h1 class="mui-title">我是A页面</h1>
        </header>
        <div class="mui-content">
            <button type="button" class="mui-btn mui-btn-blue">打开B页面</button>
        </div>
        <script src="js/mui.min.js"></script>
        <script type="text/javascript" src="js/Broadcast.js" ></script>
        <script type="text/javascript">
            mui.init()
            mui.plusReady(function(){
                document.querySelector("button").addEventListener('tap',function(){
                    mui.openWindow('B.html')
                })
            })
            new Broadcast().on('say', function(data){
                alert(JSON.stringify(data))
            })
        </script>
B
        <header class="mui-bar mui-bar-nav">
            <a class="mui-action-back mui-icon mui-icon-left-nav mui-pull-left"></a>
            <h1 class="mui-title">我是B页面</h1>
        </header>
        <div class="mui-content">
            <button type="button" class="mui-btn mui-btn-blue">通知A页面</button>
        </div>
        <script src="js/mui.min.js"></script>
        <script type="text/javascript" src="js/Broadcast.js" ></script>
        <script type="text/javascript">
            mui.init()
            mui.plusReady(function(){
                document.querySelector("button").addEventListener('tap',function(){
                    // 通知A页面的方法
                    //var A = plus.webview.getLaunchWebview()
                    //A.evalJS('alert("我是被B的")')
                    new Broadcast().emit('say', {
                        from: '我是B啊',
                        id: 666
                    })
                })
            })
        </script>
点击B页面的按钮
哇哈哈,基础功能已经实现了怎么样,
当然,这只是最基础的实现了监听,触发而已,后续还需要更多的优化,以及管理,辣么,下章见
上一章我们了解到通过webview evalJS的方法来跨页面通知事件,但是在其中还是有需要优化的地方,接下来我们慢慢的来分析。
上节回顾:【5+】跨webview多页面 触发事件(一)
代码:
//页面通知

class Broadcast{
    /**
     * 构造器函数
     */
    constructor(){

    }

    /**
     * 事件监听
     * @param {String} eventName 事件名称
     * @param {Function} callback 事件触发后执行的回调函数
     * @return {Broadcast} this
     */
    on(eventName, callback){
        document.addEventListener(eventName, e => {
            callback.call(e, e.detail)
        })
        return this
    }

    /**
     * 事件触发
     * @param {String} eventName 事件名称
     * @param {Object} data 参数
     * @return {Broadcast} this
     */
    emit(eventName, data){
        // 获取所有的webview
        var all = plus.webview.all()
        // 遍历全部页面
        for(var w in all){
            // 挨个来evalJS
            all[w].evalJS(`document.dispatchEvent(new CustomEvent('${eventName}', {
                detail:JSON.parse('${JSON.stringify(data)}'),
                bubbles: true,
                cancelable: true
            }));`)
        }
        return this
    }

}
自定义需要通知页面
可以看到,之前我们emit发送通知时,是对所有的webview进行获取通知,但是有时候我们并不想通知所有的页面,而且通知别人的时候也不想通知自己啊,怎么办,在这里我们在emit方法参数多加一个配置项
    /**
     * 事件触发
     * @param {String} eventName 事件名称
     * @param {Object} data 传参参数值
     * @param {Object} options 其它配置参数
     */
    emit(eventName, data, {
        self = false, // 是否通知自己,默认不通知
        views = [], // 为空数组时,默认通知全部,为string数组时,认为是id,为object时,认为是webview对象
    } = {}) {
        //code...
    }
然后我们针对传进来的拓展参数,进行逻辑判断,得到最终我们需要通知的webview list
    /**
     * 事件触发
     * @param {String} eventName 事件名称
     * @param {Object} data 传参参数值
     * @param {Object} options 其它配置参数
     */
    emit(eventName, data, {
        self = false, // 是否通知自己,默认不通知
        views = [], // 为空数组时,默认通知全部,为string数组时,认为是id,为object时,认为是webview对象
    } = {}) {
        let all = []
        // 获取 特定 webview 数组
        if(views.length > 0) {
            // 如果是string 类型,则统一处理获取为 webview对象
            all.map(item => typeof item === 'string' ? plus.webview.getWebviewById(item) : item)
        } else {
            // 不特定通知的webview数组时,直接获取全部已存在的webview
            all = plus.webview.all()
        }
        // 如果不需要通知到当前webview 则过滤
        if(!self) {
            let v =  plus.webview.currentWebview()
            all = all.filter(item => item.id !== v.id)
        }
        // 遍历所有需要通知的页面
        for(let v of all) {
            v.evalJS(`document.dispatchEvent(new CustomEvent('${eventName}', {
                detail:JSON.parse('${JSON.stringify(data)}'),
                bubbles: true,
                cancelable: true
            }));`)
        }
    }
如何调用
new Broadcast().emit('say',{
    name: 'newsning',
    age: 26
},{
    self: true, // 通知当前页面 默认不通知
    views: ['A.html','C.html'] // 默认通知所有页面,但不包括当前页面
})
// 如上代码就只通知到了3个页面, 当前页面, A页面, C页面
事件 - [ 订阅 | 发布 | 取消 ]
如果你遇到那种还需要移除监听事件,亦或者Once只监听一次的事件,再或是你看个代码不爽
ok!我们来撸一套简单的 守望先锋模式,哦不,是观察者模式
事件订阅
瞧瞧我们之前的代码,on方法是直接把传进来的函数作为调用,这样子在外部调用时移除事件就没路子了,包括Once也很是蛋疼
    /**
     * 事件监听
     * @param {String} eventName 事件名称
     * @param {Function} callback 事件触发后执行的回调函数
     * @return {Broadcast} this
     */
    on(eventName, callback){
        document.addEventListener(eventName, e => {
            callback.call(e, e.detail)
        })
        return this
    }
我们先来定义好2个专门放置事件的存储对象,碧如 :
    // 事件列表
    const events = {
        // 事件名称 : 事件方法数组
    },
    // 单次事件列表
    events_one = {

    }
之后我们修改一下on方法,并新增一个once方法
    /**
     * 事件监听
     * @param {String} eventName 事件名称
     * @param {Function} callback 事件触发后执行的回调函数
     */
    on(eventName, callback) {
        // 获取已存在的事件列表
        if(!events[eventName]) {
            events[eventName] = []
        }
        // 添加至数组
        events[eventName].push(callback)
    }

    /**
     * 事件监听 (单次)
     * @param {String} eventName 事件名称
     * @param {Function} callback 事件触发后执行的回调函数
     */
    once(eventName, callback) {
        // 获取已存在的单次事件列表
        if(!events_one[eventName]) {
            events_one[eventName] = []
        }
        // 添加至数组
        events_one[eventName].push(callback)
    }
酱紫,每次添加事件时,都会放入我们的事件列表中,但是!我们并没有给任何dom添加事件,而仅仅是放入所对应的事件列表中,奇怪了,看看我们之前的添加事件方法
给document监听一个事件
触发document事件
nonono , 我们不这么借助document亦或者其它dom的事件监听,还记得上一章的 evalJS('faqme()')么?我们就用亲切的函数来触发事件
事件发布
在事件订阅当中,我们仅仅只是把事件放入了事件列表中,我们该如何触发?
编写一个静态方法,用来触发当前页面的事件, 然后通过
    static _emitSelf(eventName, data) {
        if(typeof data === 'string') {
            data = JSON.parse(data)
        }
        // 获取全部事件列表 和 单次事件列表,并且合并
        let es = [...(events[eventName] || []), ...(events_one[eventName] || [])]
        // 遍历触发
        for(let f of es) {
            f && f.call(f, data)
        }
        // 单次事件清空
        events_one[eventName] = []
    }
再配合修改一下 emit 里面的 evalJS
    /**
     * 事件触发
     * @param {String} eventName 事件名称
     * @param {Object} data 传参参数值
     * @param {Object} options 其它配置参数
     */
    emit(eventName, data, {
        self = false, // 是否通知自己,默认不通知
        views = [], // 为空数组时,默认通知全部,为string数组时,认为是id,为object时,认为是webview对象
    } = {}) {
        let all = []
        // 获取 特定 webview 数组
        if(views.length > 0) {
            // 如果是string 类型,则统一处理获取为 webview对象
            all.map(item => typeof item === 'string' ? plus.webview.getWebviewById(item) : item)
        } else {
            // 不特定通知的webview数组时,直接获取全部已存在的webview
            all = plus.webview.all()
        }
        // 如果不需要通知到当前webview 则过滤
        if(!self) {
            let v =  plus.webview.currentWebview()
            all = all.filter(item => item.id !== v.id)
        }
        // 遍历所有需要通知的页面
        for(let v of all) {
            /////////////////////////
            ////////////////这里是重点, 调用Broadcast的静态方法
            /////////////////////////
            v.evalJS(`Broadcast && Broadcast._emitSelf && Broadcast._emitSelf('${eventName}', '${JSON.stringify(data)}')`)
        }
    }
这样子,就巧妙的触发了每个webview页面 相对应的事件,并且单次事件也得到了清除
事件移除
我们知道前面的事件订阅只是将事件存起来了,事件移除相应的就是把事件列表清空
    static _offSelf(eventName) {
        //清空事件列表
        events[eventName] = []
        events_one[eventName] = []
    }
最后收尾
所定义的2个静态方法,触发 和 移除 事件,我们在内部代理2个相应的方法
    /**
     * 当前页面事件触发
     * @param {String} eventName 事件名称
     * @param {Object} data 传参参数值
     */
    emitSelf(eventName) {
        Broadcast._emitSelf(eventName, data)
    }

    /**
     * 清空当前页面事件
     * @param {String} eventName 事件名称
     */
    offSelf(eventName) {
        Broadcast._offSelf(eventName)
    }
最后,成果已经出现
A.html
            var b = new Broadcast()

            b.on('say', function(data){
                alert(JSON.stringify(data))

                // 删除本页面say事件
                //b.offSelf('say')
            })

            b.once('say', function(data){
                //单次
                alert('单次:'+JSON.stringify(data))
            })
B.html
            new Broadcast().emit('say', {
                from: '我是B啊',
                id: 666
            })
最后附上源码:
/**
 * 5+ Broadcast.js by NewsNing 宁大大
 */

// 获取当前webview
const getIndexView = (() => {
        // 缓存
        let indexView = null
        return(update = false) => {
            if(update || indexView === null) {
                indexView = plus.webview.currentWebview()
            }
            return indexView
        }
    })(),
    // 获取全部webview
    getAllWebview = (() => {
        // 缓存
        let allView = null
        return(update = false) => {
            if(update || allView === null) {
                allView = plus.webview.all()
            }
            return allView
        }
    })()

// 事件列表
const events = {

    },
    // 单次事件列表
    events_one = {

    }

//页面通知类
class Broadcast {
    /**
     * 构造器函数
     */
    constructor() {

    }

    /**
     * 事件监听
     * @param {String} eventName 事件名称
     * @param {Function} callback 事件触发后执行的回调函数
     */
    on(eventName, callback) {
        // 获取已存在的事件列表
        if(!events[eventName]) {
            events[eventName] = []
        }
        // 添加至数组
        events[eventName].push(callback)
    }

    /**
     * 事件监听 (单次)
     * @param {String} eventName 事件名称
     * @param {Function} callback 事件触发后执行的回调函数
     */
    once(eventName, callback) {
        // 获取已存在的单次事件列表
        if(!events_one[eventName]) {
            events_one[eventName] = []
        }
        // 添加至数组
        events_one[eventName].push(callback)
    }

    /**
     * 事件触发
     * @param {String} eventName 事件名称
     * @param {Object} data 传参参数值
     * @param {Object} options 其它配置参数
     */
    emit(eventName, data, {
        self = false, // 是否通知自己,默认不通知
        views = [], // 为空数组时,默认通知全部,为string数组时,认为是id,为object时,认为是webview对象
    } = {}) {
        let jsstr = `Broadcast && Broadcast._emitSelf && Broadcast._emitSelf('${eventName}', '${JSON.stringify(data)}')`
        this._sendMessage(jsstr, self, views)
    }

    /**
     * 当前页面事件触发
     * @param {String} eventName 事件名称
     * @param {Object} data 传参参数值
     */
    emitSelf(eventName) {
        Broadcast._emitSelf(eventName, data)
    }

    /**
     * 事件关闭移除
     * @param {String} eventName 事件名称
     * @param {Object} options 其它配置参数
     */
    off(eventName, {
        self = false, // 是否通知自己,默认不通知
        views = [] // 为空数组时,默认通知全部,为string数组时,认为是id,为object时,认为是webview对象
    } = {}) {
        let jsstr = `Broadcast && Broadcast._offSelf && Broadcast._offSelf('${eventName}')`
        this._sendMessage(jsstr, self, views)
    }

    /**
     * 清空当前页面事件
     * @param {String} eventName 事件名称
     */
    offSelf(eventName) {
        Broadcast._offSelf(eventName)
    }

    /**
     * 页面通知
     * @param {String} jsstr 需要运行的js代码
     * @param {Boolean} self 是否通知自己,默认不通知
     * @param {Array} views 为空数组时,默认通知全部,为string数组时,认为是id,为object时,认为是webview对象
     */
    _sendMessage(
        jsstr = '',
        self = false,
        views = []
    ) {
        let all = []
        // 获取 特定 webview 数组
        if(views.length > 0) {
            // 如果是string 类型,则统一处理获取为 webview对象
            all.map(item => typeof item === 'string' ? plus.webview.getWebviewById(item) : item)
        } else {
            // 不特定通知的webview数组时,直接获取全部已存在的webview
            all = getAllWebview(true)
        }
        // 如果不需要通知到当前webview 则过滤
        if(!self) {
            let v = getIndexView()
            all = all.filter(item => item.id !== v.id)
        }
        // 遍历全部页面
        for(let v of all) {
            v.evalJS(jsstr)
        }
    }

    static _emitSelf(eventName, data) {
        if(typeof data === 'string') {
            data = JSON.parse(data)
        }
        // 获取全部事件列表 和 单次事件列表,并且合并
        let es = [...(events[eventName] || []), ...(events_one[eventName] || [])]
        // 遍历触发
        for(let f of es) {
            f && f.call(f, data)
        }
        // 单次事件清空
        events_one[eventName] = []
    }

    static _offSelf(eventName) {
        //清空事件列表
        events[eventName] = []
        events_one[eventName] = []
    }

}
您也可以通过babel在线转化成es5 在线转换地址
最后您还可以在github上看到一些其它5+ Api封装的源码 [5+ api整合]
https://github.com/NewsNIng/ni
class Man{
    constructor(){
        this.name = 'newsning'
    }
    say(){
        console.log('天行健, 君子以自强不息. ')
    }
}

咨询一下wap2app,能否支持打包成独立的app安装版本
如题,测试了一下,我们线下有很多客户,他们委托我们给他们开发了很多html5移动页面应用,可以在微信里面使用,现在他们希望能够转换成独立的app,我试用了你们的wap2app,发现只能打包成流应用,能够直接打包成独立app?
如题,测试了一下,我们线下有很多客户,他们委托我们给他们开发了很多html5移动页面应用,可以在微信里面使用,现在他们希望能够转换成独立的app,我试用了你们的wap2app,发现只能打包成流应用,能够直接打包成独立app?

