


分享uniapp使用原生Android推送消息(内推)以及点击通知监听数据
前言
由于用uniapp官方的plus.push.createMessage()在Android平台下推送通知无法显示推送时间,需要调用原生Android推送通知。
在社区综合了各大神的代码,具体如下:
推送
推送事件:
/**
  * android原生通知发送
  * @param content 通知内容
  * @param data json对象,存储通知的隐藏数据,用于点击通知时接收使用
  */
 android_notify(content = '', data = {}) {
  // #ifdef APP-PLUS
  var title = '通知标题';

  console.log('准备通知');
  console.log(plus.os.name);

  //Android平台下才使用此推送
  if (plus.os.name != 'Android') {
   return false;
  }

  //随机生成通知ID
  var NotifyID = Math.floor(Math.random() * 10000) + 1;

  var main = plus.android.runtimeMainActivity();
  var Context = plus.android.importClass("android.content.Context");
  var NotificationManager = plus.android.importClass("android.app.NotificationManager");
  var nm = main.getSystemService(Context.NOTIFICATION_SERVICE);

  var Notification = plus.android.importClass("android.app.Notification");
  var Intent = plus.android.importClass("android.content.Intent");
  var PendingIntent = plus.android.importClass("android.app.PendingIntent");
  var intent = new Intent(main, main.getClass());

  //传递参数
  var payload = {
   'msg':content,
   'notify_id':NotifyID,
   'data':data
  };
  intent.putExtra("receive", JSON.stringify(payload));

  //PendingIntent.getActivity的第二个参数需要设置为随机数,否则多个通知时会导致前面的通知被后面的通知替换Extra的数据
  var pendingIntent = PendingIntent.getActivity(main, 0, intent, PendingIntent.FLAG_CANCEL_CURRENT);
  var SystemVersion = plus.os.version;
  var firstVersionNumber = Number(SystemVersion.split('.')[0]);
  var r = plus.android.importClass("android.R");
  var mNotification;

  //判断当前系统版本在8.0及以上
  if (firstVersionNumber >= 8){
   var NotificationChannel = plus.android.importClass('android.app.NotificationChannel');
   var channel = new NotificationChannel("s"+ NotifyID, "1", NotificationManager.IMPORTANCE_HIGH);
   nm.createNotificationChannel(channel);
   Notification = plus.android.importClass("android.support.v4.app.NotificationCompat");
   mNotification = new Notification.Builder(main, "s" + NotifyID);
  } else {
   Notification = plus.android.importClass("android.app.Notification");
   mNotification = new Notification.Builder(main);
  }

  mNotification.setContentTitle(title)       //设置标题
  mNotification.setContentText(content);       //设置内容
  //mNotification.setSubText('');        //子内容暂时去掉
  mNotification.setAutoCancel(true);       //设置点击消失
  mNotification.setShowWhen(true);       //显示通知时间,貌似不加这句也能显示
  mNotification.setTicker("PadInfo");       //弹出通知
  mNotification.setSmallIcon(17301620);       //设置当前app图标
  //mNotification.setDefaults(Notification.DEFAULT_VIBRATE);  //声音、闪灯、震动效果,可叠加,此语句无效
  mNotification.setPriority(Notification.PRIORITY_DEFAULT);   //通知优先级
  mNotification.flags=Notification.FLAG_ONLY_ALERT_ONCE;     //发起通知时震动
  mNotification.setContentIntent(pendingIntent);
  var mNb = mNotification.build();

  //判断当前系统版本在8.0及以上
  if (firstVersionNumber >= 8){
   nm.notify("s" + NotifyID, NotifyID, mNb);
  } else {
   nm.notify(NotifyID, mNb);
  }
  //void plus.device.beep(2);//bee bee叫
  plus.device.vibrate(300);//震动

  console.log('通知结束');
  return true;
  // #endif
 }
调用方法:
android_notify('test', {
    params1: 'params1',
    params2: 'params2',
    params3: 'params3',
    params4: 'params4'
});
接收
点击通知接收通知数据
 /**
  * android原生通知接收
  */
 android_receive() {
  // #ifdef APP-PLUS
  if (plus.os.name != 'Android') {
   return false;
  }
  //android原生通知栏接收器(程序退出后无效)
  var main = plus.android.runtimeMainActivity();
  var intent = main.getIntent();
  var message = intent && intent.getExtra != undefined ? intent.getExtra("receive") : null;
  console.log(message);
  message = message ? JSON.parse(message) : '';
  if (message) {
   //删除当前通知
   // var Context = plus.android.importClass("android.content.Context");
   // var nm = main.getSystemService(Context.NOTIFICATION_SERVICE);
   // console.log(message.notify_id);
   //nm.cancel('s' + message.notify_id, message.notify_id);//安卓版本大于等于8的
   //nm.cancel(message.notify_id);//安卓版本小于8的
   // nm.cancelAll();

   //把消息数据置空,以免再次打开APP时重复执行此处
   intent.putExtra("receive", '');

   var params = message.data;
   if (params1 == 'xxx') {
    //TODO do something.
   } else if (params1 == 'yyy') {
    //TODO do something.
   }
  }
  // #endif
 }
调用方法
  // App.Vue
  onShow: function() {
   ...

   // #ifdef APP-PLUS
   android_receive();
   // #endif

   ...
  },
注意事项
- 已知问题:第一次通知会有通知延迟现象,大概2-3秒后才会收到通知,之后就不会了(官方的推送没有此问题);
- 程序被关闭后点击通知消息无法再接收到通知的数据(暂时没有好的解决方案,如果大家有好的方法,欢迎回复分享);
希望能帮助大家。
-
2020年4月3日补充:
-
多行显示通知消息
//创建大文本样式
var bigTextStyle = plus.android.importClass("android.support.v4.app.NotificationCompat$BigTextStyle");
var style = new bigTextStyle();
style.setBigContentTitle(title);
// style.setSummaryText("备注一行");
style.bigText(content);//这里可以设置超长的文本
mNotification.setStyle(style); //设置大文本样式以上代码放到var mNb = mNotification.build();之前即可

uniapp打包成H5样式不生效问题
本来用uniapp写个小程序的,因为需求需要打包成H5,本来以为不会有什么问题的,打包完成之后发现一个button的样式没有了,原来该button的样式是通过id绑定的,后来折腾了半天都没有用,改成class绑定样式就可以了
本来用uniapp写个小程序的,因为需求需要打包成H5,本来以为不会有什么问题的,打包完成之后发现一个button的样式没有了,原来该button的样式是通过id绑定的,后来折腾了半天都没有用,改成class绑定样式就可以了


小团队承接APP定制开发项目、iOS、安卓版均可开发
小团队承接APP定制开发项目、iOS、安卓均可开发
首先提供项目整体需求逻辑;需求确认;
计算工期报价以及开发人员配备;
签订合同按合同约定支付合同款项;
线稿图、UI设计图确认;
UI设计图确认后,签订确认书;
前端代码编写切图;
后台搭建完成开发;
本团队开始测试,测试完毕无误后,交由客户进行测试;
客户测试无误,开始安排项目对接,后台不需要的数据进行清除;
客户安排上线时间,进行上线;
小团队承接APP定制开发项目、iOS、安卓均可开发
首先提供项目整体需求逻辑;需求确认;
计算工期报价以及开发人员配备;
签订合同按合同约定支付合同款项;
线稿图、UI设计图确认;
UI设计图确认后,签订确认书;
前端代码编写切图;
后台搭建完成开发;
本团队开始测试,测试完毕无误后,交由客户进行测试;
客户测试无误,开始安排项目对接,后台不需要的数据进行清除;
客户安排上线时间,进行上线;
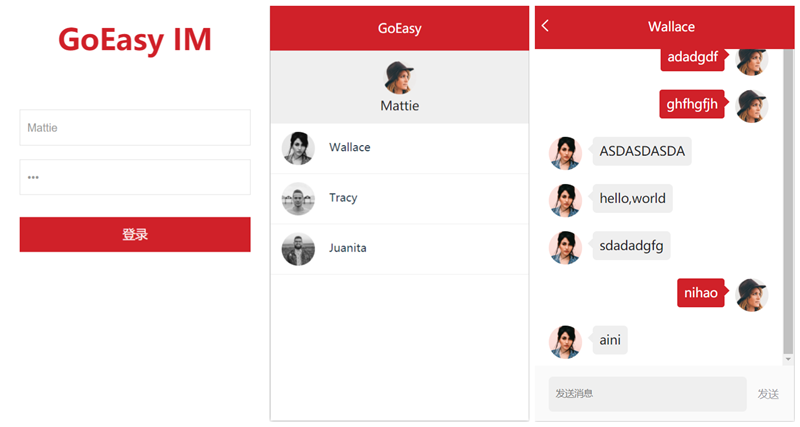
websocket IM聊天教程-教你用GoEasy快速实现IM聊天
经常有朋友问起GoEasy如何实现IM,今天就手把手的带大家从头到尾用GoEasy实现一个完整IM聊天,全套代码已经放在了github。
uniapp im即时聊天demo:https://ext.dcloud.net.cn/plugin?id=5177
今日的前端技术发展可谓百花争鸣,为了确保本文能帮助到使用任何技术栈的前端工程师,Demo的源码实现上选择了最简单的HTML+JQuery的方式,所以,不论您是准备用Uniapp开发移动APP,还是准备写个小程序,不论你喜欢用React还是VUE,还是React-native或ionic, 或者您直接用原生Javascript和Typescript,都是可以轻松理解,全套代码已经放在github上了,下载后不需要搭建任何环境,直接用浏览器打开,就可以用来聊天了。
作为一名程序员,在编码之前,首先要做的当然是架构设计!什么?确认不是装逼?当然,别忘了星爷的那句话:我是一名程序员!没有思想的程序员,跟咸鱼有什么区别呢?

咳咳咳,正文开始:
首先我们代码层将整个功能分为四层:
1、华丽的展示层(index.html):你们负责功能优雅强大,我负责貌美如花。展示层其实就是纯静态的html,显示界面,高端点说,就是负责人机交互的。
2、承上启下的控制层(controller.js): 控制层作用就是接受页面操作的参数,调用service层,根据页面的操作指令或者service层的反馈,负责对页面的展示做出控制。不可以编写任何与展示逻辑无关的代码,也就是不能侵入任何业务逻辑。衡量这一层做的好不好的的标准,就是假设删掉controller和view层,service能准确完整的描述所有的业务逻辑。
3、运筹帷幄的关键核心业务层(service.js): 接受controller层的指令,实现业务逻辑,必要时候调用goeasy提供网络通讯支持,或调用restapi层完成数据的查询和保存。这一层包含所有的业务逻辑,任何业务逻辑相关的代码,都不可以漏到其他层,确保只要service存在,整个项目的灵魂就存在,确保service层完全是原生代码实现业务逻辑,而没有类似于vue或者小程序前端框架的语法和代码渗入,从而达到service层能够在任何前端框架通用。
4、神通广大的服务器交互层(restapi.js): 根据传入的参数完成服务器端接口的调用,来实现数据查询或、修改或保存,并且返回结果,不参与任何业务逻辑。在实践中大部分是负责发送http请求和服务器交互。
分层的目标就是为了确保除了在核心业务层以外的其他层次能够被轻易的替换。举例:我们当前的版本是使用html+jquery完成,如果希望再开发一个Uniapp实现的小程序或者app,只需要用Uniapp画个新外壳,对controller层做一些修改,就可轻松完成一个小程序或者APP版的IM聊天,不需要对service和restapi做任何修改 。同理,如果服务器端发生变化,或者更换了与服务器的交互方式,只需要对restapi做出修改,其他三层则不受任何影响。
OK, 有了如此清晰而优秀的代码结构分层设计,就差一段优雅的代码来实现了。
Ready, Go! 编码开始:
1、登录页面
这个最简单,闭着眼睛画个界面,用户名密码正确后,完成以下几个步骤。
1.1. 根据用户名查询出来的用户,初始化全局变量:当前用户。
1.2. 将controller层的onNewMessage, onFriendOnline,onFriendOffline赋值给service 。
1.3. new goeasy建立长连接,记得要传入userid。如需在subscriberPrencese用户上下线提醒事件,或者在调用HereNow获取在线用户列表时,能拿到userId以外,更多的信息,可以在userdata里传入。
1.4. 调用restapi,查询该用户的好友列表,根据结果初始化本地好友列表friendlist。
1.5. 循环好友,以friendUUID为channel,调用subscriberPrencense,监听所有好友的上下线事件。
1.6. 以当前用户的uuid为channel,调用subscriber,监听来自所有好友发来的消息。
1.7. 显示好友列表界面。
1.8. 初始化好友的在线状态,以数组形式传入所有好友的userId,调用hereNowByUserIds,获得当前在线的好友列表,根据结果将friendlist里属于在线状态的friend的在线状态改为true,同时将界面上在线用户的头像改为彩色。
2、显示好友列表(1.7)
2.1. service层获取当前用户信息,在页面显示当前用户的username和头像。
2.2. service获取本地好友列表,然后controller将每个好友的头像和名称显示到页面上,对于当前在线的用户,旁边显示一个小绿点,并且为每个好友绑定一个点击事件,点击好友时,显示聊天界面, 如果该好友有未读消息的,红色小气泡显示未读消息数量。
3、点击一个好友,进入与其聊天的界面
3.1. 窗口顶部显示聊天好友的名称。
3.2. 调用restapi根据当前用户的UUID和好友的friendUUID,查询与该好友的聊天记录,如果这个聊天记录的sender是自己,就显示在页面的右边,如果是朋友发的,则显示在左边。
3.3. 将该好友在本地数据里未读消息恢复为0。
3.4. 并且将聊天记录滚动到最下边。
3.5. 如果点击返回,就直接调进入第二步。
4、在聊天界面,输入消息后发送
4.1. 当前用户uuid作为senderUUID和消息内容组成chatMessage。
4.2. 调用restapi将chatMessage发往“服务器”端,我们建议的方式是所有的消息发往自己的服务器端,在服务器端先保存入库,然后在服务端publish。具体做法是将chatMessage转换为字符串,入库,然后将该好友的channel作为channel调用GoEasy完成publish。(当然,你会发现在我们的示例代码这个过程是在restapi里直接完成的,原因是为了demo的演示方便,我们模拟的服务器端行为,相信你懂的)
4.3. 自己的消息发送成功后,显示在聊天窗口的右边。
5、收到新消息
5.1. 在1.6定义了接收好友新消息的事件,当收到一条好友的新消息时。
5.2. 首先调用restapi保存到服务器。
5.3. 本地好友数据里的未读消息加1。
5.4. 如果当前界面是好友列表,将来自该朋友的未读消息的数字显示在界面上。
5.5. 如果收到的消息就是来自当前对话窗口,就将消息显示到聊天窗口,并且调用service将本地数据里该好友的未读消息清0。
6、用户上下线提醒
6.1. 在1.5监听了用户上下线,当收到一个用户上线或下线的通知后(注意返回的是一个列表,一次事件有可能有多个好友都发生了状态变化)。
6.2. 修改将本地数据里该好友对象在线状态,如果是上线事件就显示彩色,如果是下线就显示黑白色。
至此,整个聊天功能就完成了,是不是很简单呢。在整个demo中只用到了goeasy的四个API:subscriber(接收消息),subscriberPrencense(接受上下线通知),hereNowByUserIds(获取当前在线用户列表), publish(发送消息)。详情可以参考goeasy官方文档https://www.goeasy.io/cn/developers.html
注意事项:
1.在restapi.js 里 可以找到用户名和密码
2.在service.js里将appkey替换为您自己的common key
3.subscriberPrencense和hereNowByUserIds这两个方法,默认是关闭的,需要扫码添加GoEasy客服开通哦~
将代码与本文一起对照阅读后,要写个IM,比画个0还简单,如果使用的是其他的前端技术框架如小程序和React-native,只需要重新画个外壳就好了!什么,你不相信?如果觉得你被骗了,请扫码添加微信好友,欢迎吐槽!没有您暴风雨般的吐槽和春风一般的赞美,我如何进步呢?

彩弹在最后:
看了代码的你,是不是发现我们的RESTAPI其实是个冒牌货,并不会真的和远程的某个服务器交互,这是为了方便演示,我们定义了两个变量来帮助模拟远程数据的查询,然后用localstorage来模拟服务器的保存,相信聪明的你,肯定已经get到我们的代码思路了。
GoEasy系列教程:
经常有朋友问起GoEasy如何实现IM,今天就手把手的带大家从头到尾用GoEasy实现一个完整IM聊天,全套代码已经放在了github。
uniapp im即时聊天demo:https://ext.dcloud.net.cn/plugin?id=5177
今日的前端技术发展可谓百花争鸣,为了确保本文能帮助到使用任何技术栈的前端工程师,Demo的源码实现上选择了最简单的HTML+JQuery的方式,所以,不论您是准备用Uniapp开发移动APP,还是准备写个小程序,不论你喜欢用React还是VUE,还是React-native或ionic, 或者您直接用原生Javascript和Typescript,都是可以轻松理解,全套代码已经放在github上了,下载后不需要搭建任何环境,直接用浏览器打开,就可以用来聊天了。
作为一名程序员,在编码之前,首先要做的当然是架构设计!什么?确认不是装逼?当然,别忘了星爷的那句话:我是一名程序员!没有思想的程序员,跟咸鱼有什么区别呢?
咳咳咳,正文开始:
首先我们代码层将整个功能分为四层:
1、华丽的展示层(index.html):你们负责功能优雅强大,我负责貌美如花。展示层其实就是纯静态的html,显示界面,高端点说,就是负责人机交互的。
2、承上启下的控制层(controller.js): 控制层作用就是接受页面操作的参数,调用service层,根据页面的操作指令或者service层的反馈,负责对页面的展示做出控制。不可以编写任何与展示逻辑无关的代码,也就是不能侵入任何业务逻辑。衡量这一层做的好不好的的标准,就是假设删掉controller和view层,service能准确完整的描述所有的业务逻辑。
3、运筹帷幄的关键核心业务层(service.js): 接受controller层的指令,实现业务逻辑,必要时候调用goeasy提供网络通讯支持,或调用restapi层完成数据的查询和保存。这一层包含所有的业务逻辑,任何业务逻辑相关的代码,都不可以漏到其他层,确保只要service存在,整个项目的灵魂就存在,确保service层完全是原生代码实现业务逻辑,而没有类似于vue或者小程序前端框架的语法和代码渗入,从而达到service层能够在任何前端框架通用。
4、神通广大的服务器交互层(restapi.js): 根据传入的参数完成服务器端接口的调用,来实现数据查询或、修改或保存,并且返回结果,不参与任何业务逻辑。在实践中大部分是负责发送http请求和服务器交互。
分层的目标就是为了确保除了在核心业务层以外的其他层次能够被轻易的替换。举例:我们当前的版本是使用html+jquery完成,如果希望再开发一个Uniapp实现的小程序或者app,只需要用Uniapp画个新外壳,对controller层做一些修改,就可轻松完成一个小程序或者APP版的IM聊天,不需要对service和restapi做任何修改 。同理,如果服务器端发生变化,或者更换了与服务器的交互方式,只需要对restapi做出修改,其他三层则不受任何影响。
OK, 有了如此清晰而优秀的代码结构分层设计,就差一段优雅的代码来实现了。
Ready, Go! 编码开始:
1、登录页面
这个最简单,闭着眼睛画个界面,用户名密码正确后,完成以下几个步骤。
1.1. 根据用户名查询出来的用户,初始化全局变量:当前用户。
1.2. 将controller层的onNewMessage, onFriendOnline,onFriendOffline赋值给service 。
1.3. new goeasy建立长连接,记得要传入userid。如需在subscriberPrencese用户上下线提醒事件,或者在调用HereNow获取在线用户列表时,能拿到userId以外,更多的信息,可以在userdata里传入。
1.4. 调用restapi,查询该用户的好友列表,根据结果初始化本地好友列表friendlist。
1.5. 循环好友,以friendUUID为channel,调用subscriberPrencense,监听所有好友的上下线事件。
1.6. 以当前用户的uuid为channel,调用subscriber,监听来自所有好友发来的消息。
1.7. 显示好友列表界面。
1.8. 初始化好友的在线状态,以数组形式传入所有好友的userId,调用hereNowByUserIds,获得当前在线的好友列表,根据结果将friendlist里属于在线状态的friend的在线状态改为true,同时将界面上在线用户的头像改为彩色。
2、显示好友列表(1.7)
2.1. service层获取当前用户信息,在页面显示当前用户的username和头像。
2.2. service获取本地好友列表,然后controller将每个好友的头像和名称显示到页面上,对于当前在线的用户,旁边显示一个小绿点,并且为每个好友绑定一个点击事件,点击好友时,显示聊天界面, 如果该好友有未读消息的,红色小气泡显示未读消息数量。
3、点击一个好友,进入与其聊天的界面
3.1. 窗口顶部显示聊天好友的名称。
3.2. 调用restapi根据当前用户的UUID和好友的friendUUID,查询与该好友的聊天记录,如果这个聊天记录的sender是自己,就显示在页面的右边,如果是朋友发的,则显示在左边。
3.3. 将该好友在本地数据里未读消息恢复为0。
3.4. 并且将聊天记录滚动到最下边。
3.5. 如果点击返回,就直接调进入第二步。
4、在聊天界面,输入消息后发送
4.1. 当前用户uuid作为senderUUID和消息内容组成chatMessage。
4.2. 调用restapi将chatMessage发往“服务器”端,我们建议的方式是所有的消息发往自己的服务器端,在服务器端先保存入库,然后在服务端publish。具体做法是将chatMessage转换为字符串,入库,然后将该好友的channel作为channel调用GoEasy完成publish。(当然,你会发现在我们的示例代码这个过程是在restapi里直接完成的,原因是为了demo的演示方便,我们模拟的服务器端行为,相信你懂的)
4.3. 自己的消息发送成功后,显示在聊天窗口的右边。
5、收到新消息
5.1. 在1.6定义了接收好友新消息的事件,当收到一条好友的新消息时。
5.2. 首先调用restapi保存到服务器。
5.3. 本地好友数据里的未读消息加1。
5.4. 如果当前界面是好友列表,将来自该朋友的未读消息的数字显示在界面上。
5.5. 如果收到的消息就是来自当前对话窗口,就将消息显示到聊天窗口,并且调用service将本地数据里该好友的未读消息清0。
6、用户上下线提醒
6.1. 在1.5监听了用户上下线,当收到一个用户上线或下线的通知后(注意返回的是一个列表,一次事件有可能有多个好友都发生了状态变化)。
6.2. 修改将本地数据里该好友对象在线状态,如果是上线事件就显示彩色,如果是下线就显示黑白色。
至此,整个聊天功能就完成了,是不是很简单呢。在整个demo中只用到了goeasy的四个API:subscriber(接收消息),subscriberPrencense(接受上下线通知),hereNowByUserIds(获取当前在线用户列表), publish(发送消息)。详情可以参考goeasy官方文档https://www.goeasy.io/cn/developers.html
注意事项:
1.在restapi.js 里 可以找到用户名和密码
2.在service.js里将appkey替换为您自己的common key
3.subscriberPrencense和hereNowByUserIds这两个方法,默认是关闭的,需要扫码添加GoEasy客服开通哦~
将代码与本文一起对照阅读后,要写个IM,比画个0还简单,如果使用的是其他的前端技术框架如小程序和React-native,只需要重新画个外壳就好了!什么,你不相信?如果觉得你被骗了,请扫码添加微信好友,欢迎吐槽!没有您暴风雨般的吐槽和春风一般的赞美,我如何进步呢?
彩弹在最后:
看了代码的你,是不是发现我们的RESTAPI其实是个冒牌货,并不会真的和远程的某个服务器交互,这是为了方便演示,我们定义了两个变量来帮助模拟远程数据的查询,然后用localstorage来模拟服务器的保存,相信聪明的你,肯定已经get到我们的代码思路了。
GoEasy系列教程:

使用native.js for ios如何获取bundleId
相对于native.js for android来说,native.js for ios对objective-c封装以后提供给我们的方法要少得多,基本上属于我们得知道objective-c怎么写,才能用native.js for ios来improtClass一个类,还得知道类下的所有方法,才能正常得使用。
下面就是使用 native.js for ios 获取应用bundleId的方式:
// 判断系统类型
if (plus.os.name === 'Android') {
  // 获取安卓应用包名
  packageName = plus.android.runtimeMainActivity().getPackageName()
} else {
  // 获取苹果应用包名(bundleId)
  packageName = plus.ios.importClass('NSBundle').mainBundle().bundleIdentifier()
}相对于native.js for android来说,native.js for ios对objective-c封装以后提供给我们的方法要少得多,基本上属于我们得知道objective-c怎么写,才能用native.js for ios来improtClass一个类,还得知道类下的所有方法,才能正常得使用。
下面就是使用 native.js for ios 获取应用bundleId的方式:
// 判断系统类型
if (plus.os.name === 'Android') {
  // 获取安卓应用包名
  packageName = plus.android.runtimeMainActivity().getPackageName()
} else {
  // 获取苹果应用包名(bundleId)
  packageName = plus.ios.importClass('NSBundle').mainBundle().bundleIdentifier()
}
uniapp电影app作品展示 分享
从当初的 5+ 到 uniapp第一版 流应用 ,到现在最新uni-app,一直使用dc家 的产品制作app。
最近做了个影视app玩,不得不说uniapp确实强大。
首页用的vue写的,轮播也是再hllo uniapp 找的。顺便做了个下拉刷新。

分类 页页很方便。上拉加载更多,一句代码就解决了。


至于播放器,功能页很多,也可以直接用官方的。当然播放器肯定也能播放 直播流。
倍速,投屏,弹幕,自然都可以实现。
这里的难点 我想就是线路切换问题,很容易绕晕。
而且很多人有解析,有切片,有的还是对接别人的api,也有一次传完数据,也有点一集传一集的api。

搜索界面使用的 nvue ,这里用到了input ,这些几乎都不用写,直接导入复制黏贴就行。
打开页面 自带加载效果。

再说说网页功能,uniapp已经集成 x5内核,同时影视站长关心的网页播放器也得到了解决
上面界面就是和腾讯产品里的播放器一模一样。
好了,介绍这么多。希望大家支持国产,有兴趣的伙伴可以加入我们的qq群343440607,一起开发app
从当初的 5+ 到 uniapp第一版 流应用 ,到现在最新uni-app,一直使用dc家 的产品制作app。
最近做了个影视app玩,不得不说uniapp确实强大。
首页用的vue写的,轮播也是再hllo uniapp 找的。顺便做了个下拉刷新。
分类 页页很方便。上拉加载更多,一句代码就解决了。
至于播放器,功能页很多,也可以直接用官方的。当然播放器肯定也能播放 直播流。
倍速,投屏,弹幕,自然都可以实现。
这里的难点 我想就是线路切换问题,很容易绕晕。
而且很多人有解析,有切片,有的还是对接别人的api,也有一次传完数据,也有点一集传一集的api。
搜索界面使用的 nvue ,这里用到了input ,这些几乎都不用写,直接导入复制黏贴就行。
打开页面 自带加载效果。
再说说网页功能,uniapp已经集成 x5内核,同时影视站长关心的网页播放器也得到了解决
上面界面就是和腾讯产品里的播放器一模一样。
好了,介绍这么多。希望大家支持国产,有兴趣的伙伴可以加入我们的qq群343440607,一起开发app
想购买几个已上架有一定用户访问量的uniapp
想购买几个已上架有一定用户访问量的uniapp
感兴趣的加下微信,done2008
想购买几个已上架有一定用户访问量的uniapp
感兴趣的加下微信,done2008

pages.json 解耦 助力 uni-app 模块化编程---uni-dev-tools
uni-dev-tools 是什么
uni-dev-tools是一个辅助开发 uni-app 的旁路辅助开发工具。对uni-app原目录设计只做优化,不做侵入。他不是开发框架,也不是插件。
该工具只为简化开发人员工作,优化多人开发模式,负责将pages.json中的配置分解再合并的自动化工作。
解决pages.json混乱的问题。因此pages.json不需要提交,pages.json 将会由其他文件自动合并生成。
pages.json 痛点
1.公有、私有混合,造成模块化开发,移植困难
2.团队开发,多人同时编辑该文件,代码提交,签出遇到若干问题
3.假若系统有50个view,那么pages.json 将会有1公里那么长,问谁能维护?
uni-dev-tools 的愿望
1.满足系统功能模块化;
2.全局与私有解耦合;
3.避免团队开发同时编辑一个文件;
4.方便模块移植;
5.我希望的uni-app框架结构为:pages文件夹为各模块的根目录,其中一个文件夹就是一个模块,里面包含视图层,逻辑层,私有路由配置文件。各功能模块的私有化配置,仅局限在各自的目录下,不与框架目录产生耦合关系。各开发人员的工作空间仅限于当前模块的工作目录。
使用 uni-dev-tools 后,你的 uni-app 目录结构可以这样

目录结构不限于以上,您可以按照自己的习惯,进行构建。如果您需要改造uni-app的目录,请注意下面
uni-dev-tools 监控以下目录
pages config workers sub-packages
uni-dev-tools 监控以下文件
router.json,condition.json,easy-com.json,global-style.json,config.json,tab-bar.json,preload-rule.json,sub-packages.json
所以,只要您的目录是以上目录,并且文件名是以上所列,无论你在json文件中方什么,都会自动合并到pages.json,所以目录结构您可以自己发挥。
因此 uni-dev-tools 干了以下这些事
1.应用根目录下增加了 config 目录,里面存放系统的全局配置文件,比如:condition.json,easy-com.json,global-style.json,tab-bar.json,通过各json文件的文件名可以看出,是对应pages.json 中的 各配置节点。
2.如果存在workers目录,在该目录下生成 config.json ,对应 pages.json 中的 workers 属性配置。
3.应用根目录下创建分包目录 sub-packages,并生成 preload-rule.json 对应 pages.json 中的preloadRule 分包下载规则 属性。今后所有分包都放在这个文件夹下,一个目录一个包,在该包下创建router.json文件,可对应pages.json 中的subPackages属性配置。
4.pages目录中存放主包页面模块,一个文件夹一个模块,该文件夹下的router.json 对应 pages.json 中的 pages 属性配置。
5.如果您对于以上的目录设计不满意,您可以自己进行精简,uni-dev-tools 监控的目录为"pages config workers sub-packages",监控的文件名为"router.json,condition.json,easy-com.json,global-style.json,config.json,tab-bar.json,preload-rule.json",
只要你确保是这项文件名和目录名,配置文件放置的层级结构你可以自定。比如你可以只创建config文件夹,并包配置都放在这个文件夹下,也是可以的啦。不需要强制按照我的目录编排。
6.监控以上各目录文件,发生新建或修改时,自动拉取配置,合并生成 pages.json
你要如何做
转到应用根目录下,运行
npm install uni-dev-tools

//对应用进行初始化,从pages.json 中分解各个属性节点,生成各个配置文件
npx uni-dev-tools init

//对文件进行监控,自动将各文件中的配置信息合并到pages.json中
npx uni-dev-tools watch
第一次
请先进行初始化,将pages.json中的配置分解到各个配置文件,如果不这么做,直接 watch,您的pages.json 有可能会被您创建的空json文件覆盖。
下一步,你可以做什么
删除 pages.json
bug 提交 新需求提交
https://github.com/try520/uni-dev-tools/issues
uni-dev-tools 是什么
uni-dev-tools是一个辅助开发 uni-app 的旁路辅助开发工具。对uni-app原目录设计只做优化,不做侵入。他不是开发框架,也不是插件。
该工具只为简化开发人员工作,优化多人开发模式,负责将pages.json中的配置分解再合并的自动化工作。
解决pages.json混乱的问题。因此pages.json不需要提交,pages.json 将会由其他文件自动合并生成。
pages.json 痛点
1.公有、私有混合,造成模块化开发,移植困难
2.团队开发,多人同时编辑该文件,代码提交,签出遇到若干问题
3.假若系统有50个view,那么pages.json 将会有1公里那么长,问谁能维护?
uni-dev-tools 的愿望
1.满足系统功能模块化;
2.全局与私有解耦合;
3.避免团队开发同时编辑一个文件;
4.方便模块移植;
5.我希望的uni-app框架结构为:pages文件夹为各模块的根目录,其中一个文件夹就是一个模块,里面包含视图层,逻辑层,私有路由配置文件。各功能模块的私有化配置,仅局限在各自的目录下,不与框架目录产生耦合关系。各开发人员的工作空间仅限于当前模块的工作目录。
使用 uni-dev-tools 后,你的 uni-app 目录结构可以这样
目录结构不限于以上,您可以按照自己的习惯,进行构建。如果您需要改造uni-app的目录,请注意下面
uni-dev-tools 监控以下目录
pages config workers sub-packages
uni-dev-tools 监控以下文件
router.json,condition.json,easy-com.json,global-style.json,config.json,tab-bar.json,preload-rule.json,sub-packages.json
所以,只要您的目录是以上目录,并且文件名是以上所列,无论你在json文件中方什么,都会自动合并到pages.json,所以目录结构您可以自己发挥。
因此 uni-dev-tools 干了以下这些事
1.应用根目录下增加了 config 目录,里面存放系统的全局配置文件,比如:condition.json,easy-com.json,global-style.json,tab-bar.json,通过各json文件的文件名可以看出,是对应pages.json 中的 各配置节点。
2.如果存在workers目录,在该目录下生成 config.json ,对应 pages.json 中的 workers 属性配置。
3.应用根目录下创建分包目录 sub-packages,并生成 preload-rule.json 对应 pages.json 中的preloadRule 分包下载规则 属性。今后所有分包都放在这个文件夹下,一个目录一个包,在该包下创建router.json文件,可对应pages.json 中的subPackages属性配置。
4.pages目录中存放主包页面模块,一个文件夹一个模块,该文件夹下的router.json 对应 pages.json 中的 pages 属性配置。
5.如果您对于以上的目录设计不满意,您可以自己进行精简,uni-dev-tools 监控的目录为"pages config workers sub-packages",监控的文件名为"router.json,condition.json,easy-com.json,global-style.json,config.json,tab-bar.json,preload-rule.json",
只要你确保是这项文件名和目录名,配置文件放置的层级结构你可以自定。比如你可以只创建config文件夹,并包配置都放在这个文件夹下,也是可以的啦。不需要强制按照我的目录编排。
6.监控以上各目录文件,发生新建或修改时,自动拉取配置,合并生成 pages.json
你要如何做
转到应用根目录下,运行
npm install uni-dev-tools

//对应用进行初始化,从pages.json 中分解各个属性节点,生成各个配置文件
npx uni-dev-tools init

//对文件进行监控,自动将各文件中的配置信息合并到pages.json中
npx uni-dev-tools watch
第一次
请先进行初始化,将pages.json中的配置分解到各个配置文件,如果不这么做,直接 watch,您的pages.json 有可能会被您创建的空json文件覆盖。
下一步,你可以做什么
删除 pages.json
bug 提交 新需求提交
https://github.com/try520/uni-dev-tools/issues
收起阅读 »
uniapp推出小程序SDK,会是一场技术驱动的行业变革吗?
背景
2020年2月8日,著名跨端开发技术框架uniapp发布小程序SDK。借用官方的一句话来解释这个SDK的功能:
“uni小程序SDK,是一个用于原生App中集成的SDK,它可以帮助原生App快速实现小程序的能力”
作为一个已经被业界认可的跨端开发技术框架,uniapp又在跨端开发的道路上向前迈进了一大步。
此次小程序sdk的发布,标志着小程序技术领域的全面竞争时代来临。
它可以让众多原生app以极低的技术成本,构建自己的小程序生态(注意,是自己的)。它从技术端解决了小程序生态构建的基础设施问题。
笔者长年从事软件开发行业,于19年开始入坑uniapp,用于替代传统的vue的技术方案。在生产环境下,实现了h5,小程序,app的多端快速低成本的开发。
技术驱动革新
未来基于uniapp的应用将会获得一个全新的应用场景——无缝嵌入各种原生app,这是一种挑战h5集成难易度的方案。
总所周知,传统app集成大多采用SDK封装、webview内嵌、接口对接这3种方案。然而这些方案往往在开发成本、使用体验方面都难以得到比较好的平衡。
1.SDK封装方式。适合偏底层的业务,比如各种直播SDK、IMSDK、推送SDK。然而对于一些重业务的应用来说,SDK方式集成存在比较大的缺陷,不同的终端需要开发不同的SDK。能否抽出业务层是开发者比较关心的问题。以往面对比较大的业务应用,封装成SDK显然不合适。
2.Webview内嵌形式,体验糟糕,网页的体验终归是在服务端,即便是采用了vue构建SPA单页应用,仍然难以解决与原生的相互调用问题。受制于webview的能力,很多页面切换的效果都不理想。
3.接口对接方式,无疑是可以获得最佳的体验,但是也是最高成本的,目前app开发,很大一部分工作均在业务前端,如果通过接口对接,那么对于app的开发者来说,其存在的意义仅限于节省后端开发人力。
综合上述三种常见的集成方式,一种体验优秀,成本低廉的集成模式一直被业界需求,单也一直未被满足。
uniapp小程序SDK似乎就是捕捉到了这种需求,顺势而为,推出小程序SDK。目前开源程度仅限于大厂商单独获取源码。
实践
笔者在从业早期,也学习过安卓应用的开发,所以自己动手搭建了一套安卓的开发环境。多年未从事安卓开发,搭建环境的过程也是非常坎坷。不过最终还是成功运行了uniapp提供的项目示例。
先上一个官方的示例:
下面是笔者进行改造后,将一个自己公司的产品进行对接。通过判断勾选的单选框,设置不同的appid,从而打开不同的界面。
可以看到,我们成功打开了自己开发的应用。并且还可以直接启动至对应的子页面。
这边再讲一下直接打开子页面的应用场景。
在进行业务对接的过程中。比如开发者的应用场景是自己原有的业务app上对接一个社区,来做社区化运营,那么这个时候,我们往往会做一个应用场景就是他需要在app原有的界面内,植入一个发布按钮。点击该按钮,可以直接打开社区,并跳转到发布界面。
这样的体验是非常棒的。
对应的启动代码:
如何夹带启动参数?
上面这段代码是设置一个参数a,值为1,在启动的时候作为启动参数。
在uniapp当中,只需要通过对应的api获取到这个参数。
在开发当中,开发者很关心宿主程序如何与内嵌的应用进行交互。尤其是我们在做用户免登陆这个需求的时候,h5 webview方式只需要在url当中,夹带当前用户的token,即可实现免登陆。那么uniapp这边可以通过启动参数的形式优雅地实现这个需求。
除此之外,官方还提供了一套完整的小程序SDK的api文档,供开发者查阅。笔者初步看了一下,可以实现一些常规性的界面UI的调整。满足不同的业务场景使用。同时也提供了一些关闭、触发的回调函数。基本可以满足业务需求。
缺点?
经过笔者真机测试。将我们的产品短说社区系统1.9.0完整版本实际置入后。得到了一个较为不错的表现,但是仍有不足。
首先是v3编译器,uniapp近期推出的最新的编译器,官方称提升了性能等等,由于历史原因,短说社区基于老的编译器开发,在真机测试中,在V3下存在一点样式兼容问题。导致了些许错位。
在打包资源后,置入演示demo,发现小程序SDK环境下运行后,同样存在样式错位问题。但是所幸整体交互还算可以。运行较为流畅,主干功能未受影响。
实战下来,总体感觉uniapp目前提供的小程序SDK有以下几个不足之处:
1.编译测试较为麻烦,目前只能在开发环境下,模拟运行小程序版本,测试无大问题后,将资源包导出后放进app。再进行真机调试。如果编译差异不存在,那么这样的调试也基本可以接受。就怕存在一些编译差异,导致一些摸不到头脑的坑。
2.V3编译器自身的向下兼容问题。相信一些基于v3开发的应用不存在这个问题,但是对于一些有些积累的APP,譬如笔者公司的产品来说,就比较头疼了。需要逐个调试,进行调整修复。笔者测试了老版本编译器,错位极其严重。而使用v3后,有所改观。证明编译器和sdk本身就是在一个完善过程中。
3.包的大小问题,由于笔者手上的是官方提供的演示案例。所以无法进行前后比较。但是从官网评论来看,有开发者发现集成这个小程序SDK后,包体积大了48MB,也有人通过缩减功能只增加了12MB。倒是导出的资源包体积还可接受,基本可以忽略。
4.动态下载和加载资源包的问题,目前官网还未有明确的文档说明。如果可以实现动态下载资源包并且运行,意味着可以实现像微信小程序这样的生态。想象空间非常大。尤其对于有千万级用户的app来说,吸引力巨大。
5.API目前虽然还不错,但是还需给一些发展时间。对于复杂的应用场景,还需要更多的API支撑。
6.目前由于官方的开源策略,需要app厂家自行与官方沟通获得小程序SDK源码,官方注明是没有费用的。
最后
目前国内互联网市场,增量难以获得,且成本高昂,在存量市场下,如何开拓更多的业务场景,以更低成本更轻快的速度集成现成的软件厂商提供的应用是未来几年的一个重要应用场景。
Uniapp此番推出的小程序SDK,如果能够坚持做下去,终有一天走出实验室,投入到生产环境中。
未来已来,技术问题解决了,剩下的就是比拼运营实力的时候了。国内app厂商,是时候考虑一下未来的方向了。
作者:奕潇(微信号yixiao100),短说OSX社区论坛系统产品总监,5年社交社区类产品管理经验。想天软件创始人。
完美解决区块链ether.js无法随机生成钱包,报错:error:Error: platform missing String.prototype.normalize
问题描述
这个错误iPhone或H5可以正常随机生成钱包,仅Android会出现这个问题(不能正常生成随机钱包)
区块链异步异常捕捉
_error:Error: platform missing String.prototype.normalize
 (operation="String.prototype.normalize", form="missing NFKD", version=4.0.27)
解决方案【运行环境为Hbuilder X2.4.6】
官方解释:这个ES6的API存在兼容问题,使用es6时需注意兼容性
解决方式参考:
https://ext.dcloud.net.cn/plugin?id=955
完整步骤
- 下载normalize-demo
- 解压后在项目中 App.vue 引入 unorm.js
- 直接连接Android手机调试即可
- 如有帮助,感谢点赞
