uniapp 原生底部导航栏怎么加角标
用的uniapp 原生的底部导航栏,有四个导航,我想在某个导航的右上角加几个字,有办法实现嘛
用的uniapp 原生的底部导航栏,有四个导航,我想在某个导航的右上角加几个字,有办法实现嘛
appleid打不开无法设置专用密码,上传app store最新上传方法
苹果的appleid子站最近打不开,之前上传app store都是需要在appleid这个子站设置专用密码才能上传的,但是现在这个网站打不开,造成设置专用密码找不到入口。
可能,现在苹果不建议再使用专用密码上传了吧。不过可以使用香蕉云编这个工具来上传,它支持使用密钥来上传,这个密钥在app store就能设置,不需要去苹果的appleid子站设置。
https://www.yunedit.com/ipasend
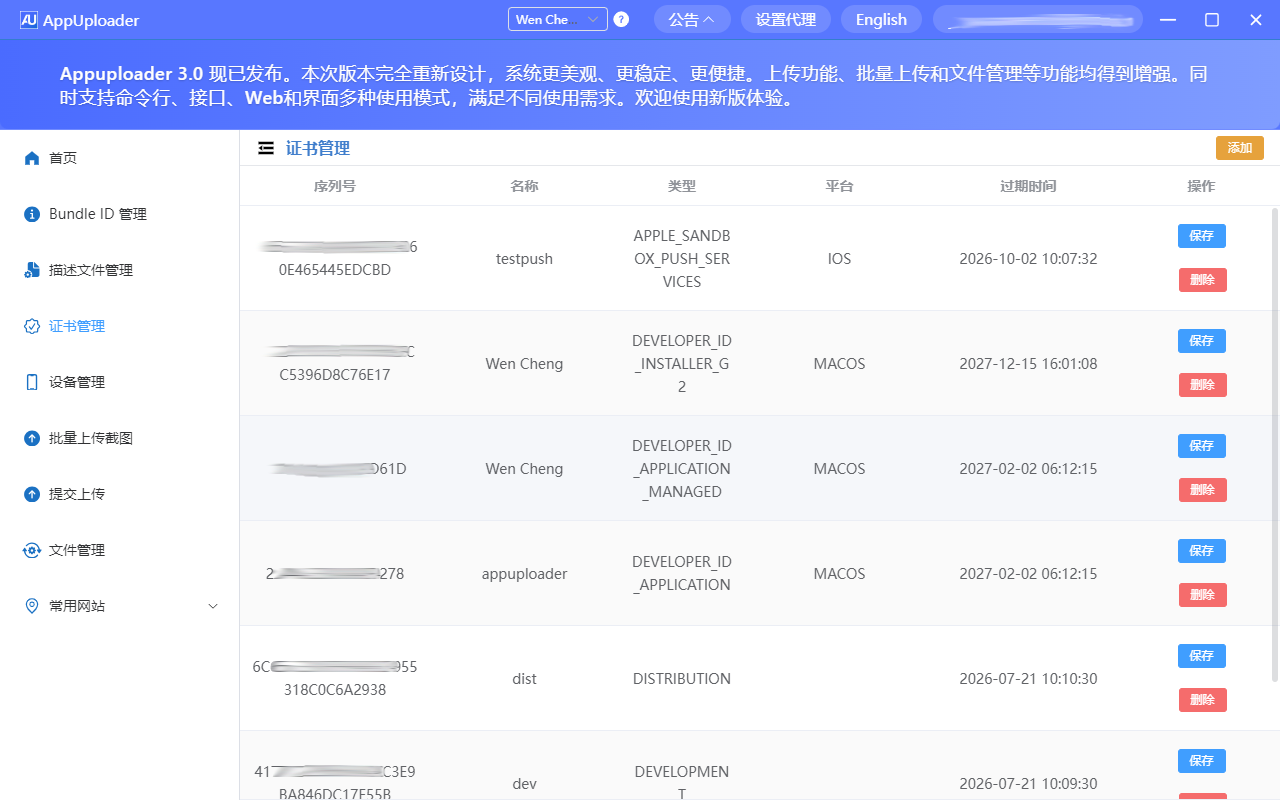
上传界面如下图所示:

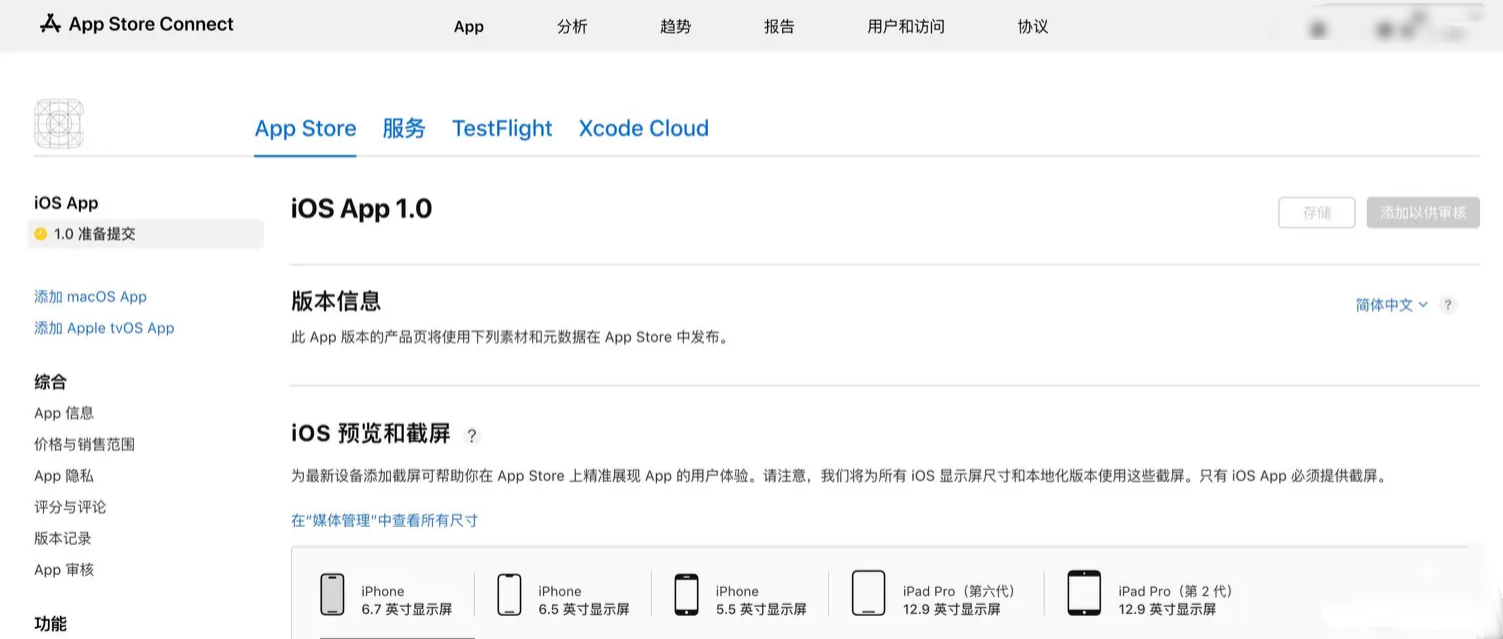
这个密钥,可以在app store设置,如下图:
这样,注意,点击用户与访问菜单后,需要再点击“集成”标签,才能看到密钥设置页面。
苹果的appleid子站最近打不开,之前上传app store都是需要在appleid这个子站设置专用密码才能上传的,但是现在这个网站打不开,造成设置专用密码找不到入口。
可能,现在苹果不建议再使用专用密码上传了吧。不过可以使用香蕉云编这个工具来上传,它支持使用密钥来上传,这个密钥在app store就能设置,不需要去苹果的appleid子站设置。
https://www.yunedit.com/ipasend
上传界面如下图所示:
这个密钥,可以在app store设置,如下图:
这样,注意,点击用户与访问菜单后,需要再点击“集成”标签,才能看到密钥设置页面。
收起阅读 »局域网文件传输
我用它在我的主力电脑和备用电脑之间同步工作文件,比用任何云盘都快,而且不用担心隐私问题,感觉就像多了个无线硬盘。
https://iris.findtruman.io/web/lan-drop?share=L
我用它在我的主力电脑和备用电脑之间同步工作文件,比用任何云盘都快,而且不用担心隐私问题,感觉就像多了个无线硬盘。
https://iris.findtruman.io/web/lan-drop?share=L
App 上架服务详解,独立开发者与团队如何高效完成 iOS 发布流程
'''在移动应用开发过程中,“上架” 是项目从研发走向用户的最后一道关卡。
但不同平台的上架规范差异巨大,尤其是 iOS,上架流程相对严格复杂,因此许多团队会选择 “App 上架服务” 或内部构建 “自动化发布流程” 来降低成本。
本文从开发者视角出发,以真实开发经验为基础,讲解如何在没有专业 Mac 环境、没有全流程经验的情况下,合理利用多种工具组合完成 iOS 上架工作。
内容涵盖开发者账号、证书体系、IPA 构建、上传工具、审核流程以及自动化发布的使用方式。
一、为什么会出现 “App 上架服务”?
相比 Android,iOS 上架存在以下难点:
- 苹果审核严格
- 证书体系复杂(p12、描述文件、App ID)
- 必须使用官方上传协议
- 许多工具传统上依赖 Mac
对于缺少 iOS 经验或全部使用 Windows 开发的团队,这些门槛让上架过程变得高风险,因此出现了 “App 上架服务”以及各种云端工具、跨平台签名工具的需求。
实际上,随着跨平台框架和上传工具的演进,现在开发者完全可以自己完成整个流程。
二、App 上架的基础流程(iOS)
即便外包或使用上架服务,流程本身并没有变化,仍然包括:
- 创建 Apple Developer 开发者账号
- 准备应用资料(图标、截图、隐私政策)
- 配置 App ID
- 创建发布证书与描述文件
- 构建 IPA 包
- 上传至 App Store Connect
- 填写元数据
- 提交审核与调整版本
每一步都有相对独立的工具与替代方案,可以自由组合。
三、哪些工具可用于 iOS 上架?(组合式解决方案)
iOS 上架并不存在必须使用的单一工具,可以组合如下方式:
1. 构建 IPA(无 Mac 方案)
- HBuilderX(uni-app 云打包)
- Codemagic(Flutter)
- Bitrise(跨平台构建)
- Expo Cloud Build(React Native)
- Unity / Cocos Creator 远程构建
这些服务为没有 Mac 环境的团队解决了“如何获得 IPA”的问题。
2. 证书、描述文件管理
过去依赖钥匙串助手,现在跨平台工具更适合团队:
- 开心上架(Appuploader)证书管理
- Apple Developer 官网页面(手动)
在 Windows 或 Linux 上可以直接使用 Appuploader 生成证书:

3. IPA 上传工具
iOS 上架最重要的部分是“上传 IPA 到苹果服务器”。
可选择:
| 工具 | 平台 | 特点 |
|---|---|---|
| Xcode | macOS | 官方工具,但依赖 Mac |
| Transporter | macOS | 操作简单,只有 GUI |
| Fastlane deliver | macOS/Linux | 自动化强,但仍需 Mac 构建 |
| 开心上架(Appuploader CLI) | Win/Linux/Mac | 全平台可用,支持命令行上传 |
跨平台方案中,CLI 工具是最灵活稳定的方式。
上传示例命令:
appuploader_cli -u ios@team.com -p xxx-xxx-xxx-xxx -c 2 -f ./output/app.ipa4. App Store Connect 配置(网页端)
无论什么系统,都可通过浏览器执行:
- 截图上传
- 隐私政策
- 元数据填写
- 版本说明
- 提交审核
这部分工作无法被完全自动化,需要由开发者提交。

四、App 上架服务的核心价值是什么?
即使现在工具齐全,仍有一些团队选择外包上架服务。
常见原因有:
1. 没有熟悉苹果审核规则的成员
审核被拒一次就可能耽误 2–5 天,服务人员通常经验更丰富。
2. 证书体系混乱
许多团队多次生成证书导致冲突,上架服务可以重新整理证书结构。
3. 时间紧张
项目上线周期短时,外包上架能降低风险。
4. 内部没有 Mac
虽然现在可以免 Mac 上架,但对不了解流程的人仍然有学习成本。
然而,大部分团队其实可以通过工具组合自己完成流程,既便宜又可控。
五、如何自己搭建一套 “App 上架服务流程”?(推荐)
下面是一套适合跨平台项目的高效流程:
1. 构建 IPA(云服务)
根据项目类型选择云构建服务,自动产出 IPA。
2. 本地或服务器管理证书
使用 Appuploader 生成证书,团队共享使用。
3. 使用命令行自动上传 IPA
appuploader_cli -u dev@icloud.com -p xxx-xxx-xxx-xxx -c 2 -f ./release/app.ipa4. 审核与版本提交
通过浏览器完成 App Store Connect 元数据填写。
5. 搭建自动化(可选)
- GitHub Actions
- Jenkins
- GitLab CI
示例流水线脚本:
fastlane gym --scheme "MyApp" --output_directory "./build"
appuploader_cli -u dev@icloud.com -p xxx -c 2 -f ./build/MyApp.ipa
这套流程成本极低,且适合没有 Mac 的团队。
六、开发者在自主上架时应注意的审核要点
即使使用上架服务,苹果审核本身也不会跳过。
以下问题最常导致审核被拒:
| 问题 | 原因 | 建议 |
|---|---|---|
| 隐私权限不符合规定 | 缺少用途描述 | Info.plist 补充字段 |
| 截图不合规 | 与实际功能不一致 | 使用真实 UI |
| Bug 或闪退 | 测试不充分 | 真机测试 |
| 登录机制错误 | 第三方登录未规范 | 检查 Apple 登录要求 |
| 商业模式违规 | 外链支付 | 使用 IAP |
了解审核规则能显著提高通过率。
七、示例:团队如何从零构建自己的 “上架服务流程”
以一个使用 uni-app 的开发团队为例:
- 开发阶段:所有成员均在 Windows
- IPA 构建:HBuilderX 云打包
- 证书创建:由一台 Windows 电脑使用 Appuploader CLI
- CI 自动构建:GitLab
- 上传 IPA:GitLab Runner 执行上传命令
- 提交审核:产品经理通过浏览器填写信息
最终,整个上架流程无需购买 Mac,成本低且易维护。
随着跨平台工具的成熟, “App 上架服务” 不再是必须依赖外包的项目环节。
开发团队完全可以通过 云构建 + 跨平台证书管理 + 跨平台上传工具在 Windows 或 Linux 环境中完成 iOS 上架。
无论是独立开发者、外包团队还是企业项目,只要掌握正确流程,iOS 上架不再是困难点,而是流程化的工作。
上架参考链接:https://www.applicationloader.net/tutorial/zh/83/83.html'''
'''在移动应用开发过程中,“上架” 是项目从研发走向用户的最后一道关卡。
但不同平台的上架规范差异巨大,尤其是 iOS,上架流程相对严格复杂,因此许多团队会选择 “App 上架服务” 或内部构建 “自动化发布流程” 来降低成本。
本文从开发者视角出发,以真实开发经验为基础,讲解如何在没有专业 Mac 环境、没有全流程经验的情况下,合理利用多种工具组合完成 iOS 上架工作。
内容涵盖开发者账号、证书体系、IPA 构建、上传工具、审核流程以及自动化发布的使用方式。
一、为什么会出现 “App 上架服务”?
相比 Android,iOS 上架存在以下难点:
- 苹果审核严格
- 证书体系复杂(p12、描述文件、App ID)
- 必须使用官方上传协议
- 许多工具传统上依赖 Mac
对于缺少 iOS 经验或全部使用 Windows 开发的团队,这些门槛让上架过程变得高风险,因此出现了 “App 上架服务”以及各种云端工具、跨平台签名工具的需求。
实际上,随着跨平台框架和上传工具的演进,现在开发者完全可以自己完成整个流程。
二、App 上架的基础流程(iOS)
即便外包或使用上架服务,流程本身并没有变化,仍然包括:
- 创建 Apple Developer 开发者账号
- 准备应用资料(图标、截图、隐私政策)
- 配置 App ID
- 创建发布证书与描述文件
- 构建 IPA 包
- 上传至 App Store Connect
- 填写元数据
- 提交审核与调整版本
每一步都有相对独立的工具与替代方案,可以自由组合。
三、哪些工具可用于 iOS 上架?(组合式解决方案)
iOS 上架并不存在必须使用的单一工具,可以组合如下方式:
1. 构建 IPA(无 Mac 方案)
- HBuilderX(uni-app 云打包)
- Codemagic(Flutter)
- Bitrise(跨平台构建)
- Expo Cloud Build(React Native)
- Unity / Cocos Creator 远程构建
这些服务为没有 Mac 环境的团队解决了“如何获得 IPA”的问题。
2. 证书、描述文件管理
过去依赖钥匙串助手,现在跨平台工具更适合团队:
- 开心上架(Appuploader)证书管理
- Apple Developer 官网页面(手动)
在 Windows 或 Linux 上可以直接使用 Appuploader 生成证书:

3. IPA 上传工具
iOS 上架最重要的部分是“上传 IPA 到苹果服务器”。
可选择:
| 工具 | 平台 | 特点 |
|---|---|---|
| Xcode | macOS | 官方工具,但依赖 Mac |
| Transporter | macOS | 操作简单,只有 GUI |
| Fastlane deliver | macOS/Linux | 自动化强,但仍需 Mac 构建 |
| 开心上架(Appuploader CLI) | Win/Linux/Mac | 全平台可用,支持命令行上传 |
跨平台方案中,CLI 工具是最灵活稳定的方式。
上传示例命令:
appuploader_cli -u ios@team.com -p xxx-xxx-xxx-xxx -c 2 -f ./output/app.ipa4. App Store Connect 配置(网页端)
无论什么系统,都可通过浏览器执行:
- 截图上传
- 隐私政策
- 元数据填写
- 版本说明
- 提交审核
这部分工作无法被完全自动化,需要由开发者提交。

四、App 上架服务的核心价值是什么?
即使现在工具齐全,仍有一些团队选择外包上架服务。
常见原因有:
1. 没有熟悉苹果审核规则的成员
审核被拒一次就可能耽误 2–5 天,服务人员通常经验更丰富。
2. 证书体系混乱
许多团队多次生成证书导致冲突,上架服务可以重新整理证书结构。
3. 时间紧张
项目上线周期短时,外包上架能降低风险。
4. 内部没有 Mac
虽然现在可以免 Mac 上架,但对不了解流程的人仍然有学习成本。
然而,大部分团队其实可以通过工具组合自己完成流程,既便宜又可控。
五、如何自己搭建一套 “App 上架服务流程”?(推荐)
下面是一套适合跨平台项目的高效流程:
1. 构建 IPA(云服务)
根据项目类型选择云构建服务,自动产出 IPA。
2. 本地或服务器管理证书
使用 Appuploader 生成证书,团队共享使用。
3. 使用命令行自动上传 IPA
appuploader_cli -u dev@icloud.com -p xxx-xxx-xxx-xxx -c 2 -f ./release/app.ipa4. 审核与版本提交
通过浏览器完成 App Store Connect 元数据填写。
5. 搭建自动化(可选)
- GitHub Actions
- Jenkins
- GitLab CI
示例流水线脚本:
fastlane gym --scheme "MyApp" --output_directory "./build"
appuploader_cli -u dev@icloud.com -p xxx -c 2 -f ./build/MyApp.ipa
这套流程成本极低,且适合没有 Mac 的团队。
六、开发者在自主上架时应注意的审核要点
即使使用上架服务,苹果审核本身也不会跳过。
以下问题最常导致审核被拒:
| 问题 | 原因 | 建议 |
|---|---|---|
| 隐私权限不符合规定 | 缺少用途描述 | Info.plist 补充字段 |
| 截图不合规 | 与实际功能不一致 | 使用真实 UI |
| Bug 或闪退 | 测试不充分 | 真机测试 |
| 登录机制错误 | 第三方登录未规范 | 检查 Apple 登录要求 |
| 商业模式违规 | 外链支付 | 使用 IAP |
了解审核规则能显著提高通过率。
七、示例:团队如何从零构建自己的 “上架服务流程”
以一个使用 uni-app 的开发团队为例:
- 开发阶段:所有成员均在 Windows
- IPA 构建:HBuilderX 云打包
- 证书创建:由一台 Windows 电脑使用 Appuploader CLI
- CI 自动构建:GitLab
- 上传 IPA:GitLab Runner 执行上传命令
- 提交审核:产品经理通过浏览器填写信息
最终,整个上架流程无需购买 Mac,成本低且易维护。
随着跨平台工具的成熟, “App 上架服务” 不再是必须依赖外包的项目环节。
开发团队完全可以通过 云构建 + 跨平台证书管理 + 跨平台上传工具在 Windows 或 Linux 环境中完成 iOS 上架。
无论是独立开发者、外包团队还是企业项目,只要掌握正确流程,iOS 上架不再是困难点,而是流程化的工作。
上架参考链接:https://www.applicationloader.net/tutorial/zh/83/83.html'''
关于安卓搜索蓝牙设备报错startBluetoothDevicesDiscovery:fail Location services are turned off 10016
关于安卓搜索蓝牙设备报错startBluetoothDevicesDiscovery:fail Location services are turned off 10016,我也遇到同样的问题,搜了很多相关问题。最后发现,开启位置权限只是其中一步,安卓手机在设置--隐私里面还有一个位置服务需要开启,我找到一段代码可以判断是否开启位置服务,希望能够给到大家帮助!
let systemType = uni.getSystemInfoSync().platform;
                // 安卓
                if (systemType === 'android') {
                    var context = plus.android.importClass('android.content.Context');
                    var locationManager = plus.android.importClass('android.location.LocationManager');
                    var main = plus.android.runtimeMainActivity();
                    var mainSvr = main.getSystemService(context.LOCATION_SERVICE);
                    if (!mainSvr.isProviderEnabled(locationManager.GPS_PROVIDER)) {
                        uni.showModal({
                            title: '提示',
                            content: '搜索蓝牙设备需要开启定位服务功能',
                            showCancel: false,
                            confirmText: '去开启',
                            success() {
                                if (!mainSvr.isProviderEnabled(locationManager.GPS_PROVIDER)) {
                                    var Intent = plus.android.importClass('android.content.Intent');
                                    var Settings = plus.android.importClass('android.provider.Settings');
                                    var intent = new Intent(Settings.ACTION_LOCATION_SOURCE_SETTINGS);
                                    main.startActivity(intent); // 打开系统设置定位服务功能页面
                                } else {
                                    console.log('定位服务功能已开启');
                                }
                            }
                        });
                    }
}关于安卓搜索蓝牙设备报错startBluetoothDevicesDiscovery:fail Location services are turned off 10016,我也遇到同样的问题,搜了很多相关问题。最后发现,开启位置权限只是其中一步,安卓手机在设置--隐私里面还有一个位置服务需要开启,我找到一段代码可以判断是否开启位置服务,希望能够给到大家帮助!
let systemType = uni.getSystemInfoSync().platform;
                // 安卓
                if (systemType === 'android') {
                    var context = plus.android.importClass('android.content.Context');
                    var locationManager = plus.android.importClass('android.location.LocationManager');
                    var main = plus.android.runtimeMainActivity();
                    var mainSvr = main.getSystemService(context.LOCATION_SERVICE);
                    if (!mainSvr.isProviderEnabled(locationManager.GPS_PROVIDER)) {
                        uni.showModal({
                            title: '提示',
                            content: '搜索蓝牙设备需要开启定位服务功能',
                            showCancel: false,
                            confirmText: '去开启',
                            success() {
                                if (!mainSvr.isProviderEnabled(locationManager.GPS_PROVIDER)) {
                                    var Intent = plus.android.importClass('android.content.Intent');
                                    var Settings = plus.android.importClass('android.provider.Settings');
                                    var intent = new Intent(Settings.ACTION_LOCATION_SOURCE_SETTINGS);
                                    main.startActivity(intent); // 打开系统设置定位服务功能页面
                                } else {
                                    console.log('定位服务功能已开启');
                                }
                            }
                        });
                    }
}【鸿蒙征文】uView Pro 开源组件库!80+ Vue3 组件,uni-app 组件库新晋之星
uView Pro 开源地址:
一、项目背景
uni-app 作为一款优秀的跨平台框架,凭借其“一套代码,多端运行”的理念,受到了广大移动端开发者的青睐。
而在 uni-app 的生态中,uView UI 作为一款基于 Vue2 开发的开源组件库,凭借其丰富的组件、完善的文档和良好的社区氛围,成为了许多开发者的首选,这当中就包括我,我在 2019 年接触 uni-app,刚开始只有官方的 uni-ui,没有别的选择,后来 uView UI 发布,以其简洁的 API 设计和良好的文档,成为我后来使用 uni-app 的首选,一直到现在。
然而,随着 Vue3 的正式发布以及 TypeScript 的广泛应用,越来越多的项目开始向 Vue3 技术栈迁移,大家对于兼容 Vue3 的组件库需求日益增长。然而直至现在,uView 官方也没出 Vue3 版本,这可能是精力不足的缘故。
作为一名前端开发者,相信大家都能深刻体会到 Vue3 带来的性能提升和开发体验优化,uView UI 没有进行 Vue3 迭代,无法满足新项目基于 Vue3 的开发需求。
为此,我决定用最新的技术栈 —— Vue3 + TypeScript + <script setup>,对 uView UI 进行全面重构,打造一款真正适配 uni-app Vue3 开发者的高质量组件库,并将其命名为“uView Pro”。
目前,uView Pro 已经支持:安卓、苹果、鸿蒙等App平台,h5平台,微信、支付宝、头条、QQ、钉钉等小程序平台,未来也会持续兼容其他平台,详情可查看官网:https://uviewpro.cn/
二、为什么选择 uView 1.x
我为什么选择 uView 1.x 来进行重构?而不是选择 uView 2.0?
对比 1.x, uView2.0 与 uView1.x 最大的不同就是对 nvue 的支持,因为 2.x 立项的首要目标就是对 nvue 的兼容,目前 uView2.0 也全面实现了兼容 nvue。
然而,我在之前的项目中对 nvue 的开发需求并不高,所以这一点对我没什么吸引力。其次,uview 2.0 对一些组件有一些优化,比如:form 表单校验的加强,优化 popup 弹窗组件 等等,如下:
其实还好,1.0 版本已经比较稳定了,2.0 我都没用过,所以我也没有必要重构一个不熟悉的框架。
因此,我最终选择基于 uView UI 1.8.8 的版本进行的 Vue3 重构,1.8.8 是 uView UI 1.x 的一个最新的稳定版本,我在众多的项目中都用过,兼容性好,主要是我很熟悉源码。
uView UI 虽然不兼容 Vue3,但也能保持周活 2.6K+
市面上也有一些开发者将 uView UI 做了适配,使其兼容到 Vue3,但观其源码,大都还是使用的 Vue2 的 Option API 风格,而我要的是 Composition API 的 <script setup> 语法糖。
三、已完成组件重构
uView Pro 致力于覆盖 uni-app 项目开发中的各类场景,组件设计参考了 uView UI 1.8.8 的 API,确保开发者可以无缝切换。以下为已完成的 80+ 组件分类及简介:
1. 基础组件
- Color 色彩:统一色彩体系,支持主题切换。
- Icon 图标:丰富的图标库,支持自定义。
- Image 图片:图片懒加载、错误占位等功能。
- Button 按钮:多样化按钮样式,支持加载、禁用等状态。
- Layout 布局:灵活的栅格系统,适配多端。
- Cell 单元格:列表项展示,支持左滑操作。
- Badge 徽标数:数字、点状等多种徽标样式。
- Tag 标签:多样化标签样式,支持自定义颜色。
2. 表单组件
- Form 表单:表单校验、分组、布局。
- Calendar 日历:日期选择、范围选择。
- Select 列选择器:多级联动选择。
- Keyboard 键盘:自定义数字键盘。
- Picker 选择器:多类型选择器。
- Rate 评分:星级评分。
- Search 搜索:搜索框,支持联想。
- NumberBox 步进器:数字加减。
- Upload 上传:图片、文件上传。
- VerificationCode 验证码倒计时:短信验证码场景。
- Field 输入框:多类型输入框。
- Checkbox 复选框:多选项。
- Radio 单选框:单选项。
- Switch 开关选择器:状态切换。
- Slider 滑动选择器:滑块选择。
3. 数据组件
- Progress 进度条:线性、圆形进度。
- Table 表格:多功能表格。
- CountDown 倒计时:活动倒计时。
- CountTo 数字滚动:数字动画。
4. 反馈组件
- ActionSheet 操作菜单:底部弹出菜单。
- AlertTips 警告提示:警告、提示信息。
- Toast 消息提示:轻量弹窗。
- NoticeBar 滚动通知:顶部公告。
- TopTips 顶部提示:页面顶部提示。
- SwipeAction 滑动单元格:列表项滑动操作。
- Collapse 折叠面板:内容收起展开。
- Popup 弹出层:多种弹窗样式。
- Modal 模态框:确认、取消弹窗。
- FullScreen 压窗屏:全屏弹窗。
5. 布局组件
- Line 线条:分割线、装饰线。
- Card 卡片:内容卡片。
- Mask 遮罩层:遮罩效果。
- NoNetwork 无网络提示:断网提示。
- Grid 宫格布局:九宫格、自由布局。
- Swiper 轮播图:图片轮播。
- TimeLine 时间轴:事件流程展示。
- Skeleton 骨架屏:页面加载占位。
- Sticky 吸顶:元素吸顶。
- Waterfall 瀑布流:图片流式布局。
- Divider 分割线:内容分隔。
6. 导航组件
- Dropdown 下拉菜单:多级菜单。
- Tabbar 底部导航栏:多端适配。
- BackTop 返回顶部:一键回顶。
- Navbar 导航栏:页面头部导航。
- Tabs 标签:选项卡切换。
- TabsSwiper 全屏选项卡:滑动切换。
- Subsection 分段器:内容分段。
- IndexList 索引列表:字母索引。
- Steps 步骤条:流程步骤。
- Empty 内容为空:空状态展示。
- Section 查看更多:内容展开。
7. 其他组件
- MessageInput 验证码输入:短信验证码输入框。
- Loadmore 加载更多:列表加载。
- ReadMore 展开阅读更多:内容展开。
- LazyLoad 懒加载:图片、内容懒加载。
- Gap 间隔槽:布局间隔。
- Avatar 头像:用户头像。
- Link 超链接:文本链接。
- Loading 加载动画:多种加载效果。
所有组件均已通过 h5、微信小程序、Android 平台的自测,最大限度的保证了良好的兼容性和稳定性。
四、技术优势与要点
1. 最新技术栈
- Vue3 + TypeScript +
<script setup>:充分利用 Vue3 的响应式、组合式 API,TypeScript 强类型保障,<script setup>简化代码结构。 - 全量组件重构:所有组件均基于最新技术栈重写,非简单兼容,真正适配 Vue3。
- API 设计对齐 uView 1.8.8:最大程度降低迁移成本,老用户可无缝切换。
2. 多端兼容
- 支持 h5、微信小程序、Android:核心组件已在主流平台自测通过,兼容性强。
- 未来规划更多平台:后续将适配 iOS、支付宝小程序、百度小程序等。
3. 性能优化
- 按需加载:支持 tree-shaking,减少包体积。
- 响应式渲染:充分利用 Vue3 的响应式系统,提升渲染性能。
- 自定义主题:支持主题切换,满足多样化需求。
4. 开发体验
- 文档体系:同步重构文档,涵盖组件用法、API、案例。
- VSCode 代码提示:计划开发 VSCode 插件,提升开发效率。
- 社区支持:我创建了相关交流群、GitHub/Gitee Issues,及时响应反馈。
五、快速使用
安装
npm 安装
# npm 安装
npm install uview-pro

# yarn 安装
yarn add uview-pro

# pnpm 安装
pnpm add uview-pro
插件市场下载
https://ext.dcloud.net.cn/plugin?id=24633
快速上手
main.ts引入 uView 库
// main.ts
import { createSSRApp } from 'vue'
import uViewPro from 'uview-pro'

export function createApp() {
  const app = createSSRApp(App)
  app.use(uViewPro)
  // 其他配置
  return {
    app
  }
}App.vue引入基础样式(注意 style 标签需声明 scss 属性支持)
/* App.vue */
<style lang="scss">
@import "uview-pro/index.scss";
</style>uni.scss引入全局 scss 变量文件
/* uni.scss */
@import 'uview-pro/theme.scss';pages.json配置 easycom 规则(按需引入)
// pages.json
{
  "easycom": {
    "autoscan": true,
    "custom": {
      // npm 方式
      "^u-(.*)": "uview-pro/components/u-$1/u-$1.vue",
      // uni_modules 方式
      // "^u-(.*)": "@/uni_modules/uview-pro/components/u-$1/u-$1.vue"
    }
  },
  "pages": [
    // ...
  ]
}
使用方法
配置 easycom 规则后,自动按需引入,无需import组件,直接引用即可。
<template>
  <u-button>按钮</u-button>
</template>
六、未来计划
uView Pro 的目标是成为 uni-app Vue3 生态的标杆组件库,根据规划,未来几个方向包括:
- 持续优化现有组件,新增组件,提升用户体验
- 国际化(i18n)支持:统一组件的语言切换能力,方便多语言产品线接入。
- 暗黑模式(Dark Mode):与运行时主题切换能力结合,提供暗色皮肤一键切换体验。
- 优化现有平台兼容性,扩展更多平台的适配测试(保持对小程序宿主的兼容修复)。
- uni-app x 支持:目前还在调研中。
- mcp 支持。
相信这一切都不会太远,期待 ing
七、结语
uView Pro 和 uView 一样,作为一款完全开源、免费商用的组件库,离不开社区的支持与贡献。无论你是前端开发者、设计师、产品经理,还是企业用户,都欢迎加入 uView Pro 的研发,参与组件开发、文档完善、生态建设等工作。所有贡献者都将在官网、文档中鸣谢。
未来,uView Pro 将持续迭代,拥抱新技术,服务更多开发者。让我们一起为 uni-app Vue3 生态贡献力量,打造更优秀的 UI 组件库!
uView Pro 开源地址:
- GitHub:https://github.com/anyup/uview-pro
- Gitee:https://gitee.com/anyup/uview-pro
- npm:https://www.npmjs.com/package/uview-pro
- 官网文档:https://uviewpro.cn/
- 插件市场:https://ext.dcloud.net.cn/plugin?id=24633
欢迎 Star、Fork、PR、Issue,欢迎来撩!
如有问题或建议,欢迎在 Issue 区留言交流,或入群交流反馈!
uView Pro 开源地址:
一、项目背景
uni-app 作为一款优秀的跨平台框架,凭借其“一套代码,多端运行”的理念,受到了广大移动端开发者的青睐。
而在 uni-app 的生态中,uView UI 作为一款基于 Vue2 开发的开源组件库,凭借其丰富的组件、完善的文档和良好的社区氛围,成为了许多开发者的首选,这当中就包括我,我在 2019 年接触 uni-app,刚开始只有官方的 uni-ui,没有别的选择,后来 uView UI 发布,以其简洁的 API 设计和良好的文档,成为我后来使用 uni-app 的首选,一直到现在。
然而,随着 Vue3 的正式发布以及 TypeScript 的广泛应用,越来越多的项目开始向 Vue3 技术栈迁移,大家对于兼容 Vue3 的组件库需求日益增长。然而直至现在,uView 官方也没出 Vue3 版本,这可能是精力不足的缘故。
作为一名前端开发者,相信大家都能深刻体会到 Vue3 带来的性能提升和开发体验优化,uView UI 没有进行 Vue3 迭代,无法满足新项目基于 Vue3 的开发需求。
为此,我决定用最新的技术栈 —— Vue3 + TypeScript + <script setup>,对 uView UI 进行全面重构,打造一款真正适配 uni-app Vue3 开发者的高质量组件库,并将其命名为“uView Pro”。
目前,uView Pro 已经支持:安卓、苹果、鸿蒙等App平台,h5平台,微信、支付宝、头条、QQ、钉钉等小程序平台,未来也会持续兼容其他平台,详情可查看官网:https://uviewpro.cn/
二、为什么选择 uView 1.x
我为什么选择 uView 1.x 来进行重构?而不是选择 uView 2.0?
对比 1.x, uView2.0 与 uView1.x 最大的不同就是对 nvue 的支持,因为 2.x 立项的首要目标就是对 nvue 的兼容,目前 uView2.0 也全面实现了兼容 nvue。
然而,我在之前的项目中对 nvue 的开发需求并不高,所以这一点对我没什么吸引力。其次,uview 2.0 对一些组件有一些优化,比如:form 表单校验的加强,优化 popup 弹窗组件 等等,如下:
其实还好,1.0 版本已经比较稳定了,2.0 我都没用过,所以我也没有必要重构一个不熟悉的框架。
因此,我最终选择基于 uView UI 1.8.8 的版本进行的 Vue3 重构,1.8.8 是 uView UI 1.x 的一个最新的稳定版本,我在众多的项目中都用过,兼容性好,主要是我很熟悉源码。
uView UI 虽然不兼容 Vue3,但也能保持周活 2.6K+
市面上也有一些开发者将 uView UI 做了适配,使其兼容到 Vue3,但观其源码,大都还是使用的 Vue2 的 Option API 风格,而我要的是 Composition API 的 <script setup> 语法糖。
三、已完成组件重构
uView Pro 致力于覆盖 uni-app 项目开发中的各类场景,组件设计参考了 uView UI 1.8.8 的 API,确保开发者可以无缝切换。以下为已完成的 80+ 组件分类及简介:
1. 基础组件
- Color 色彩:统一色彩体系,支持主题切换。
- Icon 图标:丰富的图标库,支持自定义。
- Image 图片:图片懒加载、错误占位等功能。
- Button 按钮:多样化按钮样式,支持加载、禁用等状态。
- Layout 布局:灵活的栅格系统,适配多端。
- Cell 单元格:列表项展示,支持左滑操作。
- Badge 徽标数:数字、点状等多种徽标样式。
- Tag 标签:多样化标签样式,支持自定义颜色。
2. 表单组件
- Form 表单:表单校验、分组、布局。
- Calendar 日历:日期选择、范围选择。
- Select 列选择器:多级联动选择。
- Keyboard 键盘:自定义数字键盘。
- Picker 选择器:多类型选择器。
- Rate 评分:星级评分。
- Search 搜索:搜索框,支持联想。
- NumberBox 步进器:数字加减。
- Upload 上传:图片、文件上传。
- VerificationCode 验证码倒计时:短信验证码场景。
- Field 输入框:多类型输入框。
- Checkbox 复选框:多选项。
- Radio 单选框:单选项。
- Switch 开关选择器:状态切换。
- Slider 滑动选择器:滑块选择。
3. 数据组件
- Progress 进度条:线性、圆形进度。
- Table 表格:多功能表格。
- CountDown 倒计时:活动倒计时。
- CountTo 数字滚动:数字动画。
4. 反馈组件
- ActionSheet 操作菜单:底部弹出菜单。
- AlertTips 警告提示:警告、提示信息。
- Toast 消息提示:轻量弹窗。
- NoticeBar 滚动通知:顶部公告。
- TopTips 顶部提示:页面顶部提示。
- SwipeAction 滑动单元格:列表项滑动操作。
- Collapse 折叠面板:内容收起展开。
- Popup 弹出层:多种弹窗样式。
- Modal 模态框:确认、取消弹窗。
- FullScreen 压窗屏:全屏弹窗。
5. 布局组件
- Line 线条:分割线、装饰线。
- Card 卡片:内容卡片。
- Mask 遮罩层:遮罩效果。
- NoNetwork 无网络提示:断网提示。
- Grid 宫格布局:九宫格、自由布局。
- Swiper 轮播图:图片轮播。
- TimeLine 时间轴:事件流程展示。
- Skeleton 骨架屏:页面加载占位。
- Sticky 吸顶:元素吸顶。
- Waterfall 瀑布流:图片流式布局。
- Divider 分割线:内容分隔。
6. 导航组件
- Dropdown 下拉菜单:多级菜单。
- Tabbar 底部导航栏:多端适配。
- BackTop 返回顶部:一键回顶。
- Navbar 导航栏:页面头部导航。
- Tabs 标签:选项卡切换。
- TabsSwiper 全屏选项卡:滑动切换。
- Subsection 分段器:内容分段。
- IndexList 索引列表:字母索引。
- Steps 步骤条:流程步骤。
- Empty 内容为空:空状态展示。
- Section 查看更多:内容展开。
7. 其他组件
- MessageInput 验证码输入:短信验证码输入框。
- Loadmore 加载更多:列表加载。
- ReadMore 展开阅读更多:内容展开。
- LazyLoad 懒加载:图片、内容懒加载。
- Gap 间隔槽:布局间隔。
- Avatar 头像:用户头像。
- Link 超链接:文本链接。
- Loading 加载动画:多种加载效果。
所有组件均已通过 h5、微信小程序、Android 平台的自测,最大限度的保证了良好的兼容性和稳定性。
四、技术优势与要点
1. 最新技术栈
- Vue3 + TypeScript +
<script setup>:充分利用 Vue3 的响应式、组合式 API,TypeScript 强类型保障,<script setup>简化代码结构。 - 全量组件重构:所有组件均基于最新技术栈重写,非简单兼容,真正适配 Vue3。
- API 设计对齐 uView 1.8.8:最大程度降低迁移成本,老用户可无缝切换。
2. 多端兼容
- 支持 h5、微信小程序、Android:核心组件已在主流平台自测通过,兼容性强。
- 未来规划更多平台:后续将适配 iOS、支付宝小程序、百度小程序等。
3. 性能优化
- 按需加载:支持 tree-shaking,减少包体积。
- 响应式渲染:充分利用 Vue3 的响应式系统,提升渲染性能。
- 自定义主题:支持主题切换,满足多样化需求。
4. 开发体验
- 文档体系:同步重构文档,涵盖组件用法、API、案例。
- VSCode 代码提示:计划开发 VSCode 插件,提升开发效率。
- 社区支持:我创建了相关交流群、GitHub/Gitee Issues,及时响应反馈。
五、快速使用
安装
npm 安装
# npm 安装
npm install uview-pro

# yarn 安装
yarn add uview-pro

# pnpm 安装
pnpm add uview-pro
插件市场下载
https://ext.dcloud.net.cn/plugin?id=24633
快速上手
main.ts引入 uView 库
// main.ts
import { createSSRApp } from 'vue'
import uViewPro from 'uview-pro'

export function createApp() {
  const app = createSSRApp(App)
  app.use(uViewPro)
  // 其他配置
  return {
    app
  }
}App.vue引入基础样式(注意 style 标签需声明 scss 属性支持)
/* App.vue */
<style lang="scss">
@import "uview-pro/index.scss";
</style>uni.scss引入全局 scss 变量文件
/* uni.scss */
@import 'uview-pro/theme.scss';pages.json配置 easycom 规则(按需引入)
// pages.json
{
  "easycom": {
    "autoscan": true,
    "custom": {
      // npm 方式
      "^u-(.*)": "uview-pro/components/u-$1/u-$1.vue",
      // uni_modules 方式
      // "^u-(.*)": "@/uni_modules/uview-pro/components/u-$1/u-$1.vue"
    }
  },
  "pages": [
    // ...
  ]
}
使用方法
配置 easycom 规则后,自动按需引入,无需import组件,直接引用即可。
<template>
  <u-button>按钮</u-button>
</template>
六、未来计划
uView Pro 的目标是成为 uni-app Vue3 生态的标杆组件库,根据规划,未来几个方向包括:
- 持续优化现有组件,新增组件,提升用户体验
- 国际化(i18n)支持:统一组件的语言切换能力,方便多语言产品线接入。
- 暗黑模式(Dark Mode):与运行时主题切换能力结合,提供暗色皮肤一键切换体验。
- 优化现有平台兼容性,扩展更多平台的适配测试(保持对小程序宿主的兼容修复)。
- uni-app x 支持:目前还在调研中。
- mcp 支持。
相信这一切都不会太远,期待 ing
七、结语
uView Pro 和 uView 一样,作为一款完全开源、免费商用的组件库,离不开社区的支持与贡献。无论你是前端开发者、设计师、产品经理,还是企业用户,都欢迎加入 uView Pro 的研发,参与组件开发、文档完善、生态建设等工作。所有贡献者都将在官网、文档中鸣谢。
未来,uView Pro 将持续迭代,拥抱新技术,服务更多开发者。让我们一起为 uni-app Vue3 生态贡献力量,打造更优秀的 UI 组件库!
uView Pro 开源地址:
- GitHub:https://github.com/anyup/uview-pro
- Gitee:https://gitee.com/anyup/uview-pro
- npm:https://www.npmjs.com/package/uview-pro
- 官网文档:https://uviewpro.cn/
- 插件市场:https://ext.dcloud.net.cn/plugin?id=24633
欢迎 Star、Fork、PR、Issue,欢迎来撩!
如有问题或建议,欢迎在 Issue 区留言交流,或入群交流反馈!
收起阅读 »【鸿蒙征文】当新手遇上HarmonyOS:打造一款“垃圾分类助手”元服务
作为一名刚刚踏入鸿蒙生态的个人开发者,面对HarmonyOS丰富的开放能力,既兴奋又忐忑。我选择开发一款轻量化的“智能垃圾分类助手”元服务作为我的第一个项目,它能让用户通过相机或输入快速查询垃圾类别,并通过卡片直观展示分类结果。本文将重点分享我如何集成三项关键的鸿蒙开放能力,并成功解决开发中的实际问题。
一、能力集成背景:解决“不知道是什么垃圾”的痛点
在日常生活的垃圾分类场景中,用户常常面临“不确定垃圾类别”、“查询步骤繁琐”以及“需要快速获取结果”的核心痛点
。传统的解决方案要么需要用户安装独立的APP占用存储空间,要么查询路径较长,体验不够流畅。
目标:开发一款即用即走的元服务,通过卡片直接提供服务,实现“随手拍、随手查、结果立现”。
挑战:作为新手,我需要一个低后端维护成本、能快速实现核心功能(如图像识别或智能问答)、并能提供流畅前端交互的方案。
鸿蒙能力选型:针对以上,我选择了以下三项鸿蒙开放能力,它们极大地降低了我的开发门槛:
端云一体化开发(云开发):提供Serverless后端支持,我不必自建服务器。
元服务卡片:作为服务的直接入口,实现服务外显,减少操作层级。
AI能力(结合ArkUI):计划整合智能识别或自然语言处理功能,用于垃圾识别。
二、集成的鸿蒙开放能力全称及核心功能
端云一体化开发(云开发):
核心功能:允许开发者在DevEco Studio内一站式完成端侧(应用)和云侧(云函数、云数据库)的开发。云函数用于处理复杂的业务逻辑(如调用AI模型进行图像识别或智能问答),云数据库用于存储垃圾分类规则数据。这让我无需关注服务器运维,只需专注业务逻辑实现
。
元服务卡片:
核心功能:元服务是HarmonyOS的一种新型服务提供方式,以万能卡片等多种形态呈现,具有即用即走、信息外显的特性
。我的垃圾分类结果可以直接展示在卡片上,用户无需进入完整应用。
AI大模型能力(结合ArkUI框架):
核心功能:HarmonyOS提供了丰富的AI接口。在本项目中,我探索了如何利用ArkUI声明式开发范式
构建交互界面,并初步尝试集成鸿蒙的AI能力(例如通过云函数调用大模型API),实现对用户输入的文本(如“香蕉皮”)进行智能识别和分类。
三、能力集成的核心步骤
3.1 端云一体化开发(云开发)集成
在DevEco Studio中创建新项目时,我选择了“端云一体化开发”模板。IDE自动为我创建了端侧(Application)和云侧(CloudProgram)的工程结构
。
关键步骤1:创建云函数。在CloudProgram/cloudfunctions目录下,我右键新建了一个名为classifyGarbage的云函数。这个函数的核心逻辑是接收用户上传的图片URL或文本,调用AI服务进行识别,并从云数据库中查询对应的分类结果。
关键步骤2:部署与调试。编写完云函数后,通过DevEco Studio的“Deploy Cloud Functions”功能,将其部署到AGC(AppGallery Connect)平台。利用“Cloud Functions Requestor”工具在本地进行模拟触发和调试,确保函数逻辑正确
。
关键步骤3:端侧调用。在元服务的ETS代码中,引入AGConnect的云函数SDK,并通过简单的API调用云函数。
// 示例代码片段 (基于 ArkTS)
import agconnect from '@hw-agconnect/api-ohos';
import "@hw-agconnect/function-ohos";

async function classifyWaste(inputText: string) {
  try {
    const result = await agconnect.function().wrap("classifyGarbage").call({
      input: inputText
    });
    console.log("Classification result:", result.getValue());
    // 更新UI或卡片信息
  } catch (error) {
    console.error("Error calling cloud function:", error);
  }
}
3.2 元服务卡片开发
关键步骤1:卡片布局。在entry/src/main/ets/entryformability目录下,定义卡片的UI布局。我使用了ArkUI的组件,如Text、Image和Button,来构建一个包含输入框、查询按钮和结果展示区域的卡片界面
。
关键步骤2:动态数据更新。利用ArkUI的声明式UI和状态管理(如@State装饰器),当从云函数获取到分类结果后,自动更新卡片上显示的文本内容,实现数据的动态绑定
。
3.3 AI能力探索与ArkUI界面构建
作为新手,我首先从相对成熟的文本交互入手。我构建了一个简单的文本输入界面,并将用户输入传递给云函数。在云函数内,可以集成预训练的模型或调用第三方AI服务API来完成智能分类。
关键步骤:在UI中,使用TextInput组件接收用户输入,使用Button组件触发查询事件,并将结果显示在Text组件中
。这体现了ArkUI框架声明式开发的高效性。
四、场景落地
4.1 应用场景落地
该“智能垃圾分类助手”元服务典型的使用场景是:用户在需要丢弃垃圾时,直接桌面上滑找到服务卡片,输入垃圾名称(如“过期药品”),点击查询,卡片上即刻显示出分类结果(如“有害垃圾”)。整个过程无需下载安装大型应用,体验非常轻量化。
五、总结与展望
通过这个小小的项目,我深刻体会到HarmonyOS开放能力为个人开发者带来的强大赋能。端云一体化开发让我这个新手也能轻松拥有“云端大脑”;元服务卡片让我的应用以最优雅的方式触达用户;而ArkUI与AI能力的结合则让智能交互变得简单可行。
对于所有和我一样的个人新手开发者,我的建议是:从一个小痛点出发,勇敢地利用鸿蒙提供的强大工具箱,你会发现,创新和实现,离我们并不遥远。 鸿蒙广阔的生态,正等待我们共同描绘。
【鸿蒙征文】从零到上架:用 uni-app 开发鸿蒙习惯养成应用习惯修仙的全流程实践
星光不负,码向未来。本文记录了一个习惯养成类应用从零开始,基于 uni-app 开发并成功上架华为应用市场的完整历程,希望能为正在探索鸿蒙开发的开发者提供一些参考。
一、缘起:为什么选择 uni-app + 鸿蒙
鸿蒙生态快速发展,HarmonyOS NEXT 的发布让原生应用开发成为趋势。作为一个独立开发者,我面临一个选择:是学习全新的 ArkTS 开发,还是利用现有的技术栈快速进入鸿蒙生态?
最终,我选择了 uni-app。原因很简单:
开发效率:我已经熟悉 Vue3 和前端开发,uni-app 让我可以复用现有技能,快速上手
跨平台能力:一套代码可以同时覆盖 iOS、Android 和鸿蒙,降低维护成本
生态成熟:uni-app 对鸿蒙的支持已经相对完善,官方文档和社区资源丰富
快速迭代:对于个人开发者来说,时间就是成本,uni-app 能让我更快地验证产品想法
于是,我决定用 uni-app 开发一款名为"习惯修仙"的习惯养成应用,并将其作为进入鸿蒙生态的敲门砖。
二、项目概述:习惯修仙
"习惯修仙"是一款将游戏化机制与习惯养成结合的应用。用户可以将早起、运动、阅读等日常行为映射为"功法",通过完成习惯获得"修为",提升"境界",让枯燥的习惯养成变得有趣。
核心功能
功法管理:支持计时、计数、打卡三种类型的习惯任务
修为系统:完成任务获得修为,积累到一定程度可以"破境"
数据统计:记录每日、每周、每月的完成情况
华为账号登录:支持华为账号一键登录,数据云端同步
技术栈
框架:uni-app(Vue3)
状态管理:Pinia
样式:SCSS + 自定义主题系统
工具库:dayjs(时间处理)、echarts(数据可视化)
目标平台:HarmonyOS
三、开发实践:从零到一
3.1 项目初始化
使用 HBuilderX 创建 uni-app 项目后,第一件事就是配置鸿蒙相关设置。在 manifest.json 中,需要配置:
包名(bundleName):这是应用的唯一标识,需要与华为开发者后台保持一致
图标和启动页:准备符合鸿蒙规范的图标和启动画面
签名配置:配置 Release 证书,用于正式打包
这里有一个小坑:包名一旦确定,后续修改会比较麻烦,建议在项目初期就规划好。
3.2 状态管理架构
习惯养成类应用的核心是数据管理。我使用 Pinia 构建了全局状态管理,主要包括:
用户数据:修为、境界、属性等游戏化数据
任务数据:功法列表、打卡记录、统计数据
应用配置:主题、设置、登录状态等
Pinia 的持久化插件让我可以轻松实现本地数据存储,这对于离线使用场景很重要。同时,我也预留了云端同步的接口,为后续的账号登录功能做准备。
3.3 页面开发与路由
uni-app 的页面路由系统与小程序类似,通过 pages.json 配置页面路径和导航栏样式。我设计了以下主要页面:
启动页:应用介绍和引导
首页:今日任务概览和快速操作
功法列表:展示所有习惯任务
功法详情:查看任务详情和历史记录
计时页面:专注计时功能
个人中心:用户信息和设置
在开发过程中,我发现 uni-app 的条件编译功能非常实用,因为开发的时候是在浏览器上调试,最后再在鸿蒙真机运行测试。通过 #ifdef APP-HARMONY 可以针对鸿蒙平台做特殊处理,比如使用鸿蒙原生的某些能力。
3.4 样式与主题系统
为了保持多端一致性,我建立了一套自定义主题系统。通过 SCSS 变量定义颜色、字体、间距等,然后在各个页面中统一使用。这样不仅保证了视觉一致性,也方便后续的主题切换功能。
四、华为能力集成:登录功能实战
4.1 为什么选择华为账号登录
最初我计划同时支持微信登录和华为账号登录,但考虑到开发成本和维护复杂度,最终只保留了华为账号登录。实际上,在审核过程中发现,华为应用市场并不会硬性要求必须有华为账号登录,只要应用功能完整、符合规范即可通过审核。
4.2 集成过程
华为账号登录的集成主要分为几个步骤:
开发者后台配置
在华为开发者联盟注册账号并创建应用
获取 Client ID
配置公钥指纹(与签名证书绑定)
申请 OAuth 权限(openid、profile 等)
manifest.json 配置
在 app-harmony.distribute.modules 中添加 uni-oauth 模块
配置华为的 client_id
代码实现
使用 uni.login({ provider: 'huawei' }) 获取授权码
通过 uni.getUserInfo({ provider: 'huawei' }) 获取用户信息
将授权码发送到后端验证,获取用户 token
更新本地登录状态
4.3 登录流程优化
为了提升用户体验,我做了以下优化:
登录状态持久化:用户登录后,下次打开应用自动保持登录状态
数据同步机制:登录后自动同步本地数据到云端,避免数据丢失
优雅降级:如果登录失败,应用仍可以以游客模式使用核心功能
五、上架准备:审核与发布
5.1 华为应用市场审核要点
华为应用市场的审核相对严格,我总结了几个关键点:
隐私政策与用户协议
必须提供完整的《用户协议》和《隐私政策》文档。我在登录页面底部添加了相关链接,并在首次启动时引导用户阅读。
权限申请规范
应用申请的权限必须在功能说明中明确用途,且不能强制申请。我的应用只在需要时才动态申请权限,并在申请时说明用途。
应用描述与截图
应用描述要清晰、真实,不能夸大功能。截图要展示应用的核心功能,不能使用误导性的图片。
5.2 审核经历
我的应用审核了两次才通过。第一次提交审核时,审核驳回原因是"功能交互简单,影响用户的总体体验"。确实,第一版本是有点简单。修复后重新提交,大约 3 个工作日就通过了审核。
5.3 上架后的数据与反馈
应用上架后,我持续关注用户反馈和数据表现:
下载量:初期增长较慢,但随着应用市场推荐和用户口碑传播,逐渐提升
用户反馈:通过应用内反馈功能收集用户意见,持续优化
六、经验总结与建议
6.1 开发过程中的关键决策
选择 uni-app 而非原生开发
这个决策让我节省了大量学习成本,能够快速将产品推向市场。虽然在某些性能敏感的场景下,原生开发可能更有优势,但对于大多数应用来说,uni-app 的性能已经足够。
使用 Pinia 而非 Vuex
Pinia 是 Vue3 官方推荐的状态管理方案,API 更简洁,TypeScript 支持更好。对于新项目,建议直接使用 Pinia。
本地数据优先,云端同步补充
考虑到网络环境和用户体验,我采用了本地数据优先的策略。用户即使不登录,也能正常使用所有功能。登录后,数据会自动同步到云端,实现多设备数据共享。
6.2 常见问题与解决方案
问题一:鸿蒙平台样式差异
不同平台的样式渲染可能有细微差异,解决方案是使用条件编译。也发现了 tabBar 配置 borderStyle 不生效的问题,已经反馈了 Bug:https://ask.dcloud.net.cn/question/215475
问题二:echarts 在鸿蒙平台不显示
应用使用了 echarts 进行数据可视化,在 web 端运行正常,但在鸿蒙平台上,图表完全不显示。排查后发现,echarts 在鸿蒙平台需要通过特殊方式引入。解决方案是 renderjs, 在页面中通过 script 标签引入 echarts 的 JS 文件。
6.3 给其他开发者的建议
提前规划,避免返工
在项目初期,就要规划好包名、证书、权限等关键配置。这些配置一旦确定,后续修改成本较高。
重视测试,特别是真机测试
模拟器测试只能发现部分问题,真机测试才能发现真实的性能和兼容性问题。建议在开发过程中定期进行真机测试。
关注审核规范,提前准备
华为应用市场的审核规范相对严格,建议在开发过程中就按照规范要求实现,避免上架时被退回。
持续优化,关注用户反馈
上架只是开始,不是结束。要持续关注用户反馈,优化产品功能和用户体验。
七、结语
从零开始到成功上架,这个过程充满了挑战,但也收获满满。uni-app 让我能够用熟悉的技术栈快速进入鸿蒙生态,而鸿蒙生态的快速发展也为开发者提供了新的机遇。
对于想要进入鸿蒙生态的开发者,我的建议是:不要犹豫,现在就是最好的时机。uni-app 已经为鸿蒙开发铺好了路,你只需要迈出第一步。
习惯修仙应用已在华为应用市场上架,欢迎体验和反馈。未来,我会继续优化"习惯修仙"应用,探索更多鸿蒙原生能力,比如推送通知、健康数据接入等。同时,我也会关注 HarmonyOS NEXT 的发展,为应用的长期发展做好准备。
希望这篇文章能为正在探索鸿蒙开发的开发者提供一些帮助,也期待在鸿蒙生态中看到更多优秀的应用。
收起阅读 »上传app store无法设置专用密码可以使用香蕉云编密钥上传代替
最近苹果设置专用密码的功能打不开了,appleid.apple.com访问跳account.apple.com,但是account.apple.com打开后,只有一个转圈界面,无法打开。
如下图:
然而很多上传工具都是通过专用密码上传的,比如Transporter也是通过专用密码上传。像xcode不是通过专用密码上传的不一样,但是使用hbuilderx开发的IOS应用是打成ipa包的,不能通过xcode上传。
可以使用香蕉云编上传,香蕉云编支持使用app store密钥上传和专用密码上传两种方式。如图:
这个密钥很容易设置,不需要跑去appleid.apple.com设置,在app store的界面就可以使用,添加密钥后,就可以下载p8密钥,注意这个p8密钥只能下载一次,在下图标注的地方下载:
上面的参数中,Issuser ID和密钥ID可以直接从界面获得,p8密钥是将密钥下载下来后,用文本编辑器打开,即可获得。
收起阅读 »? NanoBanana AI 图像工作室:一键开启你的视觉魔法!
厌倦了普通的AI绘图?想要拥有超高一致性和清晰度的创意图像?
由 NanoBanana 提供的 “AI 图像工作室”,基于 Gemini-2.5-Flash-Image(也称为 Nano Banana)模型,为您带来超越传统的绘图体验!
🎯 是什么?
NanoBanana AI 图像工作室是一款集图片上传、风格转换和文生图功能于一体的专业级AI视觉创作工具。它专注于提供高品质、高一致性的图像生成服务。
核心功能亮点:
- ✅ 风格多样: 3D手办模型、二次元周边、乐高风格等一键切换。
- ✅ 卓越一致性: 图像细节和风格的连贯性出色,告别“AI手残”!
- ✅ 4K高清图像: 承诺提供高分辨率的输出,满足专业用途需求。
- ✅ 无水印下载: 创作成果纯净交付,可直接用于商业或个人项目。
💡 原理?
技术革新,定义下一代AI绘图标准!
“NanoBanana AI 图像工作室” 的核心是 Gemini-2.5-Flash-Image 模型(或称 Nano Banana 模型)。
- 突破传统: 官方宣称这款模型超越了 Flux Kontext 绘图模型,意味着它在图像的细节处理、主题理解和风格保持上具备更高的水平。
- “闪电”速度: Flash模型代表它具备极快的生成速度,让你的创意无需等待。
- 精确控制: 用户可以上传图片进行“图转图”(如将普通照片转为3D手办模型),或使用“自然语言”描述生成图像,模型都能精准把握需求,生成出色的作品。
⚙️ 如何用?
你的创意,只需三步实现!
- 第一步: 【点击链接】 进入NanoBanana图像工作室。
- 第二步: 【选择模式】 选择一种预设风格(如3D手办)或选择“自由输入”。
- 图转图:拖拽或点击上传你的图片。
- 文生图:在输入框中写下你想要的画面描述。
- 第三步: 【生成并定制】 点击按钮,AI立即为你呈现4K高清、无水印的定制图像。
✨ 新用户有免费生成次数,立即试用!
🔗 链接 (Link)
从灵感到作品,只差一个点击的距离。
🔗 https://iris.findtruman.io/web/nano?share=L
收起阅读 »


